The Grow Awards 2026 🏆 


Likes
Comments
Share


Likes
5
Share
@Chubbs
Follow
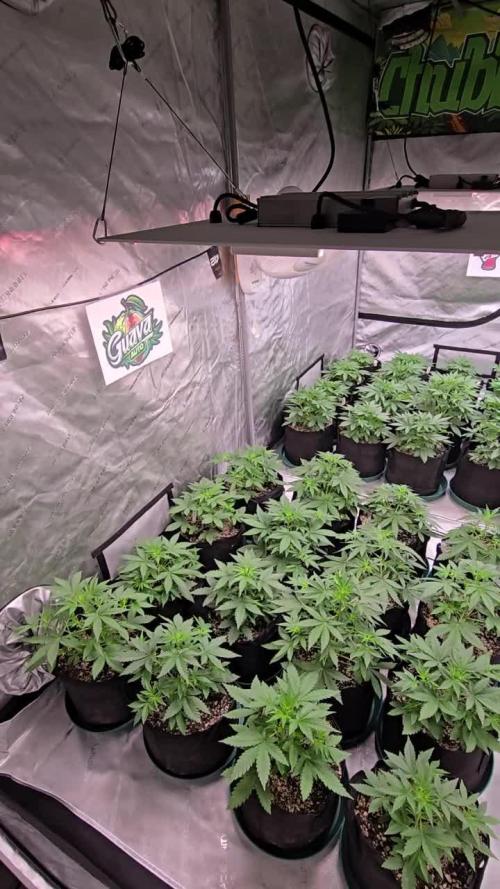
What up family, weekly update on these girls. I raised the lights 6in this week to allow some stretch but still keeping 400-600ppfd at the canopy level. Over all they're progressing beautifully. I started adding 2.5ml/gal of Athenas Blended line Grow A & B. Haven't seen any burnt leaf tips so I think they'll be OK adding a little boost. All in all Happy Growing.
Likes
2
Share
@morganfreeman420
Follow
Okey estoy pensando ya en pasar a la maceta definitiva dado que noto que la planta empieza a necesitar mas espacio, tengo planeado tambien hacer una poda apical
Likes
120
Share
@Kitties_and_Colas
Follow
~_~_~_~_~_~_~_~_~_~_~_~_~_~_~_~_~_~_~_~_~_~_~_~_~_~_~_~_~_~_~_~_~_~_~_~_~_~_~_~_~_~_~_~_~_~_~_~_~_~_~_~_~_~_~_~_~_~_~_~_~_~_~_~_~_~_~_~_~_~_~_~_~_~_~_~_~_~_~_~_~_~_~_
02/13/22
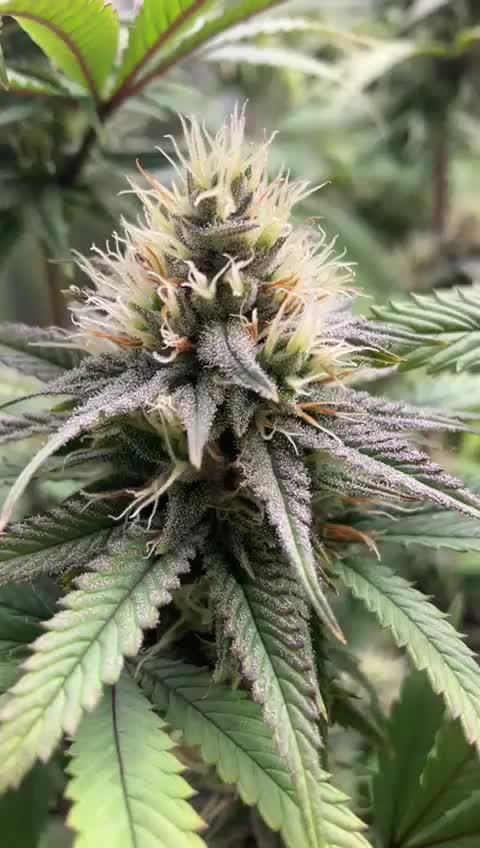
😻These ladies are sooo close! ❤️🌱.. the Peyote Gorilla looks especially sticky (has to be the GG#4) , as far as eye appeal, its definitely my favorite strain in the tent (shhhhh.. don't tell the others 😹).. we're still rocking a lot if clear trichs but the cloudiness is coming on fast, we're about 30%/70% atm..we gave them all their last heavy feeding 2 days ago, we dropped the lights again (app reading approx. 40k LUX at plant tops)...we're only doing water only from here on out, the whole tent should be entirely faded in 2weeks or less and some nice white ash in our future (and some killer tincture for yours truly lol🤘🐱).. thanks for reading if you made it this far and happy harvests everyone!!!! ❤️💡🌱😽💨
~_~_~_~_~_~_~_~_~_~_~_~_~_~_~_~_~_~_~_~_~_~_~_~_~_~_~_~_~_~_~_~_~_~_~_~_~_~_~_~_~_~_~_~_~_~_~_~_~_~_~_~_~_~_~_~_~_~_~_~_~_~_~_~_~_~_~_~_~_~_~_~_~_~_~_~_~_~_~_~_~_~_~_


Likes
7
Share
@ChitownCannaChica
Follow
Just trying to keep it watered! Dries out very quickly! Been a hard one to stay on top of! ✌️💚🌿💨
Processing
Likes
3
Share
@Samithen
Follow
Took longer than expected with most of the seeds poping after 4 days.


Likes
8
Share
@Herbangardener671
Follow
Plants are still thriving well. Watered after topping w/ proper rate for week for according to schedule PH water to 6.2 and soak pots. Temp stays high above 75 degrees humidy same until tent is opened led at 50 percent about 20 inches away

Likes
12
Share
@GeezandDraht
Follow
Week 5 🌸
This week we had quite a lot of fruit flys loving the fruity odors emitting from the tent. They especially loved the Pineapple and Blueberry heavy plants 😅.
We watered with an EC reading of about 1,1mS twice this week. Also, we finaly got the Nemathodes into our pots.
The Terps are developing beautifully and we are so excited what these flowers will taste like, once the time has come!💚
All three Strains have an estimated flowertime of 45 days, but we think most of them will take a little longer to finish up.

Likes
6
Share


Likes
40
Share
@BudXs
Follow
I saw @astroboy grow this strain and he did a wonderful job. I read about the hype surrounding the cultivar and its claim of upwards of 30% thc. Had to see for myself. Not sure who grew it better, but I do know that OSS Bruce Banner #3 is an amazing strain and I will grow it again

Likes
59
Share
@TheCannaProphet
Follow
~ AirCube Active Oxygen Ebb/Flow System sponsored by GrowAce, featuring Tropicana Cookies by FastBuds ~
Well guy's and gal's here we go again on another exciting Autoflower run together! This time will be different as I will be doing a 'Hydroponic' run utilizing the AirCube Active Oxygen Ebb/Flow System by GrowAce, who were kind enough to sponsor me for this run, so it should be interesting to see what results I get and have some fun along the way!
•Let me first tell you about this 6 Pot Ebb/Flow system from GrowAce:
"The AirCube system is the one and only Ebb & Flow grow system on the market that combines the benefits of air pruning with a fully automated Ebb+Flow system! With the AirCube's proprietary fabric pot in bucket design, this system is guaranteed to outgrow any other Ebb + Flow system on the market. The results speak for themselves- grow MASSIVE roots that result in MASSIVE fruits!
Air Pruning- Air Pruning only happens with fabric pots. As the roots reach the fabric walls of the pot, they penetrate and grow into the breathable fabric. Once penetrated, the roots are exposed to air, which causes the tips of the root to dehydrate and naturally prune themselves. This natural pruning process forces the roots to grow tons of lateral fibrous feeder roots. This results in a plant that utilizes the entire root zone and fills the entire pot with tons of roots. These fibrous feeder roots are incredibly effective in uptaking water and nutrients, resulting in a plant that grows healthier and more vigorously!
Oxygen Benefits- Without oxygen, nutrient absorption cannot occur. On a molecular level, oxygen is needed to transmit nutrients across the cell walls and into the roots of a plant. With the AirCube's proprietary bottom lifted draining design, the system actively draws all of the water out of the bucket pulls vital oxygen into the root zone.
Maximum Versatility with Any Grow Medium: The AirCube System is the only system on the market that allows you to use any growing medium you like. Use coco coir, soil, peat moss, perlite, vermiculite, hydroton, rockwool or any other medium you wish! This system is the most versatile Ebb and Flow bucket system in today's hydroponics industry.
Temperature Control- with the fabric pots constructed with highly porous polypropylene fabric, heat dissipates easily and effectively. Unlike standard plastic pots, heat isn't trapped in the root zone. Heat in standard plastic containers can reach temperatures of up to 125 degrees. When this type of heat is trapped and unable to escape, it can damage your plant's health and limit the potential of your harvest. Growing in the AirCube System, plant roots grow cooler, healthier, and more vigorous.
Largest Pots in its Class- this system features 5 Gallon grow buckets, the largest pot size of any other ebb and flow hydroponic system in the market.
Modular and Expandable- start with 6 grow buckets and expand up to 36 grow buckets with the optional 105 gallons PopTank reservoir!"
For my medium and nutrients I decided to also switch things up from my regular Organic runs, going with Plagron Nutrients and Root Royale 70/30 Coco/Perlite. When filling the fabric pots with medium, I first added just under a gallon of horticulture perlite from Nor-Cal as a base layer to ensure good drainage and then filled the remainder with the Root Royale.
•Now for the outstanding, award winning strain from my friends at FastBuds... Tropicana Cookies Auto:
I'll be running Tropicana Cookies Autoflower which is a 60/40 Indica/Sativa Hybrid. "Tropicana Cookies Auto is the perfect variety for growers of all levels, especially beginners as this strain performs very well outdoors and indoors, and can produce up to 500 gr/m2 in 56-63 days without needing extra maintenance. Reaching up to 110 cm, this strain grows fairly tall with medium-sized branching, showing its mixed heritage. Definitely the right choice for those with a high tolerance looking to get their hands on the strongest autoflowers out there. You can expect an extremely powerful and long-lasting high that’ll boost your mood and give you that extra push you need to start your days on the right foot. This variety offers the whole range of citrus and woody flavors with a strong candy-sweet background that will keep you coming back for more and more."*
*References: GrowAce.com, 2fast4buds.com
______________________________________________________________________________________________________________________________________________________________________________________________________________________________________________________________________________________________________________________________________
The Setup:
• AC Infinity 4x4 tent
•AC Infinity Cloudline T6 Exhaust Fan w/ Controller 67
•HLG 650R w/UVA Bar *** For some reason GD does NOT have a listing for the USA version of the 650R so I selected the closest match to it.
•AirCube Active Oxygen Ebb/Flow 6 pot System
•DL Wholesale Root Royale Coco Lite 70/30 coco/perlite
•TrolMaster Hydro-X Controller for light
•AutoPilot APC8200 co2 controller fed by a 50# tank
•16" Hurricane oscillating fan and 8" floor fan
•Tent cooling via filtered outside air delivered by AC Infinity Cloudline T6 fan
•BlueLab instruments: PH Pen and Truncheon Nutrient Meter
______________________________________________________________________________________________________________________________________________________________________________________________________________________________________________________________________________________________________________________________________
Weekly Updates:
11/12- Week Three of flower, here we go! The FastBuds Tropicana Cookies are all doing great! Two plants, the #1 & #3, are expressing a beautiful dark purple coloration in their flowers, while the #2's flowers are the normal green with snow white pistils and already have a good amount of trichomes formed.
I'm continuing to feed them 6 times a day for 15min. each feed, and have adjusted the nutrient level down to 800ppms. The 650R is now 26" above canopy, set to 100% output.
11/14- I'm continuing with daily monitoring of the AirCube reservoir, checking/adjusting ph and topping off with straight water. The solution strength in the reservoir is still hitting 650ppm but is starting to get discolored so I'll be doing a drain/refill in the next 48hrs before it gets funky.
11/17- Today I drained the reservoir and refilled it with straight well water that has a .3 EC(100ppm) to which I added Plagron's Cocos 'A' and 'B' in equal amounts, Green Sensation, and Royal Rush at 1ml/L and 2ml/L respectively. I also added the last dose of silica, then ph'd the solution to 5.7 @ 69℉.
I also went through all three plants, adjusting their LST and tucking a few leaves that were blocking light.
11/18- There goes Week 3 of flower and I can't wait for the upcoming weeks where these ladies will really be strutting their stuff!
💚 Thank you for checking out my passion in life! Please visit as often as you wish and I hope you enjoy this journey as much as I know I will! Grow what you love, Love what you grow!💚


Likes
3
Share
@Avengergreen
Follow
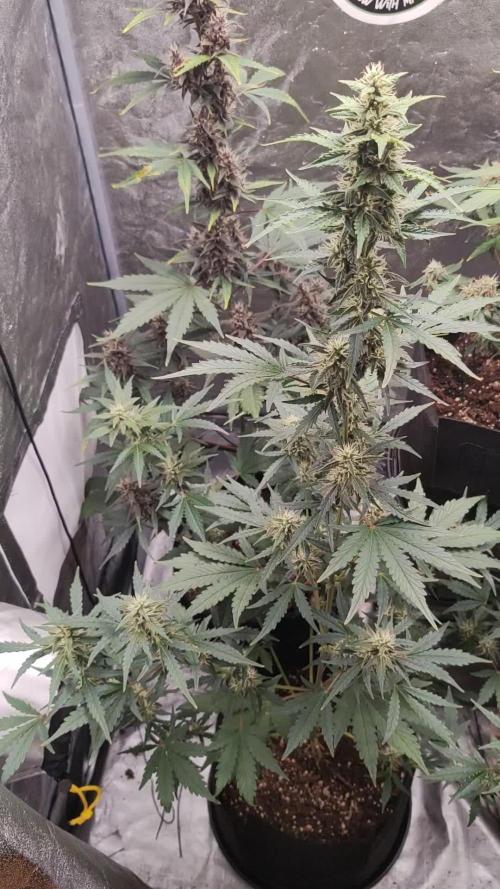
I am now at the beginning of the fifth week of flowering. The plants are handling the doses of fertilizer very well
Likes
34
Share
@SknHaze
Follow
So far I haven't had any issues besides some N toxicity from C.S.S. in early flowering.
I wanted to check if there was some mold or rot on the buds at the back so I removed the scrog net since its job was done. Everything was just fine.😅😅
I also ran out of Sugar Royal and I don't feel like buying another one so lets hope for the best😜


Likes
69
Share
@Natrona
Follow
Sour Jealousy Auto FastBuds 2025 Outside Grow
Week 7 May 11-17
FLOWER 1
Sour Jealousy has started to flower. She is 18” now after a 6-inch spurt. She really benefitted from last week’s rain. This week’s weather has been cloudy and sunny but the temps ranged from 93 high and low of 53 at night. I watered and fed 2x with Kelp 30 ml/g and TPS1 4ml/g. I included some garden pics and some cool boats. I live in a coastal area with 6 bridges. Since maritime law still governs commerce, the boats have the right of way to vehicles. On this day I got stopped by the bridge opening and was close enough to see the boats. A parade were luxury yachts.
Your likes and comments are appreciated. Thanks for stopping by.
Growers love 💚🌿
💫Natrona💫
Processing
Likes
15
Share
@eldruida_lamota
Follow
Buenos días familia, increíble, sin palabras con esta variedad, lástima la lie y perdimos una a principio, pero estas 2 crazy cookies crecen una locura.
Ph controlado en 6,5 y una humedad por encima de 40% así que todo fenómeno.
Una cepa bastante fácil en sus primeras semanas.
Veremos próximamente como se forman nuestras flores familia

Likes
5
Share
@SmallBatchNugz
Follow
Well the end of week 8 was glorious looking forward to week 9 all by itself. Yeeehaaa.
