
Likes
Comments
Share


@siLva_77
Follow
❄️❄️❄️
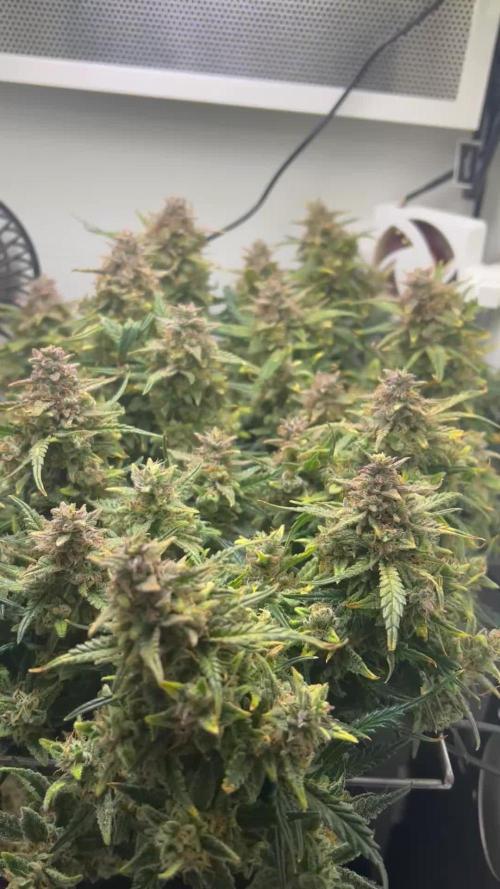
End of Week 5 - Buds are getting fatter and frosting up. The Tent is smelling incredible Like sweet lemon.
Ende Woche 5 - Die Buds werden immer fetter und frostiger. Beim aufmachen des Zeltes kam ein unglaublicher Geruch nach Zitrone. Beim Gießen kam ich hier und da mal an die Buds und der Geruch an den Händen war unglaublich, süß, fruchtig, Zitronig und Harzig - viel Versprechend.


Likes
7
Share

@Snipes420
Follow
She is almost finished. About 45% cloudy on trichomes others are mostly clear except the brown hairs those have some amber on big main bud sites.
She does still make new pistols with white hair but not so many white hair pistols left (only lower canopy)
I will be checking if she starts drinking less water and nugs stop fattening up.
Plant has a strong tangy smell and is very sticky on budsites and sugar leaves.
Her leavs do show some sort of problem/stress. The yellowing is either a nutrient problem/ph problem or yellowing due to age but i assume first one. Shes only getting water atm no nutrients
Likes
2
Share


@Grower_Resina
Follow
Infelizmente essa não teve os privilégio de ter uma flora no grow dedicado, agora por fim consegui transferir e veremos as mudanças acredito que ainda dê tempo de aproveitar.
Estou usando somente 120w LM301H


Likes
5
Share


@DemonDabsSolventless
Follow
🚨🚨🚨🚨🚨
Week V
🚨🚨🚨🚨🚨
OOOOKAAAAYY THE SMELL ALREADY TAKES OVER AND IT'S SATISFACTORY NOT TO LEAVE THESE LADIES SIDE! AND LOOK HOW THEY JUMPED! ITS GROWTH SEEMS ACCELERATED AND WITH AN INSATIABLE HUNGRY IN ITS DEVELOPMENT. BIG WEEK TO BE ALIVE 🤣 LOL
📝📝📝📝📝
Notes
📝📝📝📝📝
ALL PLANTS WITH THE 4TH DEVELOPED NODE HAVE BEEN TOPPING ONLY THE TWO LARGEST NODES ARE STILL DEVELOPING.
STILL SEEKING THE BROAD SPECTRUM OF LIGHT WE HAVE UP TO 50cm DISTANCE AND THEY ARE GROWING WELL AND APPEARINGLY HEALTHY.
FROM THIS WEEK YOU WILL ALWAYS HAVE THE PLANTS DISTRIBUTION SCHEME AT THE END OF THE PHOTOS
📝📝📝📝📝


Likes
2
Share


@Bluemels
Follow
Tag 54: Trotz heller Blätter sehen die Blüten ganz gut aus, und entwickeln langsam Geruch.
Likes
14
Share


@HiGHLYDiGESTiBLE
Follow
Week 10 - 1/3 -1/10
1/4 - update - not sure what to do next. my feeding schedule only has 10 weeks of feed so i might flush with water for last 2 weeks until it is ready to go?
**i think the deficiencies are either Maganese or something im not sure .... i think i should add some cal mag to my feed but i didnt want to go "rambo" mode just yet with this being my first grow i wanted to stick to the gameplan. going forward i might cowboy up a little more because i didnt realize that the food chart was more of a guide and then depending on what the plant tells you - you adjust appropriately... but whatever live and learn .
PPMS havent really gone over 500 during the whole grow either so i think i got some room to work with.... people said they use 3ML of CalMag the entire flower stage. flower ppm should be 1000 and veg between 600 and 800 .... ill try that moving forward

Likes
11
Share

@BalconyBoy
Follow
01.09.25 the three fast flowering strains keep dropping fan leaves and growing flower sites instead. Odor is slowly picking up on the balcony. The mildew from the Sherbets didn't spread and so far looks contained. I keep an eye on this and am ready to spray again if needed. Finally the Sherbets start to show pistils after the month of August is over, in which exotic seeds said the harvest would take place 😂. So kudos to seedsman for their genetics delivering as advertised and shame on exotic seeds for advertising harvest in August when flower starts last week of August.


Likes
11
Share


@Mo_Powers
Follow
the last week was really sunny again and the temperatures are also constant. it is growing and growing. it has now reached a height of 100 cm. it has become beautifully bushy. i am really looking forward to seeing when it finally starts flowering.
Likes
5
Share


@Bryankush
Follow
Giorno 1 molto bene le ragazze sono in ottima forma e questa sarà l'ultima settimana di veg.
Lei è veramente molto in forma😁 quindi ho deciso di fare su di lei un esperimento, cioè pizzicare il ramo e piegarlo nella posizione che voglio. È la prima volta che pratico questo quindi non so nemmeno se lo fatto nel modo giusto, ora vedremo se basterà e come reagisce. Ps:non ho tolto nessuna delle splendide prendisole!! Le ho soltanto spostate fuori dai coglioni
Giorno 2 defogliazione e Lollipopping
Giorno 3 stamattina la pianta si era già completamente ripresa🤬 quindi ho pensato di piegarla ulteriormente e per sbaglio ho finito per spezzare il ramo😤. Mi serviva di lezione dato che non avevo mai fatto questa pratica prima quindi va bene così. Ora lo fasciata a un pezzo di legno e speriamo che entro martedì stia bene per andare in fiore🙃.
Giorno 5 annaffiata con 2L
Giorno 6 da oggi 12/12

Processing
Likes
Comments
Share


@GingaNinjaGenetics
Follow
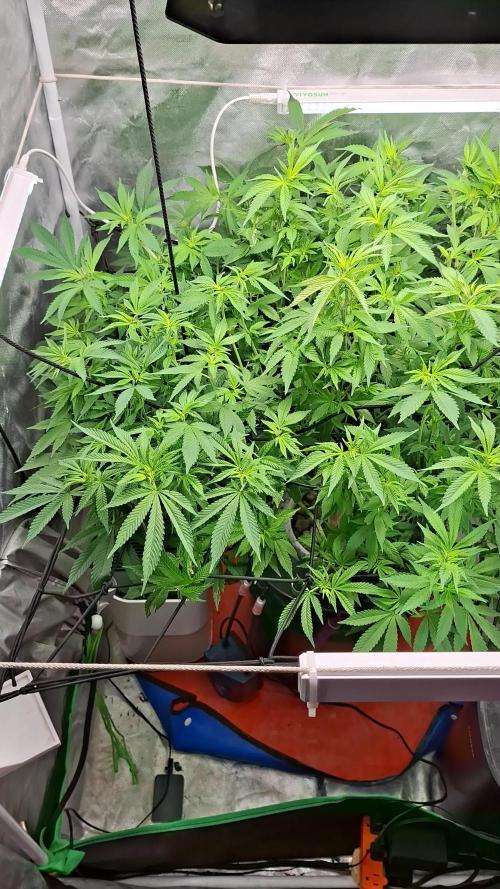
She's looking good at the end of week 4. She's halfway there now. Ill be switching her to swell by med man brand for two weeks then shes ready to flush


Processing
Likes
23
Share


@GrowGuy97
Follow
Half way through week 2, started LST on a few & topped a few, just trying different things right now! If anyone has any pointers or sees anything I should change leave a comment!
Likes
Comments
Share


@eldruida_lamota
Follow
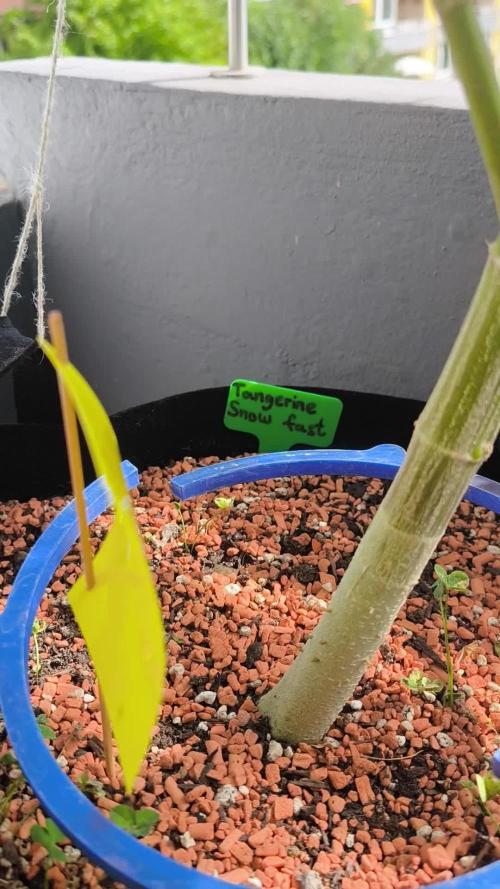
Vamos familia, actualizamos la cuarta semana de vida de esta Amaretto Tarmac de Seedstockers.
Empezamos abonando ya con varios productos de la gama Agrobeta.
Temperatura y humedad dentro de los rangos correctos, 18 horas luz, 6 oscuridad.
Una lástima que de todas solo aguanto una, aún así seguiremos con el diario hasta el final.
Ya trasplanté a sus 7 litros definitivos.
Agrobeta:
https://www.agrobeta.com/agrobetatiendaonline/36-abonos-canamo
Hasta aquí todo, Buenos humos 💨💨💨

Likes
18
Share


@Killerbubu
Follow
Total de dias 29 - 31/08/2021 ( Mais um dia e vou mudar para floração.) Faco 30 dias de vegetação
Total de dias 30 - 01/09/2021 / Rega ( mudança de horário para 12/12 fase de Floração )
( Fase de Floração )
Total de dias 31 (F 01) - 02/09/2021
Total de dias 32 (F 02) - 03/09/2021 / Rega com um 1ml de Bloom.
Total de dias 33 (F 03) - 04/09/2021
Total de dias 34 (F 04) - 05/09/2021 / Rega apenas com agua

Processing
Likes
12
Share


@Buurman
Follow
A really hot week last week, The lamp doesn’t make it any easier but steady at 28 degrees now.
OG auto in its final days I think, leaves are starting to turn yellow so I’ve started a flush, it’s a beautiful plant, 80% of the plant is covered in bud, I’ll post some good pics before harvest. Not gonna be a crazy yield but for the size of the plant really decent.
The feminized OG are all exploding with bud sites, amazing how fast it’s going the smell is getting better by the day
Gorillas are cute! Flowering a little slower but a lot bushier and the leaves are sooooo pretty!
Started to give more water and upping the dosage of nutes since I’ve not seen any signs of over feeding might as well try it out
Okloveyoubye ❤️


Processing
Likes
7
Share


@Adam420
Follow
Every week I love this plant more and more.
I have given her molasses this week
No deficiencies and her pistils are healthy as well as leaves.