
Likes
Comments
Share


@Growinglikenoone
Follow
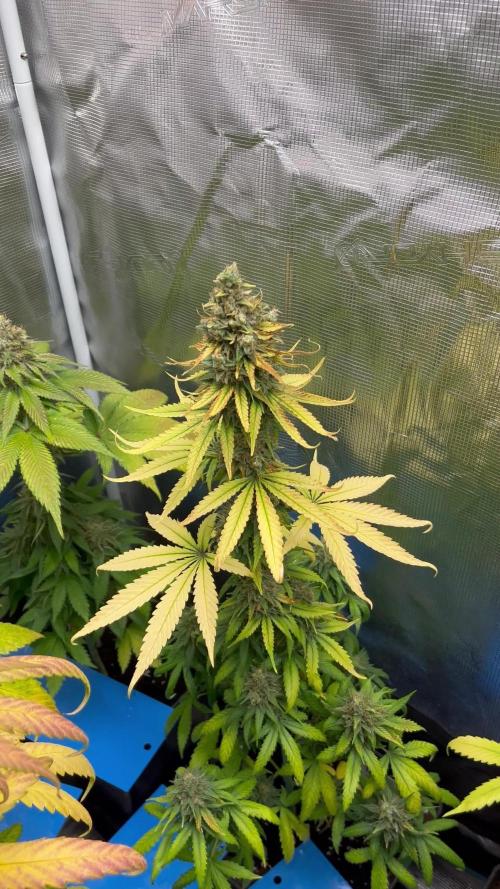
God guys, so mad I am so disappointed. Cookies seedbank -1000 stars. Die brand cost me so much money. Imagine startet with 16 plants now 6/6 lemon cherry pop are ladyboys. 4/6 hollywoods ladyboys the other two know under control but looking already sus. Tie die 1/3 didn’t sprout 1/3 killed today because ladyboy the other one also under control and looking sus. Only last real men fighter is Trump Runtz. It’s so sad grow looked pretty good and know noting left.

Likes
19
Share


@adam_pawloski87
Follow
What a fun run this was ! These Ogreberrys finished up from 81 days to 102 days with nice hints of gassy , sour purple , sweetness and glistening with frost! These ladies will cure up for a month an will be ready to test out ! So much fun , I highly recommend this strain if your looking for some oooy gooohy resiny grape smelling nugs !


Likes
11
Share


@Dreadnug
Follow
Laid out the Srog nets with intention to change the light setting next week. Added pre-flower nutes as well as a 1" top dress - with some added nutrient mix. Thoroughly watered and ready to start training.

Likes
18
Share


@BrownsBuds
Follow
Plants were left for 8 days between watering, the soil was very dry and plant leaves drooping. Watered them with 1 litre each yesterday but have noticed yellowing of leaves on the bottom. Thinking this might be due to under watering I am not sure. Apart from that the flowers themselves are looking fine. Night temps are now 18 deg and 24 daytime and humidity at 50% I have also now put in a small fan at floor level in the space of where the 4th pot was so this now gives lower air movement.

Likes
4
Share

@eldruida_lamota
Follow
Vamos familia, actualizamos la séptima semana de floración de estas Terp & Tonic de Seedstockers.
La temperatura que estuvo entre los 24-25 grados y humedad dentro de los rangos correctos.
En cuanto a las plantas pues estas últimas semanas cogimos un poco de trips y pues ahí ando combatiendo con planchas pegajosas de color azul, estiraron bien y ensancharon bastante también.
Las flores se están llenas de tricomas y van hinchando, aún con la plaga, por el momento todo correcto.
Hasta aquí todo lo de esta semana , ya será la última semana ,buenos humos.
- os dejo por aquí un CÓDIGO: Eldruida
Descuento para la tienda de MARS HYDRO.
https://www.mars-hydro.com
Hasta aquí todo, Buenos humos 💨💨💨

Likes
17
Share


@PottingShed
Follow
Week 9 begins. . Tie your mother down!
A lovely faint aroma in the grow cupboard this morning & the buds are looking healthy
I've stressed her branches out and in a few days hopefully all will be looking beautiful again 💚

Likes
27
Share


@Ganjagrandaddy
Follow
Day 28: Having sorted the over filling issue of the res and now the roots of GG#4 and ghost can breath again !, we have had a good progression this week.
Wedding cake is covered with buds after the strip out of her larf and popcorn finally. I scrapped a lot of small budlets in the process but she has rewarded me with some great bud building for it. She is beginning to smell a little now and has a sweet smell to her. Nice and sticky feel to her leaves now too.
Black Ghost OG is up for it now with some nice bud forming this week . her fat stems could hold a good sized bud so hopefully she will use it.
Gorilla Glue#4 has been a must grow for a long time fornme but I have gotten sidetracked with lots of variety and done strains with it in their somewhere. I am now so stoked to have an original GG#4 to test against the cousins , distant cousins and cousins twice removed. !!!. She is growing so well now and getting g a nice colour back into her leaves. She is covered in tall trichrome build up on her sugar leaves already amd had me trying to focus my camera as it looked out of focus due to them !!!!.She is turning into the lady i so wanted an evening with all that time. Overall a great week for sertingnher stacking nodes for the final 5 weeks fattening and swelling.
Be safe folks. peace and love Growmies.

Likes
16
Share


@SeshHouseCannabis
Follow
Need to left the plant alone for a few days while we were on vacations but everything turned out fine. Hoping the new plant will grow fast enough to catch the speed with other plants.


Likes
10
Share


@undermink
Follow
She looks awesome at the beginning of week 8. Queen Papaya II fills up my hole 60x60 tent and she is growing lovely buds... Let's see how this works out 😍I just cut some leaves and gave her some nurition (2ml one a week from each of the three).


Likes
16
Share


@HowtoBubatz
Follow
LST went good the plant is growing ervery day for 1-2 cm
I am very happy with the products used.Until now i didnt run in any issue :)
Starting to give a little more Water.
Likes
1
Share


@bigsmoke42069
Follow
Week 7 of flowering 10/30/24
Changed nutrients to fit week 7
Buds are getting even bigger and thicker.
Last week PH drop happened again a couple of days after the major flush.
PH in rootzone is getting lower every day.
Runoff still at 10-20%, so no salt buldup, EC same as intake or litttle higher.
Flushed again with FloraKleen and watered with TriPart Micro, Grow, Bloom with CalMag.
Bought Potassium Bicarbonate and Calcium Carbonate as suggested by "Aqua Man", to buffer coco in the future. (https://www.thcfarmer.com/threads/ph-dropping-from-5-8-to-3-9-overnight-what-is-causing-this.87011/post-2329509)
changed nutes on 11/2/24, to FinalPart at 1.3 EC.
Checking runoff PH and EC daily.
Likes
22
Share


@RDWCGrowing
Follow
12/25/2023-Germination Day 1
Merry X-mas 2023 I decided to start a run of SolFIre Gardens Hoodz Candyz S1. I am going to do a cup filled with RO water a touch of Hydrogen peroxide and let it sit for 24-48 hours until I see tap root then I am going to put it into a rapid rooter.. Tap root Down and put it about 1/4 of the say down the Rapid rooter.
I made some modifications to my basket on this run.. I have taken a few Pods that I use for my cloning machine and decided that I am going to try and use them as sure plants, so that I can take my water right up to the bottom of the basket this time and see if these can make my planting more consistent.
12/26/2023-Germination Day 2
Tap root achieved Planting Commencing
12/27/2023-Germination Day 3
Misted the dome lightly misted the rapid rooter and added a little water to the bottom of the pan to encourage root growth to the pan.
12/28/2023-Germination Day 4
Ground Hogs day
12/29/2023- Germination Day 5
She is up, she has broken surface, I misted the root riot, and around the bottom of the tray to try and entice root growth down rapidly.
12/31/2023- Germination Day 6
Ground Hogs Day
1/1/2024-Germination Day 7
HAPPY NEW YEARS!!.. I did it I planned it out so my planting day would fall on New Years and it worked.. Yay!!!
1/2/2024- Germination Day 8
Since the roots are not to the water yet, I am pouring one cup of water lightly on the hydroton around the lady to try and encourage root growth down to the water..
1/3/2024- Germination Day 9
Ground Hogs day, will continue until roots hit the water.
1/4/2024- Germination Day 10
Ground Hogs day, will continue until roots hit the water. I will just continue to top feed until roots are in the water.. Shouldn't be more than a few more days.
1/5/2024- Germination Day 11
Ground Hogs day, will continue until roots hit the water. I am going to change the water Sunday and kick off Week 1, I will just continue to top feed until roots are in the water.. Shouldn't be more than a few more days.
1/6/2024- Germination Day 12
Ground Hogs day, will continue until roots hit the water. I will just continue to top feed until roots are in the water.. Shouldn't be more than a few more days.
1/6/2024- Germination Day 13
Ground Hogs day, will continue until roots hit the water.
1/7/2024- Germination Day 14
Ground Hogs day, will continue until roots hit the water.

Likes
13
Share


@GrowGuy97
Follow
Flower day 24 - Ladies are coming along great! A few are having calmag deficiencies but nothing major, other than being a bit crowded I couldn’t be happier with the grow so far! Thank you to everyone following & happy growing friends!✌️🏼🌱
Flower day 25 - Humidity is at 47% temp is at 79F - Ladies got watered today at 6.5 PH , a few got some calmag. Happy growing friends!✌️🏼
Flower day 27 - RH is 51% Temp is 81F - Ladies got fed today, I got the fox farm Dirty Dozen kit is so the got a lot more stuff this week hoping it helps! Happy growing friends!🌱✌️🏼
Flower day 29 - Noticed some PM on one of the Gorilla zkittlez😫 have her pulled out of the tent right now apply neem oil hoping she will bounce back!


Likes
17
Share


@Bobo_Zion
Follow
This is the first week of the plants being above soil, we did lose one but we are germinating another to replace that. I think the one we lost was due to heat stress, the others are holding up pretty well, there is another one that showed signs of heat stress, we just moved it a little deeper in the tent and it seems to be doing okay.
Likes
4
Share


@Gruenerfinger85
Follow
Heute stehen die beiden hübschen noch in der 48 Std Dunkelheit Phase. Morgen folgen die Bilder von der Ernte.
Die beiden Ladys stehen für 48 Std in absoluter Dunkelheit bei einer Raumtemperatur von 27,7 Grad Celsius und 62% RLF

Likes
2
Share


Likes
9
Share


@Pochette
Follow
• I've added 3 X 4mL of MGB. My babe starts her day 21 with 495 PPM solution on. PH reads as 5.6 ( August 23 )
• I've added 16 mL Voodoo Juice. Total concentration is 1.5 mL/L (August 23)
• I've added 3 X 10 mL of MGB. She will start the day with 680 PPM (August 24) pH reads as 5.5
• I've added 3 X 3 mL of MGB. She will start the day with 710 PPM (August 30) pH reads as 5.5 I've topped off 2 liters so far. and adjusted the pH twice.
Likes
4
Share


@Kekkonen
Follow
Two of the plants had little bit of powdery mildew so I defoliated those leafs. Also sprayed them with baking soda, liquid soap and water mixture. Hopefully we don't find any more of that. Otherwise everything seems good they are healthy and growing well.

Likes
1
Share


@Dapper_Buds
Follow
MACs Week2/flower Went smooth with a lot of stretching an got a leaf strip at end of week2. All plants are blooming with pre flowers an are stacking very nicely as expected. Two on the right are taller then the left side. That idk why but flower formation is on par on all 4. The plant confront of the fan has wind burn. I relocated the fan up more away from directly hitting it. Plants have been topdress with 1tsb of uprisings bloom to each plant an watered with 6.0ph r/o water. The growers choice ROi-e680s Light is full 100% now again an setup on a 40dli 12/12 schedule at mid sites an 45-48dli tops sites @20in away from tops. Whole grow with sunrise/sunset function. Thanks for viewing an happy growing everyone.
