
Likes
Comments
Share


@JUNGLE_B4RNS
Follow
-Sensi Seeds Research:
The Sensi Seeds Research breeding project has created eleven cannabis seed varieties.
How? By combining new cannabis cultivars with a selection of strains from their long-established cannabis gene bank. For the first time in thirty-six years, they are opening the doors of the Sensi Seeds Research and Development Department.
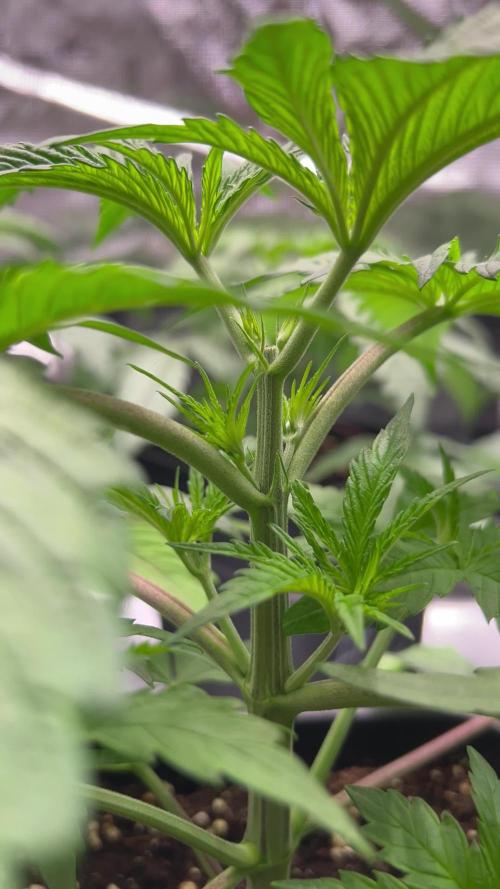
Week #15, week #7 of Flowering.
Fade is coming out, plants are near to the end of their life cycle. This where new growers start to panic, thinking their ladies are having deficiencies... but no panic ! It’s organic ! Everything is normal 😉
-ScrOG II:
#741 , #1318 , Shiva Skunk are ready and will be flushed at the beginning of next week ( tomorrow ).
-ScrOG I:
#11, Northern Lights, Black Domina, Super Skunk are good for 9 weeks of Flowering, perhaps more, and aren’t ready yet !
I have stopped the Alga-Max ( remember to always stop any P-K Boosters 2 weeks before harvest ) for the ScrOG II since last week and have given the last dose at the beginning of the week to ScrOG I.
I must recognize that I’m really fan of the Mars-Hydro SP 250, I can’t wait to see how it works from seedlings to harvest 😎
I would like to finish this week by saying thanks to the brother or brothers who has increased the views on this week, I was wondering what was happening 😄 After discovering their was a contest on the most views of the week 😂😂😂 I knew something was not normal... hahaha so funny 🤣 A BIG THANKS 👍😄
( I’m looking for a job in the Cannabis industry as Master Grower, Mineralogist, Quality Control 🐞)

Likes
14
Share

@pHilosophy420
Follow
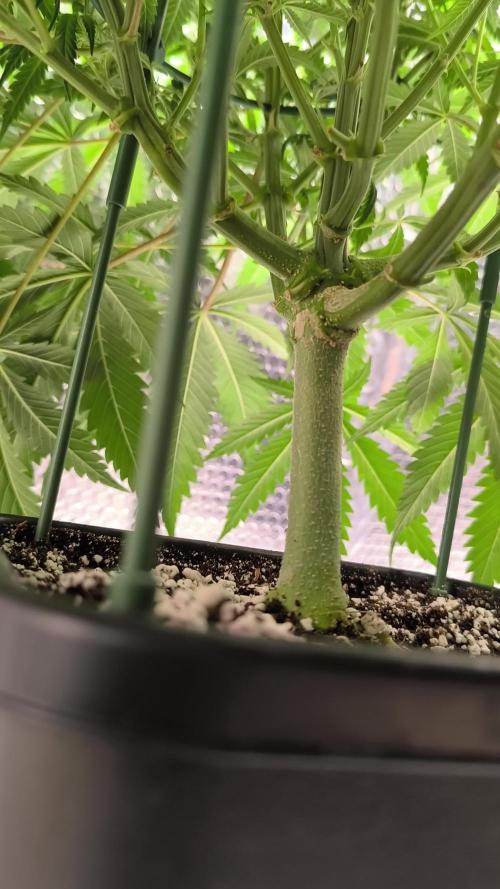
Day 56 - she is drinking water like dragon and will be a monster. 5cm stretch this week and everything is well so for, looking forward to see future weeks.

Likes
563
Share


@Ju_Bps
Follow
Hello my friends 👩🌾👨🌾,
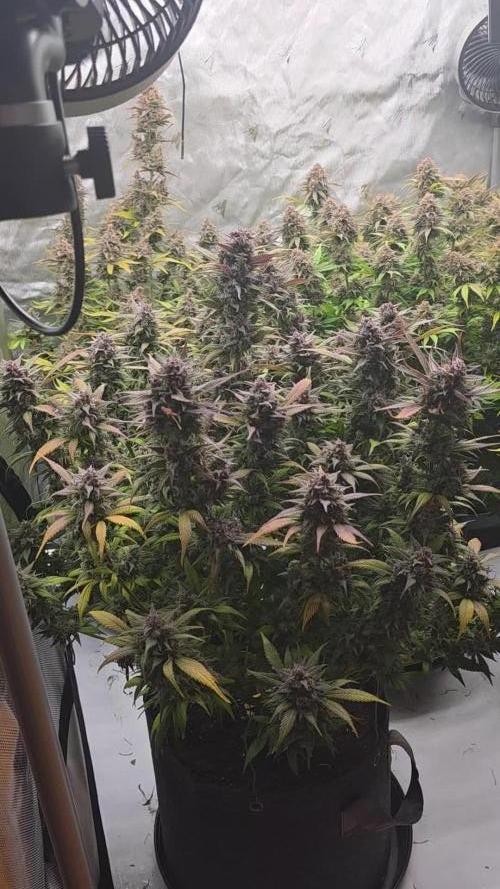
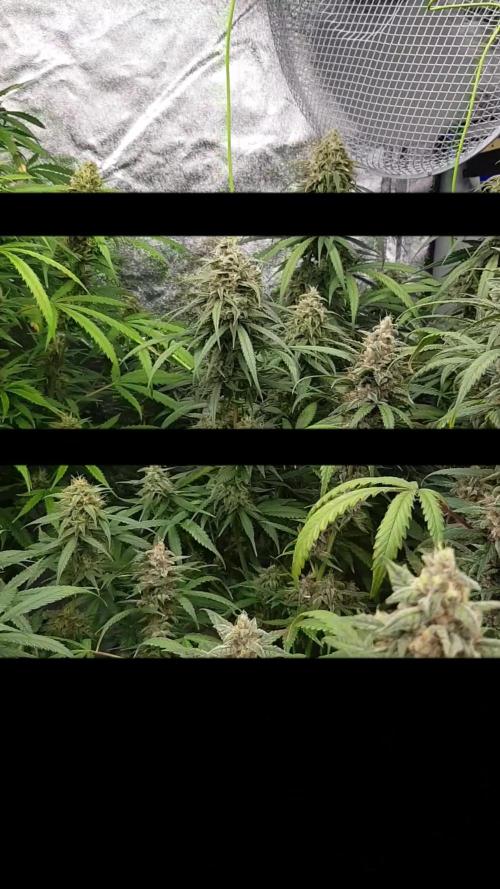
This 6th flowering week was good, maturation Buds continue 🌲, Buds bump and have a nice 🍊 pistils 😋.
The end is approaching, probably in around 2 weeks. Trichromes are trans/milky.
The smeel is really strong, not easy to talk about smeel, because 2 strong smeel in the box,
In the box, smeel, fruity/flower/sweet 😋😋
💦 2 Watering this week 1.8l/plant .
Water + Cannazym + Sugar Royal
Water + Terra Flores + Canna Boost
PH@6
Lamp @100%
Bisous 💋😘, and see you next week.
Thanks community for follow, likes, comments, always a pleasure 👩🌾👨🌾❤️🌲
Mars Hydro - TS 1000
https://www.mars-hydro.com/ts-1000-led-grow-light
Mars Hydro - FC3000
https://www.mars-hydro.com/fc-3000-samsung-lm301b-led-grow-light
Mars Hydro - SP3000
https://www.mars-hydro.com/sp-3000-samsung-lm301b-greenhouse-led-grow-light
The High Chameleon - Bisous Au THC 💋💋🌲🌲😘😘
https://www.thehighchameleon.com/shop/bisous-au-thc-83


Likes
17
Share


@nonick123
Follow
En este caso es un diario un poco distinto...
Tengo en mi terraza (outdoor) una maceta de unos 25 litros, con sustrato reciclado de todos los ciclos hechos con BIOTABS este invierno pasado
Durante todo el invierno / primavera, he ido añadiendo a esta maceta los "restos" de estas macetas del indoor, cargados de vida, sustratos y materia orgánica
Cada vez que añadía sustrato reciclado, añadía / renovaba la capa de mulch (heno) para proteger la micro-vida
Además, ha estado protegido por un techo de metacrilato todo el invierno, para evitar que las lluvias torrenciales de mi zona se llevasen los nutrientes
He mantenido este sustrato húmedo con Agua RO
A principios de mayo, planté una tomatera (tomate canario) en esta maceta
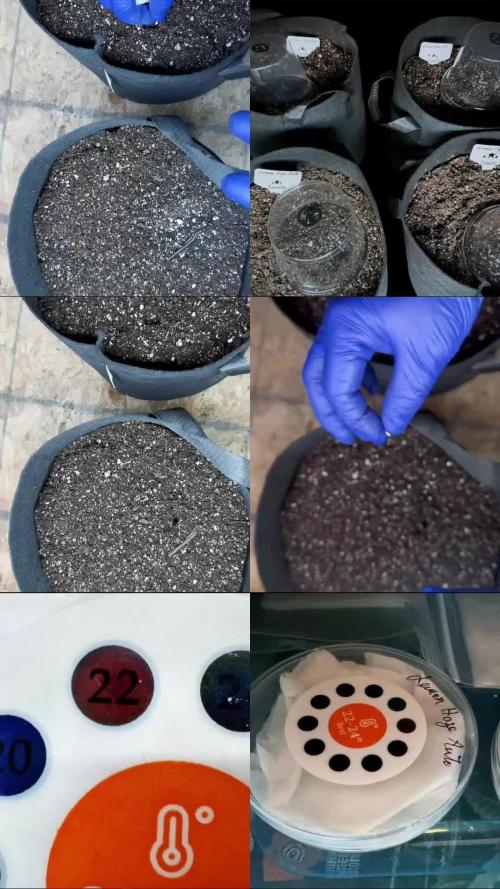
Alrededor del 26 de mayo, decidí dejar caer aleatoriamente una semilla de Gorilla Z Auto que me regaló mi amigo StackFarms
Unos días después, nacía con fuerza y vigor una pequeña plántula! 😍💥
Esta maceta se mantiene hidratada con un sistema de riego por goteo (TEMU) muy ingenioso: Utiliza un gotero medico como se usan en los hospitales!
Este sistema ha demostrado (en mis pruebas) ser bastante consistente en el riego diario!
La maceta con la tomatera + Gorilla Z Auto se mantiene hidratada con 1 Litro de H2O diario (RO o agua declorada, depende como me pille)
A divertirse con este experimento!
🚀 FastBuds 15% DISCOUNT code "NONICK" 2fast4buds.com @fastbuds.official
💦 BioTabs 15% DISCOUNT code "GDBT420" biotabs.nl/en/shop/ @biotabs_official
🌱Substrate PRO-MIX HP BACILLUS + MYCORRHIZAE @promixmitch @promixgrowers_unfiltered

Likes
32
Share

@Dottgreenthumb
Follow
Gli strains hanno 88 giorni ho versato solo acqua con ph regolato I profumi dolci si fanno sentire una volta aperta la tenda Gli odori fruttati ti avvolgono immediatamente stanno raggiungendo la maturazione desiderata aspetto ancora qualche tricoma ambrato in piu per il taglio finale
Le piante stanno scaricando tutti i sali minerali il run off è sceso a 0.6 di ec con un ph di 6.8
Sempre molto positivo e contento del risultato con fast bud
Likes
35
Share

@Fatnastyz
Follow
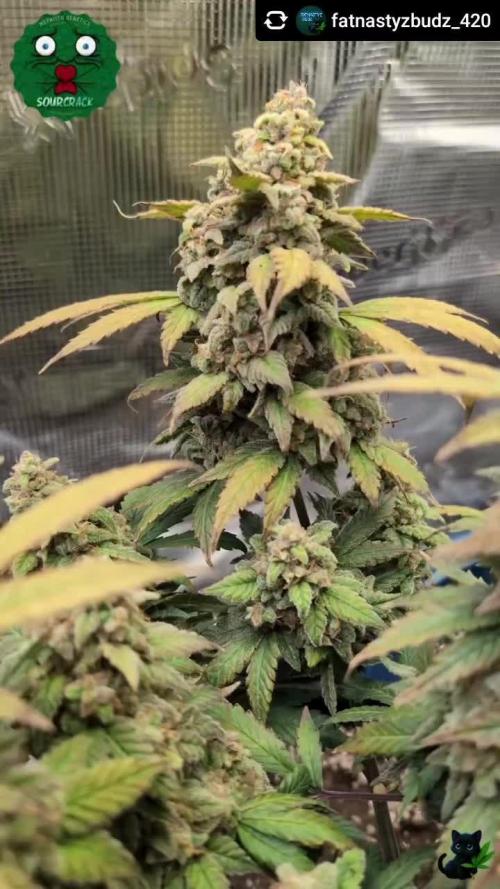
Super glad I got to finally run her again! Wanted to for a while, but then ol' Personalsmok3s had to call me out! 😂😂Which just ensured it was next! 🙏
Love this thing and I could grow a tent full at once!
😻😁🤘

Likes
22
Share


@Phinolagreen
Follow
10. Woche dauert nicht mehr lange, dann ist Ernte Zeit, sie kriegen jetzt nur noch Wasser
Likes
5
Share


@BlackandGreen
Follow
Plants are really flowering still small but plant one has a lot of tops now and plant 2’s buds are already getting dense.

Likes
12
Share


@GREENPHOENIX6262
Follow
Week 3 Veg - Thus far running accordingly. No signs of stress or deficiencies. Introduced a Co2 bag (Exhale 265) to run into early flowering.
*End of week recap* (08/27)
User error during LST for both -
Gave heavy nutes to assist on the rebound - Minor chance of stunting
Besides the LST error - Running smoothly -
Light flower will begin in 2 weeks.
Likes
27
Share


Likes
29
Share


@Ganja_Victoria_Aus
Follow
Keeping my lady happy is a full-time job full of surprises, sometimes heavily exhausting long hours. I'm giving all my love to them. So thankfully, Respect and Love for my family for keeping me able to spend hours daily. 🌅🙏🤙
Unfortunately, grow diaries crash every time I update nutrients and photo 🤷

Likes
9
Share


@Scilef
Follow
Daily reports:
Day 1.
• Watering:
Day: In - 6.1 pH 968 ppm (0.75 l); Out - 6.3 pH 843 ppm (0.3 l).
• Stats:
Temp: 26.0 °C
Humidity: 69%
Day 2.
• Watering:
Night: In - 6.0 pH 978 ppm (1.0 l); Out - Nothing.
Night 2 (after a 1.5h): In - 5.6 pH 40 ppm (1.0 l of plain water); Out - 6.2 pH 680 ppm (0.7 l)
• Stats:
Temp: 24.9 °C
Humidity: 70%
• Note: I was missing for 1.5 day and there are a lot of deficits, but look how big Heracles is! Tomorrow I will give her a Mg foliar and she will be the best girl ever.
Day 3.
• Watering:
Day: In - 6.1 pH 1010 ppm (0.75 l); Out - 6.3 pH 760 ppm (0.35 l).
Night: In - 6.1 pH 1040 ppm (1.05 l); Out - 6.4 pH 724 ppm (0.5 l)
Night (foliar): 6.5 pH 224 ppm (0.2 l of MgSO4)
• Stats:
Temp: 25.4 °C
Humidity: 71%
• Note: No more plain water in feeding schedule. Showered Heracles with epsom salt, fed her two times (0.55 litres was not enough) tonight. I am so excited to see the difference!
Day 4.
• Watering:
Day: In - 6.05 pH 1050 ppm (0.75 l); Out - 6.3 pH 702 ppm (0.35 l).
Night: In - 6.0 pH 1040 ppm (0.75 l); Out - 6.5 pH 764 ppm (0.1 l)
Day 5.
• Watering:
Day: In - 5.8 pH 1050 ppm (0.75 l); Out - 6.5 pH 721 ppm (0.25 l).
Night: In - 6.0 pH 1050 ppm (0.9 l); Out - 6.4 pH 740 ppm (0.3 l)
Day 6.
• Watering:
Day: In - 6.0 pH 1130 ppm (0.75 l); Out - 6.4 pH 841 ppm (0.4 l).
Night: In - 5.7 pH 1130 ppm (0.75 l); Out - 6.4 pH 940 ppm (0.15 l)
• Note: Well, it's almost no difference after using an epsom salt. Next week will be a big defoliation after Heracles reaches the net. I need a dehumidifier since it's still 70%+ humidity in the box.
New leaves started to grow disproportionally. The flowering is coming.
Decided to water on the low level of pH once to fix possible copper and zinc deficits. This grow is full of a new experience!
Day 7.
• Watering:
Day: In - 5.8 pH 1140 ppm (0.75 l); Out - 6.2 pH 989 ppm (0.25 l).
Night: In - 5.9 pH 1130 ppm (0.75 l); Out - ? pH ? ppm (0.? l)

Likes
4
Share


@Kelly420
Follow
Okay so after 48 hours instead of 24 of darkness. These ladies were begging to be chopped with how much more intense the smell got. Cheesy , sweet , skunky , and a floral incense kind of scent. Made lots of finger hash just getting them off the plants , already smoked.
I’m about 75% done with chopping all the major tops. This time I decided to cut off the branches and dry on an eight tier 24” diameter rack off Amazon. All 8 tiers are full with gorgeous top colas.
I’m drooling. Can’t believe just how much bud this is turning out to be. They are dense , and oozing. Not going to get a wet weight because this is just too much. But holding the rack it’s like 20 lbs or more. My scales don’t go that high. Lol.
Gotta say it, I think my buds look 10 times better than the advertisement photos g13 lab’s mozzarella. My 2 cents and honest opinion. Please do give me your opinions.
I know I didn’t show the full grow because life gets busy. My next grow I want to control the humidity and heat levels a bit better. Or just humidity and run co2 to withstand higher temps. I have every angle of the grow under my tips now. It feels amazing to have this kind of harvest after the dedication these plants received. I’m Convinced…. rdwc with a water chiller , is by far the best way to do hydro. When it’s dry I’ll add the final weights.
My nutrient reg is this. Jacks 321 , botanic are cal mag plus, hydroguard,PK booster is flower fuel(purple can off Amazon) and unsulfured molasses. If you don’t have an ability to keep water at 70 degrees then only use jacks hydroguard and cal mag. You’ll still do well but that molasses , that sauce is the boss.

Likes
15
Share

@BudVision
Follow
Hi Growers,
Another week of vegetation is complete. The plants were divided into two tents to provide more space and improve airflow. Topping was done yesterday, so I’ll give them some time to recover. Once they are ready, I will flip them to flower.
———————————————————————————
Další týden vegetace je za námi. Rostliny jsem rozdělil do dvou stanů, aby měly více prostoru a lepší cirkulaci vzduchu. Včera proběhl topping, takže teď jim dám nějaký čas na regeneraci. Jakmile budou připravené, flipnu do květu.
Peace and happy growing ✌️🌱
Likes
17
Share

@GERGrowDesigns
Follow
Dear Growers ,
Welcome to Week 9 or Flower week 6 // Day 63 -70 from WeedSeedsExpress Wedding Cake Auto.
Incase of Moving to a New Home . I Decided to skip 3-4 Weeks from every Diarie of the 12x12 Automatic Project . Everything should be Normal in the next Weeks .
Whether you're a beginner or an expert, you are warmly invited to join, ask questions, and share your own experiences along the way!
Project Setup & Conditions:
• Brand/Manufacturer: WeedSeedsExpress
• Tent: 222cmx150cmx150cm
• Light: 2x 720 Watt Full Spectrum
• Humidity: 50%
• Soil: Narcos Organix Mix
• Nutrients: Narcos Products
• pH Value: 6
If you want Germinitation results like mine , check out Kannabia Seeds with my link [https://www.kannabia.com/de?ref=61966] and grab the germination device or the strains I used . Trust me – it’s worth it for sure !
Get another 20% Discount at all products using the code [GGD] at the Checkout .
Stay curious and keep up Growing —we look forward to welcoming you back for the next chapter soon!

Likes
7
Share


@Kratomizer
Follow
Everything looks good. Humidity has been way too high.
I started flushing the plants.

Likes
Comments
Share


@GothBotanical
Follow
The outdoor girls settled into mid-vegetative growth this week under stable late-summer conditions. Daytime highs hovered in the mid-80s °F with warm evenings and good airflow. The 5-gallon plant continued to bulk up with thick stems and wide fans, while the two 3-gallon pots stayed slightly smaller but healthy and even. Light training was maintained to keep open canopies and even tops. All three plants showed solid color—medium green with no major deficiency signs—but minor heat stress and light leaf curl appeared on the hottest days. They were watered evenly through the auto-watering bases with RO water and light Cal-Mag, letting the soil dry back fully before refilling. No top-dress or compost tea this week; amendments from earlier feedings were still active. Overall, Week 6 was a steady outdoor stretch phase with healthy structure, balanced moisture, and a smooth lead-in toward pre-flower.
Likes
129
Share


@DreamIT
Follow
🎲➕ VLC Critical Plus + by PEV Grow➕🎲
➕20.6 Quiet week start, I dry the soil well and tomorrow I start with the fertilizer, yeah!
➕21.6 All great, you see the changes day after day, really interesting 😁👊🦄
➕22.6 Everything is OK. Very fast, wide leaves for now, we are at the second node. a few days and mainlining begins 🤘
➕23.6 all regular, super yeah
➕24.6 even today nothing in particular to say, I can't wait to be able to manipulate it 😁🦄
➕25.6 It grows really well, very satisfied
➕26.6 All very well, tomorrow transfer next week or mid-week first cut, yeah!
__________________________________________
❓ Are you new to the world of cultivation and don't know where to safely buy your seeds?
😮On the Pevgrow site, you can find the best-feminized seeds indoors and outdoors. Achieved through totally natural stress methods and with guaranteed superior quality.
✅http://bit.ly/PevGrow
ℹ️Check out the marijuana dictionary
✅http://bit.ly/CannabisDictionaryPEVGrow
__________________________________________
👀 Are you looking for a good lamp to start with? 👀
🌞Viparspectra has something more than the others, take a look at their site.
⏩ Use "GDVIP" for an extra discount or "ViparDreamIT" for an extra 5 %% discount
👀 Search for it on Amazon
✅Amazon US: https://amzn.to/30xSTVq
✅Amazon Canada: https://amzn.to/38udUVe
✅Viparspectra UE: bit.ly/ViparspectraUE
👀 Watch my ViparSpectra XS1000 unboxing on YouTube, leave a like and write to the channel 🦄
✅http://bit.ly/UnboxingViparSpectraDreamIT
______________________________________________
📷🥇 Follow the best photos on Instagram 🥇📷
https://www.instagram.com/dreamit420/
🔻🔻Leave a comment with your opinion if you pass by here🔻🔻
🤟🦄💚 Thank you and enjoy the growth 💚🦄🤟

Likes
92
Share


@DogDoctorOfficial
Follow
Week 10 - Second Week of Flowering 🌸
As week two of flowering begins, the garden’s growth is unstoppable! These ladies are thriving, stretching up while staying beautifully vibrant and green. Every inch of this tent is optimized—each plant is soaking up light, nutrients, and water precisely as they need, filling the room with energy.
Room Conditions 🌡️
• Temperature: 27.3°C
• Humidity: 62.6%
• CO₂ Levels: 800 ppm
• VPD: 1.36 kPa (excellent range for robust flowering)
• Lighting Intensity: 818 PPFD
Solution & Medium 💧
• Solution Temp: 21.5°C | TDS: 470 ppm | pH: 6.02
• Medium: Moisture 100% (recently dried to 67%), TDS 510 ppm, Temp 22.5°C
The “dry-out” to 67% was a strategic move, helping boost nutrient uptake and root strength. Meanwhile, our slight increase in reds seems to be having the desired effect, nudging these ladies further along in the flowering process.
Eye Safety & LED Lighting 🌞🕶️
With powerful LED systems like the ThinkGrow and ICL-300, eye protection is critical. LED grow lights emit high-intensity light across the full spectrum, including intense UV and infrared components that are not easily detected by the human eye. Long-term exposure without adequate protection can lead to eye strain, and in extreme cases, damage to vision.
• Blue Light Hazard: LEDs often have elevated levels of blue light, which can harm the retina over time if proper precautions aren’t taken.
• UV Protection: Even low doses of UV can accumulate and harm eyes, so grow glasses with UV protection are essential for any indoor gardener.
Investing in quality grow room glasses can help protect from glare, UV, and infrared rays, making plant care safer and more comfortable.
Lighting Enhancements: ICL-300 In-Depth 🔆
The ICL-300 is our newest addition, specifically designed for inner canopy illumination. This LED offers a targeted light boost under the canopy, enhancing flower growth in lower and shaded areas—ideal for maximizing yield and light efficiency.
• Dual Spectrum Technology: The ICL-300 provides a custom spectrum designed to penetrate deeper into the plant canopy, promoting robust bud formation throughout.
• Enhanced Light Distribution: With strategically positioned diodes, the ICL-300 reduces shadowing and balances light distribution to all parts of the plant.
• Energy Efficiency & Heat Management: This light is designed to be energy-efficient, running cooler and reducing the risk of heat stress within the grow space.
The inner canopy light gives the plants exactly what they need, particularly during the flower stage when bud sites deep in the canopy can benefit from more direct exposure. However, after noticing slight leaf burn on some plants, I’ll hold off a bit longer before fully integrating this light to ensure optimal adjustment.
Looking Forward 🌟
As we continue dialing in conditions, it’s all about balance, precision, and taking proactive steps to optimize every aspect of the grow environment. We’ll keep a close watch on the canopy height, and next week, I’ll aim to fine-tune the light integration even further with the ICL-300.
P.S. - ICL-300 and CO₂ Sensor 🌱
The TrolMaster CO₂ Sensor (MBS-S8) has been crucial for real-time CO₂ adjustments, ensuring the plants get exactly what they need without constant monitoring. Combined with the ICL-300’s spectrum flexibility, these tools make an unbeatable setup, allowing for nuanced control over plant growth and development.
As always, a huge thanks to the Grow Fam for the tips, support, and enthusiasm! I’m excited to see what these next weeks will bring as these plants reach their full flowering potential. Stay tuned for more updates, and don’t forget: eye safety first, growers! 🌞🌿
Discount Codes so you can save big on your next check out 💚💚💚
Kannabia - DOGDOCTOR 30% off
SeedsmanSeeds - DOGDOCTOR 10% off
CannaKan- DOGDOCTOR 15% off
terpyz.eu - DOCTOR 15% off
The Neutralizer - PORKIT5-DOG 15% off
As always thank you all for stopping by, for the love and for it all , this journey of mine wold just not be the same without you guys, the love and support is very much appreciated and i fell honored and so joyful with you all in my life 🙏
With true love comes happiness 💚🙏 Always believe in your self and always do things expecting nothing and with an open heart , be a giver and the universe will give back to you in ways you could not even imagine so 💚
Friendly reminder all you see here is pure research and for educational purposes only
Growers Love to you all 💚💚💚


