The Grow Awards 2026 🏆 


Likes
Comments
Share
@BLAZED
Follow
1-11
At the end of the day i chopped her down, did a small wet trim removing some big leaves, and hang the buds to dry.
2-11
Temps: 19.3 to 20.5 degrees
Humidity: 55% to 64%
3-11
Temps: 17.1 to 20.4 degrees
Humidity: 54% to 66%
4-11
Temps: 18.1 to 19.6 degrees
Humidity: 62% to 66%
5-11
Temps: 17.9 to 20.1 degrees
Humidity: 56% to 64%
6-11
Temps: 17.6 to 19.4 degrees
Humidity: 59% to 67%
7-11
Temps: 17.8 to 19.2 degrees
Humidity: 60% to 66%
8-11
Temps: 17.4 to 19.9 degrees
Humidity: 58% to 67%
9-11
Temps: 17.8 to 20.1 degrees
Humidity: 62% to 64%
10-11
Temps: 18.2 to 20.5 degrees
Humidity: 62% to 65%
11-11
Temps: 18.7 to 20.4 degrees
Humidity: 57% to 65%
12-11
Temps: 18 to 20.1 degrees
Humidity: 54% to 66%
13-11
Temps: 17.8 to 20.2 degrees
Humidity: 61% to 67%
Started trimming today.
14-11
Finished trimming.
I was afraid of finding a lot of budrot, luckily it was only the one cola.
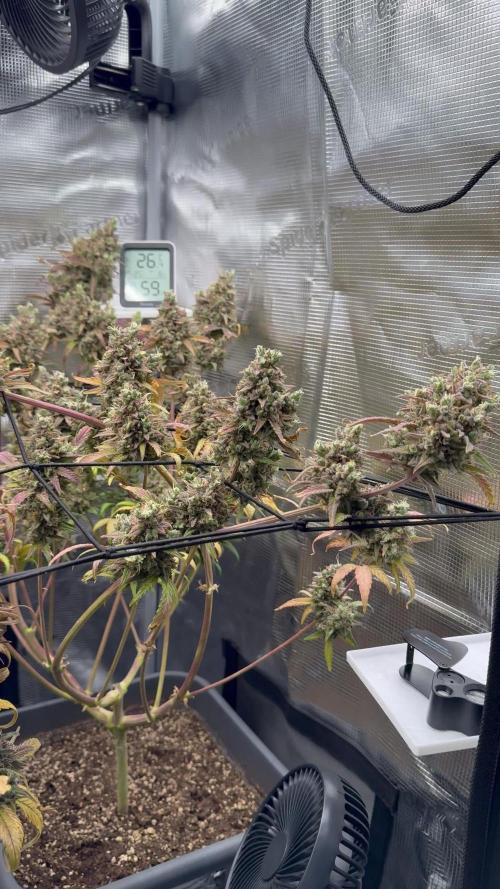
The buds are very frosty, the bottom at the base of the branch looks a bit brownish on some buds, i inspected it with a microscope and didnt find any mold or weird things. There are a lot of amber trichomes tho.
I think that's why it looks brown like that. It smells and smokes good, so i think its fine.
If someone thinks otherwise, let me know!
End results:
Buds: 92 Grams
Small Buds: 18 Grams
Trim: 16.7 Grams
Total weight of the buds: 110 Grams.
I calculated that i used a total of 72.3 watts this grow, that makes it 1.52 grams per watt!
Very happy with the end results, and its by far my personal record hahaha.

Likes
16
Share
@Targona
Follow
Targona, 43 days since my little girl sprouted from seed 🌱
Sixth week of growth for my OG Eddy Lepp Auto 💚🌺💚🌺
Nutrients:
As I mentioned last time, I switched to mostly organic nutrients from Plagron and Biobizz💓 -
Plagron Alga Bloom - is a complete fertilizer designed exclusively for the flowering phase. It contains all the important substances that the plant easily absorbs 🌸🌾
----------------------------------------------------------------------------------------------------------------
Plagron Sugar Royal - is a supporting enzymatic fertilizer designed exclusively for the flowering phase. It contains hormones, enzymes, vitamins and trace elements necessary for proper flower development 🍭🍭🍭
----------------------------------------------------------------------------------------------------------------
Plagron Green Sensation - Green Sensation is a professional flower stimulator and activator. It contains all the necessary ingredients that support flowering and also the formation of sugars, and thus the overall yield 🌊🌿
-------------------------------------------------------------------- --------------------------------------------
JUNGLE X Environ is a highly effective complex preparation for stimulating the formation of flowers 🌸🏵️
----------------------------------------------------------------------------------- -------------------------------
BioBizz Bio pH - is an organic pH regulator. An aqueous solution of citric acid, which is naturally found in citrus fruits 🍋🍋 - I use it regularly after measuring the pH. Since the pH was now 6.5 +, there was no need to lower the pH.
------------------------------------------------------------------------------------ -----------------------------
Terra Aquatica pH test kit - Very reliable, easy to use and inexpensive. The pH Test Kit conveniently replaces expensive pH meters. It includes a wide range from 4.0 to 8.5. 🌈
I am no longer fertilizing Plagron Power Roots this week, fertilization should be done no later than the fifth week of plant growth.
I have gently switched to mostly organic nutrients, with the addition of very gentle flower stimulants that are only slightly or partially mineral.
In general:
OG Eddy Lepp Auto 💚🌺💚🌺 - Original Sensible Seeds really belong to the highest quality breeders and this is visible in their genetics. OG Eddy Lepp Auto is an amazing genetics, a stable strain that behaves naturally and responds very well to both nutrients 👍💪 and the transition to other nutrients. I tried to do this change very carefully and most importantly, I switched to very high quality organic nutrients, or organic for the most part 💩- from Plagron, Jungle Indabox and Biobizz. The girl grew very tall, it is a 50/50 hybrid, but it looks like she has leaned towards the sativa side - it is a tall slender plant with long leaves 🍃🍃 It is full of white pistils that form white pompoms all over the plant 💚🏵️🌱
Training:
At this stage, the plants do not need much training. I just cut off a few leaves and gently and slightly pulled it down the middle with white tape so that it wouldn't shade either myself or the other sisters in the tent 💚🌞🌿🌞
Light: Mars Hydro TS1000 The plants respond effectively and the light is technically very well managed - I try to have 50 cm between the light and the plants, so I move it up regularly 💡💡💡
Thanks for the likes
See you soon 😍😍

Likes
3
Share
@Grow_Bro_NL
Follow
Well unfortunatly due some technical issue on GD's side my pictures and videos arent uploading right so sorry for that.
All plants seem to be adjusting fine and i took a cut (when topping) of the top right grape & cream cause she handled everything like a champ so far where the others had some difficulties.
We'll see if that holds up come harvest time but maybe a cross between that pheno and a seedsister might be viable.
Still just water. I did adjust the blumats to dry up a little more and the plants are taking that for the better.
Toprow is
3x grape&cream
Middle row
1xMokums Tulip
1xVanilla Frosting
1xLemon OG(own cut)
Bottom row
Sour Tangie Dawg
Stay tuned!

Likes
15
Share
@MG2009
Follow
10/06/2018
Love how she looks don't know why? Just nice stacking of buds no mold issue, smelliest plant early on, and still is stinkiest. I can not wait for the first toke, to see if I made the right choice. See if it is worthy of the name (Ghost 👻 Walker)
or stay GTH X SKYWALKER #5?
Likes
10
Share
@sunshinegroww
Follow
Here we go in partnership with Zamnesia and Plagron so far good start ,dont have time to enter the competition so im thinking i will mainline this one

Likes
10
Share
@Gram_Solo
Follow
Tropicanna has now started Flushing with just Flawless Finish. 4 more days left, then going to do a 48 hour dark period to bring all that gooey resin out. There's a really nice purple color on the buds, looks fire , shud be a nice smokee 👌
Wedding Cakes have had a feed of just Overdrive for one last push on the nugs before the flushing begins.
should be cutting down the Trop in the next week to dry, cannot wait :) not had a nice sativa in a while, just Indica couch lock for ages 😆
👍

Likes
3
Share
@Muxa752
Follow
Все идет по плану , шишки пухнут ,появился характерны запах , в целом идет ленивый гров . подчищаю листву понемногу , стабильный полив ,хорошие условия , больше ничего не нужно )

Likes
67
Share
@HazeyBobby
Follow
The week starts Monday Jan-27, being day 27 of flowering.
Plants are looking very good and healthy, albeit some bigger buds at this stage is missing.
Carried out more defoliation of upper leaves on the CBD. Only trimming fan leaves on one side of a bud site in alternate fashion. Strategy is to expose more bud sites to light. Leaves are getting sticky and glistening brightly.
Feeding a high EC nutrient mix whilst monitoring run-off EC which remains below feed EC. The canopy is still thick with beautiful luscious green leaves typical of an Indica.
Light is maintained at 30cm above the canopy, with daily fertigation at lights on - watering just over 2L per day. Maintaining an average RH in the space at 50%.
---- updates for prior 4 weeks --------------------------------------------------------------------------------------------------------------------------------------------------------------------------------------
-----------------------------------------------------------------------------------------------------------------------------------------------------------------------------------------------------------------------
The week starts Monday, Jan-20 still flowering away.
Bud sites are beginning to take form and the ScrOG setup looks full, ready for the development of some large buds.
Removed a few more leaves from above the canopy which were blocking bud sites below. Also cut small stems (with bud sites) below the canopy from both plants which were unlikely to grow strong. It's now looking clearer below the canopy.
The canopy is still thick with beautiful luscious green leaves typical of an Indica. Run-off EC has been slowly rising over the weeks but still under the feed EC - will be keeping my eyes on this.
Light is maintained at 30cm distance from canopy, with daily fertigation at lights on - watering almost 2.5L per day. Maintaining an average RH in the space at 50%.
-----------------------------------------------------------------------------------------------------------------------------------------------------------------------------------------------------------------------
The week starts Monday, Jan-13 in flowering stage.
The plant is growing thick and fast, with very short node intervals creating a thick canopy.
Carried out substantial defoliation of almost all the big fan leaves and a few little stems that were not likely to make it above the canopy. Avoided defoliating the major cola branches. This encourages the plant not to waste resources on a node which is only going to produce “popcorn” buds.
The plants reacted well to the defoliation and were looking good by the end of the light cycle for the day. The net is completely full and this will be the last week of applying any LST as part of the ScrOG setup.
Light is maintained at 30cm distance from canopy, with daily fertigation at lights on - watering almost 2.5L per day. Lowered the average RH in the space to 50%.
-----------------------------------------------------------------------------------------------------------------------------------------------------------------------------------------------------------------------
The week starts Monday, Jan-06 in flowering stage.
The net is filling up nicely with the ScrOG process being enjoyable - just tucking branches nicely under squares once stretched enough. The Indica dominant strain is really shining with incredible dense growth and thick branches that don't bend as easily as it's Sativa neighbour.
Light is maintained at 30cm distance from canopy.
-----------------------------------------------------------------------------------------------------------------------------------------------------------------------------------------------------------------------
My grow setup includes;
- Secret Jardin DS120W tent (120cm x 60cm x 180cm) placed inside the bedroom. Passive intake of air is from a closed off section of the room where the central heating boiler sits - the intake is warm air (20 degC.) and fairly dry (40% RH) during the winter months.
- Mars Hydro SP250 LED light
- extraction fan - AC Infinity Cloudline T6
- ventilation fans
- aquarium heater
- small oil heater
- small dehumidifier
- 20L Airpots and 3.5L general pots for seedling stage
- Canna Coco substrate and nutrients
- pH and EC/TDS meters
- Thermo/Hygro meter
Likes
28
Share
@Paulbearer1891
Follow
Not a ton to report as I switch them to flower. The first day they went to the 12/12 light schedule I chopped the shit out of them, taking probably 100 fan leaves from the 4 plants all together. They're just too bushy and I feel like I'm asking for problems letting them grow into each other. Of course when you try to grow four plants in a 2x4 tent, that's an expected problem.
They looked blended, bomb-out and depleted when I finished chopping leaves and pulling the main growth tips apart from each other and through the scrog net. I was a little worried that I overdid it, but 12 hours later they had more than bounced back. I'm a little leary of hard defoliation in flower, but pistils have hardly developed and the plants clearly need and respond well to it. I'm sure I'll take about the same amount from them a couple more times.
A couple concerns: small amounts of white mold growth on the top of the coco of a couple plants and the sides of a couple bags. Very faint and not growing much. Also no signs of it on leaves or stems of the plants themselves. I've been spraying with a water/hydrogen peroxide mix.
Also a few leaves here and there on a few of the plants look chewed up or torn. There are no signs of pests, so I think they're from some minor abuse during training or from the fan blowing. Will definitely be keeping an eye on mold/mildew and pests, especially going into spring locally.

Likes
Comments
Share
@BruWeed
Follow
11/10 - empezo su quinta semana de floración.
Se encuentra perfecta, su olor es muy fuerte y esta muy resinosa.
No tuve ningún problema hasta el momento. Su evolución fue muy rapida en comparación a otras geneticas que cultive.
Aprox le faltaría un mes mas para ya poder podarla, los pistillos se encientran muy blancos por el momento.

Likes
15
Share
@Luckydope69
Follow
Dies ist die letzte Woche der Vegetation. Ich habe zu Beginn noch einmal etwas defoliert und werde es nun die ganze Woche wachsen lassen. Der Triebwuchs ist sehr schön und es wird einen Haufen Spitzen geben.
Likes
67
Share
@CommanderCannabis
Follow
Organization was the word for the week. I organized the leaves on Daphni by cutting some old fan leaves and low level leaves. I organized my CO2 injection procedure. CO2 tank to REGULATOR thru SOLENOID connected to TIMER every two hours with lights on. I also organized the power strip in the back with cable ties and sleeves. Finally I had to organize my way out of a FUBAR situation when the oxigenating device in the RainForest 66 Reservoir stopped working. I will have some words to say to Katie in customer service for sure. I got a standard oxiginator and a disk shaped air stone and use that now to keep the water healthy. Daphni is staring to bud more on the lower nodes and the progress so far looks good. Knock on wood. Since i turn the exhaust fan off when CO2 is injected i dont really need the heater so I took it out. Have a great week.

Likes
71
Share
@Schnabeldino
Follow
_____📅 Week 5 | 📅 Day 29 - 35 | 27.05 - 02.06 ______
27.05.25 | Day 29 🌞💧
🔸The ladies moved into the big tent on the 29th day after I had cleaned it and hung up my new lights.
🔸Poison Envy is developing superbly, all branches are equally developed and grow evenly. She is doing wonderfully with the LST, she is growing the fastes and most beautiful of all 4 ladies, I like it very much, can go on like this.
🔸I only work with hooks and occasionally with clips, but I've often broken branches with them so I prefer to use hooks hehe :D
01.06 | Day 34 💧
🔸 1500 ml
🌡️🔆= 23-24°
🌡️🌜= 18-19°
💨 Hum. = 65%
🔦 PPFD = 500 umol 18/6
🔦⌚DLI = ~ 32
_________________________________________________________________________________________
Equipment to use:
💡 Light: 2 x Sanlight Evo 4- 120 on 50%
⛺ 120 x120 x 180
🍯 Pots: 18 liter pot
🌱 Soil: Bio-Bizz light mix
💊 Nutrients: Advanced Nutrients
💧 Water: Tap Water 0,5 EC


Processing
Likes
5
Share
@crouch74
Follow
I can see that she is happy with her new light. She is healthy, growing pistils and stopped reaching up for the light after setting up a stronger one.
The smell is getting a bit stronger than before but still reasonable.


Likes
26
Share
@BigBadLion
Follow
Week 6 and my babies are still in veg 😥 but I'm sure next week they will finally flip! 😁
Now, what can I say about the girl that's on the back?
- She has some really long leaves and those stems are thin if I compare them to other plants I've grown.
- Some of her leaves look too shiny, dunno why!
- The internodes are really short, which is good and she's VERY bushy.
Perhaps she went thru some kind of deficiency and that's why she looks like that? Or maybe it's something else? No idea!
The other hand, the other baby:
- She's developing really well. Ahead of her sister and I'm sure she'll be the first one to flip! I mean, it looks like she's already developing some pre-flowers! :D
- She's a little taller compared to her sister
- The internodes are short and the leaves are huge! They are also slightly darker compared to her sister.
I reinforced the LST on both of my girls and I both tucked the leaves (a lot) and defoliated the plants just a little. I need to control that jungle!
Anyway, that's all for now.
Stay safe and I hope you'll all enjoy the photos and video I took! 😃
Likes
10
Share
@DeepRootsGrowTrees
Follow
APRICOT GORILLA AUTO
/ GANJA FARMER
WEEK #12 OVERALL
WEEK #6 FLOWER
This week she's stacking nicely as her buds have trichome and are more round in shape. She's got a funky like fruity gas smell to her. Stay Growing!!!
Thank you for stopping by and taking a look it's much appreciated!!
THANK YOU GANJA FARMER!!
APRICOT GORILLA AUTO /
GANJA FARMER

Likes
6
Share
@Galko420
Follow
Letzte Woche vor Ernte. Nur noch Wasser gegeben seit 2 Wochen. Jetzt noch 1 Tag komplette Dunkelheit und dann war es das.
Likes
42
Share
@Dr_Boom
Follow
She's a real beast. I started the flush this week by removing all nutrients from her watering. I just overwater her a little, and remove the access. Going forward, I will continue just giving her a good diet of plain water to remove some of the salts from the soil. She's a little too big to take outside to really flush her. I'm sure this will work out fine. I had to continue tying up some of her branches to keep them from falling over. She's looking good.
Likes
59
Share
@Insaniac_0
Follow
(11/25-12/01)
Hope everyone enjoys the daily progressions of overhead and side profile (Organized Chaos) Unfortunately they have too much of a toll for me to keep up with with 3 sets of grows going now, so this was the last week I am doing them on this set. I will try to add a video and black back or cover pics by end of week every week.
Week 3 Notes & Observations:
As mentioned last week, Plant 1 remains the supreme plant now and is producing nice stretch in the node spacing but is still showing a different type of leaf shape than plant 2. No issues from the mainline topping and they seem to be going okay. I will be topping again this weekend for the second of 3 total topping sessions. This topping will be 2 tops off the ends of the last and will produce 4 main colas.
**OOPS**
was being a little too aggressive in my HST while trying to set the mainline on both plants today. P1 was just a little rip of the skin, I taped her up and suspect she will be fine. However, on P2, I nearly snapped the whole branch off. I taped it and crossed my fingers hoping it works out in a week or two, but have serious doubts it will be able to mend such a large break. We'll see because I am posting ALL of the grow, the good and the bad.
VPD and PPFD:
This week I will hold the humidity in the tent to about 70-75% and temps will be monitored for 70- 75F daytime and 66-71F overnight. Im not adjusting my lights and look to control them 350ppfd max. Meaning slight increase over last week but mostly just growth increase.
Feed & Monitor:
***All feeds with nutes use either a whole ratio or combination of "Veg Mix" and "Bloom Mix"concentrates DILUTED in water until a total ppm of add-in is reached using a (Total Dissolved Solids) TDS Meter measured in PPM (parts per million). The "Veg Mix" concentrate will eventually be added in smaller ratios and "Bloom Mix" concentrate will eventually replace the "Veg Mix" concentrate entirely. The ppm and ratios of each feed will be listed when I feed. Veg mix recipe is on week 2. Bloom Mix recipe will be noted in this top message of the week that I make it.***
Day 28 (last feed was day 22)
Tested and Calibrated my ph pens. Starting weight from each pot was 18 lbs and 8 oz, P1 weighed 15lbs 12oz and P2 was 15lbs 4oz before feed. Each plant got 1 gallon of de-chlorinated tap water with 300ppm Veg Mix concentrate added (recipe on week 2 and makes 1 gallon at about 3600 to 4000ppm concentrate to dilute each feed, i.e. I only fed 300ppm above the purified water ppm this feed) The ph on this feed was balanced to 6.0ph to combat the original higher runoff ph from the first runoff feed. After feed P1 weighed 22lbs 3oz (21lbs 2oz after last feed) and P2 weighed 21lbs 14oz (20lbs 14oz after last feed). I got about 5cups of runoff on P1 (9 cups last feed) and 5 cups on P2 (7 cups last feed) . Runoff for P1 ph was 6.45 with 1170ppm (6.45ph with 980ppm last feed) and P2 was 6.45 with 1230ppm (6.45 with 1130ppm last feed). Top soil tested at: P1 6.35,6.3,6.33,6.33 for an avg of 6.327 (6.497 avg after last feed) and P2 tested at 6.47,6.37,6.26,6.51 avg 6.402 (6.46avg after last feed) - next feed will be 6.3ph as Im liking where the ph is so I dont see any issues, but will continue to monitor this way.
Day 34 (last feed was day 28)
Tested and Calibrated my ph pens. 1st Starting weight from each pot was 18 lbs and 8 oz. Before feeding this time, P1 weighed 14lbs 14oz (15lbs 12oz before last feed) and P2 was 14lbs 7oz before feeding (15lbs 4oz before last feed). Each plant got 1.5 gallons of de-chlorinated tap water with 98ppm Veg Mix concentrate added to flush any salt builds in the soil (recipe on week 2 and makes 1 gallon at about 3600 to 4000ppm concentrate to dilute in each feed, i.e. I only fed 98ppm above the de-chlorinated tap water ppm this feed) Due to this soil showing a possible calcium deficit, I am starting a 1ml per gallon add-in to test on all plants using this soil, so I added 1.5ml of CaliMagic (General Hydroponics 1-0-0) to each plant's feed then I ph balanced before feeding. The ph on this feed was balanced to 6.3ph. I used knitting needles to help both aerate the soil and create new water pathways for the roots. (a practice I may consider a new feeding standard) After feed, P1 weighed 21lbs 9oz (22lbs 3oz after last feed) and P2 weighed 21lbs 7oz (20lbs 14oz after last feed). I got about 11cups of runoff on P1 (5 cups last feed) and 11 cups on P2 (5 cups last feed). Higher runoff volume was expected with the feed volume increase for flush this round. Runoff for P1 ph was 6.65 with 838ppm (6.45 with 1170ppm last feed) and P2 was 6.60 with 879ppm (6.45 with 1230ppm last feed). Top soil tested at: P1 6.58,6.57,6.58,6.67 for an avg of 6.600 (6.327 avg after last feed) and P2 tested at 6.47,6.61,6.64,6.64 to avg 6.590 (6.402 avg after last feed) - next feed will be 6.0ph as I'm still liking where the ph is, but rather see it closer to 6.3 or 6.4 top and bottom. I dont see any issues with the feed's data other than the possible calcium deficit and I will continue to monitor runoff ppms as I expected this to be higher with more runoff.
Hope everyone enjoys the daily progressions of overhead and side profile (Organized Chaos) Unfortunately they have too much of a toll for me to keep up with with 3 sets of grows going now, so this was the last week I am doing them on this set. I will try to add a video and black back or cover pics by end of week every week.