The Grow Awards 2026 🏆 


Likes
Comments
Share
@littlefoot
Follow
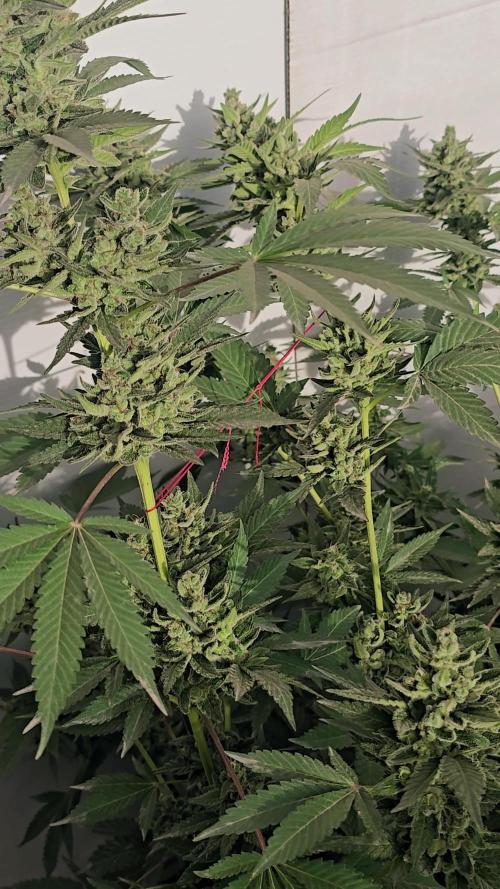
Defoliation as needed and LST.
Topped agian after my mess up, BOTH new colas are starting too grow nicely, plant is over-all very healthy.

Likes
17
Share
@ipoke_smot420
Follow
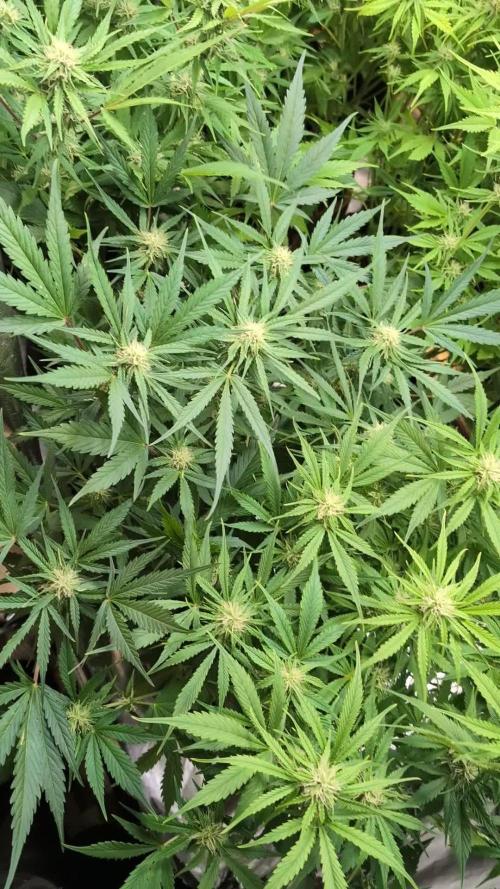
Day 63 of growth, day 40-43 of flowering
Big shoutouts all around🙏🏼🙏🏼🙏🏼💯💯💯💚💚💚
My seed sponsors: @fast_buds and @atlasseed
My friends at @seedsman for the amazing hookups from their line of 🔥🔥🔥 autos.
Thanks to @aeromixer for allowing me to be an ambassador for them(I hope I'm doing at least half as good a job for them as their pump is for me😁)
The girls absolutely love the Bar2400 from @sunraise
I'm hopeful that it will keep up in the new 4x4.
I also want to show appreciation to @sensorpushtech and @inkbird_us for helping me get my environment under control. Thank you🙏🏼
As many of you know, if you've followed along long enough, I'm a bit disabled and and even more broke💸😕
With that being said, sponsors and friends are a big part of the content I can bring to you. So I could not be more grateful for these people. But I'm also thankful for those of you who follow me and like my content, and show support that way.
My deepest gratitude goes out to all of my supporters 🙏🏼💯💚🤙🏼🤙🏼🤙🏼


Likes
43
Share
@TheCannaProphet
Follow
~ FastBuds PAPAYA SHERBET Photoperiod~
Well here we go on another journey together through 'Canna-land' and this one's kinda special... forget that, it's VERY special because this is FastBuds newest surprise for the community, a FEMINIZED PHOTOPERIOD STRAIN!🤯
I was fortunate enough to score these seeds, of which only 1000 were available and can't wait to see what this strain can do! This Papaya Sherbet, according to FastBuds, is a hybrid with a 9-10 weeks flowering period. For a more detailed and accurate description of this strain the following from FastBuds says it best:
"Combining the massive stature of Papaya (Oni Selection) with the strength and resilience of one of our best keeper cuts (Sunset Sherbet), this strain develops into a big, expansive bush adorned with numerous bud sites that later transform into a generous harvest of medium-sized buds. Papaya Sherbet flowers deliver a signature flavor of premium cannabis with subtle citrus undertones that emerge upon inhaling. During growth, her aroma makes for a sweet yet pleasantly bitter fragrance, giving you an idea of what the smoke will taste like. Notably stress-resistant, Papaya Sherbet is a great choice for growers working in challenging environments. She is very forgiving and rebounds quickly from any adversity, allowing growers the freedom to experiment with confidence that she will take everything like a champion she is. This strain embodies resilience, flavor, and abundant yields in every grow cycle."
Sounds like an epic strain and I personally cannot wait for this lady to strut her stuff!😍
________________________________________________________________________________________________________________________________________________________________________________________________________________________________________________________________________________________________________________________
The Setup:
This is going to be an outdoor grow, but I have started the Papaya Sherbet photoperiod indoors as our weather is still a bit too chilly to put a newly sprouted seedling outside (nighttime temp's dipping regularly into the 40's℉).
The plan is simple... let her grow inside under a 19/5 light schedule until the nighttime temperatures are in the mid 50's℉, which shouldn't be long. After which, she'll be moved outside and transplanted into the soil which I have already setup and inoculated with beneficial microbes from BioTabs and slow release dry amendments from Gaia Green. Once she's established herself outside she'll be given periodic top dressings of Gaia Green 4-4-4 and 2-8-4 along with worm castings and Compost Tea's. Her grow area is approx. 5'x5' and I have posts and a trellis net set up already for when she gets bigger to aid in training her. Let the fun begin!🤪💚
________________________________________________________________________________________________________________________________________________________________________________________________________________________________________________________________________________________________________________________
Weekly Updates:
8/19- Week 2 of flower is here for the FastBuds Papaya Sherbet photoperiod and she is looking fantastic!
Our weather has finally cooled down and the daylight has dropped to just over 13 hours now.
8/21- My daily watering campaign continues with me giving the Papaya Sherbet 5-8 gallons of well water from the garden hose.
8/23- Luckily, with it's wide node spacing, there's not a lot to do with the Papaya Sherbet at this point except to keep her watered! She has not required any thinning out and has had only a few lower leaves turn yellow, which I promptly remove. Overall, this lady is a dream to grow, requiring little to no effort or maintenance!
8/25- There's the second week of flower on the books for the FastBuds Papaya Sherbet photoperiod and I have great expectations for how this fine looking lady is going to turn out, as she has exceeded all my expectations so far!
Thank you for checking out my diary, your positive comments and support make it all worthwhile! 💚Growers Love!💚😎🙏


Likes
42
Share
@cheetah844
Follow
We have a runner. She's growing to the sun 🌞 can't wait to get her outside. The male I grew was extremely tall I'm going to keep her short and bushy, hopefully. One of my favorite daytime strains for an uplifting mood that I've had so far.
Likes
9
Share
@barrychopsticks
Follow
Almost ready to harvest (Day 53)
The are labled with 55-65 days of flowering
Started to only give water with calmag from day 51
Smells are really nice

Likes
26
Share
@BigBadLion
Follow
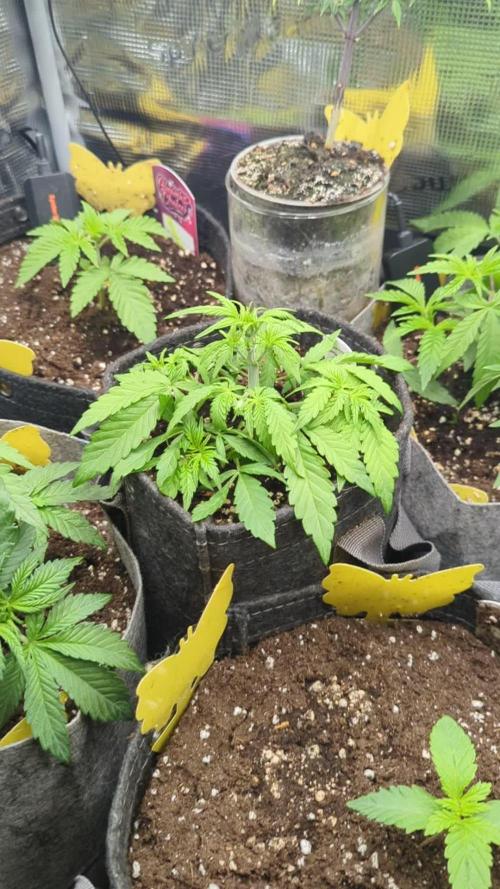
Week 6 and my babies are still in veg 😥 but I'm sure next week they will finally flip! 😁
Now, what can I say about the girl that's on the back?
- She has some really long leaves and those stems are thin if I compare them to other plants I've grown.
- Some of her leaves look too shiny, dunno why!
- The internodes are really short, which is good and she's VERY bushy.
Perhaps she went thru some kind of deficiency and that's why she looks like that? Or maybe it's something else? No idea!
The other hand, the other baby:
- She's developing really well. Ahead of her sister and I'm sure she'll be the first one to flip! I mean, it looks like she's already developing some pre-flowers! :D
- She's a little taller compared to her sister
- The internodes are short and the leaves are huge! They are also slightly darker compared to her sister.
I reinforced the LST on both of my girls and I both tucked the leaves (a lot) and defoliated the plants just a little. I need to control that jungle!
Anyway, that's all for now.
Stay safe and I hope you'll all enjoy the photos and video I took! 😃
Likes
13
Share
@XanHalen
Follow
Mar 31
I think things are going very well, one plant has rusty spots, pretty sure its calcium deficiency, will be upping across the board.
Got the runoff ppm to a good spot, will be going back to 800ppm feeds by week 8, 750ppm this week.
I want more stable genetics next time, I am way to new to be dealing with basically 3 different strains, that's what it feels like, and I have very little time as it is.
Thinking of upping PPFD some more, i think the droop of the one plant was just adapting to watering till runoff, I want to see some fattening AND RIGHT NOW.

Likes
8
Share
@Kirsten
Follow
26.12.24:
These are my 2 best plants P1 and P2 Purple Punch, they are looking great! Not sure what happened to P3.
They are in early flower/ pre-flower with the pistils clearly seen on P2. I am also hoping to tie some of the branches down to help light penetration on the lower canopies.
I have noticed light stress on my plants. I had moved the lights further away and increased the light intensity to 70%. Unfortunately that created some issues. Namely severe palour of the leaves.
To try and rectify the situation, I've dimmed the lights to about 30%, staying at the same distance, about 30 inches away. I measured the par levels, after I did this. They should a reading of anywhere between 40 and 150, at the canopy of the plants. They are all different sizes. This seems to have improved the colouring on all plants.
After this evenings watering, I will monitor recovery and increase lighting intensity again slowly. I am also using the light cycle of 21/3, so the plants have many hours more light to absorb, than for example 12/12 or 18/6.
I am pleased with the progress, considering all of my mistakes!
29.12.24:
So I finally gave LST a shot, it's probably a bit too late, however I really want to get the most of the triploid pheno, and I went a little crazy and LST'd all plants except 2, as they're too small.
I did that late last night, this afternoon I was amazed to see the plants turn their leaves back to the light source. I'm glad I overcame my fear of trying it. I'm very excited to see them adapt and progress! 😁 there are videos above with before and after of my LST process.
Thanks for checking out my diary 🍃 ✌️

Likes
4
Share
@Big0zGrower420
Follow
Learned a lot from this grow and am very happy with the results. Pulled 2.8 Oz and 1.1 Oz of trim/popcorn buds in a one gallon pot. Definitely wont be doing that again, but had a lot of fun throughout the entire process. Going to be starting another grow soon! Very excited for that.

Likes
3
Share
@Mexicanasseeds
Follow
En esta sexta semana, el cultivo ha entrado en la ventana crítica de maduración bioquímica. Una vez finalizada la consolidación estructural, la planta ha redirigido el flujo de carbono hacia la ruta del ácido mevalónico y la ruta MEP/DOXP, optimizando la síntesis de precursores de cannabinoides y terpenos en los tricomas glandulares capitados-pedunculados.
2. Elicitación y Priming Inmunológico (Evento Crítico)
Se ejecutó la tercera y última aplicación de Ácido Salicílico (AS) a una concentración de 100 ppm mediante fertirriego radicular (riego manual único).
* Mecanismo de Acción: La aplicación radicular de AS actúa como una señal exógena que mimetiza un ataque de patógenos biotróficos, activando la cascada de señalización de la Resistencia Sistémica Adquirida (SAR).
* Respuesta Fisiológica: Esta señalización induce la expresión de genes relacionados con la patogénesis (Proteínas PR) y, colateralmente, sobreestimula la producción de metabolitos secundarios como mecanismo de defensa abiótico.
* Objetivo: Maximizar el contenido de resina y compuestos volátiles antes de la fase de lavado, aprovechando el "priming" para fortalecer la pared celular y la densidad de los exudados glandulares.
3. Dinámica Nutricional y Balance Iónico
Con la transición hacia la madurez, el manejo de la solución nutritiva se ha ajustado para prevenir antagonismos:
* Balance P-K: Se mantiene la intensidad en el aporte de potasio (K^+) para soportar el transporte de fotosintatos (sucrosa) desde las hojas fuente hacia las flores (sumideros).
* Control de EC y Dry-backs: Se aplican estrategias de Crop Steering con secados controlados del sustrato de coco para aumentar la presión osmótica, lo cual, en sinergia con la elicitación, favorece el estrés generativo.
* Monitoreo: El lixiviado se mantiene bajo vigilancia estrecha para evitar la acumulación de sulfatos y asegurar que el balance entre cationes
4. Gestión Climática y VPD
* VPD Óptimo: Se ha mantenido un rango de 1.2 a 1.5 kPa. Este diferencial de presión de vapor permite una transpiración eficiente, asegurando que el flujo masal de Calcio llegue hasta los cálices superiores, evitando necrosis apicales internas.
* Temperatura del Agua: El control a 21°C en el tanque de solución madre ha sido fundamental para mantener niveles óptimos de oxígeno disuelto y prevenir el estrés térmico radicular, factor que podría interferir con la señalización de la ruta SAR activada por el AS.
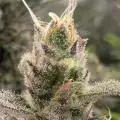
5. Estado Fenológico Visual
La morfología observada en los ejemplares muestra una senescencia controlada de estigmas (comenzando la oxidación en un 15-20%) y una arquitectura de cogollo "espigada" pero densa, característica de una alta eficiencia fotosintética y una correcta gestión del DLI (Daily Light Integral). La cobertura de tricomas es profusa, con una turbidez que indica el inicio de la degradación de precursores hacia formas ácidas de fitocannabinoides.
Likes
Comments
Share
@smoking_hills9
Follow
Very happy I went Original Sensible Seeds beens this grow. 🤩 All 3 autos from some special american line, and o boy , they don't disappoint.🔥 Bangers genetics 👏🏻 all trees are huge with 100s of well structured and close to each other bud sites. All very frosty for this stage already. The smell is quite stable on most , sweet creem and lemon pine. I like it a lot 💚

Likes
4
Share
@Zugzug
Follow
No food just Water.
Flower 12/12 on 9-12-24 = (44 days) or (6 weeks 2 days)
Likes
13
Share
@GrandmasBoy2021
Follow
Week 11,
As you can see with the pictures, she has some nutrient burn :( I unfortunately gave her too much nutrients. I knew this strain was sensitive to nutrients because of the 2Fast4buds strain video but I did not know what was too much or not. If I was to grow this strain again ,I would probably switch up nutrients every other watering and not every watering as I did. As a result of the burn, I used some ClearEx in hopes that the leaves will turn back to green. The plant seems to be responding well to the treatment being on 2/17 and all. My plan is to water the plant on 2/19 with only water to flush the plant some more. Hopefully by 2/22 I can give the plant some finishing bud density nutrients for a week or two and then flush time.
I am nowhere near a master grower and every mistake is a learning experience :)
Let me know if you have any questions/ comments/ concerns. Good luck with everybody grow! (hopefully they don't get burned like mine did this week) lol


Likes
1
Share
@PapaTerps
Follow
AlienZ Automatic - Greenhouse Seed Co.
Day 32 - watered with 1L of RO tap water, mixed with the defined nutrients and pH'd to 6.3. I've seen a few signs to indicate that she is about to start her flower cycle, but she's still in veg for now. I've removed her most top two fan leaves to allow the lower nodes to get more light, but other than that, I'm just letting her do her thing 💪🏻 from next week she will be in flower, so I will have to start increasing some of her nutrients and water volume to about 2 liters!
Day 35 - watered with 1L with nutrients l, pH'd to 6.3. She looks like she's about to start her first phase of bloom, so I've just quickly topped her and removed a few nodes to encourage an even canopy when she starts to stretch. I've also removed a couple of inward facing fan leaves to help with airflow - so she should stretch nicely 👌🏻
Processing
Likes
43
Share
@Jack_Greenstalk
Follow
added trellis netting this week to start SCROG. two layers close to eachother so I don't have to wait for entire square of growth to tuck under higher growth to keep flat even canopy. also minimizes my need for zip tie and garden ties needinf adjustment. I'm happy with veg growth thus far, and once the screen fills up with more green in a week or two these two ladies will both be ready to flip to flower. waiting on lower nodes to develop a bit more and get best use I can from a big(ish) 315 w LEC light.
the girls are getting foliar every 3 or 4 days. using heavy 16 foliar only at the moment but will follow their foliar mix as grow progresses.
smell has gotten much heavier, especially in nemo, the more blueberry pheno of the two, looking at the fan leafs I think V is more haze pheno with super thin sativa leaf structure.

Likes
37
Share
@eezeegrow
Follow
Well, I've had a problem. One of my automatic plug has failed and the light has been on for 3 days 24h/day. I've had some problems because of this but I think (I hope) I've recovered.
This will be the last week with ripen and then water for the last week. Buds are still nice and it seems that everything is ready for the harvest. 😉
Processing
Likes
3
Share
@Bigwhitty420
Follow
*Update Day 36 (1/26)*
Everything is looking up for the Berry and WW, Bubblegum got attacked by my cat. Lost a branch possibly two. =( Other then that it's coming right along.
Added scrog net
*Update Day 38 (1/28)*
Watered Berry and WW. Bubblegum was watered/fed yesterday.
*Update Day 40 (1/30)*
Watered/fed Berry and WW
Replaces my two 600w Vivosun, with a single 1200w Vivosun led/cob light. Nothing was wrong with the two 600w. Upgraded hoping it will save some money on electric.
*Update Day 41(1/31)*
Watered Bubblegum

Likes
2
Share
@CannaIGrow
Follow
Transplant week! Some of the girls in the tent started to droop but this one didn’t! She’s looking pretty good to me
Come hang out with us in the discord!