
Likes
Comments
Share


@growmoregas
Follow
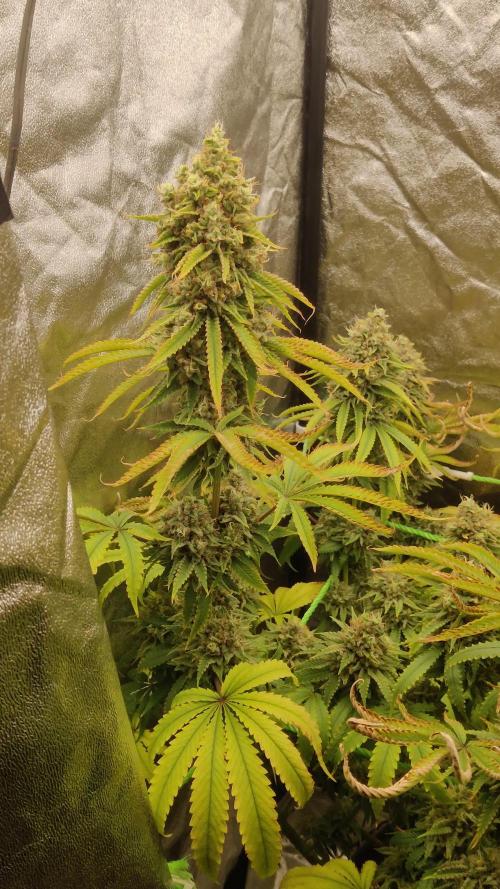
LIMETTA MARMALADE by JOLLY POND FARM
(Cotton Candy Kush / Mimosa) x (Koffee Cake / SkyCuddle Kush F3)
Bred by @landrace_bureau
Hunted/Selected/S1 by Jolly Pond Farm
@jollypondfarm
jollypondfarmacy.com
Sativa
Flowering Time: 68-73 Days
~~~~~
1/14/2025
res were all swapped yesterday except for #3 ,
roots barely reaching through, still top watering, as soon as i see its 5 finger leafset, i'll switch to veg nutes.
VPD @ 0.9kpa ish
DLI @ 30 ~
~~~~~
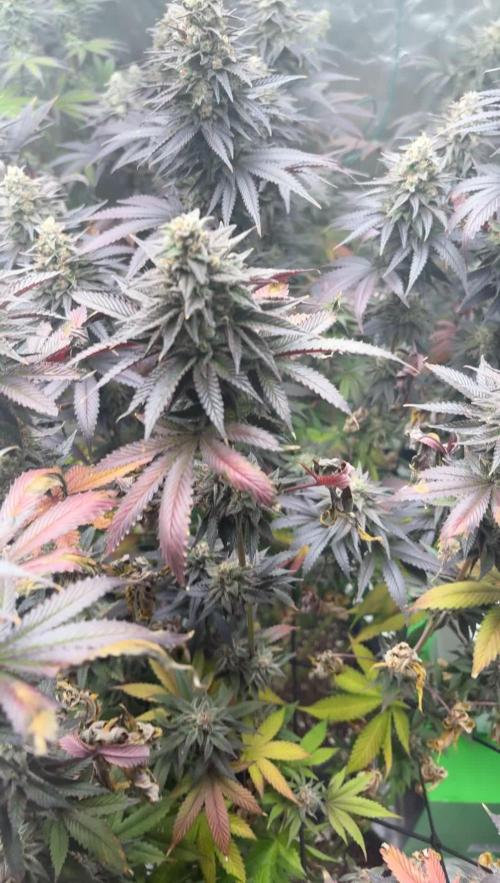
1/21/25
i have noticed that the limetta marmalade are a litttle more sensitive to light at this stage than most of what i am rocking, but that could be because i've gave them a little light to begin , so i can't say for certain.
however everything is looking good.
Follow me on Instagram @growmoregaas & Twitter @growmoregas
Likes
10
Share


@barlobruz
Follow
8/22/2021
- Did some mid-flower defoliation to increase airflow and to prevent mold and mildew.
- Split the top right main from trying to train her down and spread out the canopy, supporting with tape and twist ties.
8/23/2021
- Top right main is still vigorous after split.

Likes
14
Share


@Curbyourenthusi
Follow
********************************************************************
START OF WEEK
Went to the grow store and wound up with an AC Infinity EVO6. It should be a nice light for the future, and when my warranty replacement comes back, assuming that won't be an issue, it'll be nice to have a decent back-up. That's the bright side, but I am a little bummed about laying down the cash with ten to 14 days left. That part is the kick in the nutes. Fine, moving on.
As for the grow, it's plowing forward. These plants are doing all the things we want them to do right now. They're getting fat, they're getting sticky, and the fade is fading away. Some branches may call for some last minute support, but for now the sucked-in tent walls will continue to suffice. The feed is still at 1100ppm and pk boosted, but the plan is to finish this week around 750.
********************************************************************
END OF WEEK
Day 63 of flowering has arrived. I've backed off the nutrients. We're now sitting at 850ppm with about 6-8 gallons in the system remaining. This should equate to a Thursday refill with no feed, and then a Saturday or Sunday chop. VPD has been running a touch high this week, but that's not a concern. It's staying in the ideal range for most of the lights on period, and then trailing up in the last few hours to around 1.7-1.8. No biggie. The new light is really nice, but it runs hotter than the combo of the S22 and S44 (500W total), and that's with the EVO6 driver outside of the tent. This also isn't a big deal. The max tent temp is around 84, and before that wouldn't get past 82. Not a huge difference, and potentially better for the plants with the additional heat. I've got two CO2 mushroom bags in there, so more temp should mean more production at that level.
I'm excited for this grow to finish and I'm looking forward to sampling the variety. I'm definitely using half, if not more, to make bubble hash. I'm probably just going to run it all together, as opposed to having runs for each pheno. I'll sample the tops independently, and smash rosin by pheno, but I'm not sold on isolating the hash. Seems like triple the work, but I've got a week to make further considerations, so we'll see.
This will be my last grow until I sell this place and move into my next place. I'm going to miss growing. It's brought me a ton of peace by giving me something to anticipate, study, and take pride in. It's such an enjoyable hobby. I'll miss it in the time being, but I'm grateful that I won't need to step foot inside of a dispensary in 2024. Big win there! Everyone should grow their own.

Likes
15
Share


@bagofbunnys
Follow
This week some of the plants are starting to show a few brown pistils on the calyxes as an indicator that peak bloom period is occurring. I don’t expect them to do much other than fill out a bit at this point with exception of some of the more Sativa phenotypes like the Tangerine Dream. One of the these seedplants failed to bloom properly it may lack the autoflowering genes. I don't want to risk damaging the roots in the system by culling it. I might leave it in to see what happens and transplant it before I clean out the system for the fall grow.
I’m pretty satisfied with the autoflower grow so far but I do have some room for improvement:
1) Next grow I will use CNS17 Ripe possibly from start to finish to see if that improves the flowering of the plants. I feel that my feed is high in nitrates so I am starting to flush this week.
2) You can see by the plants all showed variation in physical appearance and Trichrome production. The only plant that has gone purple out of the batch and is a high yielding Gorilla Zittles from Barneys. If I grow autoflowers again in this system I want to choose plants that are a little more uniform. I think the Botanicare Turbo Garden and similar systems are best suited for clones as they grow a little more uniform. Autoflowers even from the same strain have a wide variation which is cool because every seed is a surprise.
3) I need an overhead plant support. I am not sure how the plants survived some pretty high winds. One stem broke and I repaired it enough so that the plant actually survived.
4) I'm working on a microcontroller sensor node to allow some automation to the system.
My favorite plants in this batch are the Dinafem Amnesia Auto CBD based only on aesthetics at this point.
The Blue Dream Auto from Humbolt is one of the smaller plants but it has quite a bit of resin on it. The smaller plants may have been stunted as my nute level from the beginning was approaching upper limits for leaf burn (1.7-1.8 EC). I had since backed down but over-fertilization in early stages is not reversible and comes at a cost of plant health and vigor.
I took a video to try and show the overall garden progress. I did not defoliate this grow which makes it hard to see the individual flower structure but I will have defoliated harvest photos coming up soon!


Processing
Likes
31
Share


@LockDownGrow
Follow
so the development on this lady has been VERY slow and has made very little bud production at all she also did not really stretch out at all from flower her buds are at the same stage at week 7 then the blackberry was at week 2 really , she is showing nor has all her life of any deficiencies what so ever , she has stay very short and stocky with good leave production " before i defoliated she was a real nice little bush " she smell amazing and the only was i can describe it when i touch her sugar leaves is exactly like chewing on the lemon "yellow" skittles sweet so can see exactly where the name came from for this strain.
she as you would expect has not been drinking a great deal and i am still able too only feed her 8 pint of feed per week where as her sisters are taking 14 pints ,
but other than her staying small and not wanting too really produce yet she has been easy too grow even for a newbie such as my self and has been trouble free ,

Likes
5
Share

@DerEkstaseHase
Follow
Sie Blüten werden dunkler, nicht mehr lange bis zur Ernte.
Die Seneszens hat begonnen, die Pflanze remobilisiert jetzt ihre letzten Nährstoffe aus den Blättern, deshalb werden diese von Tag zu Tag etwas gelber.
Der Drain ist wieder in einem guten Bereich und die Pflanze hat inzwischen das schlimmste überstanden. Die Nährstoffe werden in den nächsten Wochen stückchenweise reduziert und in ein paar Tagen werde ich den ersten Trichom Check machen.
Bis dahin darf die Dame noch glücklich weiter wachsen!
:)

Likes
15
Share


@Webacca
Follow
Sunset Sherbet, wieder sehr schnell unterwegs.
Madame setzt Wasser und Dünger in gute 20cm/w um. Respekt.
Immer wieder Entlauben und Blüten anstarren. Sonst nicht viel zu tun.
Schnelldurchlauf der letzten Woche am Ende

Likes
41
Share


@GermanGrow182
Follow
War 10 Tage im Urlaub. Eine Woche wechselhaft, 3 Tage heiß. Sie sind gut gewachsen. Blue mystic: habe eine getoppt und eine gefimmt.
Die getoppte skywalker schießt in die Höhe und muss bald wieder getoppt werden. Fat banana ist sehr stark im wuchs. Bald werd ich die mal entlauben.Es läuft gut. Bis nächste Woche ✌️


Likes
119
Share


@Natrona
Follow
****DIVINE SEEDS *****
*****OPIUM*****
Sponsored grow
***DIVINE SEEDS *****
Week 11 6/16-23 Opium Loves the outside. She is tall and lanky, towering over the other outside girls: Fractal, Lemon Cake and Drizzle. All are showing yellowing leaves so everyone is now getting nutrients with feedings.
I saw a Japanese beetle on my Lemon Cake and some small holes in the leaves so I added 1/2 tsp neem to the feed solution 6/12. Also started using fish & kelp. I'm still watering 1 gal per plant when I feed 2x/week. With the heat and humidity, I water daily but do not feed daily.
Nutrients:
TPS1 15ml/gal @4 gal =60ml
Signal
1.5 ml
Cal mag 10ml @4 gal
Recharge ½ tsp/gal =10ml
Kelp & fish GS plant foods 1/4c /gal @ 4 gal =1c
Neem ½ tsp (for Japanses beetles)
Ph5.7
PPM 1414
Solution Temp 85
Outside temp 92f
6/19 Opium had a Spa day. Hair cut. All large umbrella fans were removed. Since she is in flower, she didnt need excess vegetation. This defoliation reveals true sativa form. There are 6-8inch stretches between nodes. I added a 6 ft support pole since we've had thunderstorms with high winds. I didn't want her majestic crown to snap off. I water daily and feed 2x per week now.
*****OPIUM*****


Likes
16
Share


@ChewiesGrow420
Follow
Today on day 17 from date of birth Iam preparing a worm casting tea. In a cheese cloth bag ,Made up of 2 cups of worm castings 2 tablespoons of unsulfured molasses,2 tablespoons of mineralized phosphate (bat shit) ,2 tablespoons of soluble seaweed extract . 2 tablespoons of alfalfa meal 2 tablespoons of all purpose 4-4-4 all Gia green products other than. I also sprinkled in some great white premium mycorrhizae inton2 gallons of water. Tea will brew for 24 hours before applying.


Likes
Comments
Share

@MisterGroot420
Follow
Всем доброго времени суток ✌️
Смотрите со 105 дня
Наконец добрался до своего минигрова и переделал коробку,извиняюсь ,что долго не выкладывал,работаю сейчас почти каждый день и бывает не особо было времени идти на локацию,тут ещё передержал растишки в шприцах,поливы бывало пропускал,быстро сохла земля,так как корни уже вылезали из под низа,потом после пересадки,растишки тупили больше месяца,я думал всё,хана им,но выходил их,чему был очень рад,дальше ещё был момент,что мягкие поддоны в боксе прохудились от старости и когда поливал обычный гров,то вода проливалась после полива и дно коробки становилось мокрым,затем сверху от тяжести лампы,коробку промялась,вообщем самое главное растишки живы и мой проект продолжает радовать Вас и меня,сделал каркас из опор для растений, теперь точно спокоен,но вот момент немного не продумал,по поводу тренировок растишек,так сказать изподвыподверта ,но ничего через тернии так сказать,в шприцах делал спецом,чтобы потом удобно было пересаживать на вулкан,делаю полив ровно в жерло вулкана )) с такой жарой,пришлось делать отвод от напольного кондея к нижнему притоку, 105 дней от каски,а я ещё не разу не кормил удобрами ,только давал от биобаза витамины,теперь точно больше не пропаду и буду часто выкладывать контент,впереди грандиозные планы ,ну и надеюсь получится сделать изюминку к концу грова

Processing
Likes
5
Share


@Ensign420
Follow
Week 02 Introduction
This week has been a bit of a struggle. Had my first experience dealing with slime and brown algae. But I think adding enzymes and increasing the beneficial bacteria helped to fix the issue. Also experienced nutrient burn for the first time. My nutrient solution strength got as high as 671 PPMs. So backed it down to about 430 PPMs during the end-of-week reservoir change. Also cut Hydroguard (expired?), CaliMagic, and Superthrive from this grow. Now she's still stunted, but is starting to recover. Hopefully...
[START OF WEEK 02]
Day 01 - Monday - 08/10/20 - Total Days: 008
-----------------------------------
- [0830]: Still looks a bit yellow. But getting larger!
--- Solution strength was at 248 PPMs.
--- Just topped off with a bit of distilled water
--- PH went up to 6.1 so PH'd down to 5.8
--- Ran the top feed for a bit to wet the hydroton.
- [2130]: She's looking even more yellow now.
--- Even the new leaves are really yellow.
--- Decided to add more base nutes.
--- Added 4ml of Sensi A
--- Added 4ml of Sensi B
--- Now at about
--- Solution Strength went up to 304 PPM.
--- PH was at 6,
--- Also raised the water level a bit more.
--- I really hope it's a nutrient deficiency and not an over-watering issue.
--- Please live!
Day 02 - Tuesday - 08/11/20 - Total Days: 009
-----------------------------------
- [0830]: Looking less droopy. But still yellow.
--- Decided to do a reservoir change.
--- 4.5gal of distilled water
--- 8ml of Sensi Grow A
--- 8ml of Sensi Grow B
--- 8ml of Voodoo Juice
--- 4ml of B-52
--- 4ml of CaliMagic
--- 4ml of Hydroguard
--- 4 drops of Superthrive
--- PH'd down to 5.8
--- Solution strength: 302 PPM
--- Since I didn't want to risk over-watering the rockwool, I did not to do a top feed, may do one tonight after the sleep cycle (lights are still set to go off at 10am and back on at 4pm).
--- As I was doing a reservoir change, I noticed that the tubes and bucket were a bit slimy. Didn't really stink or anything. Is this normal? Maybe due to the Hydroguard and Voodoo Juice?
--- I hope she gets better soon!
- [2215]: Getting larger! But still yellow.
--- Also can see a root growing through the net pot! Tiny little thing but it's there! Will have to start dropping water once more appear.
--- After looking over a few DWC diaries using AN nutes, seems like my solution strength is still too low. Most around this stage average around 500 PPMs with about 4ml per gallon.
--- Top fed for a minute to wet the top of the hydroton.
--- Solution strength went down to 263 PPM.
--- Added 8ml more of Sensi A
--- Added 8ml more of Sensi B
--- Now base nutes are at 16ml for 4.5 gal of water.
--- PPMs went up to 411.
--- Still lower than 500 PPMs, but that's okay.
--- PH was at 6. Not sure if I should adjust PH using AN nutes. So going to not ajdust unless PH goes above 6.1.
Day 03 - Wednesday - 08/12/20 - Total Days: 010
-----------------------------------
- [0830]: Looks like more root growth!
--- She still looks yellow. But leaves are perky.
--- PH was at 6.2 so lowered down to 5.8.
--- Solution strength was at 394 PPMs
--- Since roots are still growing, I decide to lower the water level a bit. Now water level is a bit below the net pot.
- [2200]: Root is getting longer!
--- Slime is returning. Not sure why.
--- Solution strength: 357 PPMs
--- PH: 6.1
--- Decided to add an enzyme along with more beneficial bacteria to hopefully cure the slime.
--- Added 16ml of Sensizym
--- Added 5ml of Hydroguard
--- Added 8ml of Voodoo Juice
--- New solution strength: 430 PPMs
--- New PH: 6.1
--- Top fed for a minute.
--- This slimy residue is really freaking me out! I hope the added enzymes will help eliminate the slime.
--- Going to do a full reservoir sterilization/nutrient change over the weekend. Please survive until then girl!
Day 04 - Thursday - 08/13/20 - Total Days: 011
-----------------------------------
- [0930]: I think the enzymes worked! There is little to no slime now!
--- Although I think the root was also dissolved in the process. It's now just a little stub sticking just below the net pot. The enzyme is also suppose to dissolved dead roots too but guess that root was too weak? Not sure what happened there. But I think the slime is cured!
--- Solution strength went down to 395 PPMs. Decided to add more base nutrients.
--- Added 8ml of Sensi A
--- Added 8ml of Sensi B
--- Added 4ml of B-52
--- Solution strength went up to 598 PPMs.
--- PH was at 6.1
--- As long as the PH is between 5.5 and 6.3, I'm not going to use PH Up or Down. But still will monitor PH levels.
- [1715]: Checked up on her after her nap and shes looking alive but stunted. But no slime!
--- Decided to add some sugars to help maintain the enzymes and beneficial bacteria.
--- Solution strength was at 587 PPMs.
--- PH was at 6.2
--- Added 8ml of Bud Candy
--- Solution strength went up to 671 PPMs.
--- PH also went up to 6.3
--- Lowered water level a bit to hopefully promote more root growth.
--- Top fed for a minute.
--- She is getting bigger, but still looks yellow.
Day 05 - Friday - 08/14/20 - Total Days: 012
-----------------------------------
- [0915]: Leaves look a little burnt on the tips. Still no slime.
--- Going to back off on the PPMs to hopefully fix the nutrient toxicity.
--- Solution strength was at 632 PPMs
--- PH was at 6.3
--- Added/Removed water until PPMs were at 536.
--- PH was still at 6.3
--- Raised water up a bit, then top fed for a minute.
- [2200]: Looking better. Still yellow though.
--- Solution strength: 514 PPMs
--- PH: 6.5
--- Added PH down.
--- New solution strength: 518 PPMs
--- New PH: 5.2
--- PH was kind of high. So decided to PH down. Had to use quite a bit to bring it down. But eventually got it to drop down to 5.3. A little low, but so far, the PH has always gone up so wanted to start it really low.
--- Ran the top feed for a minute to re-saturate the top of the hydroton.
Day 06 - Saturday - 08/15/20 - Total Days: 013
-----------------------------------
- [0830]: She looks stunted. leaves are still yellow.
--- Solution strength: 514 PPMs
--- PH: 5.6
--- Top fed for a minute.
--- Not sure what to do at this point. Going to do another reservoir change soon. Hoping she lives until then.
- [2145]: Looking pretty much the same.
--- A bit of slime has returned. Since I've been diluting the nutrient solution, the enzyme ratio has dropped. So I guess this is expected.
--- Also noticed that slime build up was on the air-stones. Never really checked the stones so not sure how long that has been there. Looks brown too, which can't be good.
--- Going to do an H202 sterilization of the system (minus the net pot) tomorrow so did not add anything.
--- Lowered the water level to below the net pot.
--- Then top fed for a minute.
Day 07 - Sunday - 08/16/20 - Total Days: 014
-----------------------------------
- [0900]: STERILIZATION DAY!
--- Decided to skip today's night cycle for a deep clean.
--- I'm hoping that skipping a night cycle won't be too stressful.
--- Temporarily moved her to a new bucket.
--- Used about a half of gallon of straight distilled water to flush out the net pot.
--- Drained the system and wiped up all the brown sludge. Also removed the air stones and cleaned up all the goo.
--- Filled the system with 2 gallons of distilled water and at least 30ml of food grade hydrogen peroxide (35% strength).
--- Yea its a lot, but since I'm not going to sterilize the system overnight, I went with a really high doseage. Basically I kept adding until I started to see little bubbles start to form.
--- Then I ran the water pump.
- [0915]: Boiled the air stones in tap water for about 10 min. Then reconnected them to the airlines.
--- I let the air stones and hose soak in the sterilization solution for about 5 minutes so the peroxide can absorb into the stones. Then ran the air stone to help mix and agitate the solution.
--- Occasionally, I'd repeat the process of turning the air pump off for a few minutes to let the stones soak.
- [1000]: Covered the top two row of holes of the net pot with some aluminum tape. Hopefully this solves the light leaking in through the hydroton.
- [1200]: Used an old toothbrush and scrubbed the pump clean. Then drained the system.
--- Refilled with more distilled water and peroxide. Again added a lot.
--- Ran system again to sterilize even more.
- [1530]: Drained the system and refilled with distilled water to rinse.
--- Ran the system for a few minutes, then drained and rinsed again.
--- Did this a few more times over about an hour.
- [1630]: Added 4 gallons of fresh distilled water.
--- Added 15ml Sensi Grow A
--- Added 15ml Sensi Grow B
--- Added 12ml of B-52
--- Added 16ml of Voodoo Juice
--- Added 16ml Sensizym
--- Solution strength was at 430 PPMs
--- PH was at 5.6
--- I was going to add Hydroguard, but I think the bottle is expired. Since 2017 or 2018!? I think Hydroguard is good for up to 2 years from the date on the bottle or 6 months after opening. So not going to use from now on. I wonder if this could have contributed to the slime build up.
--- Also removed the CaliMagic and Superthrive too. Going to only use AN products to eliminate the chance of incompatible nutrients.
--- Placed her back in the bucket and top fed for a minute.
--- Here's hoping for the best. Going to let it ride until morning! Please feel better!
[END OF WEEK 02]

Likes
9
Share

Likes
7
Share


@Dargaville_Dukes
Follow
Poor babies! They've definitely had a rough start. I'm fairly certain now the issue has been too much moisture in the soil. I believe there are a few factors that have had an impact:
1) Obviously, giving them too much water. In the first week I gave 90ml into their 1 litre pots over two waterings. I thought this was okay because the top soil was completely dry between waterings. Someone suggested that seedlings don't need additional water for the first 10 days so I'll try that next time
2) Feedback I've had is that my soil mix is quite heavy @ 63% soil, 25% Coco, 6 % perlite + 6% vermiculite. In future I'll increase the perlite portion to about 40%
3) Also, I just noticed that the plastic pots I'm using have very small drainage holes. I think this has caused moisture to accumulate at the bottom of the pot. Yesterday I pushed my finger all the way to the bottom of the pot and it is much wetter at the bottom than at the top.
So yeah, tough start. But they're still growing, albeit very slowly. I trust they'll survive.

Likes
12
Share


@ZzTooRightOGzZ
Follow
She doing so good after the lst I did earlier this week.
Topped her towards the end of week 3.