
Likes
Comments
Share


@Hawkbo
Follow
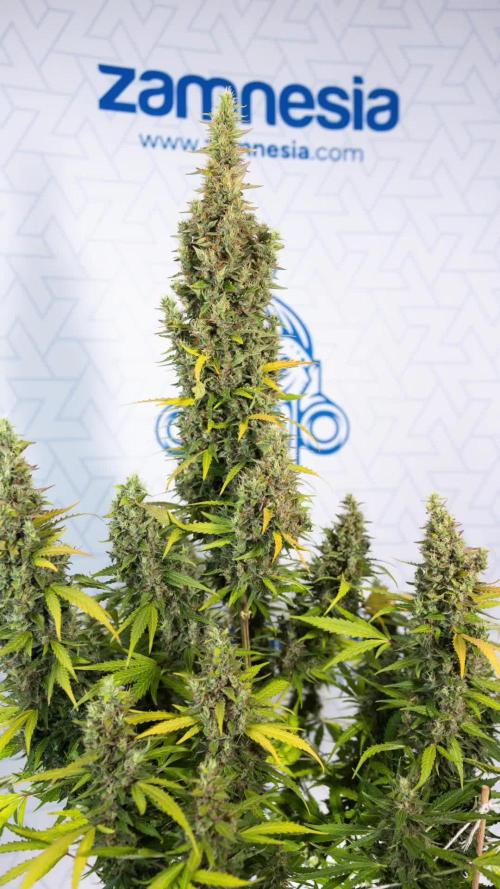
Some strains/cuts just need to be grown back to back, so far all 3 of these qualify. This strain is on track to run a little longer than most of the crop with the flush atleast a week away but I can already tell it will be worth the extra time. 2 and 3 are on the left and 1 is the tall one on the front right. They have a pungent creamy vanilla frosting like nose on them. All are very consistent in bud structure they are just put together very nicely. From this crop and my last crop only I think I could fill a 4x8 with fire using one of each plant in 3 gallon bags. This is the main reason why I prefer photoperiods these days other than the fact they are generally easier to grow, I like being able to run the same plant back again when they are at this level you cant go wrong. I had a wisdom tooth taken out today so I'm gonna have some time to take some good pics I think which is over due if anyone wants to check back in when the cover photo changes. Rain science grow bags are far and away the best bags I've used and if you want to try them they are inexpensive and you get 10% with the code bangdang.
Took the pics on Saturday with my 40mm free hand without any extra lighting just the flash


Likes
2
Share


@Kirsten
Follow
16.2.25:
I decided to check out the lower canopies of all plants to see if I need to get rid of any foliage.
I did get rid of a few small branches and leaves.
However, whilst I was doing this, I saw more garden pegs from my LST remaining.
There were about 6 or more in Pink Mist alone. Additionally, on Watermelon, there were some left in, too.
I'm so annoyed to see that because the plants are really stretching, and I could've potentially disrupted this by leaving the pegs in for all this time without realising it.
🤞 that I haven't compromised things too much. We'll see.
I watered today with 2ltrs of dechlorinated water PH'd to 6.3 containing the following nutrients;
♡ .8g Green Leaf Nutrients PK booster
♡ .5g Ecothrive Biosys
I ordered quite a few things for the garden. I got Greenleaf Nutrients Sea K(elp) and Mega Crop Parts A+B. To go with their PK Booster I got last month. I'm excited to try it all together. Next run, maybe just using these. We'll see how it goes.
18.2.25:
The plants are going crazy for water! Everything is getting used right up so fast!
Today, I decided to add some more Black Strap Molasses to add some carbs and other micronutrients. I'll add the jar with the label in the photos section above.
I watered a very small amount to each plant.
What I put in:
♡ Black strap molasses 150g
♡ 2g Sea K(elp) Greenleaf nutrients.
I dissolved everything in 4ltrs of dechlorinated water PH'd to 6.4.
19.2.25:
I received the majority of the garden purchases that I made. I'm still waiting for the Ecothrive Life Cycle. I wanted to top dress, but it's been delayed unfortunately.
I am using my Greenleaf nutrients products which I bought on Amazon. I got the Mega Crop 2 part system Part A and Part B. I have the Sea K(elp), and the bud explosion PK booster.
I really wanted to get some of their sweet candy asking read many positive reviews. Unfortunately, for me, this is unavailable to buy currently. So that's a little disappointing.
I needed to do a good watering so when my nutes were delivered today, I got excited 🤗
I watered 2ltrs of dechlorinated water per plant, PH'd to 6.4, containing the following nutrients:
♡ 1g Mega Crop Part A
♡ 1g Mega Crop Part B
♡ .5g Sea K(elp).
The plants drank this up within a few hours.
I'm going to try and hold off on watering in hopes that my Ecothrive Life Cycle will arrive so I can top dress and water it in then.
20.2.25:
My Ecothrive Life Cycle arrived yesterday, and the plants are ready for their top dress and a good watering in.
I have some Biobizz Light Mix, Canna Coco,and perlite. I'm going to use this as a base to mix my amendments in.
I'm going to fill my 5 gallon bucket with about 4.5 gallons of my top dress mix. I will distribute this across 6, 4-5 gallon pots. Then I will water in well with Greenleaf nutrients Mega Crop Parts A+B and Sea K(elp).
I've made a crude attempt to video mixing my top dress. Don't listen to the audio. lol, my YouTube didn't stop playing whilst I recorded this 😂
So anyway, I added the following amendments to the above base mix of 4.5 gallons;
♡ 3 TBSP Ecothrive Life Cycle
♡ 3 TBSP Vitalink Bat Guano
♡ 3 TBSP Ecothrive Charge
♡ 1 TBSP RHS Mycorrhizal Fungi granules
♡ 6 TBSP Ground Cinnamon.

Likes
5
Share


@Mrs_Larimar
Follow
2022-09-13
The Mimosa Purple Kush doing well
I think iam going to Harvest them in the next Days
Trichomes are milky, Plants are fading
Here is the Code for my Nutrients:
https://greenbuzzliquids.com/en/shop/
Code: mrs_larimar
xxxxxxxxxxxxxxxxxxxxxxxxxxxxxxxxxxxxxxxxxxxxxxxxxxxxxxxxxxxxxxxxxxxx
Mimosa Purple Kush Autoflower is a fruity sequel to our popular Purple OG Kush Feminized.
This new Mimosa Purple Autoflower has Purple OG Kush, Mimosa and
OG Kush Automatic as its ancestors making it a true recommendation for every Kush lover.
It’s not just a super nice strain but also great eye-candy due to the nice purple and blue hues.
Because it’s an autoflower strain, Mimosa Purple Kush can be grown in any climate and you’ve got a
harvestable plant after just 10 to 12 weeks after germination
The Mimosa Purple Kush Autoflower is indica dominant and therefore an ideal strain to grow on a balcony.
Because they stay compact if you grow them in a pot (+/- 60cm) then you don’t have to worry about them becoming
too large and on open ground they won’t be able to grow past 70 to 90 cm.
For an automatic Mimosa Purple Kush has a very high amount of THC of 18 to even 20%!
This guarantees a very relaxing high that won’t disappoint even veteran Kush smokers.

Likes
11
Share


@GorillaZativus
Follow
Videos:
10 días despertando , transplante 12 días , algunos sistemas radiculares y despertando post transplante .
🌱Solución de riego a micorrizas :
Mycochum y luego riego completo cuando despierten .
Ocupamos granular y great white en polvo para transplante , mitad y mitad.
Ph: 6,0
Ec: 0,7
🌱Solución riego a foleo 1 hora antes que despierten :
1 litro : proactive 5,0 ml y knactive 2 ml.
Ec : 0,5
Ph: 6,0
🌱Sumamos alfalfa alrededor de los tréboles
👑Actualización Jardin 18-19 días .
⌛️Videos :
🎥18 días , con hambre y sueño.
🎥19 días antes de dormir
🎥19 días despertando post foleo y post preventivo de tierra de diatomeas , listas para transplante en 1 semana .
🌱Solución foleo 2 litros :
knactive + proactive (4,0 ml ) y ( 0,8 de proactive ( melazas , quitina , etc ) Y sumamos preventivo después que se secó el foleo.
Ec : 0,4
Ph: 6,1
🌱metimos amarres al central y full lst .


Likes
19
Share


@Mazgoth
Follow
It’s better than it was before.This week I’m giving only water and the next one I will flush with flawless finish
Likes
9
Share


@Chucky324
Follow
Hello This is the end of week 13 and the beginning of week 14 of veg.
I didn't report last week because I was still harvesting the 13 plants of Captain Future. Put the last plant in the curing bags last night.
I'll be switching over to flowering either tonight or tomorrow by taking out the lights and opening the tent at 8 am and closing it at 8 pm.
Each plant is getting 2 gallons of rainwater for now. Still lots of compost in the pots for food for them.
But I'll be mixing up some flowering solution to put in the 15 gallon reservoir and giving each plant a few minutes each day.
It will last for 6 days and I'll clean and mix some new nutrient on the seventh day. I'll hand water when the pots seem dry.
Each plant has filled their space now and it's time to flower.
OK. Have Fun.
Chuck.
Likes
13
Share

@Bread_n_Buds
Follow
Our Karen Kush Automatic #1 is the biggest lady of this autoflowering series, reaching 130 cm (5.2 ft) tall and boasting a large yield.
The buds are plentiful and of high quality, both in the main cola and the periphery. We'll definitely exceed 100 grams in an 11-liter pot, which is excellent.
Maturity - The resin content is excellent. The trichomes are amber (about 20%), mostly white/opaque (40%), and several are still clear (40%). The pistils are 60% red, 40% red. I harvested slightly early because I wanted to preserve the most energy-dense properties of this plant.
The overall shape of the plant is truly splendid. It was harvested properly, perhaps a little early, but the important thing is to let it turn yellow, otherwise the flavor will be affected by the final, over-fertilized finish.
Techniques chosen: As mentioned, after a great LST plant, this one was left to grow, and it's a monster.
We're 100% organic and 1000% Plagron, as always.
The soil we've chosen is the recently launched Plagron Bio LightMix, which will allow us to start with smoother and more reliable watering, without the sudden changes that liquid fertilizers can cause. A week's worth of soil is enough, so don't overdo it.
Choose your preferred style and calculate your results on the website:
www.plagron.com
Visit the new Growshop area on the Zamnesia website:
Z - https://www.zamnesia.io/it/531-growshop
A high-yielding strain
above average!
Z - https://www.zamnesia.io/en/10783-zamnesia-seeds-karen-kush-auto.html
Z - Zamnesia Seeds - There's no need to complain about this strain: Karen Kush Auto will satisfy even the most demanding smokers with its dense flowers, fragrant terpenes, and high THC content. Created by crossing Monster Bud Kush, White Widow, and ruderalis, Karen Kush Auto boasts first-class genetics that leave no room for complaint. Inhale its sweet, spicy, and diesel aroma and enjoy the enveloping physical effect. After a few minutes, the only thing you'll want is a comfortable place to relax. And the best part is that you won't find this strain anywhere else, as it was created by the geneticists at Zamnesia Seeds.
Karen Kush Auto is a slightly indica-dominant strain, which manifests itself in its bushy structure, hardiness, and moderate height. Despite its name, Karen Kush Auto is anything but demanding. It only requires good soil, regular watering, and fertilizer to fuel its vigorous vegetative growth. When it enters the flowering stage, it will reach a final height of around 70-90 cm, depending on the space available.
If you like what you've read about growing Karen Kush Auto, wait until you smoke it. This 60% indica strain produces dense flowers loaded with resin and vibrant terpenes that evoke aromas of sweet citrus, black pepper, and diesel. The floral notes create the perfect backdrop for the pungent diesel scent. And after smoking, relax and let the waves of euphoria and strong physical intoxication glue you to the couch with a big smile and half-closed eyes. It's perfect for evening use or weekend relaxation!
You know, but I recommend it. You'll find so much beauty here, essentially "all the best nature has to offer."
Z - www.zamnesia.com
Music // www.radionula.com
+ Feng Shui Music
+ Frequency 432 Hz

Likes
16
Share

@carlitoshaze44
Follow
Día 12/1/26
Día 2 de la semana 8 de floración.Entramos en la octava semana con problemas.
De los tuppers quitadores de humedad que tengo,uno se me volcó enganchándolo con mi artilugio una lanza con gancho para vaciarlo y cambiarle el recambio.pero se derramó la mitad del contenido en una zona media - casi atrás del armario y quemó varias plantas.
2 de manera grave y otras 2 no tanto.
Me es una lástima la verdad,las atendí ayer con un gran lavado,añadiendo en esa zona mucha agua, a través de la manguera del grifo empoandolo.
Espero que no siga a más y puedan terminar los 15 días que les queda.
En dos días,añadiré un riego de azucares con un poco de PK.
En la entrada el foco.
No está funcionando bien,creo que el fallo viene del driver o el dimmer.
No sube la potencia y comienzan a fallar los leds
Añadiré dos lámparas de 100w cada una para reforzar.
Y cuando acabe el cultivo meteré las dos nuevas lámparas marshydro sp3000.
Día 13
Las plantas están bien jodidas,después del lavado de raíces,solo cruzo los dedos para que puedan finalizar la floración.
Dos de ellas llegaron al punto de quemarse dos canopias en el centro por el debido exceso de cloruro de calcio que contienen los contenedores de absorción de humedad.
Por lo demás las demás chicas están estupendas.
Día 15
Se quedaron bien fastidiadas ya las quemaduras pararon hace un día.
Quemaron prácticamente 2 plantas casi al 70%
Y las otras 5 están 50/50%
Me a jodido mucho.. casi finalizando ya solo nos quedan 12 días de cultivo. 🤩
Podría haber salido perfecto en salud al menos.
Rendimiento lo mejoraré en la siguiente tanda.
En el día de ayer di el último riego de abonos .
Ahora en adelante todo va a ser agua y limpiar raíces.
Si estuvieran todas buenas de salud ,seguiría dando abonos en la siguiente semana.
Pero prefiero limpiar y preparar el terreno también así de exceso de nutrientes para las siguientes…
Día 16
Ya estamos a punto de entrar en la octava semana.
Tome la deicision de dejar las plantas que se quemaron parece que ya se pararon.
Pero las mantendré con esperanza de poder madurar los demás cogollos que no se han visto afectados.
Por lo demás las plantas están fantásticas.
Hay alguna que tiene un pequeño bloqueo de nutrientes,debido a las grandes cantidades de fertilizante de estas últimas semanas.
Pero mañana ya empiezo con los riegos de lavado de raíces,agua con enzimas.
Muchas flores empiezan a tomar tonos de las bajas temperaturas.
Morados y azules.
No podré sacar el rendimiento que deseaba en este cultivo por una torpeza de volcar, el desumificador desechable.
Pero ya vamos preparando la siguiente ronda de amnesia y esta vez si lo haremos verdaderamente bien!


Likes
15
Share


@DjgrowingMj
Follow
It's HARVEST Day!!!! Added another week of flower to give her time to dry and be able to give some accurate weight numbers. She was a real pleasure to grow, really excited to smoke this one. I'll be back in a couple weeks to give a smoke report post dry/pre cure.
Happy holidays growmies!!


Likes
4
Share


@cannabisisland420
Follow
Plants are developing great root structures. Plant A has roots coming out of the bottom of the pot. Will get ready to transplant soon, possibly at the end of the week.
8/23 transplanted to 5 GL pot
8/24 full day after transplant and plant looks great.
8/25 Full feeding 70F 5.8 PH 698PPM
Processing
Likes
2
Share


@DIRTYKEG
Follow
Fun time im excited it's turning out pretty good allot allot of learning as you go but it's working I think... the GSC started dropping a couple leaves but I think it v was just cause it got to dry flowering stage seems to suck up allot more water....


Likes
4
Share


@Purkle
Follow
I love these last stages!
The girls are still stretching but I decided to give them a defoliation a week early. If you look back on last week you can see how bushy they have gotten so there was a definite need to get some light to the lower bud sites. I can definitely start to smell the familiar gassy aroma coming through now so may be time to get the fan and carbon filter cranked up.
I will be top amending the soil again at some point this coming week but as for now I have just been feeding with water and liquid seaweed.
I've had a few compliments from friends on the good health of the plants this time round compared to previous grows when the Sour Diesels had nutrient issues, not helped by the Coco medium I was using. I'll be sticking to this choice of soil and organic nutrients with the results I'm getting so far! I mean, look at those pistils!! 😁
I love that I've had 93 views on this diary so far! Thanks to everyone that's checked it out but I'd love some feedback? If you like what you see please drop me a like and if not, let me know what I can improve or do differently?
I've got another video for you guys from today so I hope you enjoy it :).
Until next week!
✌️

Likes
43
Share


@UnorthadoxDude
Follow
Hello and welcome to week 7 beginning for Nesia, the largest and most advanced 6 week old plant I have ever grown.
I update daily so week 6 is now complete. Please do check it out!
I have added some comparisons shots of Karen, the oldest girl of this [G2] series to show just how impressive Nesia is. Nesia is 25 days younger than Karen and she is already a larger plant. This diary is not very popular or comment filled right now, but as this grow progresses I really think it's going to gain some attention. Nesia is going to be big.
Day 44: Nesia stretching fast now.
Day 45: Flowering is going well. I have adjusted the timer such that the main tent is now getting 20/4 upped from 18/6. After monitoring DLI at 18/6 for a week I am unhappy with the overall level but because of the varying heights of the plants I am limited in what I can do in adjusting the light height. Some areas were only getting 20 DLI. So I have rearranged to have the taller plants on the edges and the lowest in the middle and doing it this way all plants are getting between 35 and 50 DLI at 20/4 - although one or two cola tips here and there are getting 55. Will monitor for a week.
Day 46: Fertigated 5l
Day 47: Nesia is really moving into flower strongly now. Pistil development has started proper, stretching rapidly.
Day 49: Nesia starting to pose me a challenge. She is big. Now by far the largest plant. She has reached 50cm height and 70cm across.
I will add proper photos later and do a week summary.
Day 49: Nesia is stretching really fast now. I hope she doesn't stretch much more but I fear we're only halfway done. She's way bigger than Karen now. Taller, wider. Fertigated 5l
End of week summary... well what can I say Nesia has now surpassed Karen (25 days older) in every size and growth metric. She is following exactly the same pattern except without all the problems. I think she still has 2 weeks of stretching to go, on that basis I am expecting her to grow upto 25cm in the next week and the same again the week after - so I think Nesia is going to end up being about 1m tall. Honestly I hope not though, but let us see.
Likes
16
Share


@Djeemz
Follow
These beautifull ladies are sharing a tent with dutch passion Skywalker haze sisters and also doing very very wel with the Green House feeding nutrients and growing on Cocos with 70/30 perlite and water them daily or everyother day depending on their needs offcourse i also have some root stimulator from Hy-Pro that i add and seems to do its works. Al in al i am very happy with this grow so far and will make it a priority to keep it updated till the end even though i have to tear down the tent for a day due to getting a new boiler installed which in the same room offcourse and our plan is to change lighting to CMH in the future due to heat problems.

Likes
6
Share


Likes
6
Share


@KcKush
Follow
*FOUND 2 More males I think I have 7 plants out of the original 13
*PPM increases to 650
* One of the plants that received no training seems to be clawing like if it had nitrogen toxicity.
*Ugly plant is still ugly lol looks like it just started flowering followed by another late flowering one.
*Used BigBud got lazzy to experiment to see if the stuff works I’ll try it some other time.
*Plant number 1 seemeded to have 2 pollen sacks at the bottom so I’ll keep an eye out.

Likes
17
Share


@Fitzwell
Follow
She is starting to kick off buds nicely. The smell is fantastic makes me wanna slap my momma. I've been defoliating the plant here and their to allow more light to get through her
