The Grow Awards 2026 🏆 


Likes
Comments
Share
@Natrona
Follow
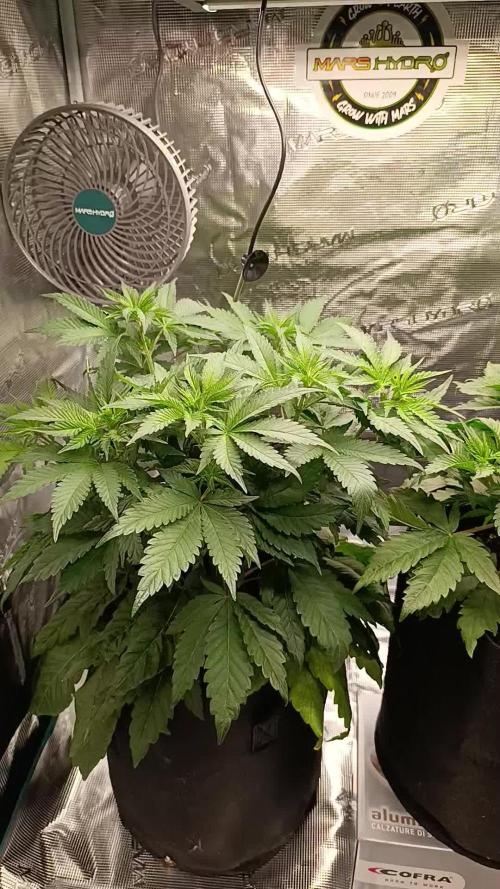
Week 6 2/9-15
Pink Rozay Auto in flower. On Thursday, 2/13 I did a major defoliation on Pink Rozay. I removed all large fan leaves and any leaves shading bud sites. Initially, I thought this would be my last defoliation, however I have since heard that, 10 they continue to grow new leaves until day 20 of flower and 2 there must be enough foliage on the plant to photosynthesize energy. Well, I hope I left enough leaves for energy to keep bulking up the buds. She is still stretching and now 18 inches. This should have been an indication Not to defoliate severely.
Oh darn
I add 2 gallons of water to the T700 humidifier daily to keep the VPD in line. The controller is set to flower now.
2/9 & 11 4 gal fed 2 liter each nutrients added at ½ of recommended amount. Making 4 gallons since I have 2 pots of carrots and a Dill in the back.
Bloom Juice 45ml
Plant Juice 75 ml
Royal Rush 15 ml
Power bud 15ml
Green sensation 7.5ml
Recharge 2.5ml/gal
4 ml
Cal Mag
5
Ppm 333
Ph 7.02
Temp 66
2/13 5 gal
Bloom Juice 60ml
Plant Juice 60 ml
Royal Rush 20 ml
Power bud 20ml
Green sensation 10ml
Recharge 2.5ml/gal
4 ml
Cal Mag
25
Ppm 538
Ph 6.6
Temp 66
Your likes and comments are appreciated. Thanks for stopping by.
Growers love 💚🌿
💫Natrona💫


Likes
101
Share
@DogDoctorOfficial
Follow
Week 7 here we go
They starting to show some colors as they are getting frostier and frostier 😇
tricomes still all very young and clear but getting there 🤫😈
Day 46 update : selective defoliation, they needed more air and light going around. It smells like candy’s store mixed with pine trees and the minty fruit salad that as all that exotic and exquisite aroma in it I’m loving this round and loving all the new learning that came with it 🙏❤️😈🤫🤓😇
As for the geek department 🤓 I’m currently:
- VPD - 1.03 kPa
-PPFD - 725.38 umol/s/m2
-DLI - 28.71
Loving this LED Tec 😍
Girls:
1-BlueBerry
2-Alaskan Purple
3-Poyote Gorilla
4-Hindu Kush
5-Whitw Mango
6-Super Glue
7-Badazz Cookies
8-S.A.D.
tent -8x8 / 2.4x2.4 but i'm only using 1/2 so 4x4 / 1.2x1.2
Led - Lumatek 465w Compact Pro at 75%
All i Grow is medicine for myself,
Stay safe, stay tuned and B Happy
Peace out
D


Likes
176
Share
@Hologram
Follow
Dosidos is a tough cookie💪
As days are getting shorter and shorter, she is getting taller and taller trying to get more light..(and make room for her cookies)
Its a nice summer day today but autumn is coming so weather is becoming more unstable every day..😲
But i have a feeling (or its just hoping🙏) that she will just keep on baking the cookies anywayz
.. as long as i put her in her safehouse, so she will be dry and cosy, when needed 😳👊
Happy growing for all✊


Likes
9
Share
@Kushizlez
Follow
Day 69 (March 6th)
Just gave everyone their last watering. I’m going to harvest and wash everything tomorrow night on day 70. I‘m not going to do that whole 48 hours of darkness thing because I didn’t see a difference last time I did it. In fact, it made my plant under watered before drying which caused it to dry too fast. Slurricane and cheese will be washed with h2o2 and the rest will just be rinsed off in warm RO water and hung up. Before and after washing I’m going to go over each branch with a flashlight and make sure there is no dog hair or debris in or on the buds. I will be drying in my spare bathroom (that no one uses!) from hangers. Aiming to keep it around 60-62F and 50-60 RH. Hoping for that 10-12 day dry. I wanted to do a full plant hang but the tent got pretty dirty and I would feel more comfortable just cutting and rinsing everything off branch by branch. I’m going to try my best to keep the full plant intact. Got my humidifier hooked up and running RO water because with tap water it deposits calcium and lime all over the buds and walls. For air flow I’m just indirectly running a small usb fan. I’m not worried about air flow in the bathroom honestly. It stays nice and breezy down there anyway.
Got the food grade peroxide and RO water to wash up the slurricane and cheese. Everything except for the cheese and garlic#1 is looking more than done. Trichomes all look pretty well done. Some of them have even burst open. Smells are all super ripe and mature too. Can’t wait to smell each individually in jars.
Next week I will recap what went wrong and what I will do differently next time to keep it from happening again.
(Day 70F) Just got everything chopped, washed and hanging. The vast majority of the PM was washed out but I can still see very small amounts. When they dry out I can shake the branches a bit to get the rest off. At very least it’s sterile now. There is no question I lost some potency while washing but the amount is negligible for a much cleaner product.
I could see lots of dirt and other debris float to the surface of the water after being washed. And no those are not trichomes, those sink to the bottom. I could put that nasty water through a bubble bag and wouldn’t get all that much. Although it probably does remove a lot of the actual trichomes heads. I’ll have to check with the microscope.
Everything is rigged up for a nice slow dry. Temp is sitting at 64 and RH is at a nice 60%.

Likes
11
Share
@Redcup
Follow
Struggled with slow growth and nutrient burn on 2/4. Found the Coco ph at 7.5, watered with 5.5 and it's now testing around 6.5! They are happy and growth speed has definitely picked up.
All have been topped atleast once and Lst on 3/4 so far.

Processing
Likes
4
Share

Likes
156
Share
@StarLorr
Follow
Helloing 👋🏻friends and visitors.
Welclone to my Clone diary🙃
Clones are doing very well, did more defoliation trying to get more light to penetrate the plants and exposing bud sites.
Feeding:
Tue 14Nov: 2L each with nuts pH'd 6.35
Thu 16Nov: 2L each with nuts pH'd 6.34
Sat 18Nov: 3L each water only pH'd 6.5
-------------------------------------•
Hope you enjoy the videos and pictures.
Thanks for stopping by, likes and comments are appreciated.
Keep on growin!
Keep on tokin!!!
😙💨💨💨💨💨
Likes
80
Share
@Roberts
Follow
AK 2.0 XL Autoflower has some big saggy buds on her. She grew great through the grow. Minor issues with ph here, and there. I have tried growing with low tds, and high tds in DWC. I prefer High TDS to help control ph level better. Plus plant gets much bigger. From my experiments. This plant is a fine example. Heavy yield, and full of frost. Strong aroma of citrus and a earthy fruity smell. She grew really well under the Mars Hydro FC4800. I will upload a harvest video if it let's me. If not it can be found on my YouTube channel. Link will be below. Thank you Mars Hydro, and Ganja Farmer. 🤜🤛🌱🌱🌱
Thank you grow diaries community for the 👇likes👇, follows, comments, and subscriptions on my YouTube channel👇. ❄️🌱🍻
Happy Growing 🌱🌱🌱
https://youtube.com/channel/UCAhN7yRzWLpcaRHhMIQ7X4g

Likes
82
Share
@BigBadLion
Follow
Hey guys!
Another week and another update!
At the end of this week I decided to finally start with the main lining and I won't lie... I was extremely nervous haha 😱 but I believe I did it well, without any major issue! I also decided to move the small 4th plant into a new home and it seems she will like the extra space!
This week I also didn't feed my babies as I over watered them 😞 but they still showed some great progress! So I suppose it wasn't that bad! 😊
Soon I'll update the next week, which is also ready and has even more timelapses!
Thanks everyone! :D


Likes
3
Share
@Wastent91
Follow
Eccoci qua alle prime due settimane di roe fioritura, è più piccolina ma ho dovuta per forza mandarla in fioritura altrimenti la sorella sarebbe diventata troppo alta per una box così bassa, quindi verrà un attimo più piccola della sorella, ma ha lo stesso vigore, la stessa voglia di crescere e mostrare tutte le sue potenzialità di questa genetica CBD davvero impressionante! Merito soprattutto dei nutrienti di Terra Aquatica, che stanno facendo la differenza, una crescita veloce senza carenze e un stelo davvero grosso e resistente, mi aspetto delle belle cime piene di resina di CBD di questa erba cosiddetta cannabis "light" che nel mio paese l Italia, è appena diventata illegale pure lei! Che tristezza, ma io me ne sbatto e continuo per la mia strada, questa è la mia passione e nessuno mi fermerà, anche se sono considerato come un criminale, in realtà è lo stesso stato che tenendo questa pianta miracolosa illegale è collusa con la mafia e con le case farmaceutiche, quindi è lo stesso stato criminale, non io di sicuro xke cerco di curarmi con un prodotto naturale! Garzie a tutti voi che mi seguite spero di continuare su questa strada senza avere problemi e spero che nonostante nn sono molto presente, vi piacciano i miei diari e le mie foto! Un buon 420 a tutti! 💪😸👌🌱🌿🧑🌾😽💨🔥🔥❤️❤️


Likes
2
Share
@ChiTaN
Follow
The girls are developing properly, frosting is beginning to be clearly visible.Also the smell has become clear and very intense.White Widow X Big Bud is the most noticeable.From today, the girls are switching to a different spectrum of light, UV light will be added.


Likes
10
Share
@Lazuli
Follow
Still only gave them rain water. Time to let them go dry and start the feeding
Likes
38
Share
@LittleBigTrees
Follow
Pulled a few fan leaves, had a house inspection so I had to move them all outside , they went from 26°c to -2°C for ten hours they also had their dark cycle interrupted during the course of moving them.
The smell is very strong now from all 6 pheno
Likes
11
Share
@SintrexGrow
Follow
Plant is showing fast growing and responded well to my diy setup and diy lights 💪
