The Grow Awards 2026 🏆 


Likes
Comments
Share
@DogDoctorOfficial
Follow
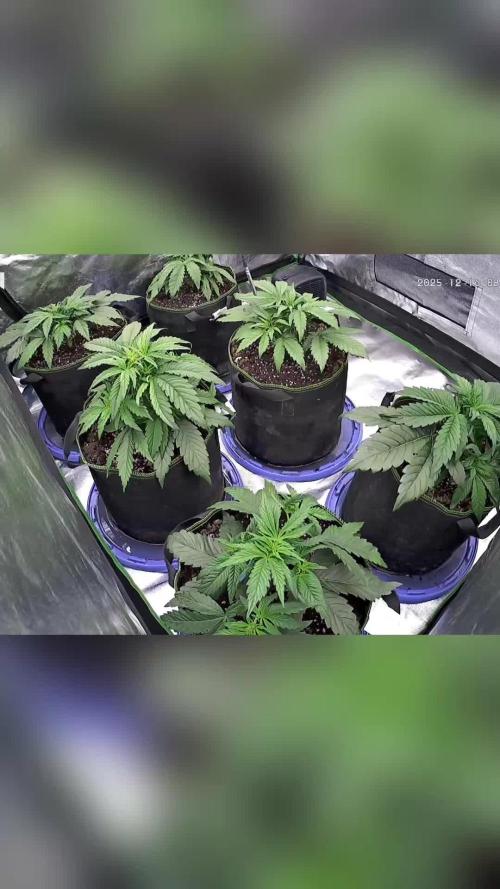
Week 6 Report: White OG – Shaping Her Future 🌟
We’re at Week 6 of veg, and the White OG is thriving like a superstar! This week, I decided to take her structure to the next level by topping a few branches, and let me tell you—she’s loving it. 🌿 The growth is vigorous, and she’s shaping up beautifully to maximize her potential for flowering.
Let’s dive into what went down this week and why it’s all so important for her journey.
Branch Topping: Building a Strong Framework
After recovering beautifully from her initial topping at node 7, it was time to refine her structure further by topping a few branches. For each branch, I left two nodes to ensure strong, healthy growth while encouraging a bushier canopy.
Why Top Branches?
Topping isn’t just for the main stem—it’s an essential technique for creating an even canopy and increasing yield potential:
1. Encourages Lateral Growth: By removing the top of a branch, the plant redirects its energy into the remaining nodes, encouraging side shoots to grow and fill out.
2. Maximizes Light Penetration: A bushier plant with more branches ensures that all parts of the plant get access to light, reducing shading and improving photosynthesis.
3. Improves Structure: A strong, evenly distributed framework sets the stage for a healthier plant that can support larger buds during flowering.
The decision to leave two nodes per topped branch ensures a balance between promoting growth and avoiding unnecessary stress.
Tent Conditions: Consistency is Key
The room conditions this week have remained steady and perfect for her vegetative stage:
• Temperature: Around 18°C—cool but manageable, keeping her growth steady.
• Humidity: At 60%, maintaining just the right level to support her root zone and foliage.
• Lighting: The Future of Grow (FOG) LED at 200 PPFD continues to provide optimal light for compact, strong growth. i will dim it up soon!
These consistent conditions give her the environment she needs to recover quickly from topping and focus on building her structure.
Nutrient Routine: Trusting the Pellets
This week, I’ve continued with the Aptus Holland All-in-One Pellets as the primary nutrient source. They’re working their magic, providing a steady release of nutrients to support her vigorous growth.
As a backup plan, I’m always ready to reintroduce All-in-One Liquid if she starts showing signs of needing more immediate nutrition. For now, she’s thriving, and the pellets are doing an excellent job of meeting her needs.
Training and Future Plans
Topping a few branches this week was just the beginning. I’m planning to continue topping over the next few weeks to shape her into a bushy, evenly distributed plant. By focusing on creating a strong structure now, she’ll be perfectly prepared for explosive growth when we flip her into flowering.
Looking Ahead: Growth on Overdrive 🚀
As Week 7 approaches, I’ll be monitoring how she responds to the additional topping and ensuring her environment stays consistent. The goal is to encourage her lateral growth while keeping her stress levels low and her energy focused.
A huge thank you to the incredible brands and community that make this journey so rewarding:
• Seedsman Seeds for the top-tier genetics—don’t forget to use the DOGDOCTOR 10% off discount code!
• Aptus Holland for their game-changing nutrient solutions.
• Pro-Mix Soil for the perfect foundation with their HP Mycorrhizae + Bacillus blend.
• TrolMaster for helping me maintain the perfect environment.
• Future of Grow LED for reliable, efficient lighting.
• Cannakan for kickstarting this journey during germination.
• Grow Diaries for being the platform where we share, connect, and learn together.
To all my followers, lovers, haters, and everyone in the community—you’re the heart and soul of this journey! 🌟
Bonus Content: New Episodes Weekly on YouTube! 🎥
Don’t forget to check out my YouTube channel for weekly episodes with tips, tricks, and behind-the-scenes action. Links are in the profile—come join the fun!
Growers Love! 💚
DISCOUNT CODE - SeedsmanSeeds - DOGDOCTOR 10% off
As always thank you all for stopping by, for the love and for it all , this journey of mine wold just not be the same without you guys, the love and support is very much appreciated and i fell honored and so joyful with you all in my life 🙏
With true love comes happiness 💚🙏 Always believe in your self and always do things expecting nothing and with an open heart , be a giver and the universe will give back to you in ways you could not even imagine so 💚
Friendly reminder all you see here is pure research and for educational purposes only
💚Growers Love To you All and remember to keep that smile big and alive 💚

Likes
15
Share
@BruWeed
Follow
🍀20/06 - Empieza su cuarta semana en Etapa de floración.
🍀Es increible la cantidad de tricomas que formó esta planta, en todos los cocos se pueden apreciar.
🍀En altura solo creció 5cm más, no creo que siga creciendo.
🍀Los cocos de toda la planta se ven perfectos sin ningun problema alguno.
🍀Esta semana ya arranque agregándole Top Bud, va ayudar mucho con el engorde de los cogollos.
🍀En estos dias seguire subiendo mas imagenes.
🇦🇷😶🌫️🍀Podes seguirme en Insta gram como @bruweed_arg 🍀😶🌫️🇦🇷

Likes
55
Share
@MadeInGermany
Follow
Info:
Unfortunately, I had to find out that my account is used for fake pages in social media.
I am only active here on growdiaries.
I am not on facebook instagram twitter etc All accounts except this one are fake.
Flowering day 1
since time change
to 12/12 h.
Hi guys :-) .
The time has finally come 👍
You have been switched to 12/12 hrs and are ready to flower.
Of course, cuttings were cut beforehand to keep the genetics.
For 4 days now she has also been getting Fast Buds from GreenBuzzLiquids.
They were also sprayed again with GBL Fast Plant spray.
She is very healthy and I am excited to see how she gets going again in bloom :-).
This week it was poured twice with 1.2 l each time (for nutrients, see nutrient table above).
Then I filled canisters with fresh osmosis water for the next few weeks 👍.
The tent was cleaned and every plant was checked for health.
At the moment I am tinkering with the ventilation because there are currently 4 fans with 4 activated carbon filters running, which I want to make more efficient by putting a hose through 2 tents.
These are the things about which you desperately at the beginning but learned from them in the end.
I wish you all a nice week.
Stay healthy 🙏🏻
You can buy this Nutrients at :
https://greenbuzzliquids.com/en/shop/
With the discount code: Made_in_Germany you get a discount of 15% on all products from an order value of 100 euros.
You can buy This Strain at :
www.Zamnesia.com
☝️🏼☝️🏼☝️🏼☝️🏼☝️🏼☝️🏼
Strain
Gelato clone from mother (Zamnesia )
☝️
Genetics: Wedding Cake x Gelato x Gelato 33
Vega lamp:
2 x Todogrow Led
Quantum Board 100 W
💡
Bloom Lamp :
2 x Todogrow Led
Cxb 3590 COB 3500 K 205W
💡💡☝️🏼
Soil :
Canna Coco Professional +
☝️🏼
Nutrients :
Green Buzz Liquids :
Organic Grow Liquid
Organic Bloom Liquid
Organic more PK
More Roots
Fast Buds
Humic Acid Plus
Growzyme Big Fruits
Clean Fruits
Cal / Mag
Organic Ph - Pulver
☝️🏼🌱
Water: Osmosis water mixed with normal water (24 hours stale that the chlorine evaporates) to 0.2 EC. Add Cal / Mag to 0.4 Ec Ph with Organic Ph - to 5.8

Likes
179
Share
@Tropicannibis_Todd
Follow
💩Holy Crap We Are Back At It And Loving It💩 👉FOLKS WE R ALMOST TO THE FINISH LINE👈
Growmies we are at DAY 63 and she's just killing💀it👌
👉We are in full flowering mode and she's doing great 👈 Everything is looking good even the Tiny Cup 🥤
So Shit , I gave them just a tad to much nutes at the start of feeding 👈 But I have since fixed it
So I'm still doing some low stress training 🙃 and some defolation 😳
Lights being readjusted and chart updated .........👍rain water to be used entire growth👈
👉I used NutriNPK for nutrients for my grows and welcome anyone to give them a try .👈
👉 www.nutrinpk.com 👈
NutriNPK Cal MAG 14-0-14
NutriNPK Grow 28-14-14
NutriNPK Bloom 8-20-30
NutriNPK Bloom Booster 0-52-34
I GOT MULTIPLE DIARIES ON THE GO 😱 please check them out 😎
👉THANKS FOR TAKING THE TIME TO GO OVER MY DIARIES 👈

Likes
18
Share
@ShowsWorld
Follow
Growth has been explosive with the strain. Tops coming from everywhere after one topping. I plan on taking a cutting from this particular strain I have a great feeling about this one.


Likes
23
Share
@JeyGanesha
Follow
Hanno iniziato la quinta settimana di vegetativa...penso che ancora poco e la passerò in fioritura 😂💪💪💪

Likes
220
Share
@CRiSPrGrow
Follow
Week 13 : Six Shooter
So i've been looking into these plants' trichomes daily, sometimes twice daily, they're all really really cloudy, like full white, completely curled in. Some have a slight beige tint to them, so i'm guessing that's the first few ambers ! That means it's time for the chop ! these wrapped up their second week of flush with three x additive flush. To flush you water until run off then add 20% which is just about 4 pints for me. Now i'm at the end of the grow i can say that the full tent is a good idea, but it does get crowded and that will surely affect my yield as there are a fair few colas that are totally f-ed in the sense they are thin, skinny, a tiny bit of flower with just a few pistills... so those are useless and they're going into my bubble hash project, so let's see, maybe i can extract value out of the trim , the popcorn buds, and the rest of the plant ! Wish me luck and drop me a message, i'm chopping these down real soon ! 🚀
Likes
23
Share
@MistaOC
Follow
28.01. Day 3
Just relax and get an eye on the vpd!
In my case looking for 0,6.
But temp. Is very cold with 19 degrees
——————————————————————
30.01. Day 5
Same
—————————————————————
Likes
14
Share
@JamieKnolliver
Follow
Einige Triebe wurden nun durch reiben und drücken umgeknickt(HST) weil sie aus dem Netz rausgewachsen ist und ich unbedingt das höhenwachstum eindämmen muss, da die Pflanze noch ihren Stretch machen wird und ich sonst keinen Abstand zur Lampe bekomme.
In der ersten Woche deutliche Veränderung des Wachstumbildes, die ersten weißen Härchen sind erkennbar.
Biobizz Bloom und TopMax werden ab jetzt auch hinzugefügt.


Likes
8
Share
@ChitownCannaChica
Follow
Did some defoliation of the lowers. Been just dunking this lady in the water bucket daily. Have a slight deficiency going, but will wait and see since it’s the start of flower

Likes
59
Share
@AsNoriu
Follow
Day 36. Will have to clear bottom ,, few worthless shoots has to go. Will do it straight before next watering.
All good, girl is flowering ;)
Day 38. 100 ml of 6.3 ph water in. Trimmed two worthless branches before watering.
Ripped one leaf finger while taking some stuff ;)) 2x damage today ...
Day 40. She is still dark, so maybe no feed till rest of her life, will add 1g. Of BioSys with next watering .
Happy Growing !!!
Processing
Likes
5
Share
@CityFarmer
Follow
Hello everyone,
The girls are finally outside in 20 gallon fabric pots. This season I have a greenhouse for them and I hope it goes good. Still have to build the first cages around them and start stretching them. 🎊🎉 finally, summer is here 🎉🎊
See you guys next week 🤞🤞🤘🤘👊👊👊

Likes
68
Share
@Roberts
Follow
Auto Northern Dragon Fuel is doing some bulking. I have cut back on nitrogen, and increased blooming nutes. Her ph is trying to climb is why I dosed her good in nutes. I did some selective defoliation in center around the colas. I am just waiting on them to faten up. Thank you Medic Grow, and Super Sativa Seed Club. 🤜🏻🤛🏻🌱❄️🌱
Thank you grow diaries community for the 👇likes👇, follows, comments, and subscriptions on my YouTube channel👇. ❄️🌱🍻
Happy Growing 🌱🌱🌱
https://youtube.com/channel/UCAhN7yRzWLpcaRHhMIQ7X4g

Likes
9
Share
@papexa
Follow
in this stage i just add my co2 own system configuration and i setup for 500 ppm CO2 and the instalation of ozone generator of 60g
Likes
30
Share
@ArtisticGrown
Follow
Sooooo this has been an amazing and exciting week! Ive been patient with this last plant and really checking the trichomes i inly wanted a few amber caps on the nugs, was looking for milky on this one! Shes smelling amazing and the color change was such a sight to see! She did so well with the nutrients and loved the 2 week flush i did! I cut her down did a wet trim and have em in the drying rack! Im excited to see how she cures and drys ready for the smoke reveal! Much love and happy growing!!!
*check out the examples of the rewards from the traing i did with lst, hst, desolation love seeing this!!* learning this craft and style of growing is a blast! And everyone should try it!

Likes
9
Share
@Chubbs
Follow
420Fastbuds
FBT2308/Week8
What up grow fam. I hope all is good with everyone. Week 8 update on these absolutely stunning girls. They're definitely progressing nicely with the flower sites swelling up. Super frosty and beyond sticky when you happen to touch them. Over all Happy Growing


Likes
9
Share
@THCReich
Follow
From all plants, shoots were removed from time to time and the leaves were removed


Processing
Likes
21
Share
@jboog80
Follow
Going into week two of flower. All are looking great. However, my clones that I took are not rooting yet. Out of 16 clones, I have one rooted clone. Thankfully it's off of my keeper. I think I let my rockwool cubes get too dried out. I fucked up!
I need new sunglasses! Can't get good pictures with the cheap ones that I have now.
