The Grow Awards 2026 🏆 


Likes
Comments
Share
@HUMO_Cultiva
Follow
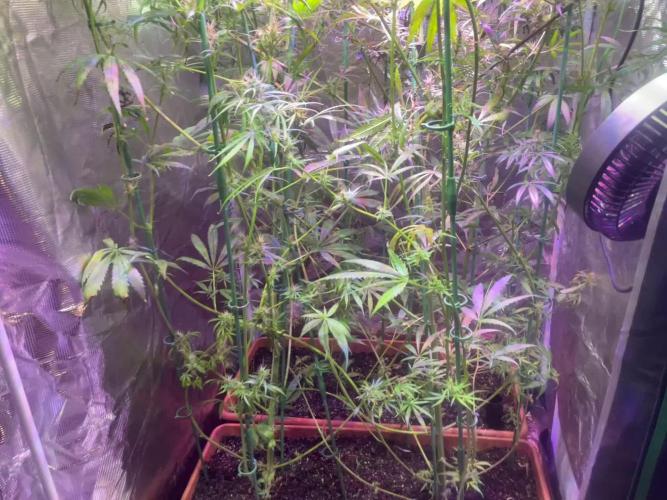
Update of Goofiez 2 of compound genetics!! On RDWC it’s literally super fast grow !! We are doing a pheno hunting of 12 plants and we seed 4 of them that are the best at the moment


Likes
77
Share
@SooSan
Follow
Dans l'ordre:
1) Afghan Peach x Blue Monkey
2) Gelato Cake
3) Fast Critical Poison
4) Tropical Fuel
5) Hindu Kush
6) (Blueberry x Black Domina) X (Kosher Kush x Mk-Ultra)
7) Blueberry
8) Herz OG
9) (Blueberry x Black Domina) X (Kosher Kush x Mk-Ultra)


Processing
Likes
62
Share
@OwlGang_Uk
Follow
Happy 1 Month To My Girls (Inserts Celebration Emojis)
I’m Very Proud Of The 1st Month’s Progress These Girls Has Really Exceeded My Expectations.
I’m Very Proud Of The Of The Purple Power If You Go Back To Week 1 You Will See That She Started Off The Slowest But She Is Now The Tallest In The Pack Standing At 21 Inches (that’s without adding the few cm I covered with soil) She Has Also Shown Signs Of Purple In Her Bud Development (Favourite Color) Can’t Wait To See Them, You Go Girl!
I’m Also Proud Of The Gorilla Glu (12 inches) Stardawg (17 inches) And Girls Scout Cookies (16 inches) Development, They Are My Favorite Buds Here In The UK. They Are Very Bushy & Branchy And Their Stems Are Very Thick. They Have The 3 Main Pillars To Accommodate BIG Buds.
Happy Growing Everyone. #OwlGang #AGrowingEmpire


Processing
Likes
Comments
Share
@MG2009
Follow
06/30/2020
Ain't she sweet!
She has produced the seed I wanted so I am gonna feed her some OVERDRIVE see if she will make a little more buds to smoke. Cookie Cake would normally go
7-10 weeks on a 12-12 schedule so I think she will be done by week 7 at 11-13 light/dark schedule.
Can't wait to start these seeds, my mouth is watering thinking of how the flavors and aromas will recombine! Maybe some cherry vanilla earthy pine goodness? We shall see hopefully a perfect union!
Likes
7
Share
@UrbanBoer
Follow
Another one is flowering cannot believe it, Another Auto. Sadly going to be absent for a couple of weeks, going out of town but as soon as I return I am posting the progress, hopefully defoliating at this stage works out.
Processing
Likes
3
Share


Likes
2
Share
@Saintvicious
Follow
Just keep watering as it drys. Supporting buds along the way that are getting too heavy. Smells like skunk and gas. Little fruit but not much. Trics still getting thick. Look forward to it finishing. Tricomes still cloudy. Little amber on sugar leaves but it's still going strong. Some leave fading finally to fall colors.
Likes
Comments
Share
@superhero897
Follow
✅0,25g Madame Grow - Amino Canna in 500ml water
✅0,5g Madame Grow - Wild Bloom Powder in 500ml water
(Every fertilizer was given separately and on different days!)
The whole plant is getting a purplish color.
Likes
6
Share
@RatmanJR
Follow
September 1st, 79 days post flip
Clones;
All 3 clones have been growing well. Humidity it starting to drop here which is good considering we are approaching later flower. I had some rot on some lower nugs on one of the plants and have since removed all of the bad bud.
It’s worth noting that based on how these have grown I will likely lose some to rot and burn from the light. I’m not worried about this. The whole point of this grow is too ultimately pick a single Pheno as our female for future breeding. I only need a little bit of each to make this determination along with seeing how they grow.
All 3 plants have started fattening up since their feeding last week. They also seemed to respond well to the 15 minute shorter days.
Now for the specifics
Clone #2:
This one is doing the worse. This is somewhat funny because during veg I thought it looked the best. It has unfortunately been out competed for the light by number 3 and 4. It also has some bud rot on its lower buds which were not getting any light or air. All bud rot buses have since been removed. Currently thin one has the least amount of a smell with it smelling earthy and peppery.
Clone #3:
This one has been growing quite well. This was the one that was shut and than exploded during stretch. I do still like its bud structure. Tightest of them all so far. Plant also has a really nice lemony and floral scent to it. At the moment this one is my favorite and my current go too pick for when this is all said and done.
Clone #4:
This one is the hint one. If I removed all of its super cropping it has too be close to 7.5 feet tall. Smells like orange rinds with a mix of gas.
Parents:
All 4 parents are very happy to receive some fert and some extra soil. Will continue to give nothing but water until it’s time to select one of these.
God Bless!

Likes
70
Share
@Mosquito_Haarlem
Follow
Dit was weer een leuke kweek.
Prachtige exotische kleuren en een bitterzoete geur.
Ze heeft 11 dagen aan de waslijn gehangen en is nu goed droog.
De toppen zijn vol en hard.
149 gram droog dat vind ik bizar veel.
De grootste toppen heb ik in plastic bakken gedaan omdat ik het zonde vind om alles klein te knippen voor de wreckpotten.
De zkittlez heeft een bitterzoet smaakje wat op grapefruit lijkt.
Geen knock-out, maar een lekker relaxed high.
Al met al weer een top strain van Weedseedsexpress 👌🏽
Iedereen bedankt voor het volgen en liken van deze grow en nogmaals veel dank naar de Weedseedsexpress 🙌🏼

Processing
Likes
5
Share
@Mr_nugs_lover_David
Follow
Looking supe healthy and strong in her first week of life, this is gonna be a good one, I love every strain from Gea seeds and I know this amnesia Pro is gonna be a number 1. It's my first time growing amnedia Pro by gea seeds, I'm growing 3 plants and I just can't wait what's coming up! 💚💎 Let's see

Likes
2
Share
@dauntless
Follow
Week 15 started 7-03-2022
July 4th Update
Cleaned our rez and made water at 6.3 Ph, cal-magged. Heavier defol. to reveal more bud sites and give more light. Upgraded flowering light higher output and more coverage. Temps are fine. She started yellowing and getting pretty defensive with the amount of light, so I backed it off to 18", way more light from this 400w COB. The UV is hurting her too so she is throwing more color into the flowers. I am flushing a bit right now and letting her just get used to the light. Added Gaia Green on top and top fed after a 12 hour pause and then flushed out the rez, so now just good water on roots, letting the media get used up, but I don't want deficiencies at the end of the grow, hence the gentle ferts. I don't want a chemical taste so flush with the natural stuff. I will top feed once more once she gets happier looking. So cal mag, like 3 ml of Hygrozyme for root health, and PHd - keeping it simple. (Don't over do the Hygrozyme)
07-06-2022
The upgrades continue. Moved the new light and new carbon filter, along with the A/C Infinity fan to a new Gorilla Growtent Lite 4x4, which is perfect for me for a good while. It barely fit in the space, modified the fan a little and its working like a champ with near identical environmentals. Moved the White Widow manifold into the 4x4 and adjusted the lights and she seems happy so far. I can tell the new light is adding growth and bulk just in a few days. Hopefully the new tent will encourage more ventilation and growth as well. Way less light leakage, almost none. So far I am happy.
Likes
17
Share
@exMoleKing
Follow
Fed the plants with Fox Farm veg nutes once this week. Still a bit early to sex them but only really concerned about the two that are growing the fastest. Hopefully be able to tell in a couple weeks. The plants that were topped for the second time are recovering well and echo new site has grown sets of leaves One of the autos started flowering and the second should start in the next 2-3 days. Did slight LST to the flowering auto to get more sun to the bud sites on the bottom.

Likes
8
Share
@Creme_De_La_Creme
Follow
Last week before turning on the utopot system !!
She is loving the high EC, everything looking perfect around here !!
Likes
361
Share
@Ju_Bps
Follow
Hello my friendly growmies 👩🌾👨🌾🌲🌲,
The #1 is my biggest plant ever, 100 cm, it's not a record lol, but for me it's tall 😊😊
The #2 start to turn purple, can't wait to see 💜🍌
Buds start to be formed and are biggest each days 🌲🌲
I'm totally in love with those cute ladies 🌲🌲🌲😁😁💜💜🍌🍌
I've continued to train a bit.
💦I give water each 3 days, 2.75l/plant
Water + RQS Bio Flowering Booster
Water + cannazym + Sugar Royal
@PH6
RQS Bio Flowering Booster - Week 3
THICKER 0.6 ml/l
BIGGER FLOWERS 0.8 ml/l
The RQS liquid kit, look doing the job, not overfert or deficiency sign for the moment.
Lamp @100% and start to be really close to the plant, but not burning sign for the moment.
Thanks community for follow, likes, comments, always a pleasure 👩🌾👨🌾❤️🌲
Mars Hydro - TS1000 💡💡
https://www.mars-hydro.com/ts-1000-led-grow-light
Mars Hydro - FC3000 💡💡
https://www.mars-hydro.com/fc-3000-samsung-lm301b-led-grow-light
RQS - Fat Banana Auto 🍌🍌🌲🌲
https://www.royalqueenseeds.com/autoflowering-cannabis-seeds/487-fat-banana-automatic.html

Likes
35
Share
@InhaleXhale
Follow
Nach langer Zeit ist es endlich soweit, ich habe sie geerntet.
Bei dieser Pflanze habe ich mich dafür entschieden sie gegen den natürlichen Lebenszyklus outdoor eher zum Blühen zu bringen.
Ich pflanzte sie in einen Hanffasersack den ich mit Erde auffüllte. Diesen platzierte ich auf einer Schubkarre.
Wo ich wohne wird es manchmal schon im Oktober sehr kalt, sodass die Wahrscheinlichkeit für eine sichere Ernte realtiv gering ist (at this point i hope the best for my other outdoor plants).
Ich rechnete mir aus wann der perfekte Zeitpunkt zur Ernte ist um noch im Sommer das Resultat genießen zu können.
Ab diesem Zeitpunkt fuhr ich die Schubkarre jeden morgen um 8 Uhr nach draußen und um 18 Uhr wieder nach drinnen um optimale 12 Stunden Lichtzufuhr zu gewährleisten.
Während den letzten Wochen der Blüte sind ein paar männliche Blüten aufgetaucht wie auch bei meinem indoor grow.
Für einige war der Zeitpunkt der Ernte vielleicht zu früh, aber ich finde es so sehr angenehm zu rauchen und auch der Effekt ist in diesem Stadium optimal für mich.
Die einzige Methode die ich hier verwendete ist das Pruning.
Es erspart dir einen Menge Zeit beim beschneiden der Blüten und lenkt die Kraft auf die verbleibenden Blüten, um diese zu stärken.
Nachdem ich bei meinem letzten outdoor grow viel zeit beim trimming verbracht habe, habe ich mir eine Erntemaschine gekauft (look at the video).
Mit dem Ergebnis der Maschine bin ich zufrieden, da ich es per Hand in der gleichen Zeit unmöglich in der Qualität geschafft hätte.
Die Blüten wurden ungefähr 2 Wochen bei guter Durchlüftung getrocknet, um am Ende wurden es 255g.
Für mich persöhnlich ist es ein sehr gutes Ergebnis.
Die Blüten sind schön fest und klebrig mit einem sehr süßlichen Geruch.
Ich habe versucht ein paar schöne Fotos zu machen und habe meine Kreativität spielen lassen (my wife also got a great idea, you can guess which idea was mine ;D)
If you have any questions feel free to ask. Im also open for criticism
I hope you enjoy the pictures and the report stay safe and happy growing.
____
i will update the smoke report soon.
Likes
10
Share
@Cr4zyElite
Follow
🌱 First week of my cannabis growing adventure with autoflowers! 🌟
As a newbie, I'm diving into the art of low stress training early on because autos have a shorter grow period and I'm curious to see how far I can push the limits. Just experimenting and gathering valuable experience in this rapid growing phase! 📚
✨ Planted in light mix soil with added worm castings in fabric and plastic pots to compare outcomes. Exciting times ahead! 🚀
Likes
26
Share
@Elpicor
Follow
The Canna Crumbly cocoa biscuits are always a delicious opportunity to fill up on energy. They are easy to prepare!
Ingredients:
30g Bitter Cocoa
300g flour
200g butter
100g sugar
5 eggs
1 bar of milk chocolate with whole hazelnuts
HOW TO PREPARE THE CHOCOLATE BISCUITS
1. Boil the eggs for 8 minutes, cool them and shell them.
2. Blend the egg yolks and set aside.
3. Mix the butter in a bowl with the sugar, add the flour and egg yolks, mix, then add to the mixture a bar of milk chocolate with whole hazelnuts previously blended into small pieces (I used the knife for a coarse mince)
4. Add the cocoa to half of the mixture and let them rest in the refrigerator for about half an hour.
5. At this point, roll out the pastry to about half a centimetre, then create the variegation between the two doughs (here you can have fun), once the biscuits have been formed, arrange them on a baking tray with baking paper and bake everything for 12-15 minutes at 170 degrees.
IMPORTANT: I put double the recommended dosage for the butter, thinking I was an expert smoker, but, next time I will follow the doses because I slept 12 hours, the edibles have a prodigious effect but you need to calibrate well otherwise you risk going to sleep at 8 pm!😇💤

Likes
22
Share
@LSDMan
Follow
(CAN) Une météo parfaite cette semaine. Je dispose des grillages plus gros autour des plants, je dégage également les alentours afin de laisser passer plus facilement les rayons du soleil et de faire baisser l’humidité ambiante. Les plants ont maintenant beaucoup plus d’espace et peuvent se développer pleinement pour prochainement, passer en floraison. Je renouvelle le marc de café autour des plants pour éloigner les potentiels nuisibles. Je pulvérise les plants au purin d’orties le jour 59. Arrosage à l’engrais de croissance le jour 60.


Likes
20
Share
@Ieiogrow94
Follow
Eccoci qui...
In questa prima settimana di fioritura ho notato come le due piccoline abbiano avuto questa crescita così esponenziale e come tutte le collab DA ORA SI INIZIA CON I VIDEO per testimoniare meglio la fioritura!!!
Grazie a @KhalifaGenetics per la collab e a tutti per il supporto🔥🌲❤️