


Likes
40
Share


@Drgreenthumb627
Follow
great tent, sturdy and durable. opened and closed it about 500 times during this grow haha Edit: 3 ounce harvest

Likes
20
Share


@ukterpdoc
Follow
Been going so well plants looking amazing they're going to find bigger pots by next weeks update and be in the veg room under there new lights and out of the tent lots more space and lots more light

Likes
7
Share


@PotCasso
Follow
Week 7 Flower Full Bloom
Watered in at 700ml
Epsom Salt 2tbs to 4l - bought at the local pharmacy.
Likes
23
Share


@cadur
Follow
Days to go, amber trichomes starting to show, maybe 5-10%. Have been on tap water for the last week.

Likes
2
Share


@CannaIGrow
Follow
Topped this girl this week, she’s growing pretty good. Very nice looking plant to my eye.


Likes
223
Share


@Tropicannibis_Todd
Follow
💩Holy Crap We Are Back💩
Well i took the summer off to do some outdoor but thats all done so , we are back indoors and at it again 😁
So super happy to be trying these ones out , can't wait😝 ..... decided to do a multi diary for a change ..👍
Growmies we are at DAY 7 and all three are doing there thing 👌
Lights being readjusted and chart updated .........👍rain water to be used entire growth👈
👉I used NutriNPK for nutrients for my grows and welcome anyone to give them a try .👈
👉 www.nutrinpk.com 👈
NutriNPK Cal MAG 14-0-14
NutriNPK Grow 28-14-14
NutriNPK Bloom 8-20-30
NutriNPK Bloom Booster 0-52-34
I GOT MULTIPLE DIARIES ON THE GO 😱 please check them out 😎
👉THANKS FOR TAKING THE TIME TO GO OVER MY DIARIES 👈

Likes
7
Share


@MrGrowthSpurt
Follow
What's good in the hood growmies!!! I hope all your grows are going well.
I missed week 8 and week 11 picture updates due to my busy schedule.
These pictures were taken Friday 8/19/22 which was the start of week 12, I finally got around to posting them today which is Monday 8/22/22.
Week 7 of flowering, everything is going as planned. I will give these babies the chop in a week maybe 2 max.
I have been feeding them every 3 day which seems to be when they need a refill. Starting this Friday, I will only feed them plan PH'd water until they get chopped that is my way of flushing them, I like to do it progressively rather than flush all at once.
It has been a very stress free experience for me, I feel like I have the game down pat as far as growing from seed. I still have my Caramelicious Feminized Photo mother plant vegging and growing and also White Widow#3 (which is 3 weeks behind the other White Widows) I just haven't been taking pictures of them.
Thanks for stopping by and I hope the plant goddesses grant you huge yeilds on your grows!!!


Likes
29
Share

@GERGrowDesigns
Follow
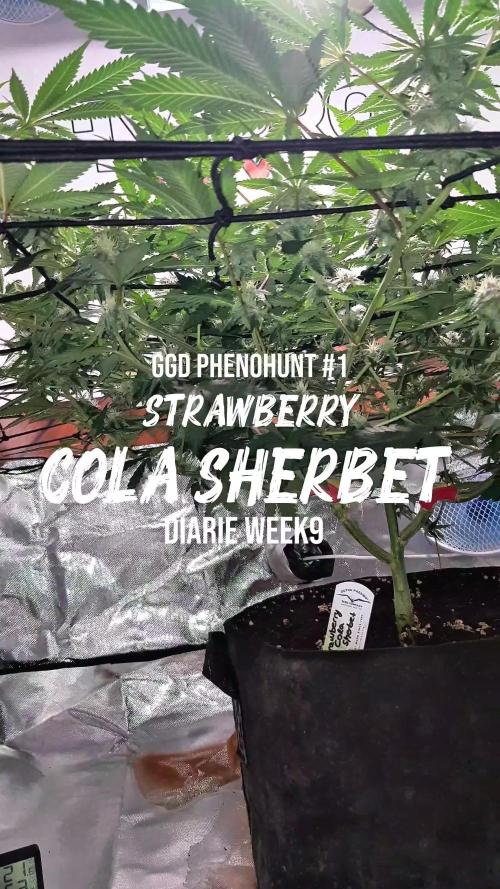
Welcome to GERGrowDesigns Breeding Cut Phenohunt #1 Diarie Week 9 (Flower Week 2 Day ~15 Since 12/12)
This diary is designed for a documentation of an indoor grow, with a strong focus on plant health, environmental control, and optimized nutrient strategy to hold this Genetic and use her for Breeding in Future projects .
The Harvested Mother Plant ,can be found in the older Strawberry Cola Sherbet Diarie💚
What happend in the past ?
-Cut removed from Mother in Flower Week 2
-Clonex Gel used ~10 days Rooting Process
- 2-3Weeks Revege Process
-transplanted in 0.3l pot
-transplanted in 12litre pot + Bigger Tent
-Plant/Health/Root Care
-Motherplant Feeding Shema , low EC , Spraymix
-Took 9 Cuts From The Plant
-Took 6 Cuts From The Plant
-Feeding Shedule for Regeneration and Growth
-Prepared New Mother Plant
-Last Veg Week before Flower
-tent move in bigger Home 100x100
-light Switch to 12/12h ,its Flower time 15.03
-One Time nutriets Boost for Flower Switch & Stretch
-ScroG Install and Daily Training in First Flower Weeks
Grow Setup & Strategy:
• 🌱 Genetics: Strawberry Cola Sherbet -Sweet Seeds
• 🏕️ Grow Space: 100x100x200cm
• 💡 Lighting: 1x200W LED
• 🌡️ Average Temperature: ~26°C
• 💧 Humidity: ~50%
• 🍵 Pot Size: 20L
• 🌿 Base Nutrients: Hy-Pro
• ⏳ Flowering Expectation: 5 weeks
Flower Week Two is Done , Media is from 31.03 flower Switch was at 15.03 (12/12)
Flower Day ~15 , looks like shes taking the shortcut of 4-5 Weeks Flower Again Like the Mother 🎯
Isnt it Fascinating how Fast some Strains can Develope After Switch🏆 she will probably overun my other Photo Tent which changed 2 Weeks before to Flower 🌱
Also Special attention will be given to Hy-pro during all phases, aiming to enhance Structure , nutrient uptake efficiency, and final quality, while closely monitoring plant response.
Feedback, questions, and constructive discussion are always welcome. Community interaction is a key part of what makes competitions like this valuable.
🌿 Happy growing & good luck to everyone!

Likes
Comments
Share


@Card1Cultivations
Follow
Growth is amazing and the girls already need to be transplanted into their final 5 gallon pots.
Transplanting went well, I could have waited another week and I think it would have been better.
Anastasia is having issues with the main stem growing straight so I added supports to encourage straight growth. Drizella is too but not as severe.
During the transplant process. I also sprinkled Great White Mycorrhizae on the roots for better root health and to reduce transplant stress.
Nutrients still hand watering every other day to run off.
5.8 ph / 1.63 ec / 74.7 degrees
I reconditioned my coco coir from my first grow that was originally 1 bag of royal gold tupur blend which I believe produced some nats due to the forest material mixed in with the coco coir. This one original bag was enough to fill two 3 gallon pots and transplant them into two 5 gallon pots with a little left to spare.
I hand cleaned that first grow medium to remove all large root debris and then rinsed it thoroughly in Ro only water before letting it dry for several weeks leading up to this current transplant. I then soaked it in a solution of Sensizym and calMag to break down any remaining dead roots into nutrients while ensuring the medium is still well buffered.
The girls were started in the 3 gallon pots using a new bag of roots organics brand 70/30 coco coir/perlite. That medium had to be buffered well with calMag to avoid common Calcium and Magnesium deficiency that surface due to coco coirs ability to soak it up and steal it from the plant. This was a leason learned from my first grow that resulted in several foliage feedings to adjust for.
I was able to recycle a great deal of coco coir from my first grow which provided me enough to bump this grow up to three plants from two. So I used the recycled coco as the base and most of the back fill in all thee 5 gallon pots. I did have to use a little extra of the 70/30 to top everything off properly.
I still have a 1/4 of a bag of the 70/30 left dor future grows.

Processing
Likes
25
Share


@Hawkbo
Follow
These have been growing kind of slowly but I got the temps up a little this week by adding some extra light and am getting vpd dialed in. These will only be in this tent for a few more days I am just starting to harvest the main tent so once that is done they will be moved to the Gorilla Grow Tent and put under the new Growlightscience LEDs so we can see how the perform full cycle. The autos will have to get moved back into this tent once I flip the main tent but the photos will prob need a few weeks of veg before that happens. Been doing foliars with the Growzyme from greenbuzz as well before lights out every other night which seems to make them happy. I think theyll take off over the next couple weeks.
Likes
4
Share


@Ryno1990
Follow
Snow Panda fast flowering photo starting veg from seedling stage she grew weird as she is missing one side of her cotyledon leafs as they did not grow
The Snow Panda is starting t9 come along good at the ending days of week 1 of veg now in a 1 gallon pot
Likes
9
Share


@Tmasm
Follow
Zamnésia, obrigado por fornecer genética para testes.
Entrega segura, dentro do prazo e muito discreta, como você pode ver nas fotos.
Experiência para possível plantio em massa, dependendo dos resolvidos.
1 BISCOTTI (SEMENTES DE ZAMNESIA) FEMINIZADO
Conforme diário já na 3 semana.
1 JEALOUSY (SEMENTES DE ZAMNESIA)
Conforme diário já na 3 semana.
1 SUNSET SHERBET AUTOMATIC (SEMENTES DE ZAMNESIA) FEMINIZADO
Já germinada, e com 1cm
Panta está linda, crescendo bem.
Gosto muito do desempenho dela, barraca com condições mínimas, mas para ela tudo bem.
Primeiras fábricas da Zamnésia, estou impressionado com a qualidade dos produtos.
Visite www.zamnesia.com, você ficará surpreso com a variedade de produtos, todos da mais alta qualidade.
O diário será atualizado toda semana, espero que gostem (eu também).


Likes
7
Share


@GrowGuy97
Follow
Update, this thing is a MONSTER!!!! Honestly a little scared to see how big she gets in flower lol😂😂


Likes
24
Share


@el_cultivito
Follow
TOTAL YIELDS wet weight
Blue Dream 1 - 600.2 G
Blue Dream 2 - 552.9 G
Blue Dream 3 - 565.3 G
TOTAL Blue Dream - 1718.4 G
________________________________
Chemdog 1 - 616.9 G
Chemdog 2 - 598.1 G
Chemdog 3 - 558 G
TOTAL Chemdog - 1773 G
________________________________
TOTAL OVERALL - 3491.4 G
7.7 pounds wet
