
Likes
Comments
Share


@Cefek
Follow
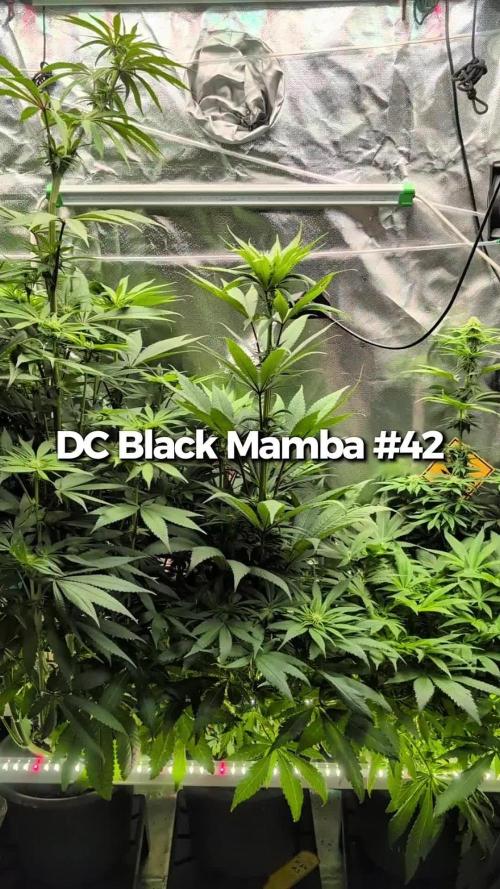
15.4 The buds are already looking beautiful, with a deep purple—almost black—color. They’re developing incredibly fast. The fan leaves are starting to turn yellow, which is expected at this stage of flowering, but it feels a bit fast to me. It might be because they’re autos and the buds are maturing so quickly, so I’m guessing it’s just that. I’ll keep an eye on it, though. Interestingly, the buds on Plant #1 are developing differently from Plant #2—they have a much wider structure. The buds on #2 are already looking absolutely stunning imo.

Likes
2
Share


@CannaIGrow
Follow
Plant is growing well. Probably the prettiest one outta the bunch so far.
Likes
1
Share


Likes
61
Share


@WhiteEdge
Follow
30.04.2024
Continue into week 9
Clean nutrient tank for the last time...This is last week of flowering for almost all girls.
Electrical Conductivity (EC): 0.8 for this week..
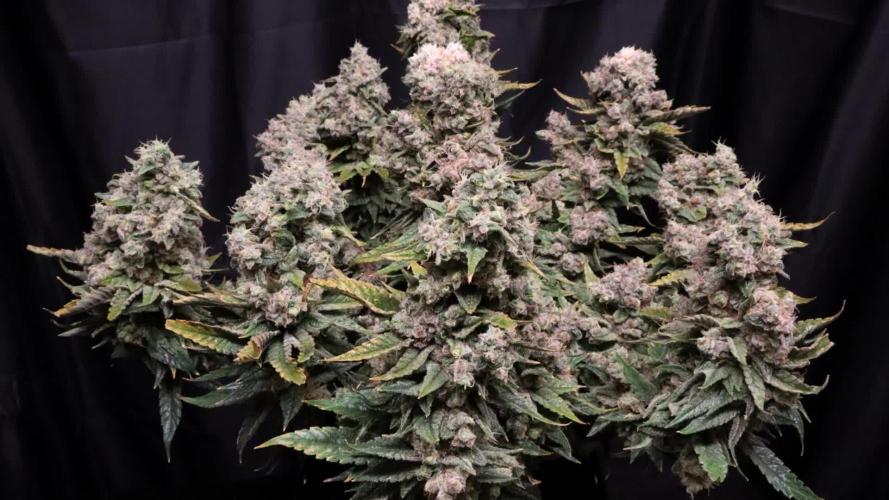
Purple Lemonade: First pheno is insane! Shape, size ,color, bud hardness, appearance, frostiness' all attributes to become photo model!
Beautiful and high odor in the room!
Lighting Parameters: PAR Map: Maximum PPFD is 800, minimum PPFD is 550.
VPD: Ranges from -0.1-1.1
Daytime Temperature (DT): 23-24°C.
Nighttime Temperature (NT): 19-20°C.
Leaf Temperature: 21-22°C.
Light Distance: 45-55 cm from the plants.
CO2 Levels: 700+ ppm.
HLG Scorpion Diablo: Set at 60%, positioned at a 45-55 cm distance.
Girls drink less water, so for this week and till the end of flowering new misting timing's
Daytime: ON for 50 seconds, followed by 30 minutes OFF.
Nighttime: OFF for 50 seconds, followed by 45 minutes OFF.
Nutrient Tank (NT):
pH: Maintained between 5.80 and 6.00. Stable PH, small drifting up and downs
EC: 0.87
Temperature: 19-21°C
Likes
6
Share


@Budking420
Follow
These girls are throwing some gigantic buds already! I'm very excited for this run of strawberry banana. There is already some trichomes building up as well. I had to use a little neem oil to control mildew on mostly the right plant as the left one had hardly any. I'm very pleased with the size shape & overall vigor with these ladies. Check back next week to see just how fast she buds! And dont forget its 4:20 somewhere!!!!!
Likes
7
Share

@TyRun
Follow
At this stage, I’m using the full lighting setup I have available:
730 nm far-red — 5 minutes at the end of the day.
450 nm blue — 4 hours during the peak light period, starting 4 hours after lights-on. It was originally meant to help control stretching, but it arrived too late, so now it will mostly be used to support terpene production. There are some studies around that.
40 W lower canopy light — no idea what the result will be, first time trying it.
Main 320 W light with UVA.
UVB — 1 minute every hour.
You can tell the light is a bit too much. The leaf color on #4 looks slightly faded, especially where she got too close to the lamp. But it does not look critical yet, so I’m not backing off for now.
#3 and #2 have some marks from UV burn. No big deal — they should adapt. I’ll try running UV every other day for now, since I still can’t control it remotely.
I finally found a 20 L reservoir for a reasonable price — just a plastic barrel. I installed it, it fit into the old spot, but I didn’t notice one important thing: the water level in it ended up higher than the pots and drippers.
The result? 1.5 liters of runoff, plus another liter on the tent floor. As they say: “Physics, you heartless bitch.”
Other than that, everything is fine. Runoff is different for every plant, of course. The girls turned out very different — each one doing her own thing. One has 6.8 pH in runoff, another has 4.8, but visually they still look strong.
They are growing every day and already starting to smell, again, each one differently. My favorite is #3. At first, she gives off this minty, floury smell — not exactly cookie or dough, but slightly sweet. Then, if you touch the trichomes with your nose, it feels like falling straight into a berry smoothie. Literally gives me goosebumps.
But she is the only one like that. The others are more like sweet, earthy cookies, with a distant mint/eucalyptus note and some gas in the background.
The first little frost of trichomes has started, and judging by that, the finish should be pretty snowy.
Basically, I’ve now brought my whole arsenal into play. From here on, it should be calmer: just watering and watching the buds swell.
As for the nutrient mix: potassium is around 150 ppm, phosphorus around 80 ppm. I reduced nitrogen as much as I could — now it’s around 100 ppm. Calcium was lowered to 100 ppm too, mainly to bring nitrogen down even further. Magnesium is around 80 ppm. Plus monosilicic acid and Hesi SuperVit.
Likes
189
Share


@Green_Man_420
Follow
Evening fellow growers hope you all had a great weekend. Massive shout to James @RQS for supplying the beans for my current grow.
⚠️ I add photos as the week progress so please stop by and check out the progress.
Day 29 the start of week 5, we have entered flower. Let’s hope for some stretch now. Really happy with how they are progressing. Still trying to figure out why the big one at the back is looking sad. She is growing at a rate of knots so I’m bamboozled to say the least! Watered last night will introduce some flower nutrients this week.
Day 31, watered today upped the amount to 1 litre also started with some bloom. Will add some photos either day or tomorrow. ✌️
Day 32, nothing to report just letting them do their thing. 👊🏻
Day 35, not been a good couple days. The dodgy looking one at the back is no longer part of the crew. She tried and I gave her all the best help I could but she just stopped growing. The bud sites were like nothing I have ever seen before I really don’t know what happened. The other mimosa is doing fine. She is stretching and the bud sites are looking good. Watered last night with plain water. Will probs give her one more feed of grow then onto the bloom. ✌️
Once again thank you all for the love and likes on the current diary. ✌️

Likes
25
Share


@pifflestikkz
Follow
Day 15
18/07/24 Thursday
De-chlorinated tap water pH 6 with calmag 5ml -5L.
I have scratched back surface soil, and topped up with canna terra pro and DyNoMyCo ✌️💚
Day 16
19/07/24 Friday
Lite Feed today, 250ml each pot small run off.
Seeing excellent start to these babies. Let's get it 👌💚
Day 18
21/07/24 Sunday
De-chlorinated tap water pH 6 with calmag 5ml to 5L.
Watering in 1L each day from now.
Updated video
Day 19
22/07/24 Monday
Nothing new to report. Starting to see them beautiful fans appear that's all 😁✌️
Day 20
23/07/24 Tuesday
Feed today, giving them straight all nutes Inc flowering nutes.
I will update the dose as they grow and develop a bigger hunger.
Video updates 👌💚
Day 21
25/07/24 Wednesday
END OF WEEK
Still no water or feed since Tuesday, it has been overcast last two days though so not a lot of energy been used.
Still happy and healthy 💪💚


Likes
4
Share

@DickJones
Follow
Bubble Gum was definitely the greatest yielder of the 3. So much flower I could not get in with the scissors to cut the leaves off at the stem. Very excited to see the final weight.

Likes
4
Share

@Chrisandweed
Follow
Pues la catastrofe pasó. Usé una bomba de descarga (un spray de esos que apretad y tira todo) que en teoria es compatible con las plantas dentro.... Se lío, ya se ve en las fotos y video que muuuuuchas hojas han reaccionado, fitotoxicidad y capúm. En fin, el cultivo lo voy a terminar, se salva mucha cosecha, en principio, pero eso.

Likes
21
Share


@NSABND
Follow
Der Start in Woche 8 ist regnerisch und bewölkt bei kühlen Temperaturen und hoher Luftfeuchtigkeit 😳
The start of week 8 is rainy and cloudy with cool temperatures and high humidity 😳
Day 62 "Haircut" for "Hilde" 😏😉
Likes
13
Share


@Krautbauern
Follow
As you can see at the beginning of the video, the Gorilla Punch was infested with spider mites at the end. I sepereted her directly outside the greenhouse.
High time to harvest them before something worse happens…
After 67 days in total from seed to harvest she got cut off👨🌾
it is dried in a cardboard box in the cellar at about 20 degrees
Because of the spider mites there were some rotten buds, maybe 2-3g i have to cut off. It was definetly the smallest plant of them all. The bud rot is caused by the plant herself... nearly every bud was produced directly at the stam buds directly at the stam.
Likes
13
Share


@EasyGoing420
Follow
Plants have been scroged and are almost covering the hole net , knowing that they are going to strech for the first three weeks of flower, I'll be switching lights to a 12/12 cycle on the upcoming days . Happy growing y'all !
Processing
Likes
5
Share


@Greenfox89
Follow
Good evening and welcome to the second entry in this diary.
So that we already have to work with high temperatures, I carefully ordered the leave coat from Biobizz but it is still not there!Just like the rest of the order.
I gave the plant 350ml Enchancer from Greenhouse. This is a new product for me. Which I will definitely include in my range.
The room climate is 40% -50% humidity humidity from 25 to 28c during the day and 21-23c at night.I once read that frozen 2L bottles can help get a few degree down, and I think about trying it.
We are still waiting for the 3 noiden of the plant and then we start training. Will topp this lady in the next days or maybe next week
Thanks for your time the fox✊🦊❤️

Likes
58
Share


@AsNoriu
Follow
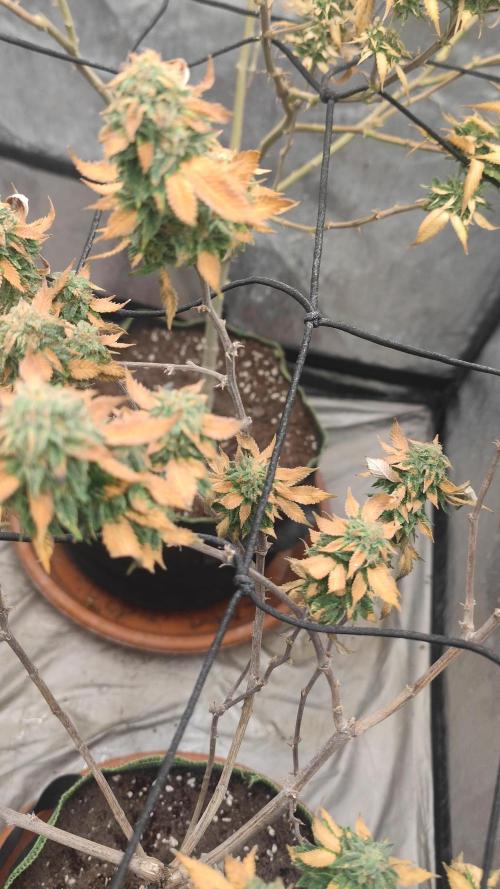
Night 87 since seed touched soil. In total darkness, after work i came to check huge rain damage - found bud rot. #1 goes down.
Day 94. Last two girls are down, this summer adventure is over !
If early spring, in theory you can have two auto harvests easy, even in UK ...
Happy Growing !!!

Likes
4
Share


@BIGLOTTOLAXER96
Follow
Had alot of fun with these realized my dumbass could only use my plant for two plants but everything is a learning process i really wanna lrean how to get fat ass nuggs any help is welcome
Likes
32
Share


@OrionSparkles
Follow
•Todo marcha ok; hay dos Epic que están más desarrolladas.😊
•En esta semana trasplantaré a mecetas de 6L,y prepararé el abonado a usar.
•Powder Feeding Bio🤙🏻
--------------------------------------------------------------
🚀A dia de hoy: 👇
▪️Editado: 15/10/23
-Trasplanté a macetas de 7L,tamaño final.
-Mezclé en cada maceta 15g de feeding bio grow.
-Y 2g por 2L,de Aditive powder Enchancer; está mezcla la aplicaré cada 12/14 dias aprox.PH: 6,🤙🏻

Likes
33
Share


@Pirangueiro
Follow
I think this species is beautiful! a light green and very symmetrical and strong leaves. it develops very well without pruning techniques. branches naturally and creates several big buds! go lemon 🍋
Likes
17
Share


@420DeepGrow
Follow
Gracias al equipo de Kannabia Seed, Marshydro, XpertNutrients y Trolmaster sin ellos esto no sería posible.
💐🍁 Moby Dick 🐋:
Criada a partir de dos parentales icónicos, como es el cruce de White Widow y una Haze pura G13, este choque de titanes provoca un híbrido que golpea a las puertas de las sativas más fuertes disponibles en el mercado.
Estamos ante una criatura impresionante en todos los sentidos, con ejemplares que florecen en solo 9-10 semanas en interior y arrojan un peso en lonja de 550 gr./m²
Al igual que su padre Haze, nuestra Moby Dick ofrece agradables notas cítricas, pero con efluvios de vainilla y eucalipto, una mezcla de aromas que genera una combinación intrigante, que puede llenar cualquier habitación con una fragancia inolvidable.
El sabor es muy parecido a su olor, con toques de limón agrio que harán que tu lengua cosquillee al inhalar, convirtiéndose lentamente en un humo dulce y terroso, con pinceladas de madera e incienso que se adhieren al interior de la boca al exhalar.
💡TS-3000 + TS-1000: se usaran dos de las lámparas de la serie TS de Marshydro, para cubrir todas las necesidades de las plantas durante el ciclo de cultivo, uso las dos lámparas en floracion para llegar a toda la carpa de 1.50 x 1.50 x 1.80.
https://marshydro.eu/products/mars-hydro-ts-3000-led-grow-light/
🏠 : Marshydro 1.50 x 1.50 x 1.80, carpa 100% estanca con ventanas laterales para llegar a todos los lugares durante el grow
https://marshydro.eu/products/diy-150x150x200cm-grow-tent-kit
🌬️💨 Marshydro 6inch + filtro carbon para evitar olores indeseables.
https://marshydro.eu/products/ifresh-smart-6inch-filter-kits/
💻 Trolmaster Tent-X TCS-1 como controlador de luz, optimiza tu cultivo con la última tecnología del mercado, desde donde puedes controlar todos los parametros.
https://www.trolmaster.com/Products/Details/TCS-1
🍣🍦🌴 Xpert Nutrients es una empresa especializada en la producción y comercialización de fertilizantes líquidos y tierras, que garantizan excelentes cosechas y un crecimiento activo para sus plantas durante todas las fases de cultivo.
Consigue aqui tus Nutrientes:
https://xpertnutrients.com/es/shop/
📆 Semana 3:
Muy buena semana, he aplicado un riego solamente con agua de manantial para reducir la cantidad de sales acumuladas en el sustrato y se ha notado una mejoria .
Creo que le quedan unas dos semanas por estirar, parece que va a ser una buena cosecha.
Se mantiene un buen control del cuarto de cultivo gracias a @marshydro y @trolmaster.
Mantengo las dosis de 1/3 de nutrientes recomendados por el fabricante.
Potencia del foco 80%

Likes
346
Share


@Canna96
Follow
This week went pretty well, other than she stretched like crazy and I am now getting worried about running out of vertical space. I also had a few of my bottom leaves get a few brown and yellow spots on them. I did post some pics and asked a question, thank you for the responses, much appreciated! I am thinking about adding my Spyder Farmer LED 100 Watt light into the tent for the nebula auto because it is about 23 inches shorter than the sour diesel. I believe it would only raise my temp about 2 degrees, and possibly lower the humidity by one or two percent. I must say my dehumidifier has been a freaking stud, running 24X7 and not complaining. I should look into adding another unit, it has been in the mid 90's and muggy for about a week. So far I have to say I am super impressed and excited with this setup, the genetics, and with growing this wonderful plant in general. Already planning ahead to my next grow, and what I can do better. I have been enjoying myself and I really appreciate everyone who has taken the time to answer my questions! I am having a blast and am excited to see what this lady will give up in a few weeks!

Processing
Likes
6
Share


@ganjaman24
Follow
Everything is looking pretty good gonna flower soon just letting the structure develop a bit more..probably going to let Somango veg longest


