
Likes
Comments
Share


@pHilosophy420
Follow
She is getting nice and fat next few weeks and it will be harvest time. This strain should taste nice so another strain I'm looking forward to smoke

Likes
27
Share


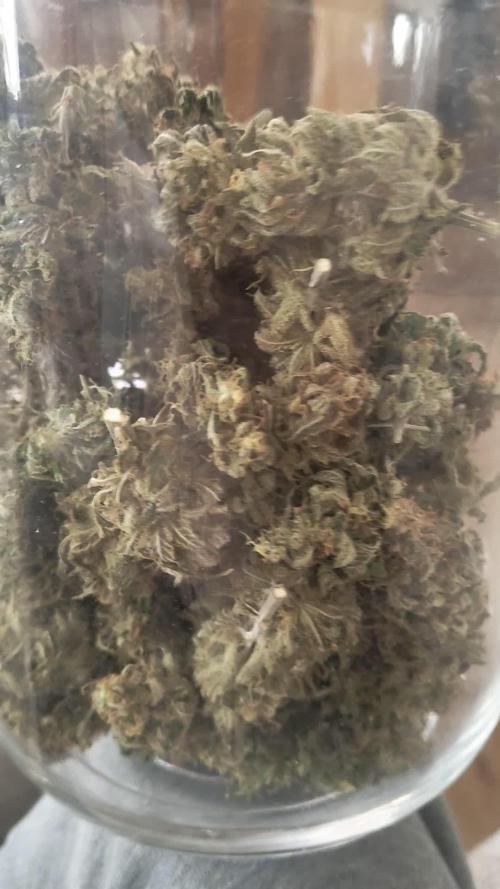
@Ganjagrandaddy
Follow
Data....
So there we have it. Another harvest in the bag and some very nice nugs of Zamnesia Biscotti to wait to dry and cure to perfection. The strain has been great to grow with no issues with anything I threw at it. I didn't see the need to use anything to minimise the iverall size of my plants but went with the nutes to see what the results would be. We will get a better idea once dried and cured with a yield per plant to go with too. I am not expecting g a huge yield based on their overall medium size bit rhe buds look so sweet amd smell amazing of a pineapple type sweet and a fuel type undertone. I think a cure will really bring out the best in these. Roll on the final report. Thank you Plagron and Zamnesia for the opportunity to try these out.
Thanks for sticking g with me for this one and hopefully some nice bud porn in the last post once finished. Be


Likes
29
Share


@Ultraviolet
Follow
The number of points on a cannabis leaf is primarily influenced by genetics, the plant's maturity, and environmental factors.
Grape Guava is an Indica Hybrid. Hmmmm
Genetics: The plant's genetics are the most important factor in determining the potential number of leaflets. Sativa-dominant strains are more likely to develop leaves with a high number of leaflets, sometimes producing 13 or more. In contrast, indica strains typically have fewer, broader leaflets, usually between 5 and 9.
Maturity: A cannabis plant's leaves gain more leaflets as it matures.
Seedling stage: The first true leaves after the initial cotyledons emerge with a single leaflet, followed by sets with 3, then 5.
Vegetative growth: Healthy, mature plants will consistently produce leaves with 7 to 9 leaflets, though 11 or 13 is possible.
Fast growth: A mature plant growing quickly in ideal conditions with plenty of light and proper nutrients is more likely to show a higher number of leaflets.
Environmental conditions: Optimal growing conditions can push a plant to express its genetic potential for more leaflets.
High light: A fast-growing plant with ample light is more likely to develop leaves with 9, 11, or 13 leaflets.
Stress: Environmental stresses, such as unusual lighting schedules, can sometimes cause mature plants to produce leaves with fewer leaflets than normal.
Blue light causes stomata, the pores on plant leaves, to open by activating a signaling pathway within the guard cells. This process involves phototropin photoreceptors, which initiate plasma membrane H+-ATPase activation, pumping protons out of the cells. This creates an electrical potential that drives potassium (K+) uptake, causing guard cells to swell and the stomatal pore to open, allowing gas exchange. Foliars applied in strong blue 430nm with 4000hz tone. 20min dose prior to application.
In essence, you're seeing a combination of the infrared light reflected by the plant, which the camera perceives as red, and any residual visible blue light the plant reflects, which results in a purple hue.
DISCLAIMER 01: All ideas expressed on this diary are for entertainment and general information purposes only. There is no advice on what an individual should or should not do. Any response made by anyone after hearing this communication is their interpretation and is their responsibility. Ideas expressed by this diary should not be treated as a substitute for medical advice or professional help. If expert assistance or counselling is needed, the services of a competent professional should be sought.
DISCLAIMER 02: All materials in this video is used for entertainment purposes and fall within the guidelines of fair use. No copyright infringement intended.
DISCLAIMER 03: This website/diary is not officially affiliated with Alan Watts or his estate. The content presented is inspired by Alan Watts' teachings and philosophy, shared with the intent to motivate, inspire, and support personal growth. The voice used is a synthesized voice and does not belong to Alan Watts. The goal is to respectfully share his timeless insights in an inspiring way, with no intention to deceive or misrepresent. All opinions and interpretations expressed are solely those of the creator and do not represent the official views of Alan Watts or his family. For a deeper understanding of his work, please refer to his original writings and recordings.
You can explore more of Alan’s work here:
📚 alanwatts.org


Likes
18
Share


@Domenik
Follow
One candy kush is gonna be ready in the next week, th rest needs 2-3 weeks more
Chopped the first candy kush on day 52, tomorrow the second is following :)


Likes
10
Share


@Dirty_rich
Follow
Estupenda planta, la recomiendo mucho si ya has cultivado al menos 5 autoflorecientes, pues aunque no es un cultivo difícil pudo salir mucho mejor por un exceso de riego que tuvo en la semana 2 y no creció como debería, aún así estiró bastante durante la floración, cosa que me sorprendió en una variedad automática. Bellísima la volvería a cultivar sin duda.

Processing
Likes
10
Share


@Ryno_Grows
Follow
Special Queen looks like she has 3 leaves, Blueberry coming in well. Did a bunch of LST and some super-cropping to bend the Sativa down


Likes
41
Share


@MaxMo8
Follow
I transferred it to a half-gallon pot and I mixed the organic fertilizer with the soil.

Likes
49
Share


@Roberts
Follow
I had a horrible germination rate then the seedling I finally got was very weak. So I made the best of it, and finished the grow. Frosty buds nice color. Great smell. The Gen 1:11 nutrition works good. Was just the first time using it in DWC. Good looking nugs. Just not one of my best grows. Thank you Mars Hydro, Gen1:11, and Humboldt seed company. 🤜🏻🤛🏻🌱🌱🌱
Thank you grow diaries community for the 👇likes👇, follows, comments, and subscriptions on my YouTube channel👇. ❄️🌱🍻
Happy Growing 🌱🌱🌱
https://youtube.com/channel/UCAhN7yRzWLpcaRHhMIQ7X4g

Likes
10
Share


@MG2009
Follow
10/06/2021
Harvesting #2 and #1 to prevent more loss to mould. #3 will tackle in morning.
#2 hardest hit.
#1 not much
#3 less. Mould
Weight will be added later as I have lost my scale in moving.
On to curing for 3-4 weeks and I will update the smoke report
Likes
84
Share


@Silverback_Guerilla
Follow
EM#1:
I can hardly believe that she weighed less than WW#1..she towered over her and her buds were as big..just not as dense I guess. Her main cola was a little over a foot and weighed 110g wet. I guess she just had a higher leaf-to-calyx ratio and leaves weigh a lot less...
She was a desirable EM pheno..dense, stocky, sturdy branches, very resinous...just a little too leafy.
Her total dry weight was 77g.
Update 9/2: 11 days of curing and it's starting to really wreak when I open the jar. Very pungent..hints of ammonia in the jar and has that sweet skunky smell when incinerated. I set fire to it today and thoroughly enjoyed the experience. It's got that same earthy taste I remember from when it was first dry, but with "herbal" tones on the aftertaste. The buzz is a really intense head high for about 5 minutes, then levels out to a good body stone. I like it. A lot.
EM#4:
My tablet died and I was unable to get any photos of her being harvested.
Her big bent main cola weighed 115g wet and was about a foot long if you straightened it out..
All the extra branching caused by the failed FIM and super-cropping really paid off.
This plant smells AWESOME...very exotic/spicy. Smells great, tastes great, excellent buzz... she was just too tall and lanky and a pain to deal with..
Her total dry weight was 101g.
Update: 8/28 - I'm determined not to smoke any more of her until next week and she's better cured....well...maybe just a little....no, not until next week...well, maybe tomorrow...
Update 9/2: I smoked some more today and wasn't as thrilled with it as the first time..maybe because I had just smoked some EM#1 ;-)
EM#2:
She is dead and drying!
Her main cola was a bit shorter than EM#1's, 11 inches, but was fatter and weighed 121g, wet. One of her other colas weighed 100g. She's very similar to EM#1 (kinda leafy), so I expect her to really lose a lot of water weight. I'm guessing she'll weigh around 85g dry...time will tell.
Update 9/4:
Total dry weight: 91g
It's only been curing for 2 days, but had to sample it. Bam! This plant was my favorite tasting EM of the crop thus far. Same great taste as EM#4, but even more pungent. I smoked about 6 quick bong rips and got a nice uplifting head buzz for an hour that leveled off to a good mellow body buzz for another hour or so.
EM#3:
update 9/2:
She might actually finish in about 10 days or so. Plenty of time to hit her again with cha ching, terpinator, and bud candy...
update 9/10:
HARVESTED!
This plant took more than 4 man-hours to manicure and took three 18" drying baskets. So many buds.
I will be amazed if she comes in any less than 150g of dried bud which would be amazing, but considering her space requirements and duration of bloom, probably not worth it...smell, taste, and effect could still sway my opinion..
update 9/14:
Total dry weight: 224g!!! (Half-pounder!)
74g of that was lower-grade bud which I'll use to make confections and e-liquid.
Took a couple bong rips..she got me stoned, but she needs to cure. Still a little green-tasting.

Likes
21
Share


@Hempy_The_Kid
Follow
10/27/22 watered with nutrients
10/31/22 Happy Halloween 🎃 been watering about every 2 days.


Likes
12
Share


@GizaWRZ
Follow
Last week .. trichomes are nice cloudy with a little bit od Amber around 5-10%. Its time for harvest 😀

