


Likes
38
Share


@MadeInGermany
Follow
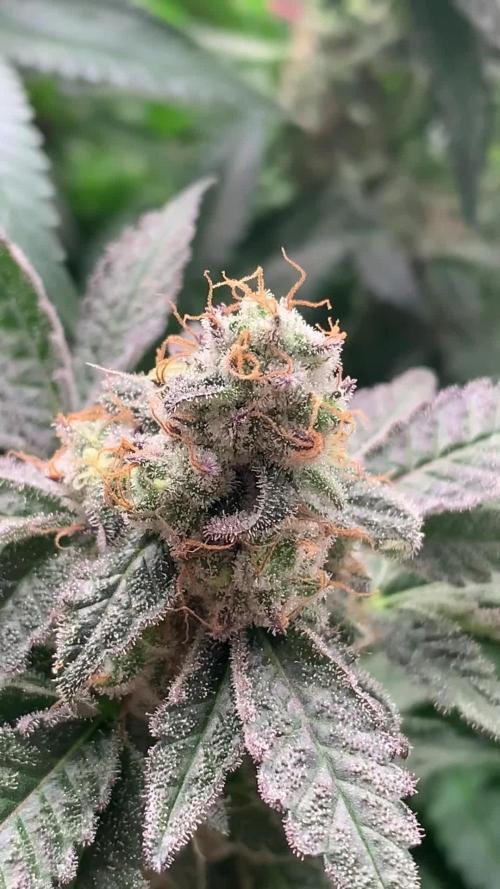
Flowering day 44
since time change
to 12 / 12 h
Hey guys :-)
The buds are becoming incredibly beautiful and smelling better and better ☺️.
Today there was again the full load of food and will be slowly driven down as soon as it comes to an end :-)
Was watered 3 times a week with 1.2 l each (nutrients see table above)
Otherwise everything was cleaned.
Have fun and stay healthy 💚💚💚
👇🏼👇🏼👇🏼👇🏼👇🏼👇🏼👇🏼👇🏼👇🏼👇🏼👇🏼👇🏼
You can buy this Nutrients at :
https://greenbuzzliquids.com/en/shop/
With the discount code: Made_in_Germany you get a discount of 15% on all products from an order value of 100 euros.
👇🏼👇🏼👇🏼👇🏼👇🏼👇🏼👇🏼👇🏼👇🏼👇🏼👇🏼👇🏼
You can buy this strain at :
https://www.exoticseed.eu/de/hanfsamen/hippie-therapy-cbd
Water 💧 💧💧
Osmosis water mixed with normal water (24 hours stale that the chlorine evaporates) to 0.2 EC. Add Cal / Mag to 0.4 Ec Ph with Organic Ph - to 5.8 - 6.5
MadeInGermany

Likes
1
Share


@AcidBurn_41
Follow
04.12.24
BT#53
Mahlzeit zusammen 🙂
So die Mendocino Skunk geht langsam den Endspurt entgegen, ihr geht es wunderbar.
Auch sie hat nur PH angeglichenen Wasser bekommen damit Sie die nächsten Tage gut versorgt ist.
In 3 Tagen bekommt Sie das letzte mal Futter dann nur noch Wasser zum Spülen.
Paradise Seeds hat da eine sehr feine Gentik an den Tag gezaubert.
Komplett resistent gegen alles , wendet bei Ihr Training an somit fühlt sie sich am wohlsten.
Sie wird es euch am Ende doppelt zurück geben, aber auch ohne Training muss sie sich nicht verstecken.
Ihre extremen seitentriebe wollen hoch hinaus.
Freue mich auf nächste Woche dann gibt es wieder ein Update, bleibt anständig stay High.
Mögen all eure Ladys Gesund und prächtig wachsen und euch mit schmackhaften Stuff versorgen 🔥🤘
■■■■■■■■■■■■■■■■■■■■■■■■■
04.12.24 BT#53
Meal together 🙂
So the Mendocino Skunk is slowly approaching the final spurt, she is doing wonderfully.
She has also only been given PH-adjusted water so that she is well supplied for the next few days.
In 3 days she will get her last feed and then only water for rinsing.
Paradise Seeds has conjured up some very fine genetics.
Completely resistant to everything, she uses training to make her feel most comfortable.
In the end she will give you back twice as much, but even without training she has nothing to hide.
Her extreme side shoots are aiming high.
Looking forward to another update next week, stay high.
May all your ladies grow healthy and splendid and provide you with tasty stuff 🔥🤘


Likes
25
Share


@BudHaks
Follow
Week 13!
I have decided to stagnant harverst her in two parts as there is fresh growth in her lower half that the light cannot reach and the top buds are mature now and at the optimal cloudy trichomes I'm looking for are present.
Look at all those trichomes heavy leaf and buds!
She is heavy and smelling amazing with hints of fruit and cookies.
I will also be flushing her next week!
What an amazing journey, coming to an end!

Likes
21
Share


@CBTreee
Follow
I don’t know if it’s the rapid stack pots combined with the rain science grow bags, or the green planet nutrients but these autoflowers are huge at 54” tall. The largest I’ve ever grown indoors. I’ve always wanted to grow a purple pheno and now that moment has come. These autos are going to be show stoppers!!! I’ve very excited to share with you all.


Likes
9
Share


@BLAZED
Follow
Week 8 (5-8 to 11-8)
5-8
Temps: 22.1 to 27.8 degrees
Humidity: 42% to 60%
6-8
Temps: 22.5 to 28.1 degrees
Humidity: 52% to 65%
7-8
Temps: 23.8 to 27.7 degrees
Humidity: 41% to 64%
Watering: Both 1500 ml.
Defoliated the plants and did some mainlining with wires.
Dry weight #1: 2.5 kg. #2: 2.5 kg.
8-8
Temps: 21.7 to 27.9 degrees
Humidity: 41% to 64%
9-8
Watering: Both 1500 ml.
Dry Weight #1: 3.0 kg. #2: 2.8 kg.
10-8
No info.
11-8
Temps: 22 to 28.1 degrees
Humidity: 50% to 63%


Likes
24
Share


@Kountryboi90
Follow
Day 27 since flipping to flower. Day 19 since first pistils appeared. Man, she is getting frosty! Starting to develop a sweet fruity type smell. Getting some color changing on the leaves due my Temps dropping more at night. Struggling to keep her from being so bushy. Will probably do one mor nice defoliation within the next few days and let her ride til the end. She's looking good. Let me know what yall think!


Likes
74
Share


@Mr_Maes
Follow
Nothing but colas on all 3 this is going to be a big harvest. Another 2 or 3 weeks max.

Likes
3
Share


@KalooNie
Follow
Definitely don't do what I did and manifold this strain, it grows too short and indica like for that! I think these would do really well in a SOG or with low stress training 💪 Once again the taste and smell is godlike, this is a very special diesel strain. 10/10!

Likes
44
Share


@PEAKYPLANTERS
Follow
Hi guys, What's up?
Welcome back to Queen Peaky's Flower Gardens
Here we are! Our little girls have just begun to open their buds to bloom in the best possible way!
Happy blooming everyone guys 😋
Likes
27
Share


@adam_pawloski87
Follow
Let’s go day 43!!!! Week went real well , girls started preflower so sometime this week I will be switching up the nutrients for flowering! We are stable and looking super healthy! Can’t wait to see what these ladies do this week! Hope you all enjoy !
Likes
39
Share


@Hazecat_420
Follow
Se trasplanto de maceta 0.5 a maceta de 1 litro para poder ir colonizando el sustrato de a poco. El tallo que se está formando va bien, no se han espigado tanto, sus nodos están muy cercas uno del otro. Luego del trasplante se aplicó foliar Insta-Green de Grotek
Likes
68
Share


@Hawkbo
Follow
Updating this 2 days late today is day 23 but the pics were taken on day 21/22. The leaf strip was a bitch, took me a day and a half to do the 5x9 and I'm still workin on the 4x8. I would have paid someone atleast $400 to do this for me it was brutal my back is toast. Hopefully it will pay off in the end 🤦♂️ everything looks promising tho.

Likes
5
Share

@Bread_n_Buds
Follow
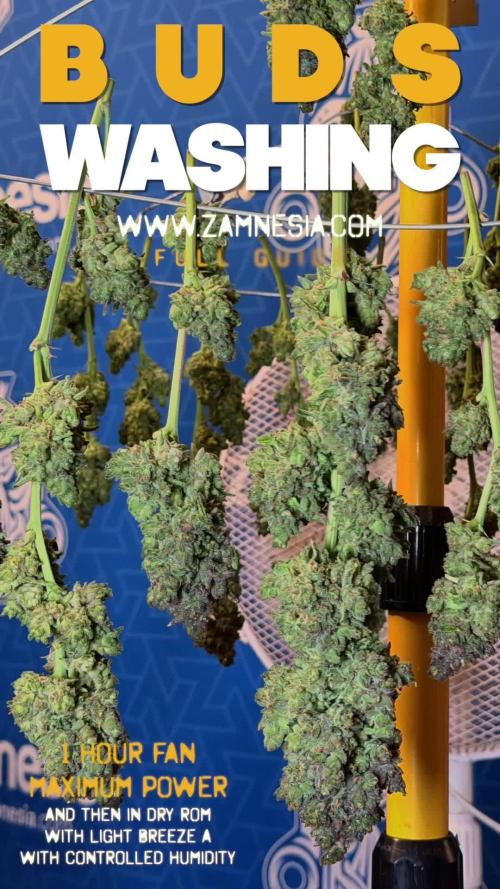
** This week, just quick photos from the growbox. Sorry, I'm harvesting now, so I can't get everything done.
Our L.A. Kush Cake #3 is almost ready. The flowers are turning color and swelling very nicely, and it seems to be turning black, becoming another fantastic dark plant like the first one. It had smaller flowers, but it was beautiful. This plant is medium-sized, but it's spectacular. It's well-proportioned, and the flowers are plump and firm.
Classic 10-liter Zamensia canvas pot
Techniques chosen: The plant was treated with 16 toppings, then trimmed of unnecessary buds, i.e., those that didn't grow well.
We're 100% organic and 1000% Plagron, as always.
The soil we've chosen is the recently launched Plagron Bio LightMix, which will allow us to get the growing process off to a smoother and more reliable start, without the sudden changes that liquid fertilizers can cause. A week is more than enough, so let's not overdo it.
We're in now the flush only water but used plagron on every phase of growing and soil too.
Choose your favorite style and calculate your results on the website:
www.plagron.com
Our new 720W Spider King lamp from Vanguard Hydroponics is now at 80%
Z - https://www.zamnesia.io/en/531-growshop
Our L.A. Kush Cake looks amazing, try it!
Z - https://www.zamnesia.io/en/11097-zamnesia-la-kush-cake-seeds.html
Z - Want to take your growth to the next level? Now you can with Zamnesia's LA Kush Cake. Originally bred by Seed Junky Genetics from a Wedding Cake and a Kush Mints, this indica-dominant strain produces large quantities of resin-coated buds, rich in sweet terpenes and a relaxing effect.
LA Kush Cake seeds produce stocky plants that thrive in any environment. Indoors, they require only 8-9 weeks of flowering to produce dense, trichome-rich buds with a pine-like structure and very compact calyxes. Outdoors, LA Kush Cake can be harvested in early October. Plants produce up to 600 g/m² indoors and 850 g/plant outdoors. In the right conditions, LA Kush Cake can develop intense purple hues that add to its appeal. As you open the jars of these buds, you'll feel a wave of pungent vanilla terpenes wafting through the air, balanced by spicy notes of pepper and mint. Whether you smoke or vape, you'll be instantly intoxicated by its distinctive flavor, with a velvety, creamy aftertaste followed by a powerful yet functional high. Enjoy a relaxing effect that will melt away any tension while keeping your mind clear: perfect for unwinding, enhancing intimacy, or simply enjoying a pleasant smoke. If you need to stay focused, you can: LA Kush Cake relaxes the body while leaving the mind clear and focused, making it the ideal choice for experienced smokers seeking a dynamic, active euphoria that lasts all day. Want to try a potent, productive, and delicious strain? Don't wait: buy LA Kush Cake seeds now and start growing her premium buds at home.
You know it, but I recommend it: here you'll find so many wonderful things, practically "all the best nature has to offer."
Z - www.zamnesia.com
Music //
www.radionula.com
+ Feng Shui Music
+ 432 Hz Frequencies


