
Likes
Comments
Share


@Phaleg
Follow
Today was "the day", I had to select some ot them for reason of space and discretion and the selected plants have been moved to bigger pots, as it follows:
Do-Si-Dos (auto), clay pot about 15L = 10cm height (the other one showing already pre-flowering was discarded)
Cookies Gelato, 9,5L pot = 10cm height
White Widow, 9,5L pot = 11cm height
2x ICE, 9,5L pot + 12,5L pot for the second = 11-12cm height (I kept both because they were both amazing!)
The choice of the pot volume was based on the expected height to be discrete, which should be max 80cm and ChatGPT helped me to calculate the pot volume (it suggested me 7,5 to 10L), but I was slightly more generous especially with the auto-flowering.
Last year my Sticky Orange auto got the best yield with the same clay pot, so I tried the same :P

Likes
22
Share


@NanoLeaf
Follow
End of Week 4
Trying to make sure the soil stays nice and moist to keep the microbes happy and letting the top 3 cm of the topsoil dry before each watering.
.
Turned the wattage up on my ballasts to 600W each.
The ladies have gained some strength and they can handle the extra wattage.
I also performed LST by tucking fan leaves and softly pinching and bending some of the bud sites also used some tie downs and topped here and there whilst keeping the stress at a minimal.

Likes
19
Share


@GoldenWeedGrower
Follow
Legend
Timestamp: 📅
Measures: 🛠️
Water: 🌊
Actions: 💼
Thoughts: 🧠
Events: 🚀
________________________________
📅 D29/V27 - 21/09/23
🛠️
🌊 1L
💼
🧠 She's growing very fast now and she looks healty. Maybe the silica made his job or maybe can be the CO2 dispenser effect ? We'll see.
🚀
________________________________
📅 D30/V28 - 22/09/23
🛠️
🌊
💼 I cropped the main bud by mistake and then topped it
🧠 It's ok, I have about 10-11 buds now to keep until the end
🚀
________________________________
📅 D31/V29 - 23/09/23
🛠️
🌊
💼 Mounted the SCROG. Made LST, big defolation and a couple of timelapse videos
🧠
🚀
________________________________
📅 D32/V30 - 24/09/23
🛠️
🌊 3L
💼
🧠 The total energy of the plant remain the same, so I expect (or better hope) a big grow of secondary buds in the next days. Let's see !
🚀
________________________________
📅 D33/V31 - 25/09/23
🛠️
🌊
💼 Added Rhino Skin to the RES
🧠
🚀
________________________________
📅 D34/V32 - 26/09/23 - and added water and nutes.
🛠️ EC is 1.0, pH 5.5.
🌊 6L of water and nutes
💼 Made LST with Timelapse
🧠 She seems ok 👌
🚀
________________________________
📅 D35/V33 - 27/09/23
🛠️ EC is 1.0, pH 5.5
🌊
💼 LST almost HST
🧠
🚀

Likes
5
Share


@Mr_nugs_lover_David
Follow
This lady has grown up for real what an awesome strain guys, the leaves are exactly the same lookimg on each pheno of runtz muffin, I got 3 plants, and this pheno #2 as you guys can see it's a beauty! I CANNOT WAIT TO TRANSPLANT HER! follow me on this beautiful journey guys! 💛❤️💚
Processing
Likes
81
Share


@LockDownGrow
Follow
ok so everything has gone fantastic , no nutrient burns at all , and have been slowly creeping up the base nutrients , i have stopped the cal mag and now adding house and gardens bud XL at full strength these girls are now in full swing of flower the Cal mag has made absolutely no difference too the yellow colour of this blackberry so I suspect it is just how this strain is as meany diary's on here of the same strain are also on the yellow side , but it's certainly not affecting the speed of the growth of her , i also bought a new ph stick this week ,
i have found when PHing the feed bucket that its best too have air stones in the bucket , add all nuts and then ph but do not use the feed that day as if you check the next day the ph is off again so i left it 24 hours after i add more ph down , and it seems too make the measurements alot easier and stable , i have bent down the main stems " without damaging them onto my netting too A keep the canopy all the same high so my lighting is covering all plants at the same distance and also it allowed the side stems too reach up too ,
i also was sponsored another new led light by kingbo this week so have added another 600watt led too the grow , so now have two 600's and one 900watt , and temps are still fine sitting at 24c lights on and 19-20 off , so am pleased with that ,
I accidentally bend the main stem last week while I was putting them under the netting too try and control the stretch , luckily it did not crack or snap the branch at all and she didn't droop on that branch at all and has healed already , it may or may not be related but as soon as it happened the side branches thickened up too the thickness of the main stem , this plant has over taken the rest in size even being a full week too 15 days younger , it's certainly not ideal but it really does not appear too have slowed down the growth and may well go in my favour , this lady really did stretch out from week 4 into 5 and is showing no sign of slowing down , her side branches are very thick almost as thick as the main stem , her leaf production was minimal and I have only had too remove very few too expose the bud sites , the yellowing seems too be recovering now and most of the plant is green now ,
Update ,
Now gone a lush green colour instead of that horrible yellow , and the buds have already started too purple , she has also stepped up a gear with her nutrient intake almost drinking 6 pints since Thursday ,
She seems too have slowed down on the stretch and has so meany bud site scattered all over her with as the diary name suggests black roses everywhere , and note too any seed banks reading this if there is not a purple stain out there already called black rose now is your chance lol and Iwant a sample pack first kinda like the tester :)
Now defoliation , as you can see they really didn't seem too mind at all being stripped and within a couple of days they had all replenished the lost leaves and even this week olive had to pull the odd few off as they have grown out ,
Method , well all info now is simple ,
Anything I cannot tuck under something that is blocking a bid site with shade I remove too middle or bottom ,
Everything else stays , I just stand above the plant and pull off anything covering the sites , it's really as simple as that , I see some strip them until there is nothing left on but a few sugar leaves , but for me didn't like the look of the plants , for me the growing process is just as much fun as the fruits ,

Likes
7
Share


@eldruida_lamota
Follow
Vamos familia actualizamos la cosecha de las gelato Olandese de Dutchfem .
La verdad que el secado muy bien 7 días en Malla y a los botes, 40% humedad y 24 grados es la temperatura ambiental que han tenido en el secado.
Por lo demás de miedo os la recomiendo.
Gracias a DutchFem, Agrobeta y Mars hydro , sin ellos este proyecto no sería igual 🙏.
Agrobeta:
https://www.agrobeta.com/agrobetatiendaonline/36-abonos-canamo
Mars hydro:
Code discount: EL420
https://www.mars-hydro.com/
Buenos humos.


Likes
11
Share


@Beedog
Follow
Buds starting to grow throughout the room now having afew issues across the board on all plants with yellowing leaves and have concluded it is mag deficiency so will add call mag now see if they peek up until next week!
Likes
5
Share

@Bread_n_Buds
Follow
**Fast Pic in growbox this week working on various harvest
I thought so when I transplanted it from a 6.5-liter pot to a 20-liter pot: Our Zamnesia Tropicana Cookies had roots I'd never seen before in such a short period of growth, which made me think this one would become a monster, and indeed...just look at it for yourself.
Truly large, immense, with mostly aligned flowers except for the crazy one. It's also very suitable for scrog, and it's a plant with large flowers
in all phenotypes that will give you immense satisfaction.
I have difficulty handling it; it's truly a monster, too big, but I also managed to flush it well and cage it well to ensure it finished well and photograph it well. It's truly beautiful.
I must say that it vegetated for 10 days after transplanting, the others less, and I regretted this; they should all have vegetated a bit longer after transplanting and before flowering, except for a couple.
Our Zamnesia Tropicana Cookies #2 was super cute from the start, but after transplanting, it became a monster that wanted to grow out of control. To be honest, I noticed a particularly strong root system when I changed the pot, and I sensed its potential.
This potential has since been confirmed by another plant grown without techniques, with a magnificent cola.
We transplanted it from 6.5 to 20 liters, let it vegetate as best we could, and the plant seems to be growing beautifully. We only removed a few small growths that hadn't seen the light of day and pruned the tops that seemed to be slipping. This one, which only lasted about 10 days after transplanting, is a monster.
We're in a standard 20-liter square plastic pot.
Techniques chosen: The plant was pruned 16 times, which means four times more pruning and a couple of extra toppings on the tops that seemed to be slipping: a real beast.
We're 100% organic and 1000% Plagron, as always.
The soil we've chosen is the recently launched Plagron Bio LightMix, which will allow us to get the grow started more smoothly and reliably, without the sudden changes that liquid fertilizers can cause. A week is more than enough, so let's not overdo it.
We're halfway through flowering, and the plant honestly looks monstrous. We're well on its way to flowering, and we've brought Green Sensation forward a week. It's very balanced, with no signs of imbalance. We've added:
- Pure Zym 1 ml/l
- Silic Rock 1 ml/l
- CalMag Pro 1 ml/l
- Sugar Royal 1 ml/l
- Alga Bloom 4 ml/l
- Power Buds 1 ml/l
- Green Sensation 1 ml/l
Choose your favorite style and calculate your results on the website:
www.plagron.com
Our new 720W Spider King lamp from Vanguard Hydroponics is now at 80%
Z - https://www.zamnesia.io/en/531-growshop
Our Tropicana Cookies is now in great shape, give it a try!
Z - https://www.zamnesia.io/en/10921-zamnesia-tropicana-cookies-semi.html
Z - The award-winning Girl Scout Cookies is a cannabis strain that lends itself very well to breeding projects. That's why we boldly experimented by combining its genetics with a fruity Tangie. The result is Tropicana Cookies, a fast and potent hybrid with 22% THC. This strain is highly productive, and its buds are not only rich in sweet and spicy terpenes but also covered in a layer of sticky trichomes (which facilitate the extraction of high-potency concentrates). Tropicana Cookies' genetic makeup is 60% sativa and 40% indica, a blend that produces a balanced and euphoric effect.
Although easy to grow both indoors and outdoors, Tropicana Cookies thrives outdoors in warm climates. If you have enough space and good sunlight, the plants can reach heights of 180 cm. Wait until mid-October and, in optimal conditions, you can harvest a whopping 700 g/plant. A result well worth the effort. This strain also impresses indoors, reaching heights of 150 cm and producing 500 g/m². Tropicana Cookies also stands out for its rapid flowering. After just 7-8 weeks of indoor flowering, it will be ready for harvest.
You know it, but I recommend it: here you can find so many beautiful things, essentially "the best that nature has to offer."
Z - www.zamnesia.com
Music //
www.radionula.com
+ Feng Shui Music
+ 432 Hz Frequencies
Processing
Likes
13
Share


@kevgrow
Follow
Hey Growers, end of week 6 from seed, end of week 1 of flower :)
Plant #1 is looking healthy and has grown tremendously. I previously had them in a 24x24x48 grow tent but after seeing how much plant#1 was growing I went ahead and purchased a bigger tent 36x36x72. Light is about 17 inches away from the plants right now. Might have to do some LST so the top leaves don't receive too much light.
P1 is filling up with pistils, looks like buds will soon begin to form :)
I have not been able to figure out Plant#2 gender. It has different charateristics from plant#1. Earlier in the week I noticed P2 was not growing in height and the leaves were starting to look pale. Light is currently set to medium low 140 Lux X100. I reduced it to 100 Lux and after a few days it began growing again and its gaining back its color. P2 has given me minor problems since day 1 but its looking better now.
Changed light cycle 12hrs / 12hrs
I had issues trying to maintain humidity levels at 45%-55%, I might need to purchase a stronger dehumidifer
cloned two plants and they are beginning to grow :)
Its been an exciting experience so far, everyday learning something new about these plants. I sometimes stand and just stare at my grow tent analyzing little details about them trying make sure they are in healthy condition. My wife complains because I spend too much time with them lol. I know once these plants get more mature she will show more interest in them.
I am learning as I go, any recommendations would be greatly appreciated, stay tuned Week 7 coming up
#HappyGrowing #FirstGrow #MysteryStrains 😊
Likes
10
Share


@CURATI_DA_SOLO
Follow
Allora.... Questa settimana ha ripreso veramente tanto! La settimana scorsa era rimasta un po' indietro rispetto le sue amiche (diverse genetiche) ma adesso ha veramente dato il suo scatto è ha rivelato che è all'altezza delle sue compagne di crescita! Anche lei sembra che si stia iniziando a riempire bene e ho deciso di togliere qualche internodo centrale per favorire l'areazione ed evitare eventuali sorprese di muffe più in là( anche se non ho mai avuto problemi meglio prevenire che curare)...non vedo l'ora che si inizi a gonfiare un po' perché sono molto curioso di questa genetica! Ha un 29% di THC quindi dovrebbe essere adatta a me .... speriamo bene e incrociamo le dita! Nel frattempo volevo ribadire la potenza di questi prodotti di Cannaboom! Sto usando tutta la linea full cream (con qualche aiuto della linea minerale tipo il loro CALMAG(SI) ) che oltre ad essere un semplice Cal Mag contiene anche silicio e ferro! Veramente adatto a le piante per fare assimilare meglio potassio e fosforo! Credetemi che con solo due applicazioni ho potuto vedere delle differenze esuberanti! Infatti speromtanto di continuare a usare i loro prodotti perché mi stanno veramente aiutando a spaccare questa growbox da 100x100! Quindi ancora grazie a CANNABOOM!
Un grande grazie speciale a tutto il team di anesia che mi ha fornito questa splendida nuovissima e potente genetica! Spero che piaccia come uscirà il diario! Ma alla fine ci saranno delle sorprese per tutti quindi rimanete sintonizzati! 💪🏼💪🏼💪🏼💪🏼
Seguitemi anche su Instagram sul mio profilo curati_da_solo🔥🔥🔥🔥

Likes
39
Share


@J_diaz420
Follow
El día 27 de floración se vuelve a podar brotes bajos y se colocan tutores de varas 👍🍀
Likes
12
Share


@cookingwithninja
Follow
day 85. Sorry haven't posted in a while. Things are ok, still defoliated here and there, removed some lower branches from all about a week ago. Bridal party was having some kind of P or K issue, like medium is too hot or some type of minor lockout, or ph issue. I have used BlueSky organics compost tea amendments,and just threw it in a 5 gal bucket of water without a compost tea bag, when the 5 gal is empty I just refill with still the amendments in the bottom breaking down, along with bluesky organics organic booster.


Likes
293
Share


@Ju_Bps
Follow
Hello growmies 👩🌾👨🌾🌲🌲,
👋 No more burning this week, using nutes again.
Buds start to bump and are more and more frosty ❄️❄️
💪 Will do a big defoliation next week ✂️✂️
💧 Give water each 2/3 day
2 l Water Only
2 l Water + Bloom + Green Sensation + Sugar Royal (3 + 1 + 1 ml/l)
PH @6
💡Mars Hydro - FC 3000
50% 13 cm
Mars Hydro Fan kit
Setting 8
Have a good week and see you next week 👋
Thanks community for follow, likes, comments, always a pleasure 👩🌾👨🌾❤️🌲
Mars Hydro - Smart FC3000 300W Samsung LM301B LED Grow Light💡💡
https://www.mars-hydro.com/fc-3000-samsung-lm301b-led-grow-light
Mars Hydro - 6 Inch Inline Fan And Carbon Filter Combo With Thermostat Controller 💨💨
https://www.mars-hydro.com/6-inch-inline-duct-fan-and-carbon-filter-combo-with-thermostat-controller
Fast Buds - Gorilla Cookies FF🌲🌲
https://2fast4buds.com/us/seeds/gorilla-cookies-fast-flowering
Likes
1
Share

@gammacrowns
Follow
Fixed the splashing issue from the top-feed DWC drip system. Also cleaned up the lower suckers and weak damaged branches.
Processing
Likes
11
Share


@Fibro_Witch
Follow
This little lady is looking more hopeful this week. I moved her (well, all of the autos) further away from the photos so she could get more direct sun. She doesn't look great, but I feel like she's working through. The newer leaves are still pretty yellow, but at least they aren't contorted and there's no horrible brown spots or anything. I gave her some of the Coast of Maine 5-2-4 around her base so hopefully she'll gobble some of that up and will look better next week when she'll have gone to flower. Stay tuned!
Likes
7
Share


@Danger90946
Follow
Here we are in week six of flower and not a lot has happen this week other than the usual watering and letting her do her thing. Only trouble this week was updating GoPro had to try a few times. Other than that we got some rain in my home town and collected about 60 gallons that I'm going to use to finish the rest of the grow. Also, got my new AC Infinity CLOUDLINE T4, Quiet Inline Duct Fan System with Temperature and Humidity Controller, 4-Inch. I was really hoping this two plants would finish before the year ended, however, it looks like they got others plans. See you guys next week.


Likes
3
Share


@heyholetsgrow
Follow
Hey everyone!
Do-Si-Dos ladies are growing inside the grow tent now and under a 250w HID, which is a HPS since my MH bulb burnt.
They are growing very strongly, fast and healthy. With a decent thick stock for their age I believe. This genetics are very strong, so far no problems, no stunt growth.
Made a 4-way topping, where you must leave 2 nodes only. The plant had around 6 nodes before topped. Will start LST on branches and shape them for the scrog I might apply later.
They leave a sweet smell scent in the air.
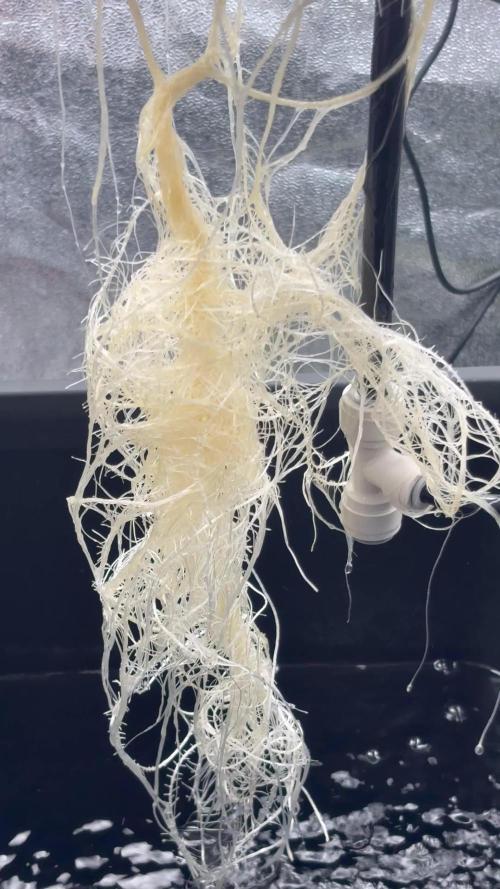
Roots are also growing pretty fast.
Thxx 🙏

Likes
6
Share


@Headies
Follow
this is weeks 5 and 6.I topped them and trained the branches out to the side. Plus I broke one... I tried to save it but it broke again later