
Likes
Comments
Share

@Finally_free
Follow
1st plant, Wet, 20gr on the top. Trichomes were getting brown. Will leave the rest for a couple of days. 2nd part, 53gr, very little!
1st plant dry, total of 16 gr, very little
2nd plant, wet, 99gr, lost 3 tops to budrot... 😑
2nd plant dry, total of 19 gr, very little
The sun screen imo was very affective, even using it in my tent. Smokin review will come in 2 weeks, really excited!

Likes
68
Share


@I_and_I
Follow
I had fun with this barneys gorilla zkittlez, although it seems like it was ready around 7 weeks, its as if the plant has been in the early stages of self seeding when I've harvested on day 54~ of flower.. Can't think any other reason why this would've happened
Anyway overall the bud is 95% amazing, just a slight sadness at the miniscule seeds forming close to the stems in the centre of some buds that takes away from the taste a little

Likes
7
Share


@Adam22
Follow
Flushed for 3 days so far so good. No yellow tips on the leafs yet but I may just have to pull this plant down today I have just 1 plant in the tent it doesn't seem worth running this just for 1 plant so I will pull down later today I think and upload pics and remember where I went wrong for next time. I have some new seeds just been delivered I think next time I will try to have an additional tent slightly bigger so I can have 2 different strains growing at the same time. Definitely using feminised seeds also as don't have time to waste vegging for 6 weeks a plant to just end up with balls. Next run will be:
4 x cookie dawg
3 x velvet moon
1 x sherbert punch
I will be looking for a decent led light for the next tent also I would like to run the same strain in both tents and see what the difference in the results are using my hps light vs led
Harvested plant 1
5oz budd
14g popcorn buds and leaf trim
Likes
3
Share

@Oyziphar
Follow
🌿
Once again, we had very sunny days this week 🌞🌞🌞and another heat wave is coming 😍😍😍
Plants are ready to harvest and they are very smelly 🌷🌷🌷
Some leaves went yellow. I defoliated these leaves 🍂
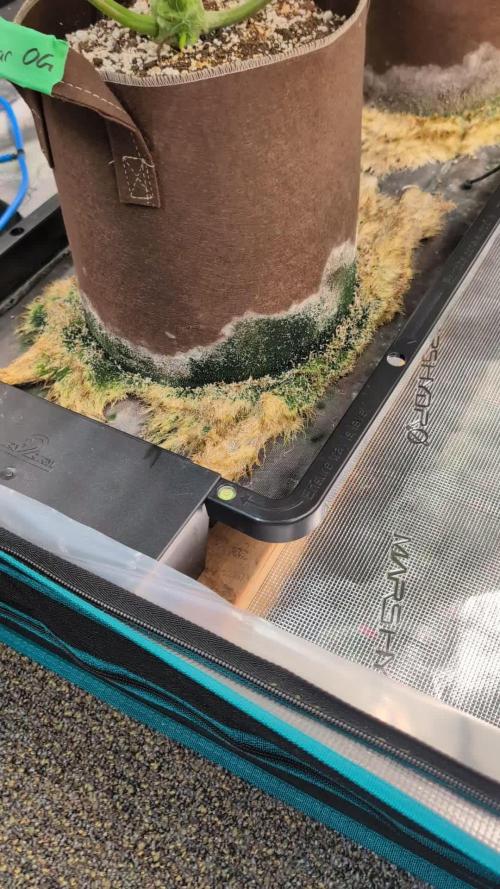
Only 3 plants on the photos 😲 Last week I noticed a little bit of budrot in plant #3 😱 I harvested the plant to prevent the mold to spread 👹


Likes
26
Share


@pifflestikkz
Follow
Day 37
06/08/24 Tuesday
De-chlorinated tap water pH 6 today with calmag only.
Pre flower stretch initiated, pre flower female sex pistils forming 😍
All happy and healthy!
Structure of Melonade Runtz and Critical orange is Beautiful.
Pic and vid update
Day 39
08/08/24 Thursday
Feed today using de-chlorinated tap water pH 6 with Plagron PK13-14.
Showing her pre stretch 😍
Day 41
10/08/24 Saturday
De-chlorinated tap water pH 6 today again with calmag.
400ml with run off now.
Day 42
11/08/24 Sunday
End of week
De-chlorinated tap water pH 6 today again with calmag.
400ml with little run off this time
Pistils on pistils now 😁
Starting to see the beginning of bud formations 💚


Likes
15
Share


@Dirty_rich
Follow
A 2 días de la cosecha
Llegando al tiempo de cosecha en su semana 12 desde semilla, olor muy diferentes a otros cultivos.
Tricomas 70% lechosos 30% ámbar en las flores.
Buena producción, ya veremos la cosecha.

Processing
Likes
23
Share


@Hawkbo
Follow
The big ones close to done just started dropping ppms. The smaller ones have a little longer and shouldn't yield much looks like they just gunna have tiny nugs cuz they in only about a gal and a half of coco on surprised they got as big as they are. The colors on the big one is insane tho.

Likes
7
Share


@hitzaza
Follow
In this week Ive been on vacation so I have just few photos. But when I came home the smell is incredibly strong.

Likes
41
Share


@PigBearMan
Follow
High,
I'm flushing since FD49.
Looks good so far, will be a nice har-fest... I guess it'll be around 600-650g dry buds. 👌
Next Moby clones are allready on their way... 😉
21% THCV is way better than 30% Gorilla's advertising. I smoked some a few days ago...what an overhyped strain that GG is...lol. 😆
Edit: Let's see if Dinafem can change my point of view when it comes to the Gorilla genetic. 😉
Stay green.👽


Likes
1
Share

@Black_Widow
Follow
Привет садоводы !!!
Прошло ровно 10 недель и цветок готов
Прекрасная генетика- супер auto
запах очень приятный сладковатый карамельный и цветки увесистые
Ставлю оценку Отлично !!!
Likes
6
Share


@DrFabrizio_85
Follow
Still pushing branches under the net. I give sugar royal once a week

Likes
26
Share


@sacredgeometry
Follow
Glad to see them start filling out. I started giving compost tea and molasses in between feeding and watering once a week. At this point I'm trying to slowly raise ppm without getting nute burn. They are barely putting put smell. I'm guessing the buds will be significantly bigger next weeks update.


Likes
6
Share

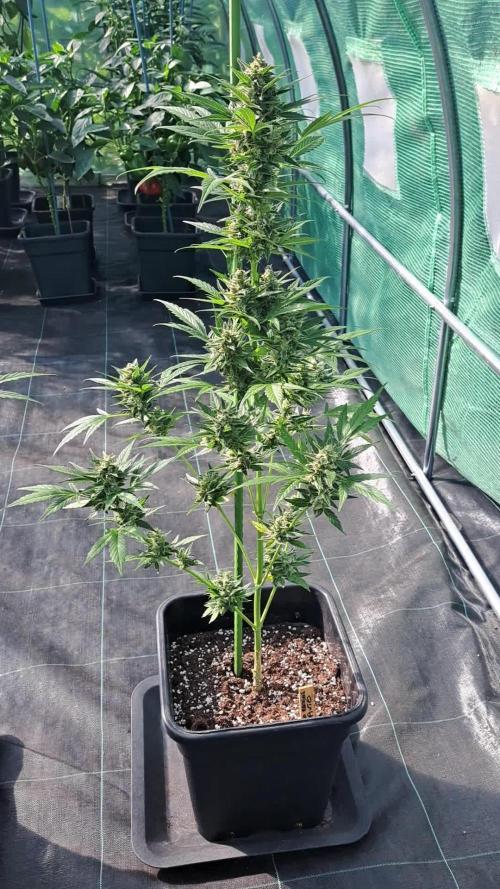
@Grow_for_Happiness
Follow
Another week has gone by and not to be a broken record but the girls continue to look great. Buds are swelling, and I would guess they have 2-3 weeks left to go. Seeing lots of trichome production already as well. Lights have been 650&700 umol/s across the canopy.
Only weird thing is that on the front plant the lower part of the fabric pot and 1/4 of the roots are turning the same green as the Plagron additive that I started using. Noticed it a few days after starting the new nutes so thinking that's all it is because the plant is otherwise looking healthy. Let's keep these ladies happy and get them to the finish line!
Likes
58
Share

@pifflestikkz
Follow
Day 85
Day 35 Flower
26/07/24 Friday
Big feed again today, using de-chlorinated tap water pH 6. 😁 I noticed slight nute burn on leaf tips so I have dialled back all base nutrients by 1ml.
Day 86
Day 36 Flower
27/07/24 Saturday
De-chlorinated tap water pH 6 only today full 5L a little run off.
Did it outside in the sunshine again today 🌞📸💚
Updates 📸
Day 87
Day 37 Flower
28/07/24 Sunday
Feed again today, De-chlorinated tap water pH 6.
She took the full 5L with about 10% run off.
She really is stacking now 💪
Day 88
Day 38 Flower
29/07/24 Monday
Just de-chlorinated tap water pH 6 today. Noticing pistils starting to mature.
Video update
Day 89
Day 39 Flower
30/07/24 Tuesday
Nice feed again today, de-chlorinated tap water pH 6.
Really throwing out trichomes now, density is getting better as well.
Day 90
Day 40 Flower
31/07/24 Wednesday
De-chlorinated tap water pH 6 only today. Full 5L again she's taking this daily now ,😅💚
Day 91
Day 41 flower
01/08/24 Thursday
End of week
Feed today using de-chlorinated tap water pH 6 added nutes brought it up to 6.2.
She just keeps stacking, think I got a fast flower... Or the heat is a little high and just prolonging her process.
May start flushing next week we will see.

Likes
11
Share


@Napo89
Follow
Si è ripresa alla grande dopo le varie tecniche di potatura e defogliazione 😊 forse pronta per la fase di fioritura?

Likes
12
Share


@d4nn5
Follow
starting to get some height on them! and tiny small buds
UPDATE:
my lower leaves are yellow and crispy all of a sudden look like theyve died, im in panic mode, i've attached a video! how can i fix this? also the same plant has started flower but is very under developed compare to the 3 others in flower?
Likes
9
Share


@McGrowin
Follow
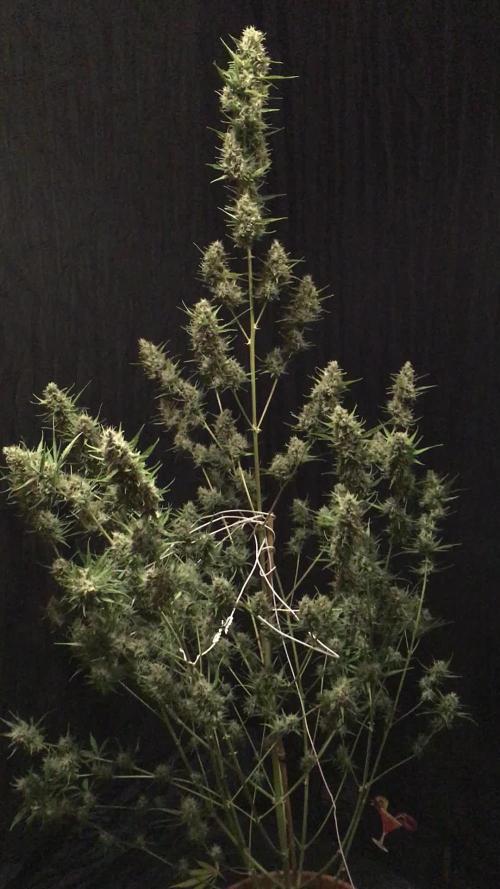
Day 42
| #1 is developing well | #2 is doing best | #3 is a runt |
Lots of trichomes on #1 and #2
Lots of catching up to do for #3
Harvest expected by Halloween


