The Grow Awards 2026 🏆 


Likes
7
Share
@StickyFingah420
Follow
Inicio de la sexta semana y así sigue el avance de la floración.
Ésta plata ha crecido a un ritmo impresionante y apesar de ser más pequeña en un inicio que su compañera de tienda, ha superado su tamaño notoriamente.
Todo sigue bien y sano como se esperaba.
Buenos humos! 👽

Likes
44
Share
@Roberts
Follow
Casey's Rollex OG is still trying to get to the solution. She was the last one to sprout in the room, since the first seedwas a dud. Shecshoukd take off on growth, once she finds the solution. Nothing more to report at this time. Thank you DutchFem Seeds, and Spider Farmer. 🤜🏻🤛🏻🌱🌱🌱🎤💓
Thank you grow diaries community for the 👇likes👇, follows, comments, and subscriptions on my YouTube channel👇. ❄️🌱🍻
Happy Growing 🌱🌱🌱
https://youtube.com/channel/UCAhN7yRzWLpcaRHhMIQ7X4g

Likes
21
Share
@Hydronaut
Follow
Started my Autoflower journey in soil a few grows ago, and was happy with 2-4 ounces. Using my hydro cabinet with this strain was off the charts compared to soil. Maybe 8 ounces when dried? Time will tell, but this lady put out!


Likes
9
Share
@I_Identify_As_A_Dan
Follow
Week 3 for Black Lebanon,
She really took off massively after being moved to the 5L pot last week, was a good move.... She was also topped tonight after the pictures were taken. Shas got a lot of space between her internodes so i have moved her to the middle of the tent.
But overall happy with her growth considering her age. She will be going in the big 250L pots outdoors when shes a little older.
She was also fed FPJ today in her watering.

Likes
25
Share
@MissFlowerPower420
Follow
Doddering along merrily, nice colour to her . Pot is proper funky lol , kind of a test to see if it's better than standard pots and fabric ones .
Happy growing n peace to all you fine horticulterists 🕊️🕊️🕊️
Likes
10
Share
@Radagast_
Follow
11.07.
OG KUSH
Day 77#
Today is the end of the eleventh week for the plants.
There were storms all week and with the fact that they spent almost the whole week under stress (they were also under heat stress a couple of days before), I am certainly satisfied with the progress.
On Tuesday, they were watered for the last time, with clean water, then it rained, and the next day it rained all day, since then they have not been watered, as soon as the soil dries I will feed them.
Below in the table is the food that they received last time, but it is included in this week, and I introduced that as well.
Stay High and Keep Growing!!!


Likes
16
Share
@DreamIT
Follow
-Sponsored by:
💫PARADISE SEEDS💫-💡VIPARSPECTRA💡-💐GREEN BUZZ LIQUIDS💐-🛠️WEDRYER🛠️
🏁18/6 hello growerz, with today I start the resumption of diaries on GD. I have 13 new genetics in germination and as many diaries. I start by putting the seeds in water for 24 hours, after a day I will put the two seeds in two different jiffies, one with humic acid from greenhouseseeds and the other with just plain water. Get comfortable and follow the updates 😉👋🦄
19/6 The seeds were divided and placed in two different jiffies, one with humic acid and one with water only.
21/6 after another 24 hours in the dark the jiffies were moved under the lamp. let's start the dances!
23/6 The seed in the humic acid jiffy has already sprouted and the cotyledons have opened. look forward to updates on the brother in the water only
24/6 we await the release of the seed in jiffy
25/6 still nothing for the second seed .-. I'm starting to worry
30/6 the second seed is officially dead, I caught a glimpse of it in the jiffy and by pressing it lightly it exploded. I will always wear a new one from paradise seeds, stay tuned
__________________________________________
Personal advertising (contains affiliate links)
__________________________________________
🦄 winners and holders of the most prestigious awards, since 1994 they offer genetics of the highest quality! Anonymous shipping!
✅https: //bit.ly/Paradiseseeds_
__________________________________________
Did you know that Green Buzz Liquids fertilizers are 100% vegan? A complete line of products ready to give the best to each of your plants! Visit the site and see my journals to see how they work 🦄
🤯 And with the code "dreami t" you will immediately receive a 15% discount on your purchases
✅https: //bit.ly/GreenBuzzLiquidsPro
__________________________________________
👀 Are you looking for a good lamp to start with? 👀
🌞Viparspectra has something more than the others, take a look at their site.
⏩ Use "GDVIP" for an extra discount or "DREMIT3" for an extra 5 %% discount
👀 Search for it on Amazon
✅Amazon USA: https://amzn.to/30xSTVq
✅Amazon Canada: https://amzn.to/38udUVe
✅Viparspectra UE: bit.ly/ViparspectraUE
✅Viparspectra USA: bit.ly/ViparspectraUS
______________________________________________
🌈 Tired of blowing on your weed hoping it dries quickly? Check out the Wedryer website! You will find a well-made accessory that will help your weed dry in just 8-10 days without the annoying risk of finding mold or other annoyances! (no affiliate links)
✅https: //bit.ly/Wedryer_
______________________________________________
📷🥇Follow the best photos on Instagram 🥇📷
https://www.instagram.com/dreamit420/
Backup
https://www.instagram.com/dreamit4200/
🔻🔻Leave a comment with your opinion if you pass by here🔻🔻
🤟🦄💚 Thank you and good growth 💚🦄🤟

Likes
4
Share
@ChiloteAnonimo
Follow
Día 03 de la 4ta semana flora (25-06-2022)
* En estas últimas semanas he tenido problema con el frío. Con luz encendida llegaba a 22°C en carpa aprox, y luz apagada 12-13°C y humedad relativa de 70%.
* Hay una lemon que ha sido la más afectada que es la más alta
* Hay una AK que soporto mejor los estrés, aunque empezó a flotar antes que todas. Una diferencia como de 2 a 3 semanas.
* Para ser mi primer cultivo y tener problemas de principiante con riego y problema con el frío. Siento que puede ir peor, estoy conforme
* Hoy aplique riego foliar de "Knactive". Producto anti estrés nacional
Día 28 de floración (29-06-2022)
* Ayer en su día 27 aplique lavado de raíces a la Lemon_1 que es la más afectada por distintos estrés a ver como se comporta, además le agrege de forma foliar Knactive al igual que regué de forma foliar la amnesia para ver como se comporta
* La AK que es la más desarrollada y la veo bien, por otra parte la banana_2 se ve menos afectada al estrés y va avanzando de forma pareja a comparación de todas las otras


Likes
5
Share
@AcidBurn_41
Follow
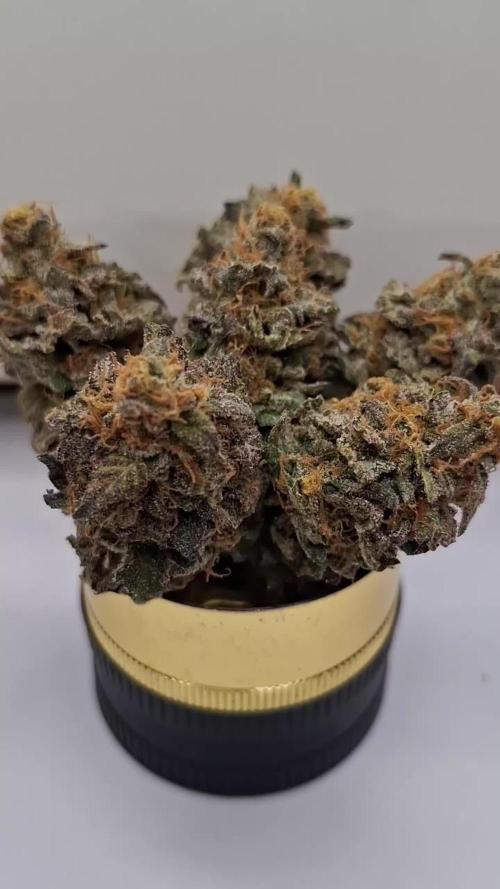
10.01.26
Einen guten Abend ✌️
Da bin ich wieder mit der White Noise von @paradiseseeds .
Das Trocknen ist vorbei jetzt wird Sie ausgehärtet im Glas. Nass waren es 185g nach dem Trocknen 14 Tage im Karton blieben mir an reinen Buds schöne 65g.
Die Buds sind sehr sehr Kompakt voll mit Tricomes sie riechen sehr Süßlich nach kiefer direkt gefolgt von Pfeffer was für die White Window spricht.
Das leicht Minzige nach Beeren stamm wohl von der Thin Mint.
Ein Rauch bericht kann ich euch leider noch nicht geben. Da ich Sie erst in wenigen Wochen genießen werde.
Aber das was ich rieche macht mich freudig auf die erste verköstigung.
Danke an Paradise Seeds für diesen feinen Strain.
Euch danke ich das ihr die Reise der White Noise gefolgt seit ,es wird ein neuen Strain meines Lieblings Züchter geben das steht feste.
Bleibt dran ihr werdet es mit bekommen, wünsche euch ein schönes Wochenende stay high Bleibt gesund.
Mögen all eure Ladys Gesund und prächtig wachsen und euch mit schmackhaften Stuff versorgen 💯🔥
■■■■■■■■■■■■■■■■■■■■■■■■■■■■■■■■■■■■■■
10.01.26
Good evening ✌️
Here I am again with White Noise from Paradise Seeds.
The drying process is complete, and now it is curing in a jar. Wet, it weighed 185g, and after drying for 14 days in a box, I was left with a nice 65g of pure buds.
The buds are very compact and full of trichomes. They smell very sweet, like pine, followed immediately by pepper, which is typical of White Window.
The slight minty, berry scent probably comes from the Thin Mint.
Unfortunately, I can't give you a smoking report yet, as I won't be enjoying it for a few weeks.
But what I smell makes me look forward to the first tasting.
Thanks to @paradiseseeds for this fine strain.
Thank you for following the journey of White Noise. There will be a new strain from my favorite breeder, that's for sure.
Stay tuned, you'll find out about it. Have a great weekend, stay high, and stay healthy.
May all your ladies grow healthy and magnificent and provide you with tasty stuff 💯🔥


Likes
4
Share
@Organic_G
Follow
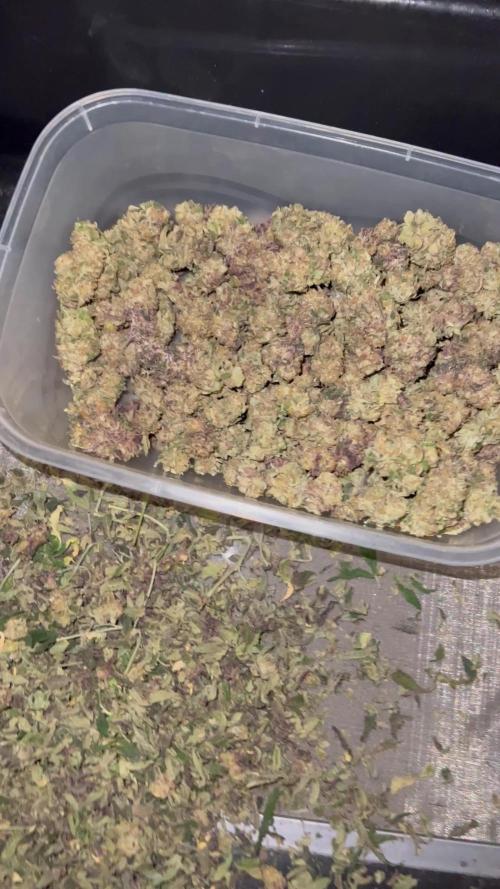
Mein bester und Ertragreichster grow kommt zum Ende…
115,5 g Shuga Leaves/small Buds
450g Proper Buds

Likes
60
Share
@m0use
Follow
Plant #3 yellow hermied and pollinated the tent :(
Can see some of the seeds in the bud closeups as well as the pollen and mini sacks of the plant on lower growth.
Not a big fan of this, It was the one plant closest to the tent door zipper and only happened on the lower growth. Almost wondering if there was a light leak or if it was just the plant. Will test for light leaks when the plants are chopped and I can crawl in and manage it.
The liverwort from last grow survived outside and is making weird spiky umbrella like things. Looks to be its flower for lack of better understanding and how its going to release a lot of spores for the next generation to grow.
Big shoutout to Medic Grow for sponsoring the lighting in my tent, They have provided me with 2x Mini Sun 2's in the 240w configuration, They use the v1 growing spectrum that is a all purpose seed to harvest spectrum so their is no hassle of switching it mid grow. If you're interested in learning more about Medic Grow products please visit the web link below.
https://medicgrow.com/
https://growdiaries.com/grower/MedicGrowLED

Likes
49
Share
@masterofsmeagol
Follow
IVE MADE MORE VIDEOS BUT THEY JUST DON'T SEEM TO UPLOAD AND IT'S FAR TO SLOW TO DO IT FROM HOME
6/27 Made last week a five day week to get back on track. It's still overcast and rainy. It's not raining a lot bit it's consistent. Despite the weather the plants are doing phenomenal. I'll update later. It's 1pm. It's been raining consistently since 11. Just a sprinkle but it's steady. I'm going to begun uploading the weeks weather on my diary. I may start a new diary for the plants I light depped as they are flowering pretty good. Rain stopped and it's just overcast for now. I looked at some videos and did a comparison of videos one week ago and videos today and HOLY SHIT! WHAT A DIFFERENCE. Especially the light depped 10th planet. Well everything but that was the most significant difference. I'm astonished at the health and growth despite the crummy weather. Continued to rain. Just got harder. Plants are taking it but it's flooding underneath the pallets a little but it will be fine. The light dep however has me concerned. The 10th planet is looking spectacular. The bigger purple punch I'd looking good too. The smaller one though looks to have a pollen sack coming off one of the branches. Considering its not on the otherside I assume it's not just a swollen calyx. I don't mind chucking it especially if that means I don't hurt my other girls so I want to make sure. I sent videos to a few other growers and I'll add a question on here. Those three plants have been isolated from the rest for a few days due to rain. I have the suspect isolated alone until I can confirm. It sucks cause the light Depp was going good and the6ve all got little flowers.
6/28 Well that fucking sucks. ALL THREE plants I tried to light depp hermed on me. I could see male flowers. Luckily I had been keeping a really good eye on them and it was preflowers mostly. At least I caught it. One or two stamines on each plant. Would've been really easy to miss. Only one had STARTED to elongate into a stem so I think I caught it early enough. Plus since all this rain they've been kept in a different location then my big girls. Glad I did that now. Boy the roots looked good on those plants. I just grabbed the stalk and lifted and it came right out of the pot. I held it there admiring it for a minute. This sucks. At least the real plants are doing good. As far as I know. No male preflowers that's for sure. I've got some feedback from other growers and the videos are a little blurry but I had found a light leak and I'm certain these plants hermed. I know I could've tried to save them but I didn't want to risk it. I compared what I was seeing with Google photos and other websites. Aside from the larger ball with its stem, there were also several little bumps besides developed calyxes that were weaving into little buds. Trust me that I wouldn't cut down my plants if I wasn't 110% sure. I might've been able to "save them" but to me it's just not worth the risk.
6/29 I was second guessing myself pretty hard last night due to some responses I got on my light dep and messages I got from other growets. Made my anxiety horrible but I looked on several video's I'd taken again and I know what I saw. I felt better after that. This was after I researched and waited THREE days until I saw the ball on the stem and the groupings of small nubs under a fresh yellow flower. These plants were flowering good and it sucks to lose them. One MAY have been ok but one was a runt and had all the characteristics of a true hermaphrodite. They were only in 3's and I couldn't risk my harvest for an experiment. Still sucks. Oh well. Sun is starting to come out. Plants seem to be doing fantastic. I have one spot on a leaf that looks like a pillar munched on a leaf so I'll probably get the bt out soon as I have a dry day that I can apply it. I'll have to check the weather. I need to start a nute regiment but the plants aren't telling me they need anything yet.
6/30 I fucked up dates or dodnt do it yesterday or it didnt save right so I'm leaving this blank today is the 1st.
7/1 I have still only watered s couple times and I haven't had to feed. This week I'm going to start nutes. I had some external ersonal situations that have kept me from my plants. I'm hoping to get back on track. I noticed some pillar damage so I'll need to dig out the BT. This morning I saw this giant ground hog by my cage. Hated too but had to get rid of him. Of course some of the blowback landed on the leaves of one of my plants. I tried to clean it as best I could. Better than that fat bastard eating everything in one night. I broke a branch either falling around it or bulling through when I was pissed or I LST it the wrong way and the wind broke it against the tomato cage. Nice big branch too on top. I tried to fix it with duct tape but we'll see. The plants need me to spend sometime with them. I need to clean them up. Apply bt and give them their first feeding. I'll update as I go. They don't seem nutrient deficient by any means but I don't think it would hurt to start the nutes.
7/2 Bags were lighter today and if it wasn't going to rain tonight and tomorrow I'd he watering. Plants look great so soil isn't depleted yet I guess. They're growing rather rapidly. The branch I broke didnt make it. Had an idea it wouldn't but I had to try. I waited on the BT on account of the rain. I may go back over and change my mind and water with silica or a mild nute solution or maybe apply the BT. Depends what time I get back. I have some work I need to do over there. There's a few that I need to clean up the bottoms on. Pest damage is minor and limited to one or two plants and a leaf or two only.
7/3 More rain. It was supposed to rain this morning too but it didn't. We got .33in yesterday and through last night so I thought that was ok. Looking back on my previous diaries I'm doing things significantly different than before. I had used a lot more nutes earlier on. This morning I mixed two gallons of 2tsp of big bloom and fed it to the 9 plants in smart pots leaving the container plants as they have much more water in them. Looking back at other diaries I previously had, WPM and septoria by this time not to mention a shit ton of other pests I was fighting by this time. Since I poisoned where the cagexwas multiple times and sprayed the cage before it was moved I luckily don't have that problem yet knock on wood. I'm planning to apply BT tonight to deal with the moth larvae if there are any. I'm looking at plants around this area and im seeimg SOME septoria and pm on raspberry bushes and burdock so it is around. I made sure my cage is not by any other vegetation this year and is sitting on asphalt with the bags on raised pallets. Good thing I did or I guarantee they'd be flooded by now. I've been seeing multiple complaints from maine growers online (AND THEY HAVE HEALTHY PLANTS!) saying this is the worst year ever. Maybe they need a dose of fusarium oxysporum to keep them humble. This is maine. If you don't like the weather just wait five minutes. Meanwhile I'll be doing my sun dance hoping for sun. "Hard to grow cannabis with no sunlight" said another grower on my forum.


Processing
Likes
27
Share
@CanadianFillmore
Follow
Week 9 the flushing begins! Mandarin dreams 1 & 2 are both looking happy and healthy. Frosty ladies with a unique smell, especially #2, she's the star of th grow. Excited for harvest, in the next 4-5 days.
Thanks for stopping by growfessors! 👽🌳🔥
Likes
2
Share
@Growedbypepper
Follow
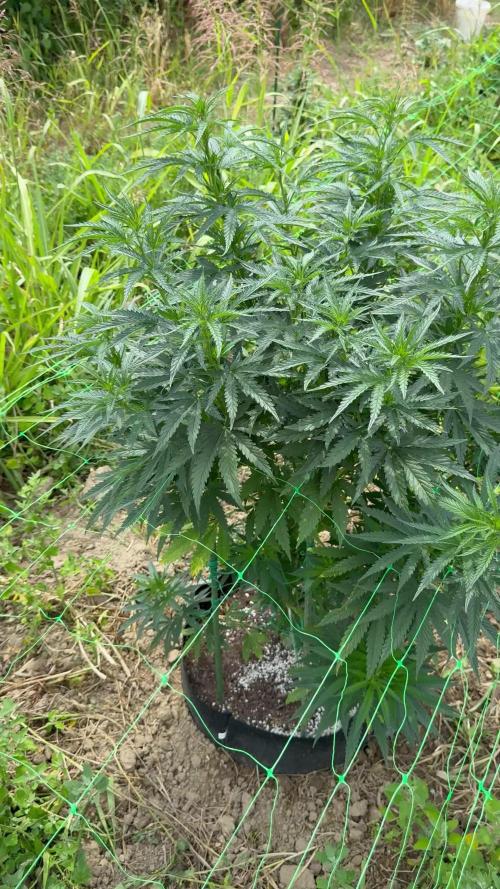
Esta planta entra en fase de floración se ve en perfecto estado muy bonita con un crecimiento de casi 20 cm en una semana... Esta planta pasa de mi indoor a mi outdoor o jardín con techo alto allí recibe las 12 horas de luz sol y las 12 de oscuridad normal... Claro está pondré unos preventivos para acaros


