By continuing to use the website or clicking Accept you consent to our cookies and personal data policy and confirm that you are at least 18 year old. For details please see Privacy Policy and Terms
Accept
Likes
Comments
Share


@valiotoro
Follow
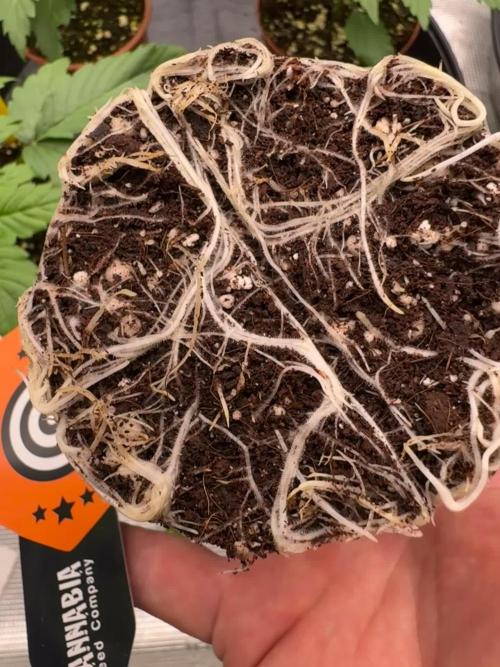
Wow! Impressed by how fast they’re growing and the root mass already. Time to move them into their final pots 🤩
These girls don’t waste time!
Likes
86
Share


@Tropicannibis_Todd
Follow
ALRIGHTY THEN
REMINDER I DO 2 UPDATES PER WEEK 👉WEEKLYROUNDUP👈👉MIDWEEKLY UPDATE👈
At this very moment , hint of Grape Crush Soda smells 😛 Which is awsome
We just hit week 9 and all is well , for the most part , I'm sure I'd be further ahead if it wasn't for the cal/Mag issues early in its development 😃 .......
👉 Baby Sister Plant #2 Is 7 weeks 49 days from seed and coming along great 👈
rain water to be used entire growth👍
Lights being readjusted and chart updated .........👍
I GOT MULTIPLE DIARIES ON THE GO 😱 please check them out 😎
👉IF ANYONE IS LOOKING FOR A PLACE TO HANGOUT VIA GROWDIARIES AND TALK GROWING AND JUST CHILL AND WHATEVER .....👈
👉I CREATED GROWDIARIES DISCORD SERVER !!!!!!!!!!!👈
LINK IS 👉
https://discord.gg/zQmTHkbejs
AND SEE HOW IT PLAYS OUT !!!!!!!
Likes
2
Share


@Mac_and_Cheesy
Follow
Shes having her last flush today on her day 75.
Its a late journal im totally new here and at growing too since i started this new passion on late december 2019 so 6 months ago or already 2 harvest ago lol.
Just to let everyone know that this is my first time ever growing automatics too and wont be the last cause ill go again in auto mode next run. 1st run was fem seeds from crop king too the blue cookie.
No lst or defoliation on this run cause im too new to this and i tried in my first run and i made so many mistakes lol. Not this time oh no :D
I gave myself a chance to learn about my plants and how to feed well this time.
Likes
18
Share


@Staffedition
Follow
Привет друзья. Моей растихе сегодня 43 дня.
Начал применять LST технику на 19 дне и продалжаю применять её через день, а 18 августа добавил ДЕФОЛИЗАЦИЮ
С 20.08 ДЕФОЛИЗАЦИЮ делаю каждые 3,4 дня
С 20.08 LST технику делаю каждые 4.6 дней
На сегодняшний день влажность 70%
Чувствуется по листьям много влажности.
Буду что решать с этим вопросом, ведь впереди цветение.
Не смотря на высокую влажность растение растёт хорошо. генетика радует.
Всем мира и добра!
https://t.me/smail_seeds
#Smail_Seeds
Likes
6
Share


@Mr_nugs_lover_David
Follow
I love this strain to pieces man! Another high quality genetic by original sensible seeds, very very hard dense nuggets like rocks, sticky, stinky as hell, high quality, as always by original sensible seeds. 100% organic grown
Likes
6
Share


@Bowser45
Follow
Never had any issies with lightmix. young plants love it alot, they thrive.
Likes
43
Share


@Silky_smooth
Follow
I forced flower a few days ago i showed that flux works on auto’s
Late evening day 27 i hooked her up to the bucket and did Some heavy defo so she is ready for her flowerstretch still going to pin her down for another week to keep her height in check and to open her up for better light penetration and airflow
Day 29 recovered nicely and looking amazing again
Day 32 further training so she has as much space as she pissibly can and removed all the undergrowth from the branches only keeping the top 2 nodes of every branch in think still half of next week that i might be able to do a very late training but only time and enviroment can block the way of the dominatrix to get to her subjects
Likes
4
Share


@ChiloteAnonimo
Follow
SEMANA DOS VEGE (12-05-2022)
* Al día 15 desde que salieron del sustrato entra en el día 1 de la segunda semana de vegeta
* Se agrega al riego 1m/l del fertilizante para vegetación de Laboratorio LAAOS, "Vegalquimia"
* Al día 20 desde que salieron del sustrato, se le aplico LST a las 6 plantitas
Likes
13
Share


@FlavoursUk
Follow
Week 2 of flower, RO water change with an EC of 1.3. Will adjust from here and observe the next day or two.
Although you watched as I did a major defoliation, as you can see, they have bounced back pretty quickly. As of now, I will be defoliating every few days just to keep the light penetrating the canopy so we have some nice buds come harvest time.
Will be back to update in a few days to update where they are at and if they need more nutrients. pH is set and stable.
Stay tuned until the next update and follow my YouTube and Instagram (Link on growdiaries profile)
Likes
21
Share


@Jays_Not_Here_Man
Follow
A-Day 60, B&C Day 56
A is fattening up! She never did stretch, but then again I had her tied and splayed pretty far out. She has been thirsty, I have been feeding a dose close to 1000 ppm every other feed which has been every other day for her. During the lower feeds, ppm has been around 400. Her tricomes are mostly clear, with some cloudy starting to show. She still has a couple of weeks to go.
B- is going to be a producer! She has so many tips and they are all fattening and developing at about the same rate, she is going to be a beast! Did a defoliation on her, she is appreciating the extra light penetration 😎💨
C- Has stretched up and out! If she stacks as tight as the other two, she will probably be the one with the most weight. Her branches are the tallest and reaching up at least 4-6 inches past both her sisters. I tied her down lightly to allow light to get through, we’ll see how she goes.
Likes
32
Share


@High_And_Hydro
Follow
An Tag 50 sieht die Tropicana Cookies schon fast "erntereif" aus. Sie bekommt noch locker eine bis zwei Wochen, aber nach 50 Tagen vom Samen bis in diesen Zustand zu kommen ist für mich beeindruckend. Das ist wirklich schnell 💪
Die anderen beiden trödeln so vor sich hin, die eine blass, die andere klein, aber sie machen ihren Job. Vielleicht lässt die Tropicana die anderen beiden aufgrund ihrer Geschwindigkeit auch einfach nur etwas langsam aussehen. Wenn die also noch abliefern, hätte ich nichts dagegen 😅
An Tag 53 sieht alles soweit gut aus.
Die Tropicana Cookies scheint schon langsam ihrem Ende entgegen zu gehen. Verdammt schnell würde ich sagen. Ich gebe ihr aber noch ein paar Tage, auch wenn ich den Platz den anderen beiden gönnen würde und später auch werde.
Die Mimosa hat sich eingegrooved und man hat endlich das Gefühl Fortschritt zu sehen. Sie bekommt überall schöne, weiße Igel.
Die MAC#1 ist scheinbar ein wenig lichtempfindlich. Ich hab versuchsweise den EC bis 4,0 hochgedrückt, aber sie bekommt die Farbe nicht zurück, solange ich ihr über 700 µmol/s/m² an Licht gebe.
Gestern hab ich das Licht ein wenig reduziert und ich habe das Gefühl, dass sie wieder mehr Druck in den Blättern aufbaut.
Leider bekam die Mimosa dadurch nur noch 580 µmol/s/m², also habe ich die vordere Lampe seitlich gehangen. So konnte ich genug Licht rein bekommen, da der seitliche Unterschied zur Tropicana Cookies bei Weitem nicht so groß ist, wie der Höhenunterschied.
Likes
23
Share


@555ABKY555
Follow
planted in July it started to grow uniformly with very fragrant leaves of Sicilian lemon peel you can smell the citrus notes in the pre-flowering leaves I enjoyed its very fresh zkitty phenotype which tended between the sour green apple and the gaseous lemon the variety is particularly susceptible at high temperatures and is the only one that on the fourth day without water this summer literally twisted its leaves on itself variety that had some problems with leaf problems but the yield was excellent with rock hard buds! THE AMAZING TERPENES
THE BEST IN THE WHOLE GARDEN.
GROWING SCENTS: green apple organic citrus peel
TERPENES: THOSE WHO SMOKE THEM ARE STUNNING.🙌🙌😍 the complexity and flavor of zsrawberry begins with a very deep hit of hearty heavy spicy smoke which soon reveals itself as a fresh lemon zest surrounded by nutmeg spice followed immediately by the sweetness and fruit of zkitty swallowed the smoke closes with a note of completeness of the three perfectly balanced flavors that tends towards diesel, strawberry spice and a dream of blackberries and redcurrant fruit salad, lemon peel with an acid finish and a round spice of aged jam😵😭😭😍
Likes
9
Share


@2fast4grow
Follow
I'm practicing a lot of LST from the main ranch and practing the defoliation for creating a Cannabonsai.
It's my first bonsai
I'm using a led lamp grow the jungle "the smith" 150w full spectrum.
Likes
16
Share


@ZzTooRightOGzZ
Follow
Started just for fun not sure if it's mail or female but it's going well so far .
Likes
30
Share


@CanadianFillmore
Follow
Another week in the books, one maybe 2 more to go, if the weather holds and humidity doesn't go crazy. Since grow diaries doesn't support more than 32 weeks, it's a bit of a pain to track the rest of this grow. Still I will post updates.
Likes
12
Share


@Lemon_Honey_420
Follow
temps got a little crazy a couple days(up to 90) but was able to keep them below 85. Realized this week I've been running an undersized exhaust fan(4" 165CFM) when I should've been running a 6". With my size room, ducting, and a carbon filter I need a minimum 260CFM. The 6" is rated at 400CFM which is more than enough. Can't believe I'm just now realizing this. Should bring temps down significantly
Likes
38
Share


@Tesla
Follow
Week 8 since switch to 12/12h.
The weather stays good, finally.
Pistils start to turn brown. Thricoms are 50% clear, 50% cloudy.
Going low on nutrients to avoid over fertilization (600-650 ppm)
2 or 3 weeks until harvest, I guess...
Suggestions are welcome. 👍
Likes
49
Share


@Wastent91
Follow
Ehi ragazzi come va? Tutto bene spero, la ragazza sta esplodendo di vigore!! Nonostante il poco spazio si sta facendo spazio tra le F1 e sta creando le sue cime come fosse la regina della grow! FastBuds mi stupisce ogni volta! Le loro genetiche sono spettacolari, ma il merito è anche della creazione del terriccio ideale della bio tabs che la sta facendo crescere come un baobab ahahah ! Si vedono le prime cime e le foglie si sono sviluppate davvero grandi e piene di vigore si vede che la ragazza sta bene e vuole dare il meglio di sé nella sua breve vita , spero esca una ganja davvero speciale da questa Tropicana cookies ,un sacco di cime resinose e piene di thc! Ringrazio Mars hydro perché il merito della crescita spettacolare di queste ragazze e della sua luce ,che a me sembra perfetta per intensità e distribuzione.. grazie a tutti voi che mi seguite ! Per questa settimana penso sia tutto alla prossima! buon 420 a tutti! 🐱😼💪🧙♂️🌱🌿🌲💗


