

Likes
6
Share


@rvabudman
Follow
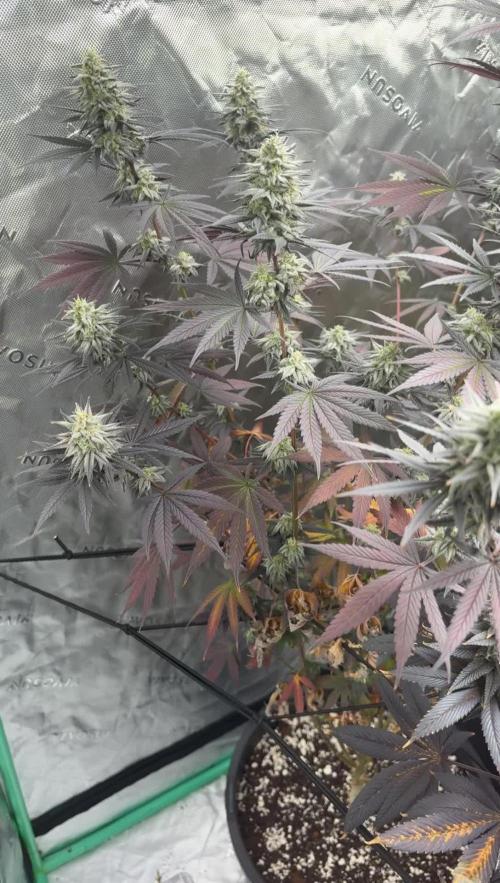
Cant take my eyes off my plant. This is my second round of growing and I am the type of person who learns through failure (not gonna upload the pics of the first round plants lol). The buds are thickening up very nicely. Hoping to get between 3-4oz , the strain is high yielding but I have a smaller tent. My auto yielded 2oz with the same space (2 plants in one tent splitting the space), but the buds definitely didn't develop as well as these buds.

Likes
Comments
Share


@Backyardnewbie
Follow
Moved light to 3ft above plants. 400ppfd plants are reacting well.

Likes
28
Share


@Pogosvk
Follow
ESTA SEMANA SOLO AGUA PARA IR METIENDO FLORACION Y LAS BACTERIAS DE BACTOHEMP PARA LA KRITICAL GB Y BACTOMATIK PARA LAS QUICK ONE MEDIA PASTILLA Y COJIDO UN TAMAÑO MUY BUENO DADO Q SON PLANTAS DE POCO TAMAÑO Y QUE E COMETIDO FALLOS DE PRINCIPIANTE EN LAS PRIMERAS SEMANAS DADO QUE EN MI CASA TENGO PROBLEMAS DE INTIMIDAD JAJAJAJ
HICE UN POQUITO DE DEFOLIACION Y POR PERRO Y NO MOVER LAS PLANTAS CORTE UNA RAMA LLENA DE FLORES DE LA PARTE DE ABAJO DE LA QUICK ONE 2 Q ESTABA CRECIENDO QUE FLIPAS ESPERO Q NO SE JODA....
EL DIA 26 YA Q VEO Q EMPIEZA A FLORECER E METIDO LAS BACTERIAS Y UN POCO DE CRECIMIENTO YA QUE LLEVABAN UNA SEMANA A AGUA DE MOMENTO VA TODO BIEN O ESO CREO POR QUE ES MI PRIMER GROW EJJEJE
dia 28 ultimo dia de la 4 semana preparando la floracion y creo q mi pequeño armario de 60x60x140 se me queda pequeño jajajjaja


Likes
Comments
Share


Likes
44
Share


@Prototype0181
Follow
The lady's are a bit shocked after the ✂️ decapitation (topping) on 10-05. going for 6/8 cola's per plant👌
Stay tuned growmies 💚


Likes
13
Share


@FlavoursUk
Follow
New week, new growth. So we have done another defoliation to allow the lower shoots to be exposed to the lights which equal to a better yield come flower time, they always need a day or 2 recover after being put under any stress, especially if its an extreme amount of leaves being taken off.
They were also lollipoped to clear up and messy under growth and to improve airflow under the canopy. I also took clones from each of these.
Paying close attention to the EC and pH. Increasing and decreasing as and when I need to going off what the plants show me.
Close to flower now. A few days to go!
Stay tuned and feel free to follow my instagram and youtube channel for a closer look. Peace x

Likes
29
Share


@yvet_te
Follow
Ladies are looking (and smelling) pretty good! Loving my Christmas trees lol. Few weeks left, should be ready to harvest around the new year. No mold and no pests so far, fingers crossed for a strong finish!


Likes
78
Share


@Wastent91
Follow
Ehi ragazzi finalmente è arrivato l atteso momento di raccogliere! Ancora una settimana secondo me gliela devo concedere! Ogni giorno che passa le cime si rigonfiano sempre di più e stanno cambiando colore verso un bel violaceo! L odore intenso di ciliegia e davvero particolare e vi posso assicurare che ricorda quella caratteristica acidità della "cola"appunto! Mi aspetto una grande fumata stonante intensa che mi faccia vibrare tutto il corpo ed espandere la mia mente ai confini della umana comprensione! Ringrazio come al solito Mars hydro e FastBuds che hanno reso possibile l evolvere di questa bellissima creatura ! Buon 420 a tutti!!


Processing
Likes
7
Share


@Andres
Follow
with her we only have to wait for her growth as well as the green crack ... they germinated the same day ... she has good color and also in her small greenhouse ... in a bottle I only have patience to enjoy it ......
Likes
12
Share


@Piablo
Follow
Lessons learned from week 1 of my first grow so far:
the best watering solution I found so far is a mix of distilled water from the store and filtered tap water. with a final ph of 6 and ppm of 20-40.
a little ph buffer goes a bloody long way. Use with caution.
performing tasks like mixing solution and potting a germinated seed are best performed without a phone (camera) in one hand.
the seed germinated within 24 hours using paper towels. I planted after 36 hours.
After 24 hours of potting, the stem was already shooting up, and I turned on the lights, set to an 18 hour schedule. I wasn't quite ready for this, so it took me some time to research and get the desired humidity and temperature.
At this point I added more nutrient in even quantities of FloraGro, FloraMicro, and FloraBloom, according to instructions. Perhaps a little early though, although after just one 18 hour light cycle this plant is shooting up like a rocket and showing leaves.
I bought a fan for the inside of the tent and propped it up on a box, and a humidifier to bring the humidity from 40-50% to around 70%.
Since it's a winter grow, I have to periodically increase the temperature to keep it at 25 °C. The intake fan, humidifier, and inside fan are significantly lowering the temperature. I'm also experimenting with finding the right humidifier settings since the humidity seems to increase a lot when the lights go out, and the machine is still new.


Processing
Likes
10
Share


@Reaper
Follow
day 15: flowers start to appear
day 16-17: temps go 24 celcius, i throw ice bottles in the res
day 25: insane stretch stops flowers fatten up, even crystals around the young budz.

Likes
3
Share


@Tashtegoo
Follow
Summer is finally here and I hope she likes feasting on those sweet, sweet sunbeams.
☀️
28.6. Seems to be done with stretching.
1.7.
Cooled down a lot. Now 18°C outside. I keep her inside the house to be safe.
Likes
13
Share

@Chucky324
Follow
Hello. This is the end of week 9 and the beginning of week 10 of flowering.
OK... One more week of light and then a couple of days of dark and then harvest.
Everything is going good here. Had 2 good watering last week. the plants are using up the nutrient that's left in the soil.
So I'm expecting some yellowing of leaves next week.
I got in touch with UKHTA Seeds last week and they said they would love it if I would give my 50% off code to someone on grow diaries.
So I've got a 50% of your first order code from UKHTA Seeds, Needs to be used by May1st 2026 though.
They would love it if diaries were made for the seeds.
Could you privet message me if your interested. If there's more than a couple of people interested I'll ask "why would YOU like these seeds" sorta quick contest to find a winner. Let me know.
OK. Have Fun.
Chuck.


Likes
4
Share


@Chubbs
Follow
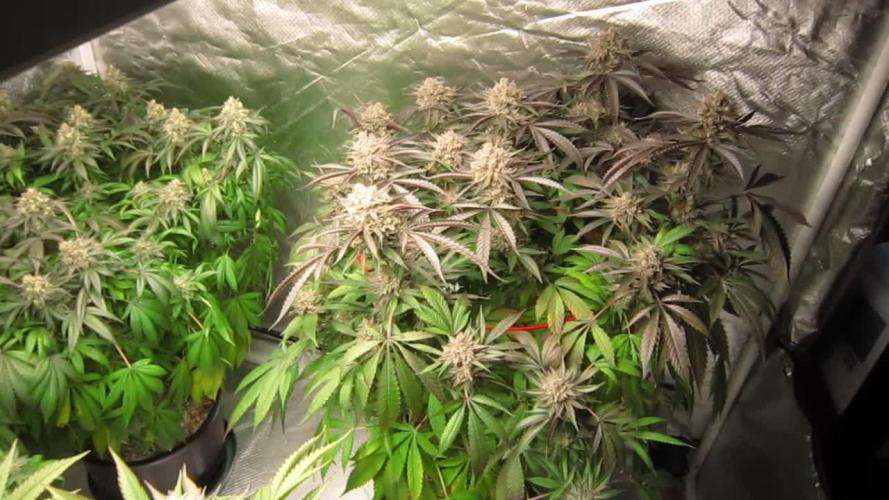
What up Fam. These girls are growing amazing. Now that I can controll the temps a little better they've taken off with growth. Starting the flower period which we all no know what that means. The countdown is on. Over all Happy Growing.