


Likes
Comments
Share

@cultivars
Follow
OCTOBER 18th to OCTOBER 24TH
Sunrise: 08:31 | Sunset: 18:50 | Total Daylight: 10:19
Weather over the past week saw several consecutive days of full cloud cover and rainy periods. Greenhouse has held temperatures during the day, and only dropped below 10C once (Day 168). Good periods of sun on Day 167 and 168, with the forecast looking sunny for the next few days. I suspect that will help along the ripening process as the plants process nutrients from the fan leaves during the fade. There hasn't really been any issues with humidity levels, as it has hovered in and around 40% to 45% RH
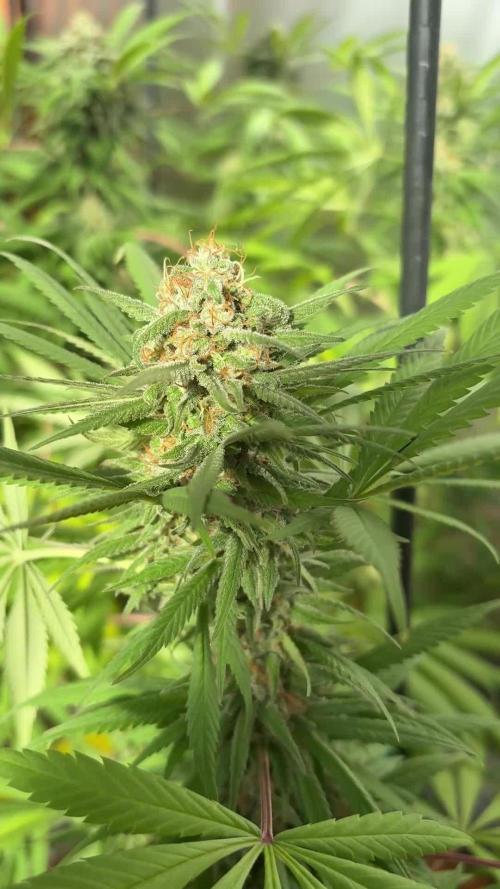
Both Lemon Orange specimens are near ripe, with many trichome heads cloudy, some clear, and few amber. Suspect it is a matter of days before they are ready to be harvested.
DAY 162
2L of plain rainwater (cold) applied to all but Lemon Orange #2 (1L for this specimen).
DAY 163
n/a
DAY 164
15C in greenhouse in the morning; Cloudy and cool day overall, but greenhouse holding temperatures above 19C and plants are clearly going through senescence.
DAY 165
Steady rain overnight, with armer temperatures; Greenhouse held overnight at 17.5C and 50% RH. Cool, cloudy and rainy day (high of 9C, 97% RH, but greenhouse and the associated equipment performing as designed and holding temperatures at 19.5C with humidity ranging from 40% to 45%.
DAY 166
Cool and rainy overnight (6C intermittent light rain). Greenhouse held to 16.5C and 41% RH. Noticed some droop so provided 1L of plain rainwater (cold) via drip in the afternoon to each specimen and everyone perked up thereafter. Temperatures reached 19C for much of the day, with 43% humidity. Temperatures outdoors were a high of 7C, with 80% humidity (or more) during the day. Remained overcast for much of the day, but there was a couple of periods of increased brightness. Plants are doing well, all fading;
Lemon Orange #1 is nearing full ripeness, and has displayed blue-ish purple tints in upper sugar leaves. and smells of sweet citrus. A few lower leaves are yellowing, but it hasn't progressed to fan leaves near the top of the plant. Pistils are all wilted and receded into calyxes (and have been for several days). Upon inspection, clear trichome heads outnumber cloudy ones, and there are very few if any amber ones.
Lemon Orange #2 is furtherest along in senscence and is soon to drop lower leaves. Upper fan leaves are slowly fading from green to yellow. Flowers are large and comparable to Lemon Orange #1 and #2 of the Summer of 2024, have very good trichome production and smell strongly of lemon with an earthy background. Pistils have largely wilted, however those at the apex of flowers are still white. Calyxes have plumped, but they're not quite ripe yet. Upon inspection, clear trichome heads outnumber cloudy ones on calyxes, while at edge of sugar leaves there are quite a few amber heads.
DAY 167
Overnight low of 2C, greenhouse held at 12.5C and 41% RH. After a cloudy cool morning, the sun broke through and warmed up the greenhouse shortly after the noon hour. Exhaust fan even came on intermittently to reduce temps below 24C. Humidity was ideal all day, in and around 40%.
After noting some droop, applied 1L of plain rainwater (cold) via drip to both Lemon Orange specimens. This may be the last watering of the season. I think it will be possible to decommission the irrigation system for the winter over the coming weekend. I can pull 20L of water for use either for this crop and/or the mother tent.
Lemon Orange #1 will be ready any day, but clear trichome heads still outnumber cloudy ones. Purpling of upper parts of flowers in sugar leaves and calyxes is progressing, with some yellowing of fan leaves starting to move up the plant. Flowers appear ripe with pretty much all pistils wilted and receded into their calyxes, but trichomes do not.
DAY 168
Greenhouse 9.5C (-2C outside) in the morning with 40% RH. Sunny morning, with greenhouse warming to over 10C by 9:30AM; Exhaust fan kicked in to hold temperatures at 24C just before the noon hour. Both Lemon Orange specimens are showing cloudy trichomes outnumbering clear ones, and outside of the margins of sugar leaves, there are few amber trichomes present. Both plants are a mere few days away from harvest.


Processing
Likes
10
Share


@WackoMastermind
Follow
Day 8 | Sun. 7/22/18
N/A
Day 9 | Mon. 7/23/18 2:30AM
1. Fed with Big Bloom, 5.8 pH RO/DI water
2. Setup time lapse camera for 6AM - 12AM (18 hrs.) (1 shot/30 seconds, 2160 frames, shown at 240 FPS)
Day 10 | Tues. 7/24/18
1. Time Lapse
Day 11 | Wed. 7/25/18
1. Time Lapse
Day 12 | Thurs. 7/26/18
1. Time Lapse
Day 13 - Fri. 7/27/18
N/A
Day 14 - Sat. 7/28/18 12:00AM
1. Light water with 5.8 pH RO/DI water

Likes
72
Share


@DreamIT
Follow
🐩👤Sirius Black👤🐩 by 🌍🌱WeedSeedsExpress🌱🌍
👤 22.3 ...
👤 23.3 ...
👤 24.3 ...
👤 25.3 beautiful plant, large and vigorous, I hope it takes a dark / red color, it would be fantastic. but I'll try with other seeds eventually 😀 the lamp is really cool, the plants look just fine under Viparspectra
👤 26.3 ...
👤 27.3 All very well, I can't wait for it to start releasing perfumes
👤 28.3
__________________________________________
👀Are you looking for a good lamp to start?👀
Viparspectra in my opinion has something more than the others, take a look at their site.
➡️ http://bit.ly/pro-seriesproductspro-series-p1500
⏩Use " GDVIP " for an extra discount💯
____________________________________________________________________________________
📜👀 A look at the details of what I'm growing 👀📜
🐩👤Sirius Black👤🐩 by 🌍🌱WeedSeedsExpress🌱🌍
📋 Details 📋
⚧ Gender
▪️ Feminised
➰ Genes
▪️ 70% Indica / 30% Sativa
🎄 Genetics
▪️ Sirius Black
🚜Harvest
▪️ 450 g / m²
🌷Flowering
▪️ 63 - 70 days
✨THC
▪️ 25.0%
✅CBD
▪️ 0.5%
🏡Room Type
▪️ Indoor
🌄Room Type
▪️ Outdoor
🕋Room Type
▪️ Greenhouse
🎂Release Year
▪️ 2020
____________________________________________________________________________________
👀📷 Follow the best photos on instagram 📷👀
https://www.instagram.com/dreamit420/
🔻Leave a comment with your opinions if you pass by here🔻
🤟🤗💚Thanks and Enjoy growth 💚🤗🤟

Likes
10
Share


@Gutismoke102
Follow
21 day cure… 👃🏽 is insane, it has more of a sweet loud taste covered in Trichomes and I love the pinkish purplish colors 💪🏽🦍👍🏾

Likes
9
Share


@Wiebechillin
Follow
- Plants are all looking very nice at this stage.
- Flowering is well under way and the buds are developing nicely throughout this week.
- Have not started LSTing 5th seed and it is growing very well
- Last week of the MH Light. Switch to HPS for flowering stage

Likes
24
Share


@Frank_cultiva
Follow
Las 4 nenas del scrog iniciaron con el ciclo 12/12 el día 05/11/2021: están siendo alimentadas con advanced nutrients(dosis indicadas en la foto de la tabla).
Las 2 nenas en macetas de 30LT iniciaron el ciclo 12/12 el día 26/12/2021:
por el momento están siendo alimentadas con advanced nutrients(dosis indicadas en la foto de la tabla)


Likes
19
Share


@jst4kicks420
Follow
first pic is second day this week its may 12 well i think they are doing pretty dam good if you ask me bt i only know so much soo lol let me know what everyone thinks let see i added hydro plex to the mix not really sure if it added to my growth i my opinion growth had already been amazing aha bt we will see spent quite a bit of time pushing big leaves out the way under the second net ehh don’t really think i did any harm bt i cut out everything tiny and under the blanket mid of to nets and down if it look bigger then my fingers it’s survived this round aha broke one water leaf up top on accident ehh oh well not much else just been watching them grow gonna have to change the chains that hold my light they hand about 12 in of the top that i can’t move up any more and plants started catching bit more light burn sadly i definitely need more space bt in the end things are looking good to me end of the week i’m feeling more then blessed with the progress everything just getting fatter tried crimping two branch way to low about to days ago bt there still alive and growing again so all it well decided to try to pull the other two down instead lol hope all had a great week and happy growing (not that you guys should care bt is my birthday today 17th )aha til next time

Likes
19
Share


@UKLEEDSGROWER
Follow
Just harvested last night so will come back on in next couple of week to review!! No estimates on yield as yet. But the smell is definitely pungent lemon and sweet smell. Can’t wait to try the end product!!

Likes
37
Share


@Kirsten
Follow
23.08.24:
I've done considerable defoliation. Also, FBP1 and FBP3 have grown all over the place. The stems are also relatively weaker as they've grown so much.
(Photos above).
Being as the plants were looking a bit delicate, I added some string and tied the side branches lightly to keep them a bit more compact.
Additionally, FBP2 has a considerable amount of buds on the main cola. So I've added a plant stake, and I just tied string around the stake and the main stalk.
The humidity has been able to stay under 53%. That's with 3 dehumidifiers. So I'm pretty sure that's about as good as it will probably be.
I've had to lower the watering frequency on FBP3, as I overwatered only this plant. and also added too much Nitrogen in. As a result all the leaves are looking droopy.
I'm really not sure how this will pan out, as they all still look like they're weeks away from harvest.
Anyway, I'll update throughout the week.
25.8.24:
I was tending to the garden a majority of the day, and realised that a branch had broken on FBP2. I acted quickly to insert plant stakes, to provide the heavily laden branches additional support. See photos above.
The branch was bent or snapped, but still in one piece. I used duct tape to carefully put it back together. Before making a stake for it.
Silica, apparently wasn't quite enough to get the FBP2 through the whole way. The flowers are very heavy and dense.
I have also given the plants water yesterday with concentrations of the following nutrients, per plant.
● 9ltr of dechlorinated tap water with 6ml of cal-mag, 3ml of Ecothrive Flourish, 6ml of Xpert Nutrients Bloom Booster.
I have also added cinnamon top dress after watering, as I have noticed some fungus gnats.
I checked the trichomes through one of my loupes yesterday too, and nearly all are still glass like in appearance, with some cloudy here and there. I'm definitely going to have some time left on these girls.
I did check the PH if my soil on all plants as I was concerned about nutrient lock out on FBP3. All pots tested out at 7.0 Ph exactly, before and after watering.
Thanks for reading my diary 😊
Likes
42
Share


@m0use
Follow
So the increase in feed is going well and the plants are drinking more and more. I measured the heights of them and adjusted the lights as one of them was not level. might have been that way since last adjustment, I kept hearing some poping noises coming from the tent so could have been that as well.
#1 33cm
#2 28cm
#3 27cm
#4 18cm
#5 38cm
#6 43cm
#4 is much shorter then the rest of its peers, but we will see how it goes long term.
As I though some slight yellowing on leaf tips but nothing crazy, PH going in at 6.2 coming out at 6.49 not bad, matching the trend in EC difference. EC going in at 1.4 coming out aorund 1.0 So might want more food but more frequently vs more at one time. I could try and get into a new watering routine but I really don't want to. Something easy maybe to mix up a jug that I just give them between normal watering that has light feed in it and will not get runoff with it. The runoff to prevent salt buildup can come from the main watering.
Also found a weird looking something growing on plant #3 medium. Took some photos of it. Looks alien. going to let it grow, that plant is doing fine.


Likes
8
Share


@sevengreenfingers
Follow
Hello everyone! I promised to track this grow very closely this time and ufortunately life got in the way. Here is a quick sumup of the grow.
First of all- One of the sour stomper plants unfortunately didn't make it. It died at about week 4. The main stem somehow had rubbed/broken down. That's why it was falling down. It was almost like a mini beaver had chewed it off at the point where the stem touches the riot rooter. At first I thought nothing much of it, maybe it hasn't been rooted in quite well yet or something. And I was constantly touiching it when watering, that made it worse. Soo the leaves were dropping and the plant looked very weak. Then I decided cut thr rapid rooters top layer and found out the severity of the problem. Tried to tape it up and other things, but it was too late. At the end it appeared all good as the remaing plants got so big the I had some space issue so I wouldn't have been able to fit another plant in anyway.
At that time I finally made my self-draining saucers. I took me a while and a lot of effort, but finally they were ready and working well. I also installed the self watering system and flowering was starting. Pretty soon I started noticing weird leaf symtoms. Brown spots, different kind. Some plants had it more, some less. Sour Stomper looked pretty good throughout the grow. Mango smiles seemed sensitive and Strawberry Nuggs were pretty strong until the end.
The grow was basically me experimenting with the setup- changing watering schedules , changing ppm, ph and all that stuff to keep the leaves looking healthy and it was very hard I have to admit. Probably my hardest grow in that regard. But somehow, the bud leaves remained healthy and the buds really fattened up good. I got away with an amzing 700G dry bud harvest which was def a new record from one grow. And the bud quality is very good too!
Next time definetly no more than 4 plants as they got pretty big and I thought it was a little overcrowded. I was doing some good defoliation too. I should have defolited strawberry nugs more tho. Sour Stomper got some amazing bud development from top to bottom because it was was growing next to strawberry nuggets which were really small most of the grow. They actually took the most time to harvest even longer than Mango smile. Mango smiles were ready quite early. Sour Stomper was just in time!
I topped sour stomper and both Mangoi smiles, left SNs both normal. Looking back at it, the way I grow them, Should have topped SNs too. Would probably have more space in the middle and longer side branches. Probably wouldn't have been as bushy!
I followed the full Terra aquatica feed chart until the end. I was supplementing with CalMag a lot as I thought the symptoms could have been from a CalMag deficiency as this was my first grow with RO water.
Overall a very challenging but good grow at the end. First time no mold problems. A record breaking yield for me. Basically surpassed the upper limit for all plant probable harvest sizes. Got good smelling quality bud. Very happy overall and will continue experimenting with Mephisto beans in the future for sure! I guess what I like the most about Mephisto is how close to description the plant is, very stable genes in that regard.
Next time I will also have to start feeding plants higher PPM feed faster at the very start. and during flowering. But still not 100% sure what caused the leaf symptoms.

Likes
14
Share

@GoldenWeedGrower
Follow
📅 05/05/26
🗓️ D064 (B4 / D1)
🌡️ 1.2
💨 1200
💧 -
🥗 -
⚗️ 1.8
🔬 5.9
🛠️ Lamps raised
📋 Only BB is actually stretching, all others are a little bit late....
📅 06/05/26
🗓️ D065 (B4 / D2)
🌡️ 1.2
💨 1200
💧 2L
🥗 -
⚗️ 1.8
🔬 5.9
🛠️ -
📋 -
📅 07/05/26
🗓️ D066 (B4 / D3)
🌡️ 1.2
💨 1200
💧 -
🥗 -
⚗️ 1.8
🔬 5.9
🛠️ -
📋 -
📅 08/05/26
🗓️ D067 (B4 / D4)
🌡️ 1.2
💨 1200
💧 3L
🥗 -
⚗️ 1.4
🔬 4.8
🛠️ -
📋 -
=============================================================
Legend:
📅 DATE
🗓️ DAY (StageWeek / Day)
🌡️ VPD
💨 CO2
💧 WATER ADDED
🥗 FOOD ADDED
⚗️ EC
🔬PH (adjustements)
🛠️ ACTIONS
📋 NOTES
📅🗓️🌡️💨💧🥗⚗️🔬🛠️📋

Likes
34
Share


@Canna96
Follow
This is my second run of Dutch Passion with my first being a monster Blueberry Auto. Massive plant, and her pungent odor overtook my entire home while trimming her today. While trimming her it smelled like I was in an earthy Pine Forest with a hint of berries, and it was one of the strongest smelling plants I've ever run. Very easy to grow, responded to all training methods with VIGOROUS growth.
I topped her above the 7th node and removed the bottom one so I had 12 mains total. It took me almost 8 hours and I even had help for 4 hours.. Trimming is definitely my least favorite part of cultivating this species.
I am super impressed with this strain and really everything Dutch Passion. They have not even sent me a single seed or even acknowledged me on here but this is my second run of their autos and I anticipate each will be a massive yielder. I will probably take a month off then start a run of a few photoperiod mainlines.
I will be back with a final smoke report after she's cured, Stay Safe and Blaze On!!! 💪
Website: https://medicgrow.com/
https://growdiaries.com/grower/medicgrowled



Likes
27
Share


@adam_pawloski87
Follow
Let’s Go day 29!! This week went real nice ! Girls are staying very healthy and building up nicely and even started showing signs of female sex which is super great ! We started doing a little bit of leaf tuck training method on em , nothing to big as like I said I want these girls just to do there thang an grow more on naturally side! My Air temp and Humidity have been on point all week, staying from 70-75 degrees throughout the day and humidity staying around 58-61% humidity , my girls are loving that summer an 75 feeling !! Can’t wait to see what we do this week ! Hopefully you all enjoy, and are ready for another great productive week ! Peace love an positive vibes to y’all Cheers 😶🌫️💨💨💨💨🤙🏻Happy Grows✌️🏻Week 4 let’s get it !
Likes
29
Share


Likes
7
Share


@Thcluva42087
Follow
Well the ladies are doing great in the 3 gal pots! I have 1 that just isn’t as perky as the other 2 and I’m gonna keep a close eye on her. They are growing extremely well under my KindLED X80 Veg bar!I’ve never ran just a veg bar and I really like the way it’s been working out for me! I work a lot so it’s hard for me to stay on here every couple days but I’ll try!
Likes
Comments
Share

