The Grow Awards 2026 🏆 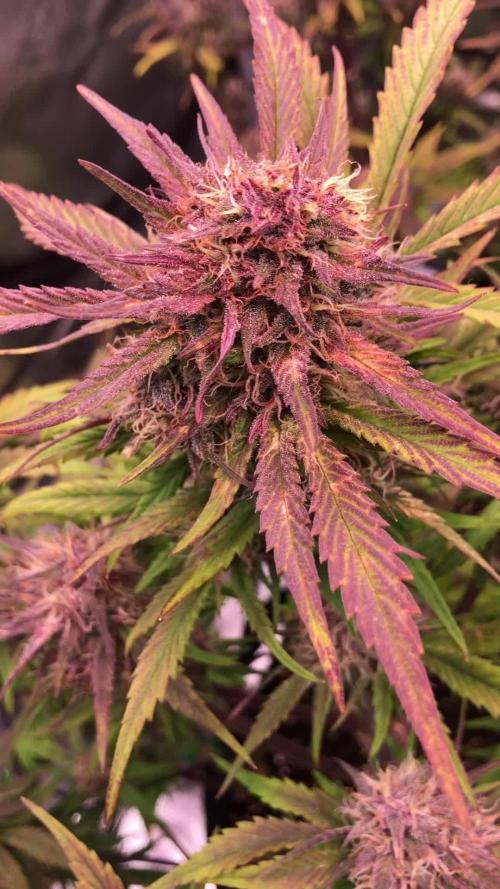


Likes
Comments
Share
@MisterTree
Follow
Sind am Tag 54 aktuell, am Donnerstag den 30.10 wurden die Lady´s großzügig entlaubt.
Bin sehr gehyped jetzt auf den Endspurt.
4.11.25 Update aktuelle Aufnahme


Likes
7
Share
@CreatureCreator
Follow
Just getting started on the right foot. Coco and bags sterilized and flushed thoroughly with 0.7EC at 6.0pH solution. Will transplant tomorrow once the coco drains down a bit. Plants look great and excited to push down the accelerator.
4/2 - transplanted into 3 gal and watered in.
4/4 - Reservoir cleaned, sanitized, and online. Switched to tap water (0.3EC) and nutes at 0.8EC for total of 1.1. Ph 5.9. New feed pump installed (no more getting electrocuted when I put my hand in the bucket. YAY!) and 5" watering rings installed. PPFD 550.
4/5 - really quite chuffed. PPFD to 600 and they are looking great. Moved Zoey up 2" to match canopy height.
4/6 - switched Silica Boost to foliar spray at rate of 40ml / gal in RO water, pH to 5.8


Likes
44
Share
@RakonGrow
Follow
Note :
+ jegliches Zubehör wird in der GermniationsWoche aufgelistet . Zeitraffer Videos folgen immer nachträglich.
+ videos werden so geschnitten das nur ein geschlossenes Zelt erscheint , ergo Fehlen paar reale Minuten (ca 1 Std) .
+ + leider ist die Halterung defekt und die Videos etwas schief . Vielleicht mach ich mich irgendwann mal daran und korrigiere das. Sorry
Day 43:
+ Höhe : 64cm
Es wächst und wächst :))
Day 44:
+ Höhe : 65cm
+ 2 Liter Flaschenwasser , kein Dünger .
+ + PH 6.5
+ Drain : PH 7.0
Höhe ist bei 63cm , das ist 3 cm mehr als die Vorgabe ausweisst :))
Day 45:
+ 66cm höhe.
+ 2 Liter Flaschenwasser
+ + Dünger für Blühte
+ + + Canna Terrar Flores (Achtung wirkt wie PH-)
+ + + Canna Boost
+ + + Cannazym
+ + + Greenhouse Feeding BioEnhancer als PH+
Jetzt säuft sie wie wilde , keine 24h und die 2Liter sind komplett wech . Mehr geht aber nicht in den Topf , ergo muss ich mir langsam mal überlegen ob ich Tropfbewässerung nutze .
Und es treten duch das nur Wasser extreme "Calzium" Probleme auf . Hihi , aber so hab ich mal das ganze auf Startsequenze gesetzt . Ich arbeite also noch daran diese Mischung aus BioBizz Light und Urgesteinmehl nach Schätzung zu meistern :)) Den Fakt ist , da ist viel zu viel Urgesteinmehl drinne , was auch die Vegiphase schon gezeigt hat.
Day 46:
+ 1.5 Liter Flaschenwasser
+ + Dünger für Blühte
+ + + Canna Terrar Flores (Achtung wirkt wie PH-)
+ + + Canna Boost
+ + + Cannazym
+ + + Greenhouse Feeding BioEnhancer als PH+
Day 47:
Draussen zu heiss , drinnen zu feucht ... Ja genau was ich nicht brauch lol ...
GoPro aus der Halterung gefallen :))
Day 48:
+ Höhe : 68cm
+ 2 Liter Flaschenwasser
+ + Dünger für Blühte
+ + + Canna Terrar Flores (Achtung wirkt wie PH-)
+ + + Canna Boost
+ + + Cannazym
+ + + Greenhouse Feeding BioEnhancer als PH+
Draussen zu heiss , drinnen naja ... Der Entfeuchter arbeitet weil ich sonst hier Tropenstimmung bekomme :)) Ein wenig Entlaubung .
Day 49:
+ Höhe : 68cm
+ 2 Liter Flaschenwasser
+ + Dünger für Blühte
+ + + Canna Terrar Flores (Achtung wirkt wie PH-)
+ + + Canna Boost
+ + + Cannazym
+ + + Greenhouse Feeding BioEnhancer als PH+
+ + + PH 5.8
+ + Drain PH 6.5
Läuft bei der Lady , sie trinkt , liebt das Licht (auch wenn die Spitze etwas zuviel bekommt , sie betet halt etwas ) , Mangelerscheinungen sind echt gering . Hat die heissen Tage (27° im Zelt bei 60%-57% ) hat sie super überstanden . Ich werde immer besser im Gießen . 75% von oben , 25% lass ich von unten aufsaugen .

Processing
Likes
11
Share
@4F1M6
Follow
I started germination of 2 Moon Walker kush beans on 29/12/2020. I pre moistened my rockwool cubes with ph balanced water to 6.4. Made sure the plugs were just damp and not soaked. Using a small wooden dowel I increased the size of the plugs pre made holes. Than I sowed my beans into the holes. Ripped off a small piece of rockwool and mulched it up.h Lightly filled the holes in with the mulched rockwool. Than stuck the plugs into a misted humidity dome, to complete germination.
Shouldn't take anymore than 4-5 days to see some sprouts. Once I see some cotlydon leaves bursting to the surface. I will get the plugs planted into some 1 gallon pots. Plus get these ladies situated into their home. Cant wait!
Some background information on my first run with MWK. She gets very branchy fast and absolutely loves lst. Responded everytime with a vigorous growth spurt after training sessions. Very easy going on nutrients and didnt have any different needs outside my normal feeding schedule. Super tight compact colas in definite need of increased air flow and movement. Ended up having the fans turned up much higher in the room she was in because of the shear mass and density. Super trichome production outta these genetics. One of the frostiest strains I've grown to date. Just diamonds!!! Amped for this second run.

Likes
21
Share
@Smokey89
Follow
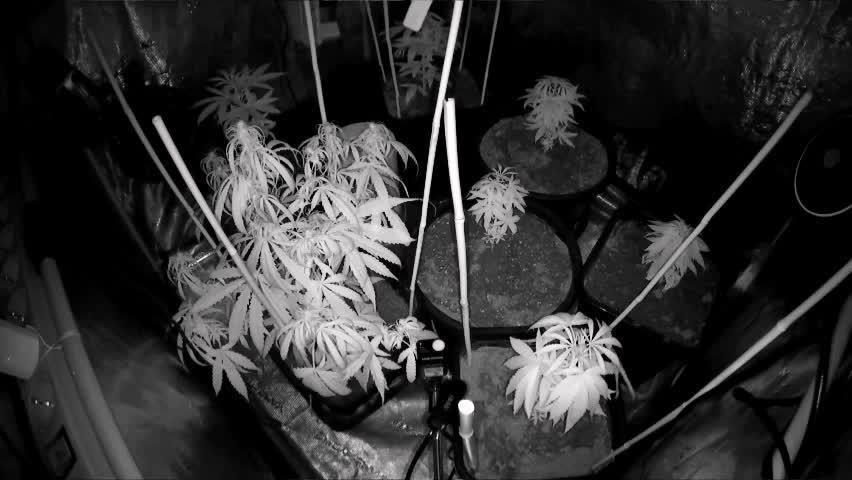
So as you can see my girls suffered a bit in week 3 but are on the mend. I've continued to LST them tying down the new growth sites and either tucking or removing the fan leaves to allow light to penetrate to the new growth sites I'm going to veg for 2/3 more weeks then flip them
Just did a complete water change and stripped down the whole system to clean the water pipes air pipes and air stones. After visiting my local hydroponics shop they recommended a organic ph up and down which I thought sounded good less chemicals in my grow what's not to like about that. However once I had used them I quickly realised they had issues I was constantly checking and adjusting my ph levels as they would drop to 5.3 and over the course of a few hours would rise to 7.4 upon checking my water pump I found my filters where completely blocked so I flushed them and put them back in and it seemed to work fine until the next day when I checked again and yet again they where blocked. I think they had reacted with my other nutrients and caused a brown funky sludge. I have scrubbed each bucket and reservoir to get rid of the gunk then used disinfect on all the equipment and the grow room. I've uploaded a video so you can see the condition my girls where living in. Hope this helps anyone in their future grows

Likes
15
Share
@dank604
Follow
Thelma (2 gal) has a massive fade setting in, only a handful of ambers though. I start her flush this week and will chop in 2 weeks, assuming the number of ambers has multiplied bigtime by then.
Louise (3 gal) is looking nice and healthy and I'm looking forward to compare harvests between both, she's a week younger.
So close!!
Likes
1
Share


Likes
27
Share
@Hawkbo
Follow
Been a couple weeks since I updated this one. I. Early flower one of them is a monster at 42 inches from the dirt. They are a little behind the pack but it should start getting interesting soon


Likes
54
Share
@Mimi420
Follow
Higuys!
They on FD 12.Not much streching so far.They doing weel so far,and i hope they gona produce fat buds!Removed some yelow leafs.They eating a lot.3-4l every 2-3 days.
Stay green!


Likes
56
Share
@Master_weeda
Follow
Bonjour à tous les padawans et maîtres jedis
Jour84 arrosage avec 2 litres d'eau ph6.3
Jour86 arrosage avec 2. 5litres d'eau ph6.3
Jour89 arrosage avec 2 litres d'eau ph6.3
LE MEILLEUR MOMENT POUR RINCER SON CANNABIS
Le rinçage commence en général deux semaines avant la récolte. Si le plant a une période de floraison de huit semaines, le rinçage doit commencer six semaines après le début de la période de floraison. Il est préférable de regarder de près les trichomes sur le plant pour déterminer quand votre cannabis est prêt à être récolter. Si les petits trichomes commencent juste à passer d’une couleur transparente à une teinte laiteuse et blanche, c’est une bonne indication que les plants peuvent commencer à être rincés. Il faut s’arranger pour que la majorité des trichomes aient changé vers la couleur désirée pour la récolte après deux semaines – ça devient plus facile à faire avec l’expérience, alors accrochez-vous !
Le rinçage peut également être un bon moyen de remettre à zéro la terre quand un plant est toujours en phase de croissance végétative. Parfois, un cultivateur suralimente par accident son cannabis, ce qui provoque un changement de couleur et un flétrissement du bout des feuilles. Ceci est appelé une « brûlure par nutriments ». Rincer la terre peut éliminer les nutriments excédentaires, ce qui aide à résoudre le problème. Cependant, c’est une mesure drastique à ce stade de la culture, alors assurez-vous que le problème soit bien une brûlure par nutriments et non quelque chose d’autre.
Le rinçage ne concerne pas que le moment de la récolte. Cette technique peut aussi être mise en place durant la phase de croissance afin de débarrasser le sol des nutriments. Bien évidemment, les nutriments permettent à votre plante de rester en bonne santé et vous assurent des rendements maximaux, mais une trop grande quantité peut causer une accumulation et un état statique durant lequel la plante ne peut plus y accéder.
Le blocage des nutriments peut être causé par une accumulation saline ou des niveaux de pH incorrects. Ces deux causes peuvent être résolues par un rinçage de votre plante à l’eau claire. Les fluides viendront pousser les nutriments en dehors du substrat et le débarrasseront de l’accumulation, permettant ainsi aux racines de pouvoir accéder à nouveau aux nutriments.
EMPÊCHER LE BLOCAGE D'ABSORPTION DES NUTRIMENTS AVANT QU’IL NE POSE PROBLÈME
Au mieux, le blocage des nutriments peut être un problème, au pire, il peut être un vrai désastre. Comme le dit l’adage, il vaut mieux prévenir que guérir. Il vaut mieux prendre de l’avant pour empêcher le blocage des nutriments plutôt que de s’y atteler lorsque c’est trop tard.
Empêcher le blocage des nutriments peut se faire par le biais d’un rinçage de routine. En rinçant vos plantes une fois avant la floraison et une fois au milieu de cette dernière, vous minimiserez l’accumulation de nutriments.
LES ENZYMES À LA RESCOUSSE
Après le rinçage pour contrer l’accumulation ou le blocage des nutriments, vous remarquerez peut-être que vos plantes ont une apparence vert foncé, c’est le signe d’un excès de nutriments. Dans ce cas, certains cultivateurs choisissent d’ajouter une formule riche en enzymes à leur substrat.
Au cas où vous auriez oublié vos cours de biologie, les enzymes sont des protéines qui catalysent les réactions. Elles aident à rincer le substrat en décomposant l’amidon, les glucides et les nutriments. Il existe sur le marché toute une variété de produits qui contiennent des formules d’enzymes très efficaces.
Si l’eau ne suffit pas à vos plantes, ces petites protéines ne feront qu’une bouchée de l’accumulation de nutriments !
COMMENT BIEN RINCER SON CANNABIS
Rincer votre plant de cannabis est un processus simple. À chaque fois que vous apporteriez normalement des nutriments, vous rincez à la place. De l’eau du robinet non traitée est tout ce dont vous avez besoin pour rincer, assurez-vous juste que son pH est sans danger pour le cannabis. La plupart de l’eau de puits a un pH sain et ne nécessite pas de traitement, mais s’il est nécessaire de traiter l’eau de rinçage pour avoir un pH adapté, faites-le. Les ajustements du pH seront donc la seule chose à considérer.
Inonder la terre avec autant d’eau fraîche qu’elle puisse contenir. Laissez l’eau durant quelques minutes pour qu’elle puisse absorber les nutriments, puis inondez la terre encore pour rincer les nutriments loin du plant. Si vous cultivez en intérieur dans des pots, notez la couleur de l’eau qui s’échappe du fond des pots. Elle sera tâchée et aura une couleur sale. C’est à cette étape qu’un appareil de mesure des TDS (Total des Solides Dissous) est utile. Si vous récupérez et mesurez le TDS de l’eau « évacuée », elle devrait avoir un taux de 1300ppm, ce qui est assez élevé. Il est important de rincer le plant jusqu’à ce que total baisse à un niveau de 50ppm, ou du moins qu’il s’approche du TDS de l’eau fraîche que vous utilisez pour rincer le plant. La couleur de l’eau d’évacuation va s’éclaircir et apparaîtra plus propre. Vous devez tirer autant que possible de minéraux dissous du plant.
Comment et Quand Rincer les Plants de Cannabis
Rincer les plants de cannabis avant la récolte peut faire la différence entre les meilleurs têtes ou la plus rude pour la gorge. Cette petite tâche est simple et facile à faire. Ajoutez juste de l’eau ! Attention car le moment du rinçage joue un rôle critique.
Le b.a.-ba du rinçage de ses plants de cannabis.
Sommaire:
1. Qu’est-ce que le rinçage ?
2. Le meilleur moment pour rincer son cannabis
3. Empêcher le blocage d'absorption des nutriments avant qu’il ne pose problème
4. Les enzymes à la rescousse
5. Comment bien rincer son cannabis
6. Comment rincer ses plantes en hydroponie
7. Les résultats du rinçage de son cannabis
8. Quand éviter de rincer son cannabis
Vous avez enfin fini vos cultures et vous vous retrouvez avec un magnifique plant couvert de super têtes, maintenant sèches, vous avez fait le curing et vous êtes prêt à fumer – et pourtant quelque chose ne va pas. La weed semble ne pas vouloir se consumer et quand vous tirez une bouffée, c’est comme si on vous avait donné un coup de poing dans les poumons et vous toussez en craignant pour votre vie ! Le goût est rude et décevant. Si c’est une situation que vous avez vécue, il y a des chances pour que vos plants n’aient pas été rincés correctement avant la récolte.
Cette fumée bien loin d’être agréable est provoquée par la présence dans le plant des nutriments et minéraux utilisés lors de la culture, ce qui altère la façon dont le plant se consume. Rincer le plant élimine ces nutriments restants, ce qui améliore la qualité des sensations. Heureusement, le rinçage des plants de cannabis se fait facilement et sans effort, et cela vous permet de produire des têtes douces et délicieuses en un rien de temps.
ARTICLE LIÉ
Comment Utiliser les Nutriments pour Cannabis
QU’EST-CE QUE LE RINÇAGE ?
L’acte de rincer un plant implique d’utiliser de l’eau pour éliminer tout nutriment présent dans la terre. Une grande quantité d’eau est passée à travers la terre et drainée sur une base régulière. Tous les minéraux et nutriments présents dans la terre sont rincés avec le temps avec l’eau, ce qui laisse une terre propre.
Mais pourquoi vouloir éliminer tous les minéraux de la terre ? N’est-ce pas mauvais pour la récolte ? En fait, cela aide à la récolte de manière significative. Quand les nutriments sont éliminés de la terre, ceci force le plant de cannabis à utiliser tous les nutriments toujours présents dans le plant. C’est comme pour le corps humain. Quand on consomme beaucoup d’aliments, ce que nous n’utilisons pas est transformé en graisses. Dans les situations extrêmes où la nourriture est rare, le corps s’appuie sur cette graisse stockée pour tirer de l’énergie.
Comme rincer force le cannabis à utiliser tous les nutriments restants dans le plant, aucun ne devrait rester et altérer les têtes récoltées. Cependant, si vous le faites trop tôt, cela peut nuire à la santé du plant, le moment est donc clé.
LE MEILLEUR MOMENT POUR RINCER SON CANNABIS
Le rinçage commence en général deux semaines avant la récolte. Si le plant a une période de floraison de huit semaines, le rinçage doit commencer six semaines après le début de la période de floraison. Il est préférable de regarder de près les trichomes sur le plant pour déterminer quand votre cannabis est prêt à être récolter. Si les petits trichomes commencent juste à passer d’une couleur transparente à une teinte laiteuse et blanche, c’est une bonne indication que les plants peuvent commencer à être rincés. Il faut s’arranger pour que la majorité des trichomes aient changé vers la couleur désirée pour la récolte après deux semaines – ça devient plus facile à faire avec l’expérience, alors accrochez-vous !
Le rinçage peut également être un bon moyen de remettre à zéro la terre quand un plant est toujours en phase de croissance végétative. Parfois, un cultivateur suralimente par accident son cannabis, ce qui provoque un changement de couleur et un flétrissement du bout des feuilles. Ceci est appelé une « brûlure par nutriments ». Rincer la terre peut éliminer les nutriments excédentaires, ce qui aide à résoudre le problème. Cependant, c’est une mesure drastique à ce stade de la culture, alors assurez-vous que le problème soit bien une brûlure par nutriments et non quelque chose d’autre.
Flushing
Le rinçage ne concerne pas que le moment de la récolte. Cette technique peut aussi être mise en place durant la phase de croissance afin de débarrasser le sol des nutriments. Bien évidemment, les nutriments permettent à votre plante de rester en bonne santé et vous assurent des rendements maximaux, mais une trop grande quantité peut causer une accumulation et un état statique durant lequel la plante ne peut plus y accéder.
Le blocage des nutriments peut être causé par une accumulation saline ou des niveaux de pH incorrects. Ces deux causes peuvent être résolues par un rinçage de votre plante à l’eau claire. Les fluides viendront pousser les nutriments en dehors du substrat et le débarrasseront de l’accumulation, permettant ainsi aux racines de pouvoir accéder à nouveau aux nutriments.
EMPÊCHER LE BLOCAGE D'ABSORPTION DES NUTRIMENTS AVANT QU’IL NE POSE PROBLÈME
Au mieux, le blocage des nutriments peut être un problème, au pire, il peut être un vrai désastre. Comme le dit l’adage, il vaut mieux prévenir que guérir. Il vaut mieux prendre de l’avant pour empêcher le blocage des nutriments plutôt que de s’y atteler lorsque c’est trop tard.
Empêcher le blocage des nutriments peut se faire par le biais d’un rinçage de routine. En rinçant vos plantes une fois avant la floraison et une fois au milieu de cette dernière, vous minimiserez l’accumulation de nutriments.
LES ENZYMES À LA RESCOUSSE
Après le rinçage pour contrer l’accumulation ou le blocage des nutriments, vous remarquerez peut-être que vos plantes ont une apparence vert foncé, c’est le signe d’un excès de nutriments. Dans ce cas, certains cultivateurs choisissent d’ajouter une formule riche en enzymes à leur substrat.
Au cas où vous auriez oublié vos cours de biologie, les enzymes sont des protéines qui catalysent les réactions. Elles aident à rincer le substrat en décomposant l’amidon, les glucides et les nutriments. Il existe sur le marché toute une variété de produits qui contiennent des formules d’enzymes très efficaces.
Si l’eau ne suffit pas à vos plantes, ces petites protéines ne feront qu’une bouchée de l’accumulation de nutriments !
Comment et Quand Rincer les Plants de Cannabis
COMMENT BIEN RINCER SON CANNABIS
Rincer votre plant de cannabis est un processus simple. À chaque fois que vous apporteriez normalement des nutriments, vous rincez à la place. De l’eau du robinet non traitée est tout ce dont vous avez besoin pour rincer, assurez-vous juste que son pH est sans danger pour le cannabis. La plupart de l’eau de puits a un pH sain et ne nécessite pas de traitement, mais s’il est nécessaire de traiter l’eau de rinçage pour avoir un pH adapté, faites-le. Les ajustements du pH seront donc la seule chose à considérer.
Inonder la terre avec autant d’eau fraîche qu’elle puisse contenir. Laissez l’eau durant quelques minutes pour qu’elle puisse absorber les nutriments, puis inondez la terre encore pour rincer les nutriments loin du plant. Si vous cultivez en intérieur dans des pots, notez la couleur de l’eau qui s’échappe du fond des pots. Elle sera tâchée et aura une couleur sale. C’est à cette étape qu’un appareil de mesure des TDS (Total des Solides Dissous) est utile. Si vous récupérez et mesurez le TDS de l’eau « évacuée », elle devrait avoir un taux de 1300ppm, ce qui est assez élevé. Il est important de rincer le plant jusqu’à ce que total baisse à un niveau de 50ppm, ou du moins qu’il s’approche du TDS de l’eau fraîche que vous utilisez pour rincer le plant. La couleur de l’eau d’évacuation va s’éclaircir et apparaîtra plus propre. Vous devez tirer autant que possible de minéraux dissous du plant.
COMMENT RINCER SES PLANTES EN HYDROPONIE
Le rinçage des plantes en hydroponie est bien plus simple que de se débarrasser des nutriments en terre. Les cultivateurs en hydroponie pourront simplement drainer leur système et le remplacer par une eau au pH neutre.
Le rinçage des plantes en hydroponie est aussi un processus bien plus court. Une fois que la réserve d’eau aura été modifiée, les plantes en hydro n’auront pas accès aux nutriments externes. Pour cette raison, un rinçage de deux jours suffira.
LES RÉSULTATS DU RINÇAGE DE SON CANNABIS
Après la récolte des têtes, prenez du temps pour bien faire le curing pour atteindre le potentiel le plus élevé. Un affinage correct par curing permet de réduire encore plus le côté rude des têtes, en éliminant des choses comme un excès de chlorophylle. Vous serez étonné de voir la différence que ce petite effort peut avoir sur votre produit. Tout votre travail se sentira dans la première bouffée de cette weed douce comme de la soie, qui caresse la gorge comme du miel. Le plus doux de la nature. Vous pouvez donc améliorer la qualité de votre cannabis en ajoutant juste de l’eau !
QUAND ÉVITER DE RINCER SES PLANTES
Le seul moment où nous recommandons d’éviter le rinçage de son cannabis est lorsque l’on travaille avec une terre biologique amendée ou un super soil. Ces substrats ont été développés avec précaution afin d’héberger des micro-organismes bienfaisants tels que des bactéries ou des champignons. Cette délicate biodiversité pourrait être éliminée et endommagée par le rinçage.
Une fois de plus, l’absence de rinçage ne devrait pas poser de soucis, car aucun nutriment externe ou synthétique n’aura été ajouté au substrat. À la place, les plantes comptent sur les micro-organismes pour décomposer la matière organique et la livrer aux racines.
May the force be with you 💪

Likes
8
Share
@DogDoctorOfficial
Follow
Mango Kush – Week 2 Flower (Week 6 from Seed)
Bloom boosters, high temps, new lights, and a little tribute to nature
Grower: Dog Doctor
Strain: Mango Kush (Pheno #1 & Pheno #2)
Environment: 8×8 Grow Room
Control System: Full TrolMaster ecosystem (Tent-X brain + WCS substrate sensors and more)
Lighting:
• ThinkGrow Model One
• ThinkGrow ICL-300 (x2 inner canopy lights)
• Future of Grow Black Series 600W
• Lumatek Zeus 465W Compact Pro
⸻
🌸 Week 2 Flower – Transition Mode
The Mango Kush sisters are looking absolutely stunning, even if this week was busier for me and I only managed a few photos. 🌱 Instead, I recorded a video walkthrough so everyone can see the whole room vibe, happy, lush, and full of energy.
Both phenos are pushing beautifully into flower:
• Pheno #1: Taller, branchy, already stretching into her flower frame.
• Pheno #2: Started later, but catching up fast, morphing gracefully into bloom.
The morphology shift is very visible this week, especially with the introduction of new bloom-focused nutrients.
⸻
💧 Feeding Update – The New Recipe
This week we swapped Start Booster → Top Booster and introduced a few Plagron classics to complement the Aptus base:
Water Mix (per liter):
• Aptus Regulator – 0.15 ml
• Aptus CalMag Boost – 0.25 ml
• Aptus Top Booster – 1 ml
• Plagron Power Buds – 1 ml
• Plagron Sugar Royal – 1 ml
• Plagron Green Sensation – 1 ml
We paused All-in-One Liquid for now, letting the slow-release pellets in the super soil do their work. The idea: less redundancy, more synergy.
💡 Experiment in Progress: I’ve used Plagron successfully in the past, but this is my first time weaving their trio (Power Buds, Sugar Royal, Green Sensation) into an Aptus base. It’s improvisation, yes, but that’s where discoveries are made. Let’s see how the Mango Kush girls respond!
⸻
🌡️ Environment – Riding the Highs
• Temps: Sometimes peaking at 34°C (🌬️ AC unit on the way soon!)
• Humidity: 60–70% at times
• VPD: ~1.89 kPa
• Soil Moisture: Watering when down to 19–20%
• Monitoring: TrolMaster WCS Substrate Sensor → feeding me EC, moisture, and root zone data in real time
⚠️ It’s not a “perfect” VPD chart this week, but the Mango Kush girls are handling it like champs. Sometimes stress teaches resilience, and these ladies are showing strength.
⸻
💡 Lighting the Room
The canopy is now supported by a serious multi-light orchestra:
• ThinkGrow Model One – Main engine, full spectrum power
• ThinkGrow ICL-300 – Inner canopy lights bringing energy to lower branches, helping all bud sites shine
• Future of Grow Black Series 600W – Supporting spectrum balance
• Lumatek Zeus 465W Compact Pro – Newly added, boosting the footprint and canopy penetration
Together, this creates an even distribution of photons across the room, minimizing shadow zones and preparing the girls for heavy bloom stacking.
⸻
🧠 TrolMaster Ecosystem – Grow Room Brain
The Tent-X controller, paired with WCS substrate sensors, has become my right hand:
• Live feedback on soil moisture, EC, temp, and RH
• Smarter watering decisions (no guessing, just data)
• Automation ready → The dream of a fully self-regulating grow room is coming closer
For now, I still hand-water, but soon automation will take over. Until then, it’s hands-on love every day.
⸻
🐝 A Tribute to Bees – Nature’s Pollinators
While we manage indoor canopies with LEDs and controllers, let’s not forget the simple magic of nature. Outdoors, it’s the bees that keep the cycle of life moving.
One photo I’m sharing this week is of a bee pollinating a flower, a reminder that without them, much of our food (and medicine) would vanish.
Bees are not just workers; they are guardians of biodiversity. 🌍💛 Let’s honor them in every grow, even indoors, where they cannot reach.
⸻
🔄 Recap So Far – From Seed to Now
• Week 0–2: Germination & seedling stage, Aptus Start Booster for early vigor
• Week 3–4: Veg growth, branching in Pheno #1, Pheno #2 catching up
• Week 5: Flip to flower, stretch begins, PPFD raised to 766
• Week 6 (Now): Morphology shift, bloom boosters added, lights upgraded, temps testing resilience
The Mango Kush girls have evolved beautifully every step of the way , two different phenos, one journey, one story.
⸻
🔮 What’s Next
• AC installation → stabilize temps into the sweet 26–28°C range
• Closer monitoring of Plagron + Aptus synergy → expect denser flowers
• Watch for first true pistils and bud formation in Week 3 Flower
• More light power on standby as the canopy fills out
⸻
📹 This week’s highlight: A video tour of the full room (since fewer photos this time).
📸 A few shots are included to show just how happy the Mango Kush girls are.
🌱 Thank you everyone for reading, learning, and growing along with us!
Join us on YouTube and Instagram for the full behind-the-scenes journey.
📲 Don’t forget to Subscribe and follow me on Instagram and YouTube @DogDoctorOfficial for exclusive content, real-time updates, and behind-the-scenes magic. We’ve got so much more coming, including transplanting and all the amazing techniques that go along with it. You won’t want to miss it.
• GrowDiaries Journal: https://growdiaries.com/grower/dogdoctorofficial
• Instagram: https://www.instagram.com/dogdoctorofficial/
• YouTube: https://www.youtube.com/@dogdoctorofficial
There’s a new series blooming and it’s more than just plants. It’s about process, patience, and paying attention.
⸻
Explore the Gear that Powers My Grow
If you’re curious about the tech I’m using, check out these links:
• Genetics, gear, nutrients, and more – Zamnesia: https://www.zamnesia.com/
• Environmental control & automation – TrolMaster: https://www.trolmaster.eu/
• Advanced LED lighting – Future of Grow: https://www.futureofgrow.com/
• Root and growth nutrition – Aptus Holland: https://aptus-holland.com/
• Nutrient systems & boosters – Plagron: https://plagron.com/en/
• Soil & substrate excellence – PRO-MIX BX: https://www.pthorticulture.com/en-us/products/pro-mix-bx-mycorrhizae
• Curing and storage – Grove Bags: https://grovebags.com/
⸻
We’ve got much more coming as we move through the grow cycles. Trust me, you won’t want to miss the next steps, let’s push the boundaries of indoor horticulture together!
As always, this is shared for educational purposes, aiming to spread understanding and appreciation for this plant. Let’s celebrate it responsibly and continue to learn and grow together.
With true love comes happiness. Always believe in yourself, and always do things expecting nothing and with an open heart. Be a giver, and the universe will give back in ways you could never imagine.
💚 Growers love to all 💚
P.S.- Why These Plagron Additives? – A Deep Dive
I’ve decided to complement the Aptus base with three Plagron boosters. Each one has its own role in the flowering process, and together they form a very balanced support system for the Mango Kush ladies.
🌸 Power Buds (1 ml/L)
• Purpose: Early flowering stimulator
• What it does: Power Buds encourages the plant to initiate bud development faster. It shortens the “transition phase” from veg into bloom, helping flowers form sooner and more consistently across the canopy.
• Why now: We’re in Week 2 Flower, the exact point where we want to signal the plants: “It’s time to build flowers.” Power Buds sends that hormonal nudge.
⸻
🍯 Sugar Royal (1 ml/L)
• Purpose: Enhances resin, aroma, and stress resistance
• What it does: Sugar Royal contains amino acids that stimulate the plant to produce more chlorophyll and secondary metabolites. In plain terms: richer terpene profile, stickier resin, stronger smell, deeper taste.
• Extra benefit: It also reduces stress from heat or drought, very useful right now since our temps have been spiking up to 34°C.
• Why now: As stretch continues, plants need to stay strong and not waste energy on stress. Sugar Royal helps them thrive despite less-than-ideal VPD.
⸻
💎 Green Sensation (1 ml/L)
• Purpose: All-in-one bloom enhancer for the second half of flower
• What it does: Green Sensation is a powerful 4-in-1 booster that improves:
• Flowering: denser, heavier buds
• Resin production: frostier flowers
• Nutrient uptake: more efficient feeding
• Soil health: stimulates beneficial microbial activity
• Why now: Even though it shines brightest in late flower, starting early allows the soil ecosystem and plant metabolism to adapt gradually. By the time we hit peak bloom, the system is fully primed.
⸻
🌱 How They Work Together
• Power Buds → Kickstarts flower sites
• Sugar Royal → Enhances resilience + resin quality
• Green Sensation → Boosts density and overall flower performance
The trio works like a team of specialists: one accelerates the start, one polishes the quality, and one pushes yield potential. Combined with the Aptus base (Regulator for strength, CalMag Boost for structure, Top Booster for bloom push), it’s a balanced, experimental, but very promising recipe.
💚 Growers love to all 💚

Likes
2
Share
@GanjaFarmar
Follow
So far the biggest but least formed plant in the tent. The blue cheese has hit 57 days from seed, and to be honest its looking all healthy! I cant wait for the next few weeks for the nugs to dense up!

Likes
49
Share
@RockoCalenberg
Follow
🌱 Blütetag 38 | Tag 98 gesamt
Klima – VPD Achterbahn
Wieder eine unruhige Woche draußen.
Mildes Regenwetter mit hoher Luftfeuchte → dann wieder kalt → dann wieder milder.
Typisches Hin und Her.
Die Pflanzen müssen ständig Transpiration und Nährstofffluss nachjustieren. Konstantere Bedingungen würden es ihnen leichter machen – aber sie arbeiten sich so durch.
🌿 Pflanzenstatus
White Gushers 33
Diese Woche zeigt sie etwas mehr Sensibilität.
An exponierten Trieben sind Klimaspuren sichtbar – kleine Nekrosen und leichte Transportanzeichen. Nichts Kritisches, aber erkennbar, dass sie die Schwankungen spürt.
Trotzdem baut sie weiter auf.
Blüten stapeln sich, die Harzproduktion nimmt zu und das fruchtige Aroma wird von Tag zu Tag intensiver.
Triangle Sherbet Kush
Deutlich die ruhigere im Zelt.
Sie geht gelassener mit den Schwankungen um und wirkt insgesamt stabiler. Auch hier kleine Spuren, aber weniger ausgeprägt.
Die Blütenstruktur wird kompakter, das Stacking läuft sauber, und aromatisch wird sie zunehmend runder.
🌸 Blütenentwicklung & Aroma
Beide Strains legen gut zu.
Mehr Dichte.
Mehr Harz.
Mehr Charakter.
Beim Öffnen des Zeltes kommt inzwischen direkt ein wahrnehmbarer, fruchtiger Duft entgegen. Wir sind klar in der Mitte der Blüte angekommen.
💧 Nährstoffe
Konstant gehalten:
CalMag: 1,5 ml/L
Bloom: 1 ml/L
Einfach, stabil, ohne größere Änderungen.
🐞 IPM / Biologischer Pflanzenschutz
Das biologische Team arbeitet weiter:
Florfliegenlarven
Raubmilben
Gelbtafeln zur Kontrolle
Ein leichter Rückgang der Trips ist erkennbar, aber sie bleiben hartnäckig. Kein akuter Druck – eher ein laufender Prozess.
🔎 Ausblick
Insgesamt bin ich zufrieden mit dem Stand.
Das Klima dürfte ruhiger sein, aber Blütenentwicklung und Aroma gehen klar in die richtige Richtung.
In der kommenden Woche plane ich eine leichte, gezielte Entlaubung (etwa 2-3 Wochen nach dem ersten Durchgang), um Licht und Luft für die letzten Wochen optimal zu führen.
Ich rechne mit etwa vier weiteren Wochen bis zur sauberen Ausreifung.
Toll, dass hier viele mitlesen, Input geben und Erfahrungen teilen – genau das macht so einen Run spannend.
Achterbahn-Woche.
Blüten bauen trotzdem.
Danke fürs Mitfahren.
— Rocko 🌿🔥💚
🌱 Flower Day 38 | Day 98 Overall
Climate – VPD Rollercoaster
Another unstable week outside.
Mild rain with high humidity → then cold → then mild again.
Classic back-and-forth weather.
The plants constantly have to readjust transpiration and internal nutrient flow. More stable conditions would definitely make things easier for them — but they’re pushing through.
🌿 Plant Status
White Gushers 33
She shows a bit more sensitivity this week.
On exposed tops, climate marks are visible — small necrotic spots and light transport signs. Nothing critical, but clearly showing she feels the swings.
Still, she keeps building.
Bud stacking continues, resin production is increasing, and the fruity aroma grows stronger day by day.
Triangle Sherbet Kush
Clearly the calmer one in the tent.
She handles the fluctuations more gracefully and appears more stable overall. Minor signs here as well, but less pronounced.
Bud structure is tightening up nicely, stacking remains solid, and the aroma is becoming rounder and richer.
🌸 Bud Development & Aroma
Both strains are progressing well.
More density.
More resin.
More character.
Opening the tent now immediately releases a noticeable fruity scent. We’re clearly in mid-flower mode.
💧 Feeding
Kept consistent:
CalMag: 1.5 ml/L
Bloom: 1 ml/L
Simple, stable, no major adjustments.
🐞 IPM / Biological Control
The biological crew is still at work:
Lacewing larvae
Predatory mites
Sticky traps for monitoring
A slight reduction in thrips is noticeable, but they remain persistent. No major pressure — just an ongoing balancing process.
🔎 Outlook
Overall, I’m happy with where we stand.
The climate could be smoother, but bud development and aroma are clearly moving in the right direction.
Next week I’m planning a light, selective defoliation (about 2-3 weeks after the first round) to optimize airflow and light penetration for the final weeks.
I’m expecting around four more weeks until proper maturation.
Great to see so many people following along, sharing input and experience — that’s what makes a run like this even better.
Rollercoaster week.
Buds keep building.
Thanks for riding along.
— Rocko 🌿🔥💚

Likes
19
Share
@Comfrey
Follow
Day 64
🌤️🌥️☁️☁️ 11-19 degrees and the humidity is around 65%. I started into the tenth week with an intense check of the main buds. Some of the trichomes are milky but the most are still clear. Maybe I‘m wrong. Some days ago I could spot some amber trichomes but the flowers expanded and it‘s not possible to find anymore amber ones. Watered 500ml pure rainwater.
Day 65
🌤️☁️🌥️☁️ Today Tropicana needs a rest. She just want to sit and do nothing except waiting for sunshine warming her heart. In the evening she asked for water, potting soil lost enough weight. 600ml with 60ml light fermented flower and herb tee. ~100 ml drainage with PH 6,2. In the main flower it was possible to find a small amount of amber trichomes.
Day 66
🌤️⛅️🌤️🌤️ 10-21 degrees, humidity 45-65%. This morning I understood, that Tropicana was not thirsty yesterday, she need to breath oxygen with her roots to feel happy. The beautiful smell is way not so intense since last night. I missed the strong smell when I opened the door to our balcony in the early morning. So no watering yesterday would be better. And my banana peel tee is not free of nitrogen, same with the herb and flower tee. Less is more will be written in my diary in the next days (weeks). Watching Trichome TV: I see more amber and I see that she needs more time after all this stress which I made for her. She told me that she is not only sick of water, she told me, that she hate to be moved all the time, too. Every move from A to B she would loose tiny roots and this would stress her a lot. When I checked the moisture I spotted too many of this root fly castings. Their mamas and papas had their orgie about a week ago and now they are eating the mulch layer roots as if there will be no morning. This is not Tropicanas day. But the sun is shining and tomorrow will be another day. Hopefully with a nose full of this tasty fruity and woody citrus smell.
Day 67
🌧️☁️☁️☁️ 13-19 degrees, humidity 42-80%. This morning the smell was more intensive like yesterday but still not like before. The leafs show the first signs of fading and I‘m very nervous. This night will fall a lot of rain for several hours. But a part of our balcony is canopied, so Tropicana will be a little bit protected by me this night. I don‘t want to make another mistake, so I use this possibility. Anyway the plants are always wet after a strong rain, it‘s just a little canopy, but not soaked with water.
Day 68
🌧️☁️⛅️🌤️ 15-21 degrees and the humidity is 74-85%. Tropicana feels better. The smell this morning was much more intensive then the days before.
Day 69
⛅️🌤️🌥️☁️ 15-22 degrees, humidity 46-89%. Tropicanas flowers are swelling and while she is maturing her smell is getting more intense and complex. Right now mandarin and an earthy woody smell, sometimes even a bit sour like a mixture of pineapple and lime juice. It‘s possible to find new colors in the flowers. There’s purple and pink, orange and ocher brown appeared. Tropicanas main flower looks like the harvest time is near, but the trichomes are still clear and just started to get milky. Anyway she is incredible fast, especially if to remember the extrem conditions with minimal temperature around ten degrees in the early mornings.
Day 70
🌧️☁️☁️🌧️ 17-23 degrees, humidity 63-94%. In the next days we will have humid thunderstorm weather. There is even a warning for huge hailstones for tomorrow. So there is a risk of damage and mold because of high humidity. I will have an eye on this. Tropicana looks healthy, so I‘m not worrying too much anymore.


Likes
148
Share
@CrazyHorse
Follow
Welcome, If you are already here and reading this, you do it at your own risk !! 😃😇😎
Another week of flowering, the girl smells so intensely that the carbon filter does not cope with effective filtration. There is a real orange scent in the tent, a blend of fresh oranges and skunk scents. The buds take on size, the resin production is amazing and creates beautiful sparkling crystals on them. There are still 2/3 weeks to go, but these are the most exciting ones. In this week I added cal-mag to fertilizers, it is a preventive measure because I increased the amount of PK 13-14, so cal-mag supplementation will not harm the plant at this stage of flowering.
Update: Day 87
I lowered the height of the lamp to 17 cm, I just need to put on my helmet, fasten seat belts and hold tightly to my chair :P
Update: Day 88
I had to use wire-mode because the side branches were starting to bend more and more under their weight. It makes me very happy because the harvest will be in 2/3 weeks 🙏
I wish you all a fantastic evening, You Lovely Girls Growers 💪💪💪