The Grow Awards 2026 🏆 


Likes
Comments
Share
@TyRun
Follow
Clones adventure. Mom's recovering.
Spoiler: it was a very bad idea to put the clones into such large plastic pots and flood the propagator with too much water. Yes, the environment was fine, but there was no airflow through the coco, so the cuts rotted and I had to re-transplant the clones again after cleaning off the damaged parts.
Meanwhile, the mom is happy and recovering very fast.
Processing
Likes
19
Share
@CannabisAprendiz
Follow
Esta es una genética de un olor muy fuerte y pesado se siente intenso desde la vegetación , es una variedad muy resinosa con unos colores morados hermosos , probando las flores cuando terminó el secado y ahora curando las flores se siente un sabor terroso , al principio no me gusto ya que nunca había probado este , pero después al seguir fumando se siente un sabor final muy agradable.
Esta genética se conservará para futuros cruces y experimentar algo nuevo.
muy conforme con la producción de cada clon

Likes
3
Share
@Ninjabuds
Follow
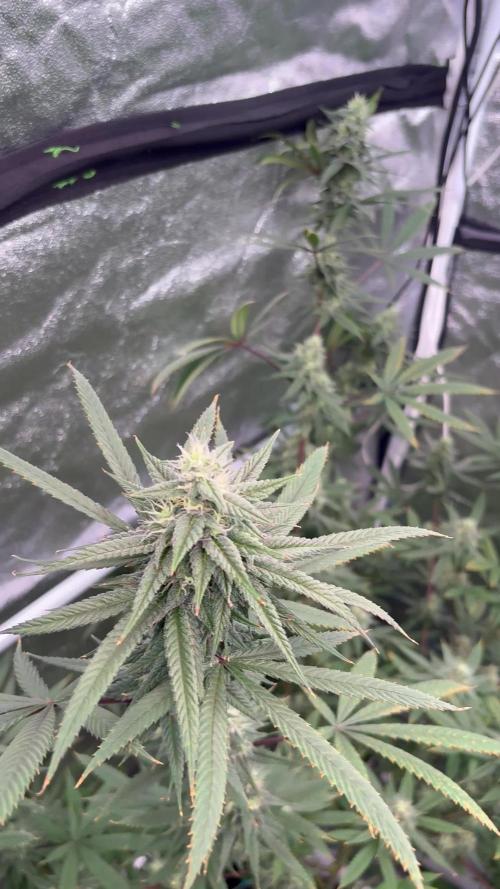
The plant is definitely a large plant with a lot of potential to make big long buds it has some of type leaves. I hope the bud fatten up a little though the plant has a strong gas and nutty cream smell it’s really nice it over powers all the other plants on the smell factor

Likes
19
Share
@Naujas
Follow
I finally came back from vacation, and I already visited it:) it doesn't look bad, a few higher branches look like the leaves are on fire, a lot of leaves were cut off yesterday so that the plant would devote more energy to the flowers:) I think the flowers will burst and expand within a week:)

Likes
1
Share
@Pestitel
Follow
Amazing experience with the Mix Pack, I will try it again next summer for sure. Love the variety.
Likes
43
Share
@PEAKYPLANTERS
Follow
Brothers and sisters farmers
Welcome to a new rich and intense week of hard work for this photoperiod.
The gems seem to start taking shape, even if contrasting with the melting infestation of shitty ... we fight without stopping and we will see how it will end!

Likes
1
Share
@X_ATTAC
Follow
Starting with healthy clones from my mom's. 12 crescendos and 8 CITRAL Flos. Using a new organic soil blend with a higher npk compared to all previous grows. I feel as though I've dialed in everything properly this time . Enjoy the content and hit the instagram link on my profile for more


Likes
25
Share
@Mr2toke
Follow
Day 55 - 08/11/23
OG Kush is looking good and healthy today. Taking the upped nutes very well!! 1100PPM might push to 1250 near the end of the week.
Nugs are forming nicely, and the colour is beautiful too!!! She's a stinky plant, dominates the tent with her pungent stench!!!
I've moved her and the Fat Banana under the SF1000, still keeping it 18 inches above.
Looking forward to the next couple of weeks. Let's see how these nugs develop!!
Likes
68
Share
@Hawkbo
Follow
Day 56
There's only 9 plants left on the microdrip getting straight full tilt and slf100, the rest are being flushed using the water wand to give the longer running strains enough time to mature. The Polar Vortex 6's , trop juice 1, garlicane 2, garlicane 5, Polar vortex 4's, platinum silk and platinum gushers are gunna come down this week.

Likes
56
Share
@Ledbelieve
Follow
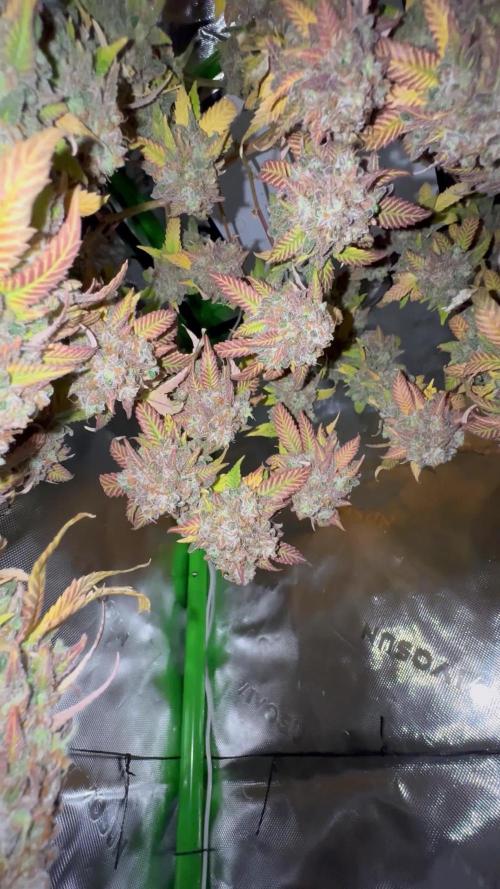
Been super busy so lagged on getting this posted. All plants are down and currently drying. The weather has gotten chilly so taking longer to dry than I would like. Super excited to get it jars and all cured up. First plant is all done and came out bomb af.... a couple of friends didn't even think it was real..lol.. because it was to purple.... the potency is totally there on this one ☝️ sometimes purple lacks that but this stuff has it all. Bag appeal, smell, taste, and potency!!! This is not a commercial strain due to the slow growth and average yield, but a conasuers dream. Didn't weight wet weight, but will post final dry weight


Likes
8
Share
@Roberts
Follow
Animal Mintz Autoflower is doing good. She is starting to form her colas. I did a solution change on her today. I added Atami Bloombastic as well. Thank you Zamnesia seeds, Medic Grow, and Atami. 🤜🏻🤛🏻🌱🌱🌱
Thank you grow diaries community for the 👇likes👇, follows, comments, and subscriptions on my YouTube channel👇.
❄️🌱🍻 Happy Growing 🌱🌱🌱
https://youtube.com/channel/UCAhN7yRzWLpcaRHhMIQ7X4g.


Likes
8
Share
@Lickey
Follow
Buds are ripening and trichomes are starting to get cloudier. I expect two more weeks

Likes
8
Share
@smoking_hills9
Follow
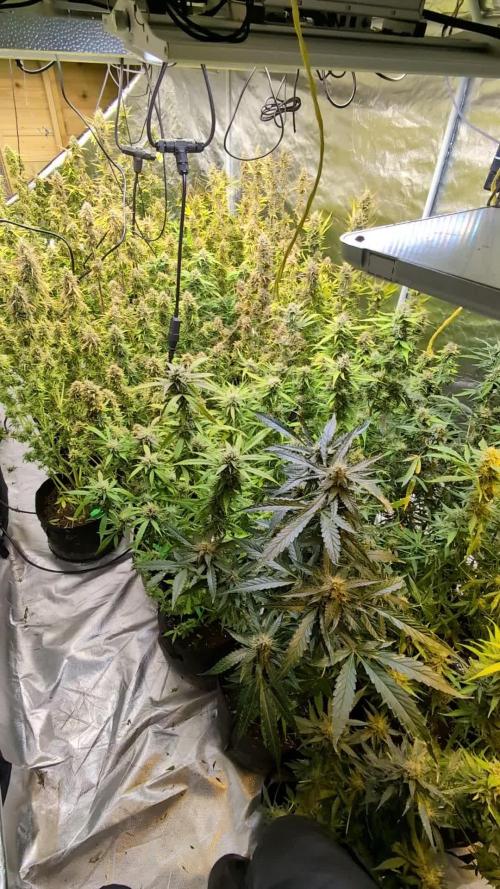
Last final defoliation done, now buds are fully exposed to the lights and the best part, harvest trim will be easier. Still it took me around 8 h altogether to defoliate all of them. Tones of buds and frost , amazing smells. Won't rush will give it a bit more to swell.
Very happy with genetics . 💚

Likes
4
Share
@HighOhioAn
Follow
Rainbow melon what can I say? This plant is absolutely one of my favorite so far out of the fast buds genetics. I’ve grown a couple other genetics before and I have to say fast buds definitely checks all the boxes almost makes it too easy. The plant literally grows itself like it has a mind of its own handling low stress training absolutely amazing. Seems like it wants to have a perfect canopy. Very little TLC and the plant absolutely is thriving. 🌿🔥
Likes
20
Share
@WeEdandGrowLover
Follow
The little is growing really really good,so much that i had to defoliate on day 30,earlier than i anticipated.
Hope she will like🤞🤞
On day 33 she's Still really growing well,getting more thirsty day by day.
Will do another defoliation on week 6,hoping to be last before harvest


Processing
Likes
21
Share
@PrairieFrostGrow
Follow
********** Week 2 of flower - Sept 26 to Oct 2/20 ***********
It has been an exciting week with finding a crack in a main stem and started new supplemental nutrients as well.
On Sept 28 I found a crack and had to do some repairs. Gorilla Girl was better off than one of the Cream 47’s with a cracked stem. GG4 was caught early enough that she didn’t separate much at the base. Looks to be as though I have caused the issue by topping the main stem a little too low😢 Coming back though and when tied together and looked after, its crazy how these plants can heal themselves😀💪👍 Took the tips from fellow growers and decided to try and fabric something with some cushion so that the straps holding the branches together don't cut into the branches. Needed another tool of the trade.......DYNAVAP to calm the nerves😀 because the grow has been going well and this set back has me pissed off as it is grower error😡 Seems to have worked out pretty well.
Switching the PK booster at the end of the week to Big Bud and started to add Rezin from Green Planet. Not much for Bud Factor X left so will run with Terpinator and Rezin as a replcement.
2nd layer of SCROG netting added early in the week, Sept 27/20. They are pushing out a good amount of leaves now and stretching so need to provide that added support for down the road.
IPM spray again this week, last opportunity, with Plant Therapy. There has been something in the tent and I think I have killed them. One more shot though to make sure and before there are too many bud sites. Love this product!!!!!! Works so well at getting rid of thrips and mites.
Really good growth this week. I need these girls to stop now though!!!!! They getting really tall and have roughly 12” above the canopy now. The node stacking is really good and they are forming a number of colas. Looking very positive so far! This strain is so vigorous and she just want to go👍 They have gone from 18” tall to 34” in a week......crazy good growth.
Little more detail........
Sept 26/20, Day 8
- Little heavier feed as they have not been watered for two days
- 4L - CalMag @ 2ml, Sensi Bloom, B52, Bud Candy, Bud Ignitor @ 1ml
- 830ppm and 5.7pH
- will start to let the pH rise bit now over next couple of weeks
- side branching doing very well and coming up.
- GG4 a little bare in the middle of the plant with just four colas.
Sept 27/20, Day 9
- 2nd SCROG layer added.
- GG colas getting long........need to add more Silica as well.
Sept 28/20, Day 10
- more microbes today
- 4 L - Microbial Mass @ 1.5ml, CalMag @ 1ml
- 290ppm and 6.3pH
- pH was a little high but left it...wasn't moving and then boom,,,,,,,oh well.
- Good amount of runoff today.
- GG4 has one cola leaves not happy. Not sure if its light or wind. Moved the closest fan to her today.
- GG1 shooting lots of branches right now.
- GG4 bud stacking is happening already and doing very well.
Sept 30/20, Day 12
- Heavier feeding today
- 5L - CalMag, Vitathrive, Rezin @ 2ml Rhino Skin, Bud Candy, B52, Sensi Bloom @ 1ml.
- repaired the cracked stem a little better tonight......not as bad for this girl.
- Try and keep the paper towels wet now so the humidity is high around the wound.
- Should have left a little more branch from the node above when cutting the top.
Oct 1/20, Day 13
- Switching PK booster today to Big Bud......these two girls are past bud ignitor.....already stacking.
- 3L - CalMag, Sensi Bloom, B52, Bud Candy, Big Bud @ 1ml
- 665ppm and 5.9pH
- Since these girls are so tall I am not going to give them Green Planet Massive. I find they get quite a bit taller with that product. I am looking for chunky and not tall so I will keep up with Advanced PK boost.
- IPM spray tonight again with Plant Therapy. Think I have seen some bug damage on Cream 47 girls.
That takes us to the end of week 11 in growth and week 2 of flower. Time will go quick now that we are off and running. Will be done feeding by early week 7. Want a good flush and leeching on these girls to get all the nutes out. I have been missing it by a few days on the last few auto runs and want this photo run to be better as I have a better track of weeks and when she will be done..........should be the end of week 9 to first days of week 10 of flower, about 7 more weeks.
Cheers Growmies and have a great week. Thanks very much to Mr_Motalovah and spacecadet55 for sharing your comments on cracking the main stems. Should be avoidable next time and appreciate the knowledge🙏👍 Looking good Sweet Seeds, she is a grower and filling in already in first two weeks of flower........If you veg longer than 3 to 4 weeks, make sure you have allowed for height concerns💪
