
Likes
Comments
Share

@Bread_n_Buds
Follow
Our Zamnesia Critical Cheese Automatic has a distinct, predominantly sativa appearance. What a plant guys, I cleaned the ugly flowers very very well and I can really say that I am very happy with this plant. Swollen buds, well aligned and looks super healthy, can't wait to smoke this.
Techniques chosen: Here, we applied LST to a plant with short internodal spacing; it's not ideal, but we wanted to give it a try.
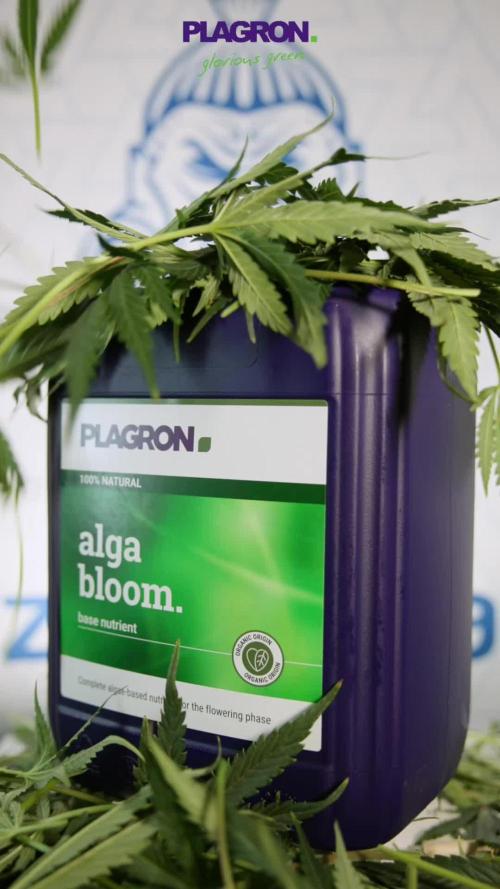
We're 100% organic and 1000% Plagron, as always.
The soil we've chosen is the recently released Plagron Bio LightMix, which will allow us to start flowering more smoothly and reliably, without the sudden changes that liquid fertilizers can cause. A week is more than enough, so don't overdo it.
We're in the final flowering stage and things are starting to get serious, so we're adding our legendary bloom booster Green Sensation and starting the late flowering phase.
- Green Sensation 1 ml/l
- Pure Zym 1 ml/l
- Silic Rock 1 ml/l
- CalMag Pro 1 ml/l
- Sugar Royal 1 ml/l
- Power Buds 1 ml/l
- Alga Bloom 0 ml/l Just booster and soon in flush
Choose your preferred style and calculate your results on the website:
www.plagron.com
Z - https://www.zamnesia.io/it/531-growshop
A great strain, not tall but very bushy! Give it a try!
Z - https://www.zamnesia.io/en/3334-zamnesia-seeds-critical-cheese-automatic-feminized.html
Z - Not content with what they already had in their hands, the expert breeders at Zamnesia Seeds wanted to embark on a journey into the world of autoflowering genetics, aiming to improve upon a great British classic... the Cheese cannabis strain. They crossed Critical with a high-quality Cheese specimen, enriched with a significant amount of Ruderalis. The result is an extremely potent, therapeutic, and easy-to-grow autoflowering version. This new, improved strain has been named Critical Cheese Automatic.
Critical Cheese Automatic embodies everything that made the original Cheese so famous, acclaimed, and loved around the world. We're, of course, talking about the Skunky flavors and pungent aromas this strain releases, not to mention the overwhelming effects it induces. Lovers of the original Cheese will surely appreciate this feminized reincarnation. Smoking Critical Cheese Automatic produces exceptionally potent sensations for an autoflowering strain. Its effects are quite strong and highly physical, both in intensity and duration. With these properties (or "body") in mind, it's no wonder many medical users are the first to want to get their hands on this "skunky" plant. Those suffering from chronic pain, inflammation, stress, anxiety, and migraines (to name just a few of the ailments it can alleviate) will notice their symptoms diminish, if not disappear completely, thanks to the potency of this strain. With this autoflowering "upgrade" of the Cheese strain, even novice growers can achieve excellent results. It's a vigorous plant, incredibly easy to grow, and requires little maintenance.
Commercial growers looking to generate income will appreciate Critical Cheese Automatic primarily for its life cycle: from germination to harvest in just 10 weeks. When grown properly, it can produce yields of 120-150g per plant. In addition to its excellent yields, Critical Cheese Automatic reaches a rather compact size (1 m), making it highly suitable for any type of grow. That said, Critical Cheese Automatic only thrives when grown outdoors in warm climates (like those of Spain or Italy).
So, in conclusion, whether you're a beginner, veteran, or commercial grower, Critical Cheese Automatic offers great satisfaction to everyone.
You know it, but I recommend it: here you'll find so many beautiful things, basically "all the best that nature has to offer."
Z - www.zamnesia.com
Z - www.zamnesia.com
Music //
www.radionula.com
+ Feng Shui Music


Likes
31
Share


@MadeInGermany
Follow
Info:
Unfortunately, I had to find out that my account is used for fake pages in social media.
I am only active here on growdiaries.
I am not on facebook instagram twitter etc All accounts except this one are fake.
Have fun with the update.
Flowering day 8
since time change
to 12/12 h.
Hey everyone ☺️.
As the flowering begins you can already see a clear stretch of the lady :-).
Yesterday 2 g GHSC Bio Bloom per l coco were added.
In 2-3 weeks I will add another 1 g per liter 👍.
The tent was cleaned and everything was refilled.
Have fun with the update.
Stay healthy 🙏🏻
You can buy this Strain at :
www.Zamnesia.com
Type:
Runtz
☝️🏼
Genetics:
Zkittlez x Gelato
👍
Vega lamp: 2 x Todogrow Led
Quantum Board 100 W
💡
Bloom Lamp : 2 x Todogrow Led
Cxb 3590 COB 3500 K 205 W
💡💡☝️🏼
Soil : Bio Bizz Coco
☝️🏼
Nutrients : Green House Seeds Company Powder Feeding Bio
☝️🏼🌱
Water: Osmosis water mixed with normal water (24 hours stale that the chlorine evaporates) to 0.2 EC. Add Cal / Mag to 0.4 Ec Ph with Organic Ph - to 5.8
Likes
18
Share

@Brotanical
Follow
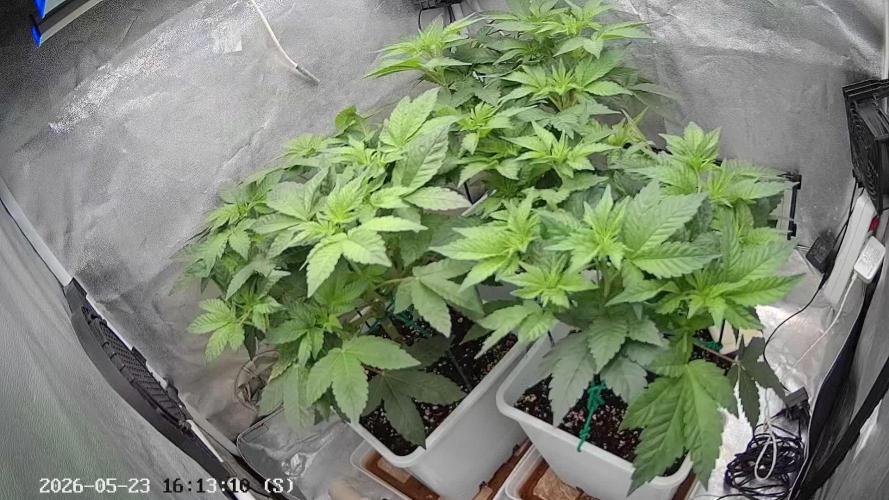
Sie bekommen Ph kontrolliertes Gieswasser👍 zurzeit noch mit hesi TNT und plagron Lemon Kick
Pro Pflanze wird mit ca 1 Liter gegossen und dazu bald mit CalMag Pro von Plagron
Bisher finde ich performt die WOB M100 Pro super mir gefällt der Wuchs der Critical Runtz unter ihr 🙂

Likes
12
Share


@Archieballs
Follow
She’s looking good. She’s taken well to LST She should be a 9-10 week plant so I think I will feed her once more.

Likes
11
Share


@RunWithIt
Follow
Alright, so she had a rather traumatic week. The pics won't show it, but here's what happened. I was supercropping her at the beginning of last week and all but snapped one of her lower branches, off. I taped it up and prayed... full recovery as of this post! The branch was wilting all week and all of a sudden the break point knuckled up and she began carrying on with bud development.
She's been drinking nutes like a fuckin' fish. I've been watching the tips for burn, but it seems to be my nutrient regiment is right on the money. No burnt tips, just happy plant.
Cheers all! 🍻 5-6 weeks until the chop! Ya gotta give Ethos a chance. Stellar run, EVERY time.


Processing
Likes
6
Share


@Easygrower
Follow
Hello growers day 15 with the mbap 2 out the 3 are doing well but 1 has stunted seems to growing very slow but 2 are sweet as a nut not having any problems so far I started using the biobizz nutrients yesterday so will see if any madness happens sorry about week 2 got mixed up with hulkberry grow but back on track now that’s it for this week so be safe and happy growing ✌️🏻

Processing
Likes
16
Share


@Mr_Motalovah
Follow
Hello Growers and Tokers! 👋 👩🌾 🧑🌾.🔥💨
Finally got that transpant done.
Added a bit of root juice to help out the transplant.
Won't be adding nutes until next week, directly bloom nutes..
Took waaaay to long to transplant. They didn't get any growth becuase of the bad weather these past weeks.
Very bummed out about that. Two of the are already in prefower.. the tiniest i hope grows a bit more..
can't really ask for much more given the bad weather and that they're autos..
I'll for sure be doing a re run with this strain with better stable conditions.
Take care out there!
One love!

Likes
158
Share


@love_2_grow
Follow
D64.
We're at the start of the fifth week of flower, and today, the Purplematic moved out, and now the Gorilla girl is all alone in the tent.
I also switched out her light from the big Kingbrite to the much smaller Viparspectra P600. I need the bigger light in my other tent, and even though the Viparspectra is a low-power light, I believe it should be enough, considering how small the Gorilla girl is. I could have put in one of the Greenception lights from my other tent, but it honestly was too much of a bother.
------------------------------
D66.
Yesterday, I gave her 2.5 liters of water @ pH 6.5 with humic acid and calmag.
Today, the green lacewing larvae (Chrysoperla Carnea) for combatting the thrips in my photo tent arrived, and I also dispersed a few of them in this tent. I haven't seen any thrips damage on the Gorilla girl, but I figured it wouldn't hurt to be proactive.
I also did minor defoliation to increase light penetration and air circulation.
------------------------------
D68.
Not much to report besides that this is one STINKY girl. She stinks up the entire lungroom, and I have ordered a new carbon filter.
Her senescence is slowly increasing, and I suspect she will be done soon-ish, although I haven't even looked at her trichomes yet.
------------------------------
D70.
We're at the end of the fifth week of flower, and chop day is getting close.
Her senescence is progressing nicely, and today, I checked her trichomes for the first time and already found quite a few amber ones.
She is coming down in a few days, but it won't be a large harvest due to her stunting. However, she smells fantastic, so I'm counting on a great smoke.
I went to WAR today against the spider mites we have in our ornamental plants in the apartment. I sprayed all plants with my homemade pesticide (capsaicin, alcohol, horticultural soap.) since I had it at hand. If that fails to knock the spider mites back, I'll bring out the neem oil instead.
The infestations aren't bad (yet), but it would suck to get mites into my tents, so better to be proactive.
------------------------------

Likes
40
Share


@SubliminalSociety
Follow
Week 25 - Frosty buds!
Finally some time this weekend to defoliate! And look what I found: lots of frosty buds.
The smell is delicious. Sweet lavender aromas, very warm. I like it a lot. Is this what she will taste like, too?
Harvest is close.

Likes
2
Share


@902EastCoast
Follow
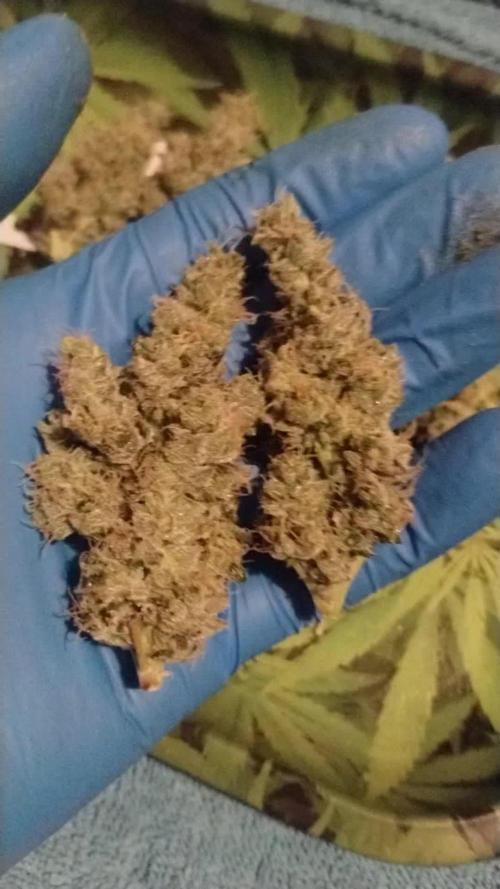
Easy to grow, beautiful structure and plant. Big frosted, dense buds with very good odour 🤤. Would 100% recommend.


Likes
6
Share


@masterofsmeagol
Follow
5/18 It's not raining now but it's supposed to later. The plants are protected though. I have brought them out to continue hardening. It's only 57 degrees but they'll be alright. I used what little water was left in the bottom of the gallon to lightly water what looked like it needed it most. I mixed up another gallon and I'll check them again before they go in for the night. These plants are getting hardened off properly. I've had some pretty serious problems when I try to transition to quickly. I don't see ANY problems (knock on wood) thus far. Pink kush reminds me of purple punch. It grows similarly and starts off slow. I hope it turns the corner like the purple punch did and make up for it with the quality of flower. I topped/fimmed a special kush #1. I'll update when I bring them in for the night. This week I'll clean/sanitize the cage and the grow bags.
EDIT: PLANTS SPENT A LITTLE OVER 3 HOURS IN THE LEAN-TO WITH INDIRECT SUNLIGHT AND EXPOSIRE TO OUTDSIDE AIR, TEMPS AND RH. I DIDNT WATER WHEN I BROUGHT THEM BACK IN. I'LL CHECK TOMM MORNING AND SEE HOW THEY LOOK. IT HAD JUST STARTED TO RAIN LIGHTLY WHEN I BROUGHT THEM IN. THEY ARE PRETTY SHELTERED FROM WIND AND RAIN IN THE LEAN-TO.
5/19 It's thunderstorms out with high winds so the girls will probably stay in today. They look like they are acclimating well. I can see where some of the FIMS took. I redid one I think. I'll update later if do anything.
5/20 Everything looked AMAZING this morning. Boy that MK ULTRA has get some thick branches already forming.
Another shitty rainy day. I consulted chatgtp and it was on the same page as me. No real benefit to expose my girls to 47° Temps, cold rain qnd wind. It will be shitty a couple more days. I'll evaluate things later. WATERED EVERYTHING TODAY. TOPSOIL WAS DRY. I USED APPROX 2/3 OF A GALLON ON EACH PLANT.
5/21 I've got a super busy day. I left early and it was to cold to put the girls out. It's 55° at 9:30a.m. It may rain off and on but I think the girls would do okay in the lean-to. I need to get them ready and hardened for their forever homes. Time seems like it's flying. We are getting close to being able to put them out without risk of reveg. Plus I'm not subjecting my girls to un needed stress for no reason. I'll update what I do.
5/22 Plants were dry this morning. I used what was left in the gallon jug to water all the plants. I don't wantcto overwater and I'd like to keep the nutes in the soil where the plant can absorb them. Not just leak out the bottom. They are all growing at an incredible pace. It's currently 49°F at 9:45. It's overcast with a chance of rain. We are at what was suppised to be the high for the day. If we get above 55 I'll bring the girls out and continuing hardening. I guess it's not going to he an early season. Won't be long though and these girls will be in their final homes. I'm impressed with what I've seen so far.
EDIT: ITS 4PM AND THE SUN JUST PEEKED OUT FOR A FEW MINUTES AND IS GONE AGAIN. PLANTS LOOK FANTASTIC. IM SO GLAD I KEPT THEM IN DURING THESE 40 LOW 50 DEGREE WET DAYS. IT'LL ONLY STRESS THEM IMO SINCE THEY LOOK SO GOOD. AS SOON AS THIS RAINSTORM AND COLD WEATHER PASSES WE SHOULD HAVE DECENT WEATHER. JUST A FEW MORE DAYS WHERE HIGHS ARE IN THE 40'S. I FEEL BAD FOR THOSE PEOPLE THAT SAW THOSE HIGH 70-80 DEGREE DAYS AND PUT THEIR PLANTS OUT. THEY ARENT DOING GOOD. JUST LOOKING AT THE FOLIAGE AROUND AND I CAN SEE TREES THAT ARE JUST LIMP. THE BLOSSOMS ON THIS SPECIES LOOK LIKE A CANNABIS PLANT IN VEG WHEN IT GOT COLD SHOCKED. ANYWAY MY BODY IS KILLING ME. I GOT A LOT DONE. AND I SOAKED MY BAGS FOR 40 MINS IN A MICTURE OF DAWN, H202 AND WATER. PRIOR I USED A WIRE BRUSH TO GET ALL DIRY AND STUFF OFF I COULD. THEN I SOAKED THEM AND AFTER I RINSED THEM. I COULD SEE THE H2O2 DOING ITS WORK. REALISTICALLY I SHOULD GET NEW BAGS. ITS JUST NOT IN THE FINANCES RIGHT NOW. OH WELL. THEYVE BEEN SANITIZED AND WASHED AND ILL GO OVER THE ONES THAT ARE STAINED AGAIN JUST TO MAKE SURE I DONT SPREAD SOMETHING.
5/23 What a miserable day. It's 44° and pouring out. I put a screenshot of tbe weather and you can see that after the next few shitty days we are getting sunny weather in the 70's. Light is long enough for them now. I need to dial back the timer morecto get them acclimated. I just have to clean up the cage and they are ready to go. Bags are sanitized. I'm going to spend some more time getting some algae off a couple. These plants are flourishing. I am happy I picked 1gal over 3gal before the transplant. It's turned out perfect thus far. Really looking forward to this. Oh and I watered everything a LITTLE bit as it was dry. Enough to get it through until they get a full watering before going outside. I also attempted a FIM on the other 10th planet. The FIM on the mk ultra worked and I've got at least three tops.
5/23 WATERED ALL PLANTS WITH APPROXIMATELY A HALF GALLON. Plants were all super light and dry. I keedcto water more volume at a time. This is easier than fixing overwatering. Things are getting tight in here. Plants are getting huge! The FIMs and Toping that ive done took. That big mk ultra has 4 or 5 tops on it! Plants look super healthy. Good weather is coming. They'll be in their forever homes shortly. It's working out perfect. Some of these plants look like they'll need a transplant soon. Still need to clean up the grow cage but that will only take a minute. Also need to fix a tear I made in a grow bag but again thats just normal small shit. If you look at the snap shot of weather I took you can see the weather is going to improve greatly. This is when I'll do the majority of work. I'll update anything else I do.


Likes
10
Share


@StickyHands
Follow
The royal crematic have some calmag deficit so i give biobizz calmag. The wedding cake looks and smels awesome, maybe 1 or 2 weeks and she is ready to harvest. Higher the sunlight evo from 60 to 80 % power.
Likes
38
Share


@TrueNorth
Follow
Made some bubble hash with bubble bag dudes hash bags! First attempt at ever doing this all these photos are in order of bag pulls! Followed all instructions mixed for 30 mins and let sit for 30 mins in between! Will let sit for 7 days on cardboard and in the herbnow dryer! The bucket used is sitting and i will sift that water aswell not letting that go to waste.! Those photos up soon with weigh ins!

Likes
5
Share


@RockDa420
Follow
Day 29 Wed 12/14/22-Watered today and FIMed plant 3, so now plant 1 has been topped and is getting LST and plant 3 has been FIMed. Plan2 has only been pruned, so now I'll be able to see the difference of these 3 methods.
Day 30 Thurs 12/15/22-Just watered today.
Day 31 Fri 12/16/22-Feeding day. Added .5 tsp recharge & 4 ml cal-mag to 1 gal water, reduced pH to 6.2, then divided equally, with one quart for each plant, watering-in 1.5 tsp Dr Earth fertilizer mixed with 1/3 c worm castings and 1 c coco coir.
Day 32 Sat 12/17/22-Auto watered today with globes because we were out of town for Christmas with my family.
Day 33 Sun 12/18/22-Just watered today and did some pruning close to the main stem on lower branches.
Day 34 Mon 12/19/22-Just watered today
Day 35 Tues 12/20/22-Just watered today

Likes
20
Share


@adam_pawloski87
Follow
We are in Flush !! Was giving them GH Flora series + rapid start + cal mag