The Grow Awards 2026 šŸ†
Likes
Comments
Share
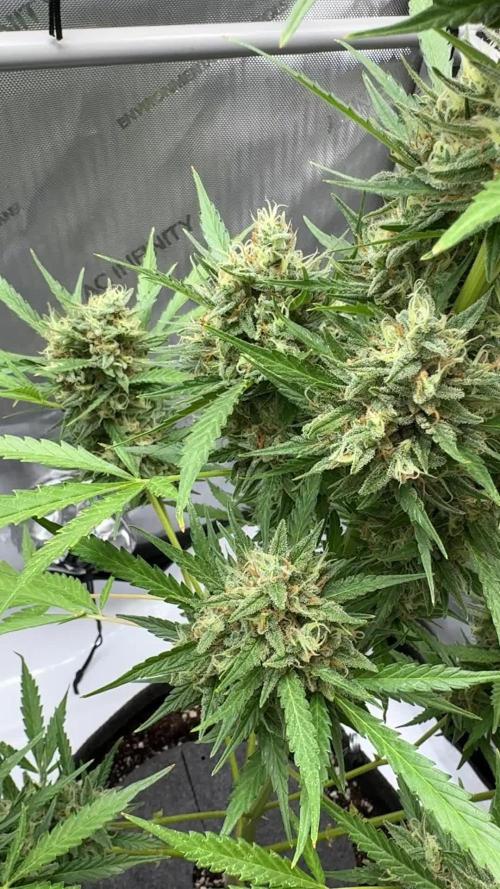
Our Watermelon Candy #1 has been left to grow freely and beautifully, just as Mother Nature intended. It's truly beautiful, stunning, with beautiful, well-aligned side flowers and a stunning main stem. It's truly a large plant. It's taking on color, and it's going to flush soon. Look at the flowers, they're beautifully swollen. Techniques chosen: here, just a little bit of trimming at the bottom to boost the flowers at the top: a truly successful operation. We're 100% organic and 1000% Plagron, as always. The soil we've chosen is the recently launched Plagron Bio LightMix, which will allow us to get off to a smoother and more reliable start, without the sudden changes that liquid fertilizers can cause. A week of soil is enough, so don't overdo it. We're intensively flushing, as I said. Choose your favorite style and calculate your results on the website: www.plagron.com Visit the new Growshop area on the Zamnesia website: Z - https://www.zamnesia.io/it/531-growshop A fantastic strain, not too tall but very bushy! Give it a try! Z - https://www.zamnesia.io/it/7484-zamnesia-watermelon-candy-automatic-semi-seeds.html Z - This feminized strain boasts everything you've come to know and love about the original cultivar, but with some welcome improvements. Combining Watermelon x Candy Kush with a pinch of ruderalis genetics, the result is a strain you won't want to miss, we promise. Being an autoflowering strain, the growing options are practically endless. So, whether you choose to grow her indoors or outdoors, one thing is certain: she'll be extremely easy to grow. Otherwise, she'll take care of herself without requiring any special maintenance. With a little general care and pruning, you'll be able to control its growth all the way to harvest. It's perfect for beginners growing indoors, as well as more experienced growers looking for easy-to-grow, high-yielding plants. Although it's not a particularly tall plant, its size can be easily controlled with LST, to which it responds positively. So, if you're interested in experimenting with this technique, don't be afraid to try Watermelon Candy Auto. In just 9-10 weeks from seed to harvest, this strain grows rapidly and, just like the original, will display a bushy canopy completely covered in large buds. Regardless of the growing environment, you can expect impressive yields. Indoor plants produce 350-400 g/m², while plants left to flower outdoors produce 50-100 g/plant. These are quite substantial yields for an autoflowering strain. With a THC level of 20%, Watermelon Candy Auto is a 50/50 sativa/indica hybrid, offering users the best of both worlds. After a few hits, you'll feel more optimistic, and even the most stoic smokers won't be able to suppress a smile. After a few minutes, a deep sense of relaxation will take over, perfect for welcoming you home after a long day. Overall, Watermelon Candy Auto builds on the qualities that made the original so popular, but it also has other qualities that make it a much simpler and more practical option. You know it, but I recommend it. You'll find so much beauty here, essentially "the best that nature has to offer." Z - www.zamnesia.com Music // www.radionula.com + Feng Shui Music + Frequency 432
Likes
237
Share
May 9th - began today replacing the CMH lite that kicked-off during the night (new bulb is done!) MARS HYDRO to the rescue with a TS-1000 hanging above the kids now. Fine-tuning as we speak - began mixing a Tea for tonight/tomorrow’s dinner - LST to begin with a few of the plants this evening - Defoliated some of the large fan-leaf pairs and now the plant structures can be fortified and shaped - grabbed 6 clones from the Panama Reds and 2 each from Fighting Buddha and Pine Tar Kush !!! Into the LED Dome (And i’m out of cubes… profanity) - some branches get tied down tonight; let the games begin 10th, - Nutrients fed for breakfast - how to say this: things are so steady with daily progression - raised lights again to maintain 2c difference between Room temp / Top-Leaf temp. My Phlizon 4500 is almost topped out in the room, and its running at 50% power. This last blast of growth and transition within the plants, tells me this set-up is going to last Just long enough !!! Just big enough - 2 more weeks come on! - a few more clones taken last-nite; cloudwalker / black tuna / lsd / alaskan purple etc etc PurpsBerry will be last clone taken - no foliar misting on Food mornings like today; every other day is still the target here in mid-Veg 11th, - while rummaging through the crop early today, I found what is certainly a Male Panama Red plant. Action taken and trying to secure that new home. Picture 11, 12, 13 - Panama Red #2 removed - Foliar Misted the Tent at lites-out - clones treated to a Foliar Misting. Feeding them through their already developed Stomata on the leaves; when they have no roots to uptake nutrients yet. ā€œThanks Andrew at LegacyMarketFarm for that detailā€ May 14 - the one plant i took real pride in FIMming successfully, has also raised the Kilt and declared his Gonads; dammit. So, he’s gone lol. 2 males out of 38 plants… (txerri bilbo haze, the very first of many seeds produced alongside killer bud to show Male) - 2 LSD clones appear to be doing well May 15th - Foliar Misted after Lites-out
Likes
16
Share
Dia 108 en el proyecto A la semana 15 ha sido pasada por agua y tormentas, han aguantado como unas campeonas, aunque he visto dos orugas y eso me preocupa, cuando paró de llover la rocie con xentari un producto agricola que lleva bacilus, esperemos que no vaya a mÔs, y se terminen estos dias de lluvia para poder terminar bien el cultivo
Likes
19
Share
Day29F - still showing vast growth on buds, swelling and trichomes blossoming out. The colours starting to form nicely on the buds. Smells like a pungent caramel now. Day32F - This plant is so thick and strong, and can resist a dry and hot climate. For me this plant has been so easy, and she sucks up nutrients and loves it, šŸ’Ŗ Buds are getting dense and so sweet to smell. So fat and so many, I'm surprised on this auto šŸ‘ well done again RQS. Day 68- Day 33F - the buds continue to swell and devolope. Trichomes flooding through now. Starting to see cloudy so will push for another week of nutes if she'll allow it after Friday, we'll see šŸ˜āœŒļøšŸ’š
Likes
16
Share
@Ensign420
Follow
Introduction - Week 14|07 Summary - Ensign's log, stardate 9437.65, Great week of growing! Wow what a good week! Growth in the main tent has all around been incredible! Submitted my first submission to the Global Grow Cup! Filmed a video of the solo cup container (marked with the ticket/order number) that will be used for the competition. Also had to fill and prove the solo cup holds 2 cups of soil. Now I need to root a clone (for the first time), transplant her into this cup, and submit my 2nd entry before the 30th of this month. As far as my first attempt at cloning, have already begun the rooting process! Managed to take cuttings from 3 out of the 6 phenos in the main tent (the first cutting was also my first time topping). Soaked the cuttings for two days before planting them into Coco Coins. So far everything has gone surprisingly well! The clones are now rooting under the propagation dome with the vents fully closed. Will check for roots soon! At the end of the week, growth was just raging! Was planning on flipping to flower in a week, but decided to begin the first week of flower next week! Thus this is the last week of veg. Plan to flip to 12/12 next Monday! Onwards to next week! [START OF WEEK 14|07] ========================================================== Garlic Budder #1 - WEEK 14|07 - Full Veg Wk5 Garlic Budder #2 - WEEK 14|07 - Full Veg Wk2 Garlic Budder #3 - WEEK 07 - Full Veg Wk5 Garlic Budder #4 - WEEK 06 - Full Veg Wk4 06/03/24 → 06/09/24 This Week's Estimated Goals ---------------------------------------------------------------------------------------------- DLI: ~26 mol/m²/d PPFD: ~400 μmol/m²/s VPD: ~1.0 kPa This Week's Meter Readings & Averages [Lights On: 16:00 - 10:00] ---------------------------------------------------------------------------------------------- DLI: 24.56 mol/m²/d PPFD: 379 μmol/m²/s VPD: 0.91 kPa Soil %: [32.7, 37.6, 37.9, 34.1] ========================================================== Day 01 - Monday - 06/03/24 - Total Days: 098 ----------------------------------- Daily Averages [~23:00] - Temps: 80.7°F [27.1°C] - Humidity: 74.4% - VPD: 0.90 kPa - Soil %: [31, 34, 39, 35] ----------------------------------- - [09:57]: Quick morning check! --- #1 is looking a bit droopy, but almost lights off (at 10:00) so not concerned. --- Nice! Mainly wanted to check on #4 and she is looking great! She’s perked back up and looking good! - [23:08]: Evening check. --- Wow! It’s a jungle in here! --- #1 has gotten too big? Nah!? Keep on growing girl! --- #2 is growing and definitely getting bigger! Growth just looking really weird. --- #3 has continued to get larger and is looking quite uniform in growth! --- #4 is growing and looking perky again! --- Even the original #1 and #2 phenos (in the back) are looking good! --- Wow! #4 is really getting close to the light. - [23:14]: Checked down both fill tubes. --- Both reservoirs were completely dry! - [23:27]: Checked the Ecowitt soil moisture sensor data: --- 30% - [CH01 EB1 - Garlic Budder #1] --- 34% - [CH02 EB2 - Garlic Budder #2] --- 39% - [CH03 GFP - Garlic Budder #3] --- 32% - [CH04 FPT - Garlic Budder #4] - [23:32]: Poured 4 cups of distilled water down EB1’s fill tube. --- Poured 2 cups of distilled water down EB2’s fill tube. - [23:38]: Checked the humidifiers. --- Refilled the 4X4’s humidifier with distilled water. --- Tomorrow, plan to defoliate and start cloning for the first time! --- Going to take multiple cuttings from both #1 and #4 for sure, but still deciding on the rest. --- Getting hyped! Day 02 - Tuesday - 06/04/24 - Total Days: 099 ----------------------------------- Daily Averages [~23:00] - Temps: 81.4°F [27.4°C] - Humidity: 74.3% - VPD: 0.93 kPa - Soil %: [29, 35, 38, 32] ----------------------------------- - [11:59]: Time to film the first entry for the Global Grow Cup! --- Going to be using BuildASoil 3.0 potting soil. --- Filming the video using a stand and my phone. --- This video is mainly to establish the container that the plant will be grown in. Also to prove that the container is a 16oz container and that it can hold 2 cups of soil. --- The ticket (order) number also had to be written on the cup. - [12:36]: Done! --- The video had to be done in one continuous shot with no edits (my original submission does not have the logo). --- There was also a photo that needed to be shot which shows the cup filled with 2 cups of soil (just like the video, the original image submission did not have the logo). --- I think I did everything correctly, but also sent an email for verification of submission and validation. --- Getting hyped! --- [*smokes a bowl] --- Going to defoliate today along with for the first-time, going to take cuttings for clones! --- After a bit of online research, decided to split the cloning process into two days. --- Today going to take cuttings and will soak them in a solution of aloe for 24hrs. Afterwards will change the water out and use straight distilled water. --- Then in a couple days, plan to transplant into coco plugs (Coco Coins) for rooting. --- For optimal results, also be using a rooting hormone (Clonex). --- Well.. Here goes nothing! - [17:01]: Evening check. --- Wow! #1 is looking huge! Her main top is stretching above the lower canopy which is continuing to bush out. --- #2 is growing along. Growth is gnarly and a bit droopy, but she’s getting taller! --- #3 is looking great! Still a bit small, but she is continuing to get larger. --- #4 looks like she needs a watering. --- Both plants in the back are also looking surprisingly great as well! - [17:05]: Checked down both fill tubes. --- Both reservoirs were completely dry! --- As far as today's defoliation, going to leave #2 and #3 alone and will focus my defoliation and cloning on the rest of the plants. --- This will be my first attempt at cloning, also going to try topping for the first time today. --- No pressure Ensign. What can possibly go wrong right? - [17:27]: Time to start the cloning and defoliation process! --- Filled a measuring cup with 3 cups of distilled water. ------ Added 3/4tsp of Horticultural Aloe ------ Added 1 more cup of distilled water --- Mixed the solution and poured an even amount into three separate solo cups. --- Made sure to mark two of the cups (#1 and #4). The unmarked one will be for any other clones from amongst the 6 phenos (if any at all). - [17:43]: Time to top and defoliate #1! --- Using a pair of brand new trimmers (AC Infinity), --- Gently cut the main stalk to even out the canopy. --- Then trimmed and cleaned most of the nodes leaving the top node or two. --- Also trimmed the leaf fingers a bit before placing the top cutting into the cup of aloe solution. --- Now for the rest of the cuttings! --- [~45 minutes later] - [18:32]: Managed to finish defoliating and cutting the rest of the clones. --- Took two more lower cuttings from #1 (3 clones total). --- Took 3 lower cuttings from #4 --- While defoliating, decided to try and clone the original #2 pheno as well. Took 4 small cuttings. --- Similar to the top cutting, trimmed and cleaned each lower node for each cutting before placing them into the cups. --- Before finishing up the 2nd cutting, I noticed the first cutting (the top cut that was also trimmed) was drooping. --- So I did not trim and the leaf fingers for the other cuttings. --- In total there were 10 cuttings taken for potential clones. --- My main focus was to take cuttings and to clean up all the lower growth from both #1 and #4. --- Defoliated and cleaned up the back original phenos as well (also trimmed back the cover crop). - [18:35]: Temporarily placed the cuttings onto the floor of the 4x4 tent. --- Took the trimmings (about 3 cups) and spread them onto the top mulch of #1 and #2. --- Time to set the environmental controls for the 3x3 veg tent. - [18:43]: Within the AC Infinity App, --- For the Veg Tent [3x3] controller, --- Adjusted the 'Vegetative [18/6]' Schedule for the grow light. ------ Set the Mode to ā€˜On Mode’ ------ Set the START/END times to 04:00PM/10:00AM ------ Set the MAX to 1 --- The IonBoard S33 is now utilizing around 60.8W (at intensity 1 out of 10). --- Adjusted the 'Vegetative [18/6]' Schedule for the exhaust fan. ------ Increased the Humidity’s HIGH trigger value from 81% to 87% --- Adjusted the 'Vegetative [18/6]' Schedule for the humidifier. ------ Decreased the VPD target value from 1.5kPa to 0.8kPa - [18:52]: Moved the cuttings into the 3x3 veg tent. --- It begins! I think. --- Going to let these cutting drink some aloe for a day before switching to straight distilled water. --- Hmm. Could be the white floor of the 3x3 veg tent, but have noticed the S33 has a whiter spectrum whereas the FC-6500 seems to be warmer in color. --- Anyways, - [18:58]: Poured 4 cups of distilled water down EB1’s fill tube. --- Poured 2 cups of distilled water down EB2’s fill tube. - [19:06]: Filled a pump sprayer with 5 cups of distilled water. --- Focused mainly on the straw mulch of #4. --- But also misted the straw mulch for the rest of the plants a bit. - [19:12]: Checked the humidifiers. --- Refilled the humidifiers with distilled water. - [19:44]: Going to be using Clonex rooting gel before planting the cuttings into Coco Coins (pre-soaked with microbes and aloe). But before that begins, going to transfer the Clonex gel into a squeeze bottle. --- Gently peeled back the seal on the original Clonex bottle. Just enough make a tiny opening, --- Then slowly and carefully poured the gel into an empty squeeze bottle. --- Also removed the sticker from the original bottle and placed it onto the new one. - [19:54]: Perfect! --- Instead of applying the gel to the cutting, going to be applying the gel to the Coco Coin. --- This squeeze bottle will make applying the gel a lot easier. --- Will take PPFD readings tomorrow. --- Also will change out the aloe solution to distilled water. --- I really hope I didn’t screw things up before they could even begin. --- Don’t die on me ladies! --- Please. Day 03 - Wednesday - 06/05/24 - Total Days: 100 ----------------------------------- Daily Averages [~23:00] - Temps: 81.9°F [27.7°C] - Humidity: 75.5% - VPD: 0.90 kPa - Soil %: [29, 36, 38, 36] ----------------------------------- - [09:40]: Quick morning check! --- #1 is looking a bit droopy, but looking okay. Topping is a high stress technique so going to take some time to recover. Don’t plan on flipping the main 4x4 tent to flower for a good week or so which should be enough time. --- #4 looks great! The defoliation seems to have no effect on growth. Nice! - [09:41]: Also quickly checked on the 3x3 veg tent, --- Nice! The cuttings are looking great! --- No yellowing and they all seemed to have turned up towards the light. --- So far so good! - [22:53]: Evening check. --- #1 is continuing to dominate this grow! She has spread wide and looking incredible! --- #2 is looking gnarly, but getting there. --- #3 is getting larger! But still a runt. By far, her leaves are the darkest of the bunch, but she is still growing! --- #4 looks happy and growing along beautifully! Wow! - [22:55]: Checked down both fill tubes. --- Both reservoirs were completely dry! - [22:59]: Poured 5 cups of distilled water down EB1’s fill tube. --- Poured 2 cups of distilled water down EB2’s fill tube. - [23:05]: Checked on the 3x3 veg tent. --- Ooo yea! The cuttings are still green! Nice! - [23:07]: Took PPFD readings. --- The cuttings were around 121 μmol/m²/s which gives a DLI of 7.84 mol/m²/d --- Nice! These levels are on the lower range for seedlings (~100-300), perfect! I think. - [23:14]: Swapped the aloe water out to straight distilled water. --- Going to let these cuttings soak for one more day before planting. --- Please don’t die girls! - [23:15]: Checked the humidifiers. --- Refilled the humidifiers with distilled water. --- Ooo yea! --- Tomorrow is the big rooting day! Day 04 - Thursday - 06/06/24 - Total Days: 101 ----------------------------------- Daily Averages [~23:00] - Temps: 81.9°F [27.7°C] - Humidity: 75.2% - VPD: 0.91 kPa - Soil %: [32, 38, 38, 34] ----------------------------------- - [16:20]: Evening check. --- #1 is a bit droopy, but growth is looking green and healthy. --- #2 is looking bigger! She’s also looking sort of droopy. --- #3 is growing along nicely! Looking good girl! --- #4 is looking great! A bit droopy but plan to water today. - [16:23]: Checked down both fill tubes. --- EB1's reservoir still has some water. --- EB2's reservoir was completely dry! - [16:23]: Checked the Ecowitt soil moisture sensor data: --- 28% - [CH01 EB1 - Garlic Budder #1] --- 36% - [CH02 EB2 - Garlic Budder #2] --- 37% - [CH03 GFP - Garlic Budder #3] --- 30% - [CH04 FPT - Garlic Budder #4] - [16:30]: Using a pump sprayer, --- Misted the straw mulch of #4 with 6 cups of distilled water. --- Focused mainly on the straw mulch. --- Also misted the straw mulch of #3 (in the grassroots fabric pot) a bit. - [16:43]: Poured 5 cups of distilled water down EB1’s fill tube. --- Poured 3 cups of distilled water down EB2’s fill tube. - [16:52]: Checked the Ecowitt soil moisture sensor data: --- 56% - [CH01 EB1 - Garlic Budder #1] --- 44% - [CH02 EB2 - Garlic Budder #2] --- 40% - [CH03 GFP - Garlic Budder #3] --- 45% - [CH04 FPT - Garlic Budder #4] - [17:01]: Took general PPFD readings. --- #1 was around 379 μmol/m²/s which gives a DLI of 24.56 mol/m²/d --- #2 was around 333 μmol/m²/s which gives a DLI of 21.58 mol/m²/d --- #3 was around 293 μmol/m²/s which gives a DLI of 18.99 mol/m²/d --- #4 was around 378 μmol/m²/s which gives a DLI of 24.49 mol/m²/d - [17:09]: Took the weekly height and light distance measurements. --- #1 was about 21" tall. --- #2 was about 13.5" tall. --- #3 was about 9.5" tall. --- #4 was about 19.25" tall. --- Hmm.. - [17:19]: Adjusted the right oscillating fan a bit. --- Re-angled the CloudRay S6 oscillating fan upwards. Been noticing that the air has been hitting the tops of the plants so easing off a bit (#1 is still getting hit, but she’s huge so not too worried). - [17:23]: Back to the measurements! --- #1 was about 9.5" away from the grow light. --- #2 was about 17" away from the grow light. --- #3 was about 17.5" away from the grow light. --- #4 was about 11.5" away from the grow light. - [17:46]: Checked on the 3x3 veg tent. --- Cuttings are still green! They do look a bit droopy but no signs of yellowing. --- Okay! - [17:55]: Time to begin the rooting process! --- For my first attempt at rooting, going to be using Coco Coins pre-soaked in saponins, microbes and aloe. --- To further help with rooting, going to also be using Clonex rooting gel. --- Filled a measuring cup with 4 cups of distilled water. ------ Added half of 1/64tsp of Quillaja Saponaria Extract [60] ------ Added 1/16tsp of Horticultural Aloe ------ Added 1/8tsp of Mycrobe Complete --- Mixed the solution thoroughly. --- Time for the Coco Coins! --- 10 cuttings means 10 Coco Coins. - [18:09]: Dropped 10 Coco Coins into the measuring cup. --- The coins immediately started to expand. --- A bit too much.. Oops! --- Poured the solution and Coco Coins into a pitcher. --- Added 2 cups of distilled water to the solution (now at 6 cups). --- Great! The coins are pretty much fully expanded, but going to wait a bit longer to fully saturate each coin. --- [~20-30 minutes later] - [18:42]: Great! --- Took the seedling and flood tray from the AC Infinity propagation dome and placed all 10 Coco Coins into the slots. --- Gave each Coco Coin a quick shake to remove excess solution. The coins were not dripping with solution but still pretty saturated. --- Arranged them into 3 groups with the cuttings in mind. --- Also tried to keep the pre-made holes intact. --- Time to inoculate the Coco Coins! - [18:54]: Using a squeeze bottle, --- While keeping the nozzle from making contact with the coco, gently filled each pre-made hole with Clonex rooting gel. Just enough gel to fully cover the hole of each coco coin. - [19:00]: Time to plant the cuttings! --- Gave each cup a misting of distilled water. Focused on wetting the top growth with water. --- Okay! --- To avoid mixing cuttings up. - [19:01]: Starting with the original #2 pheno cup, --- For each cutting, --- Using a pair of clean trimmers, made a final 45° cut about 1/2" from a bottom node. --- Then stripped away and scared the protective membrane below the node before planting. --- Made sure the node was about 1/2" below the surface of the coco. --- To help with planting, while inserting each cutting, gave the Coco Coin a gentle squeeze to loosen the coco. This also helped to ensure the coco and gel was in good contact with the cutting. --- Once the cutting was planted into the Coco Coin, made sure to place back in the same spot (made sure to keep the cuttings in their groupings). --- Once a cup was complete, made sure to keep the label with the group. --- Re-misted the top growth as needed to keep it wet. --- Also wiped the trimmers with isopropyl alcohol in between cuttings (plan to use 10% bleach solution for next time). --- Repeated this process until all 10 cuttings were cut, planted, and in the tray. --- The coco coins fit perfectly into the tray and don’t reach the bottom. Nice! --- The bottom air gap is important. --- Poured a bit of distilled water through one of the empty slots into the bottom of the tray. Just enough to fill the bottom of the tray, but not enough to reach any of the Coco Coins (~1/4cup). - [19:35]: Placed the propagation tray with cuttings into the 3x3 veg tent. --- Placed the first layer of the propagation dome on before giving the sides a misting of distilled water. --- Also sprayed the top of the propagation dome before covering the cuttings. --- Vents are all fully closed. - [19:40]: Placed the bar lights onto the top of the dome before configuring the controller. ------ Set the START/END times to 04:00PM/10:00AM ------ Set the bar light’s intensity to 2 (out of 10). --- Also made sure the propagation light controller’s time was in sync with the Controller 69 Pro. - [19:47]: Took PPFD readings. --- The cuttings were around 136 μmol/m²/s which gives a DLI of 8.81 mol/m²/d --- The PPFD levels are similar to the floor. --- Perfect! --- Going leave the IonBoard S33 on during this rooting process. --- Will check back tomorrow to cycle the air under the dome. - [19:56]: Checked the humidifiers. --- Refilled the humidifiers with distilled water. - [20:17]: Quick night check! --- Ooo yea! Growth is raging and looking perky! --- Mainly checked on #1 and #4 which were looking incredible! --- Keep on growing ladies! Day 05 - Friday - 06/07/24 - Total Days: 102 ----------------------------------- Daily Averages [~23:00] - Temps: 82.7°F [28.2°C] - Humidity: 76.2% - VPD: 0.89 kPa - Soil %: [37, 40, 38, 35] ----------------------------------- - [10:03]: Decided to increase the ambient temp in the 3x3 veg tent. --- Within the AC Infinity App, --- For the Veg Tent [3x3] controller, --- Adjusted the 'Vegetative [18/6]' Schedule for the heater. ------ Increased the Temp target value from 78°F to 82°F --- Hopefully this will help to keep the veg tent at a more consistent temp. - [22:26]: Evening check. --- Ooo yea! The garden is looking incredible! --- #1 is looking perky and just bushing out! Wow! --- #2 is getting big! Growth is weird and leaf fingers are huge! Just going to let her grow. --- #4 is looking happy and growing along like a champ! Nodes are starting branch out and she is turning into a bush! - [10:28]: Checked down both fill tubes. --- Both reservoirs were completely dry! - [22:33]: Poured 5 cups of distilled water down EB1’s fill tube. --- Poured 3 cups of distilled water down EB2’s fill tube. - [22:40]: Checked on the propagation dome (inside the 3x3). --- Ah yea! Looking great ladies! --- Lifted the top of the dome to let some fresh air in for a bit. --- Wow! --- Leaves still look nice and green! --- So far everything looks great! --- Just going to continue on! - [22:53]: Checked the humidifiers. --- Refilled the humidifiers with distilled water. - [11:01]: Decided to adjust the humidifier for the 3x3. --- Within the AC Infinity App, --- For the Veg Tent [3x3] controller, --- Adjusted the 'Vegetative [18/6]' Schedule for the humidifier. ------ Increased the VPD target value from 0.8kPa to 1.5kPa --- The higher VPD level will essentially turn the humidifier off. --- I won’t be needing the humidifier for a good week so might as well save the water. Day 06 - Saturday - 06/08/24 - Total Days: 103 ----------------------------------- Daily Averages [~23:00] - Temps: 81.6°F [27.6°C] - Humidity: 74.9% - VPD: 0.91 kPa - Soil %: [35, 40, 37, 31] ----------------------------------- - [07:40]: Quick morning check! --- #1 and #4 are looking perky and happy! --- Also checked on the propagation dome, --- All cutting still look green! Hyped! - [20:02]: Evening check. --- Wow the garden is raging with growth! --- #1 has blown up! She has clearly recovered and growth is ramping up again! --- #2 is stretching upwards! --- #3 is now the smallest of the 4, but still getting larger! --- #4 is looking incredible! Wow! Growth looks perky and happy! - [20:05]: Checked down both fill tubes. --- Both reservoirs were completely dry! - [20:10]: Poured 6 cups of distilled water down EB1’s fill tube. --- Poured 2 cups of distilled water down EB2’s fill tube. - [20:16]: Checked the Ecowitt soil moisture sensor data: --- 35% - [CH01 EB1 - Garlic Budder #1] --- 40% - [CH02 EB2 - Garlic Budder #2] --- 36% - [CH03 GFP - Garlic Budder #3] --- 27% - [CH04 FPT - Garlic Budder #4] - [20:19]: Using a pump sprayer, --- Misted the straw mulch of #4 with 5 cups of distilled water. --- Focused mainly on the straw mulch. --- Also misted the mulch of #3 a bit (in the fabric pot). - [20:27]: Checked propagation dome (in the 3x3), --- To cycle the air under the dome, lifted the top off for a bit. --- Ooo yea! Everything is still green and looking great! --- Keep on rooting ladies! --- Oops! - [21:45]: Checked the humidifiers. --- Refilled the humidifiers with distilled water. Day 07 - Sunday - 06/09/24 - Total Days: 104 ----------------------------------- Daily Averages [~23:00] - Temps: 81.5°F [27.5°C] - Humidity: 74.8% - VPD: 0.91 kPa - Soil %: [36, 40, 37, 36] ----------------------------------- - [08:18]: Quick morning check! --- Nice! The main tent is looking great! #1 and #4 are both raging with growth! --- Checked on the propagation dome (inside the 3x3) and the clones are still looking green! --- Wow! Everything is going almost too well! Just keep on growing! - [19:08]: Evening check. --- Garden is just exploding with growth! Seems everyone has fully recovered from the defoliation and topping! --- Wow #1 is bushed out and looking incredible! --- #2 is growing really starting to get large! Growth still is funky, but stoked none-the-less. --- #3 is starting to fill in the pot! Getting larger! --- Wow! #4 is getting taller and looks healthy and green! - [19:12]: Checked down both fill tubes. --- Both reservoirs were completely dry! --- Wow the canopy is really starting to get taller and closer to the light. May need to raise it up soon. --- Absolutely surprised how low the light levels have been throughout this entire cycle. Barely moved the light and have not increased the intensity past 2 (out of 10). Less is really more. --- Anyways! - [19:18]: Checked the Ecowitt soil moisture sensor data: --- 36% - [CH01 EB1 - Garlic Budder #1] --- 41% - [CH02 EB2 - Garlic Budder #2] --- 37% - [CH03 GFP - Garlic Budder #3] --- 34% - [CH04 FPT - Garlic Budder #4] - [19:19]: Poured 6 cups of distilled water down EB1’s fill tube. --- Poured 3 cups of distilled water down EB2’s fill tube. - [19:24]: Checked propagation dome (in the 3x3), --- To refresh the air, lifted the top off for a bit. --- Sweet! Still green! Wow! --- Using a spray bottle, misted the top growth with distilled water. - [20:35]: Checked the humidifiers. --- Refilled the humidifiers with distilled water. --- Wow what a week! --- Growth has been just insane in the 4x4 tent! All plants have fully recovered and have just exploded with growth. --- I think it’s time to flip to flower! --- Also, I’m absolutely baffled about how well the cloning process has been going. --- So far no issues! --- Not complaining, but just surprised. Keep on growing ladies! --- If all goes well, should have fully rooted clones soon ready for transplanting (into solo cups of course). --- Absolutely hyped for next week! --- Maximum warp Ensign, Engage! [END OF WEEK 14|07]
Likes
4
Share
Thaught the yield would be bigger and the smell louder in generell.
Likes
60
Share
Harvest done, plant is drying. 116 days from seed: 51 days veg + 65 days flora
Likes
7
Share
Really happy with the performance of my 2 Haze berry plants by Royal Queen Seeds, both phenos have the exact same fragrance I love in this strain, very fruity and sweet smell it makes you forget about everything, you feel like you're in the Caribbean just enjoying a nice fruit salad, I cannot wait to see how this ladies will get on the 4th week of flower! Stay with me to see how this 2 girls keep developing their beautiful flowers! šŸ’šā¤ļøšŸ’›
Processing
Likes
19
Share
Buenos días familia , vamos viendo El Progreso de nuestras gorillas , las cabronas crecen que no veas. Termina la segunda semana de floración sin ningún tipo de problemas, el alimento lo aceptan muy bien. Entre riego y riego hay margen de 48h ph en 6,5 y la temperatura ya no baja de los 19. Aportamos bud candy para empezar a trabajar en el sabor de nuestros ejemplares también.
Likes
3
Share
Week 12 Day 86 August 12 Ive been on vacation hada friend to water only plain water no nutrients today was first feeding since july 21 3L 3ml/l bio bloom 1ml topmax 1 ml bio grow
Likes
16
Share
@GRow_M8s
Follow
- Day 62 and the 4 of the mephs are with some amber crystals already ( Stomper#1,#2 & GWK#1,#2), - Stomper #3 (D62) and SODK (D57) are a few weeks behind. - Stomper and GWK produced a light>medium bud structure (tap water only🚿) with full of crystals šŸ’Ž (pretty cool for an auto with little effort), not yielders (soil organic) thought but with buds to make diamond rings. - SODK looking more like a yielder from these 3 strains with more compact buds and indica structure. - Humidity a little higher than the optimum this week, except Stomper#3 & SODK we didn't water the plants too much and we had some dry periods in the medium. - Made a final defoliation before harvest (4), we will dry the buds in a dry machine (as the Root66 dairy šŸ‘€) and make the rest trimming before curing. šŸ”• Smells were super stealth until now, no problem at all and the buds looking and smelling dense when touching and checking them. āš ļø Next update --> next week with the first part of the meph harvest 🤯.
Processing
Likes
2
Share
GSC 4/5wk in flower COVERED IN CRYSTALS LOOK AT THE CRYSTAL DANCIN NO BOTTLES NO NUTES ALL ORGANIC COMPOST TEA N SST TEA
Likes
19
Share
😈 Only On It'z 3 Day Of It'z 12 Week Binge! I Can Alwayz See Her Name Disintegrating From Their Lipz! "3rd Day" 😈-[V][V]-😈 Day 4 And Already Show'n Root! Using Clonex Water Solution In RO Water Ph'd Down To 6.5 And 2 T8 6500k Fluorescent 2' Tubez! 🌱 Day 5! She'z Reach'n For The Sky With Her Root Get'n Longer! After Her 2nd Node And Fan Leaf Im'a Put Her On The Juice! (Emerald Harvest'z) Cali Pro Gro A-B, Emerald Goddess, Root Wizzard And Study Stalk Into RO Water Ph'd To 6.8! After Her 6th Node And Fan Leaf! Move'n Her Into Her Lucious Condo! To Start Her Low Strezz Workout'z, Manicure'n And Scrog'n! Im'a Start Add'n (Emerald Harvest'z) Honey Chome And King Kola To Her Mix! Until She Hit'z Puberty! Once She Get'z A Little Fuzz On Her Peach! I'll Switch Out The Cali Pro Gro A-B With Cali Pro Gro Bloom A-B And (Emerald Harvest'z) Cal-Mag Keep'n Her Drink At A Chilly 59° And Her Air At 68° All While Get'n Her Hook'd Like A Crackhead On Co2! After That, 1-2 Weekz B4 She'z Ready To Pop! Im'a Starve Her Little Azz Cauze It'z Flush Time! (Botanicare'z) Clearex And RO Water Only! Don't Want Terrible Tasting Headaches! 🌱 After The 1'st Week I'll Only Be Updating Once A Week Unless Something Spectacular Happenz With The PC Grow. I Got To Much To Do With The New Big Auto Grow! Man I Love Fastbudz! Thiz Run Will Be FB'z GG Auto Fem And FB'z Six Shooter Auto Fem Som It Shoulb Be Exiciting! But Back To The Micro PC Grow! I Just Posted This Morning Day 5 And Damn! Big Difference From Thiz Morning! It'z The End Of Day 5 And The Rootz Are Fill'n The Grodan Like It'z Last'z Year'z Shoe! It'z Get'n Straight Shwifty! 😈🌱Day 6! Hey! Your A Crazy Bitch! But You Fuck So Good I'm On Top Of It! When I Dream I'm Doing You All Night! Scratcez All Down My Back I Keep It Right On! Crazy Bitch, Crazy Bitch, Crazy Bitch! "Crazy Bitch" Buckcherry🌱😈
Likes
34
Share
Both ladie growing very well and are like twin same size leaf development
Likes
13
Share
Ā”Buenos vibras y excelente humos para todos! Regresamos al cultivo y vamos a probar 6 automĆ”ticas de MrHide Seeds. LĆ”mpara: Bestva Quantum Led 2000W Semillas: 4 Auto Kritical Red , 1 Auto Triping 25 , 1 Cream Mass Nutrientes Canna: Vega - Rhizotonic - Camnazym. Sustrato 1:2 Floragard - Jiffy fino para semilleros Germinó directa en sustrato šŸ”„šŸ‘ˆ NOTA: La lĆ”mpara que utilizo y el banco de semillas no estĆ” entre las opciones de Growdiaries.
Likes
4
Share
@KaliWeeD
Follow
Ya vamos viendo bonitas flores 🌼
Likes
21
Share
@Hempcules
Follow
WEEK 20 Soooo, we’re pretty much at the end now. I harvested the plants on the last day of this week, and I was thrilled. During the final week, I mostly watered with plain water, except for a bit of Green Sensation that I added. I let my COā‚‚ level drop to 600 ppm and also dialed back the light a bit—down to around 700 to 800 PPFD. Unfortunately, it was still quite warm here this week, so I didn’t manage to lower the temperature any further. It’s definitely worth doing, especially in the last few weeks. But in my opinion, turning off the climate unit isn’t really worth it, so I kept running things pretty hot. The plants didn’t seem to mind the temperature much in my case. I had consistently high temperatures throughout the flowering phase, but I’ve been supplementing COā‚‚ from a gas bottle, which significantly increases their tolerance to heat. Overall, the buds really got another nice boost over these last few days. I think you could let them go even longer if that suits your taste. But I’m excited to harvest now. šŸ™‚šŸ™‚šŸ™‚
Likes
25
Share
t's really huge to be an autoflowering I put the photo of the base to show the ramifications as they start ... the scent is not very strong but it is pleasantly fruity just pass the hand near a top to smell it
Processing
Likes
19
Share
Week 4: look at het flapping her wings. A tremendous growth spurt in the last two weeks. I managed to identify and treat some humidity and over-watering issues and think I got her dialed in right now. But, this is what I love about this grow journey, improvement comes being consistent in learning and adapting. Once again great genetics from Humboldt Seeds and the stability of Just Cannabis soil certainly helps lessen the impact of my noob mistakes and, we back in flight mode. Topped up with couple liters of PH water only. No nutrients at this point just PH water and living soil. A few changes this week; moved her to a more comfortable space. Dropped the light gradually throughout the week and settled at 40cm. Temp slightly lower lately but I managed to keep humidity idling between 65/75. Added an extra fan to the grow air to improve ventilation. Will be focusing more on extraction and dehumidifiers as from next week.