



@lebrongrows
Follow
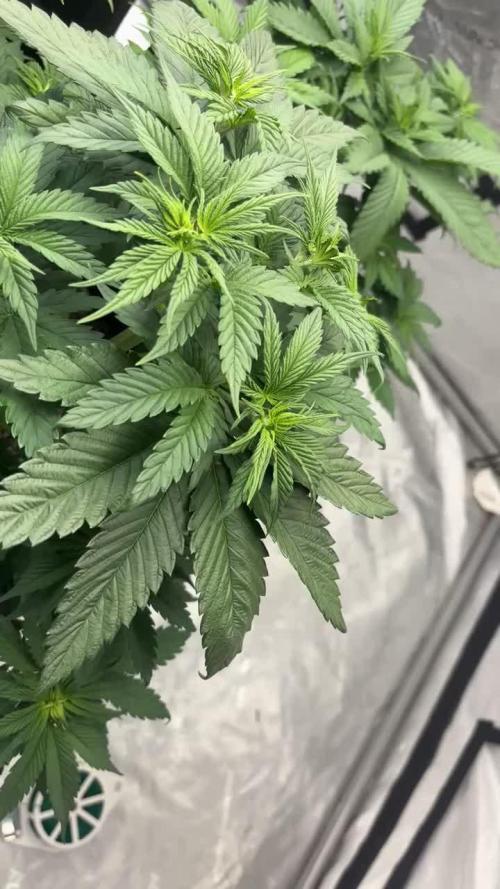
2/18: 4 weeks since we planted them. Some of the new nodes since topping are starting to come in. Also finally got to doing some lst. First time, so I didn't rlly know what I was doing all that much, but my main goal was to pull branches outward and have more light reaching all the nodes. I should definitely have topped and done LST earlier, but oh well, now I know for next time. I also removed some of the new fan leaves that were covering the new nodes. My roommate wanted to experiment with the smallest one so removed some of its big fan leaves. I don't really think that was the right call, but whatever we'll see what happens. Would also have loved to try mainlining but its also pretty late for that. It would have slowed down veg quite a bit too, and since we have to go home from college in early may, they have to be harvested by then. Gonna water later this afternoon as well.
2/19: Watered them last night. 0.75 gallons each. 4 tsp grow big, 6 tsp big bloom, 1.5 tsp calimagic per 2 gallons. I'm not sure why I didn't realize earlier I can just partially tuck the higher fan leaves under the lower nodes coming in. It makes the plant look droopy since big leaves are tucked, but I feel like it helps the lower nodes receive light and catch up, while being able to keep the fan leaves without cutting them. The small plant has 10 main nodes, and the rest have between 12-14, with many smaller additional nodes coming in under. I'm not sure how much I should try to grow these smaller nodes on the lower branches, or if I should just snip them off. Main focus right now is to get the nodes at similar hight and horizontal grow.
2/23: Watered this morning. Should have watered last night but my roommates were asleep and I was a bit too lazy to do it myself (took me an hour last time to do it all myself). I think I'm gonna start filling up a 5 gallon bucket instead of the 2 gallon one I was using, since I won't have to spend as much time refilling the water, nutrients, and get correct ph. Nutes doseage was 3 tsp grow big, 6 tsp big bloom, 2 tsp calimagic per 2 gallons. Roughly 0.8 gallons each plant. Ran out of big bloom for a few of the plants, but I don't think that should cause any big issues. Me and my roommate were debating if we should feed them nutes this water, or do straight water and calmag. Ended up feeding them since I didn't think we already have much salt buildup, but I think we will do a straight water and calmag flush next time. I also remembered we have a TDS meter, so I used it for the first time. Water in was about 750 or so ppm, and runoff was about 1350. I think thats kinda high for runoff, but like I said we will flush next time, and plants look healthy for the most part. Will definitely look more into that starting now. Also, the ph meter I had previously bought is complete garbage, so I had only been setting ph to around 6.2-6.5 with one of those visual mixing solution kit. I'd been doing this before mixing nutrients, and hoping that they don't throw the ph values off too much. I know this is pretty reckless and stupid, but it seems to somehow be working for now. I think it's probably a better idea we get a working ph meter so we can make sure levels are good after mixing in nutrients, but I'm feeling a bit lazy and frugal to buy a meter, so we'll see. Overall, plants look fairly healthy. They were a bit droopy today because I think I waited a bit too long before watering them, but oh well. One of the two plants that is a leggier and less bushy phenotype is turning pretty yellow however. I'm assuming it's a nitrogen deficiency but I'm not certain. Seems to have gotten a bit worse the last few days, but I'm hoping things will sort themselves out. Might also just up the doseage for grow big, which contains more nitrogen than big bloom. On a few of the other plants, the older and lower fan leaves also seemed to have some spotting resulting from calcium deficiency. Newer leaves all seem fine, and with the recentish addition of calmagic, I'm hoping this won't be an issue going forward. Have also been snipping very small nodes that are coming in on the lower branches. Not snipping them all, just trying to predict which ones have a chance at reaching quality light and developing into good colas. Anything I think will turn into larf im just snipping.
Looking back on the last few weeks, there are a lot of things I have learned that I hope to carry over to our next grow next year. I should have started lst and topping sooner, I understand how much and often to water them much better now, and there are a plethora of other small things that I have learned. I wish I didn't cut corners on some small things and overall was a bit more attentive to details, but for how well it seems to be going, I really can't complain. I'm incredibly stoked about how this is going, and I still can't believe I'm growing these plants with my roommates in our garage as a college student.


@Master_weeda
Follow
Bonjour à tous les padawans et les maîtres jedis
Pour cette semaine je prévoit de pratiquer comme technique spéciale le LST et juste un arrosage.
Pour cela comme à mon habitude j'attend le cinquième noeud ou que je juge la plante robuste.
Je profite que cette semaine qui va être relativement calme pour faire un LST appliqué et vous faire un rappel de ce qui est pour moi la meilleure technique pour arroser une autofloraison et la façon dont je pratique le LST.
En suivant ces quelques simples conseils vous obtiendrez un résultat optimal tout au long de votre culture :
Le cannabis est une plante qui n’aime pas recevoir un léger arrosage en continu. Il est impératif de l’arroser en grosse quantité, puis d’attendre que la terre soit bien sèche avant d’arroser à nouveau!
Pour calculer la quantité d’eau nécessaire à chaque plante, suivez cette règle :
Le volume d’eau à donner lors de chaque arrosage doit représenter au moins environ un quart du volume du pot !!
Exemples :
pour un pot d’1L, donnez 0,25L d’eau à chaque arrosage pour un pot de 4L, donnez 1L d’eau à chaque arrosage pour un pot de 12L, donnez 3L d’eau à chaque arrosage pour un pot de 30L, donnez 7,5L d’eau à chaque arrosage !etc…
Pour donner un tel volume d’eau, il est souvent nécessaire d’arroser en deux (voir trois) fois, lentement et uniformément sur toute la surface. Disposez de bonnes coupelles sous les pots, celles ci se rempliront d’eau qui remontera dans le pot par capillarité en moins d’une journée. Il est également très important d’utiliser un bon terreau de qualité, avec une bonne capacité de rétention d’eau mais qui assure également un bon drainage (celui ci doit contenir de la perlite, et/ou de la coco, etc..)
Il vous faut alors maintenant attendre quelques jours en sous-pesant régulièrement les pot avec vos bras. Quand ils seront redevenus très légers, vous pourrez arroser à nouveau !!
En effet, comme l’eau pèse beaucoup plus lourd que la terre, un pot gorgé d’eau pèse plusieurs fois le poids d’un pot d’une plante prête à être arrosée. Avec un peu d’entraînement, vous apprendrez donc très rapidement à sous-peser vos pots pour savoir quand une plante a soif.
C’est une technique à la fois très facile et très efficace, et qui peut être appliquée à toutes les plantes en pots !
En arrosant de cette façon, en général vous devrez arroser vos plantes tous les 3 à 6 jours.
Pour cette semaine 3 au jour 17 ma plante fais 12 centimètres et son cinquième noeud apparaît je décide donc de pratiquer un LST sur ma plante.
Pour ce j'utilise du fil de fer galvanisé que je plante directement dans le substrat en faisant attention de ne pas endommagé les racines car n'oublions pas que ce qui pousse dessus pousse aussi dessous.
Jour 17 je pulvérise du une solution composé d'une cuillère à café de savon noir mou dilué dans un litre d'eau en prévention d'éventuels nuisibles.
Je corrige mon LST suivant la pousse de ma plante ...
Pour ma par c'est la manière dont je procède. Comme promis petit rapel de:
Quand commencer à appliquer la technique LST
De nombreux cultivateurs commencent la manipulation dés que les plantes possèdent entre 3 et 6 nœuds ou une paire de feuilles. Durant cette première étape de la croissance, le tronc encore flexible est pliable sans risque qu’il ne se casse, même si au fur et à mesure du développement de la plante il sera de plus en plus difficile de le plier. Nous pouvons continuer à guider la croissance des branches durant toute la culture, même durant la floraison, ce qui pour cette étape représente un grand avantage face à la taille, qui n’est pas du tout recommandé une fois que la formation des têtes commence, cela stressera en effet la plante, ce qui aura pour effet de retarder la récolte.
Comment appliquer la technique de guidage LST
Si nous sommes prudents, la flexibilité naturelle des fibres du cannabis permet de plier leur tronc et branches avec une relative facilitée, même durant la floraison des plantes.
En utilisant une corde fine, nous pouvons accrocher la pointe de la plante à la base du pot par exemple ou à un tuteur que nous aurons planté dans le substrat. Nous plierons le tronc avec précaution et nous le fixerons avec la corde, à partir de là, nous pouvons augmenter progressivement la tension de la corde, chaque jour un peu plus, jusqu’à obtenir la position souhaitée. Soyez attentif à la réaction de la plante, essayez de ne pas appliquer trop de pression sur la corde et rappelez-vous que la flexibilité des branches peut varier d’une plante à l’autre.
Pour obtenir de meilleurs résultats, il suffit de suivre quelques règles simples. Pour commencer, nous devons choisir une corde fine mais pas trop pour ne pas blesser les troncs au fur et à mesure qu’ils grandissent et qu’ils deviennent plus gros.
Nous pouvons utiliser des crochets en plastique souple ou de n’importe quelle autre matière flexible pour éviter d’endommager les plantes. Spécialement en intérieur, utiliser des cordons en plastique de couleur (voir les diaries de @Silky) est très pratique pour voir facilement les accroches et faciliter le travail au milieu du réseau formés par les cordes, les tuteurs, les mailles ou les supports que nous aurons dans la culture. Bien entendu, en culture extérieure et surtout en guerilla nous ferons juste le contraire et nous utiliserons des matériaux de couleur qui n’attirent pas l’attention pour que notre jardin reste discret.
Pour stresser les plantes au minimum, la mieux est de réaliser ces manipulations le soir ou juste après que les lampes en intérieur s’éteignent, ce qui leur permettra de se remettre durant la nuit. Normalement, le jour suivant nous pourrons observer comme les pointes des branches que nous avons pliées se dressent de nouveau vers le haut à la recherche d’une source de lumière.
Que la force soit avec vous


@SlowpokeFuegobud
Follow
💜 💚 😍🥤💜💜 💚 😍🥤💜💜 💚 😍🥤💜💜 💚 😍🥤💜💜 💚 😍🥤💜
Dear growmies, welcome to week 4!! ❤️
WOOOW she is growing like from another world!! 🚀 Can't wait to see the stretch!!
DAY 25
Watered with 2ml grow + 4ml more roots + 2ml growzymes + humics + 5ml fast buds + 2ml calmag + epsom💧
DAY 27
Watered with 4ml more roots + 2ml growzymes + humics + 5ml fast buds + 2ml calmag 💧
Thanks @Fast_Buds for your awesome genetics, growing Fastbuds is always a bit like riding a ferris wheel! Woohooo!! 😜 🙏 💚
Thanks to my sponsors @Green_Buzz_Nutrients, their nutes never ever let me down!! Check out my diaries on how well they work! 💚 😘 In case you want to give them a try, you can find a generous discount code in the setup description further down the road ⬇️
You can find more brand hot updates on my IG, where I share real time events from my growroom, don't miss this! 😝
_______________________________________________________________________
Purple Lemonade FF
As refreshing as cold lemonade on a hot Summer day. 🌞
• Quench your thirst. Just as good as lemonade on a hot Summer day.
• The gentle giant. Up to 550 g/m2 of gorgeous pinkish-purple buds.
• Refreshing for the mind and body. The ideal all-day strain with a perfectly balanced effect.
• Sweet n’ sour terps. Mouth-puckering lemon flavors that’ll hypnotize your taste buds.
• Properly purple. The perfect choice for purple hash and extractions. As refreshing as cold lemonade on a hot Summer day.
Arising from a cross between purple and citrus Cali genetics, Purple Lemonade FF (Fast Flowering) offers a complex high made up of perfectly balanced cerebral and body effects that are ideal for daytime use. Expect an extremely enjoyable high that boosts your mood while deeply relaxing your whole body and getting
rid of muscle pain. This meticulous cross produces up to 550 g/m2 of some of the most beautiful purple buds, with pinkish and reddish hues that will catch everyone’s attention. The beautiful purple buds are ready for harvest in 7-8 weeks and come hand-in-hand with unbelievably sugary citrus terps that are just as refreshing as a cold lemonade on a hot Summer day. It’s the ideal variety for the sweet-tooth stoner seeking strains that deliver both in quality and quantity of resin.
Bud Description 🦔
Purple Lemonade FF grows chunky, spade-shaped buds that boast a whole range of pinkish-purple hues with rich, dark orange pistils shooting out of every direction. This variety stands out for the, oftentimes, lilac trichomes that give them a gorgeous pink tint and make for outstanding purple concentrates. The buds give off a delicious tart lemon aroma that reveals a sweeter, more fruity scent as you break the buds open. Definitely a must for flavor chasers and those looking for pungent terpene profiles.
Smoke Reports 💨
Purple Lemonade FF offers an effect that’s just as unique as the flavor. Expect a potent uplifting high that gives you that energy boost you need to get things done while 100% happy and stress-free. The effect gradually transforms into a wave that works its way along the limbs and through the muscles, deeply relaxing your body and putting you in the right mindset to go through a busy day with a huge smile on your face. This is an excellent all-day smoke as it not only increases energy but can also help combat chronic pain, migraine and stress.
Plant Appearance 💄
This feminized photoperiod variety develops a thick and strong structure, growing a medium-sized main cola with multiple shorter side branches, typical of hybrid strains. Purple Lemonade FF develops fairly short internodal spacing with gorgeous purple buds growing stacked on top of each other, making it the perfect choice for growers of all levels looking to get lots and lots of top-shelf purple weed, as this variety can produce up to 550 g/m2 in a 7-8 week flower cycle.
Grow Tips 🤓
This is a super fast feminized photoperiod version that takes approximately 7-8 weeks to flower with a 5-week vegetation cycle,, this means you can have faster harvests by shortening the veg cycle or have a longer veg cycle for bigger yields. Purple Lemonade FF (Fast Flowering) makes for a great candidate for growers of all levels as it’s a vigorous strain that will thrive with basic maintenance both indoors and outdoors. This is a resin powerhouse so make sure to have your trim bin close by as all the resinous sugar leaves will make for the most mouth- watering hash and extracts.
Flavor 😋
Expect a long-lasting citrus zest that taste just like it smells. Purple Lemonade FF reeks of a delicious blend of sweet fruits and tart citrus that’ll make your mouth water. On the inhale, expect sour flavors that taste just like lemon candy with hints of orange and a really subtle earthy background. And on the exhale, the citrus flavors open up, giving place to a more sugary berry fruitiness that leaves your whole mouth tasting like an extremely sweet weed-infused lemonade.
https://2fast4buds.com/seeds/purple-lemonade-fast-flowering
_______________________________________________________________
Setup:
140x70x200 cm Spiderfarmer tent
2x Monkey 16W fans (not oscillating)
1x Secret Jardin 30W
1x box fan 50W oscillating (on lowest level)
LED
Full Spectrum 320W AGLEX AGL-320W-MA
5,6 kg
foldable, dimmable
864 pieces Samsung LH301H
864umol/s
2,7umol/J
full spectrum white + RED 660nm + IR 740nm
wavelength range 380-780nm
covering 3x4ft
Green Buzz Nutrients https://greenbuzzliquids.com/
❗ Use code GD42025 for generous 25% discount (for orders of minimum 75€)
Biobizz Lightmix + coco + wormcastings + perlite
Carbon Active Granulate Filter 125/360 cm³/h
PrimaKlima exhaust EC 125-400/240 cm³/h


@Jakobyzone420
Follow
Soddisfatto del mio lavoro? SI ASSOLUTAMENTE SI . Questa è la mia prima esperienza nel campo della coltivazione della cannabis e sono veramente contento del risultato, ma non devo cantare vittoria troppo presto adesso manca la seccatura e la concia speriamo bene ahahah 🤣


@GoldenWeedGrower
Follow
D29/V25 - 29/04/23 - Benting
D30/V26 - 30/04/23 - EC 0.9 pH 6.5
D31/V27 - 01/05/23 - LST and Benting
D32/V28 - 02/05/23 - Some other LST
D33/V29 - 03/05/23 - Added water and nutes - EC=0,9 pH=6,5
D34/V30 - 04/05/23 - LST
D35/V31 - 05/05/23 - Nothing





@THCpapa
Follow
Week 14 marks not only the completion of the first week of flowering but also a remarkable stretch in the growth of my green companions. It's like they've hit a growth spurt of epic proportions, reaching for the stars with leafy determination. They're like botanical skyscrapers, standing tall and proud in their green kingdom.
Each week, these plants become more beautiful, like nature's own masterpiece unfolding before my eyes. The best part? There's no more discoloration on the leaves, and they're gobbling up nutrients without any negative side effects. It's like they've discovered the fountain of leafy youth, and they're thriving like never before.
But amidst the leafy triumphs, there's a slight hiccup in the form of temperature. Throughout the day, the temperatures can reach a toasty 83 degrees. I have a Vivosun controller that's supposed to kick in the exhaust at 79 degrees, but it seems to be struggling to keep up. Looks like it's time to bring in the big guns and get an AC unit for my green haven.
As I reflect on the journey so far, I can't help but feel a sense of awe and gratitude for these amazing plants. They've taught me patience, perseverance, and the true beauty of nature's artistry. Here's to Week 14 – a week of stretching, flowering, and the promise of a bountiful harvest. Cheers to my green companions – may they continue to grow and thrive in their leafy paradise! 🌿


@DrGanj
Follow
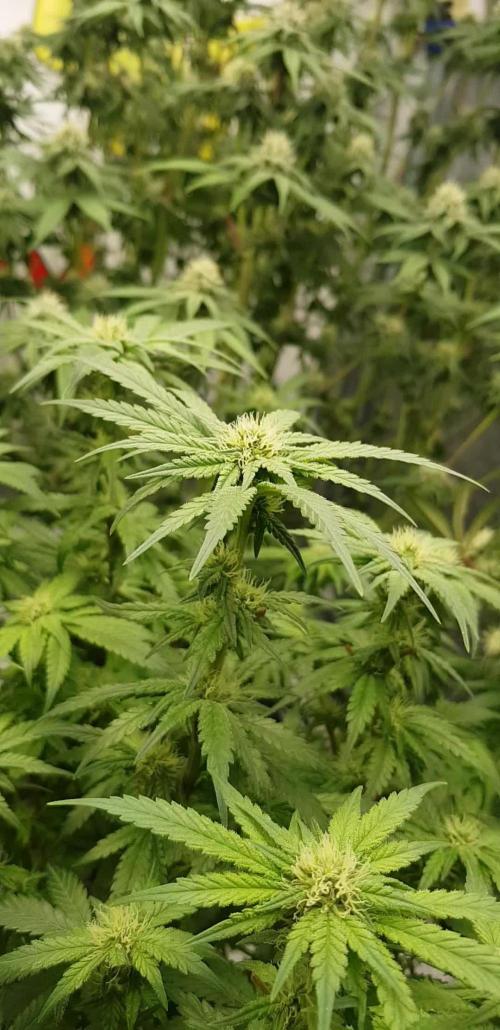
Started flush now. I'm adding Nature Delight Active Sugar Boost as it's been recommended to boost terpene production. No idea if it will work this late into flower but trying anyway as apparently it has no need to be flushed and is fully organic.


@GERGrowDesigns
Follow
Welcome to Flower Week 4 of Sensi Seeds Mandarine Jam
I'm excited to share my grow journey with you from my
Sensi Seeds Project . It's going to be an incredible ride, full of learning, growing, and connecting with fellow growers from all around the world!
For this Project , I’ve chosen the Feminized Photo Strain Mandarine Jam:
Here’s what I’m working with:
• 🌱 Tent: 120x60x80
• 🧑🌾 Breeder Company: Sensi Seeds
• 💧Strain Info : 20-23%
• ⏳ Flowering Time: 7-8weeks


@KingCatfish
Follow
End of week 8 and mid way through week 9. Already put nutrients in and already finished first flush. Will be flushing from now on, trying to get 6.5 everytime. Room is 24 degrees at 55 percent Rh sometime 45 or 65. Smell starting Ng coming from no where, good bud smell coming from them.



@DaveJohnson
Follow
Week 4: Pre-Flower - The Hunger Games Begin! 🌱➡️🌸
Currently bumping: Larry June - Organic Tokens 🎵
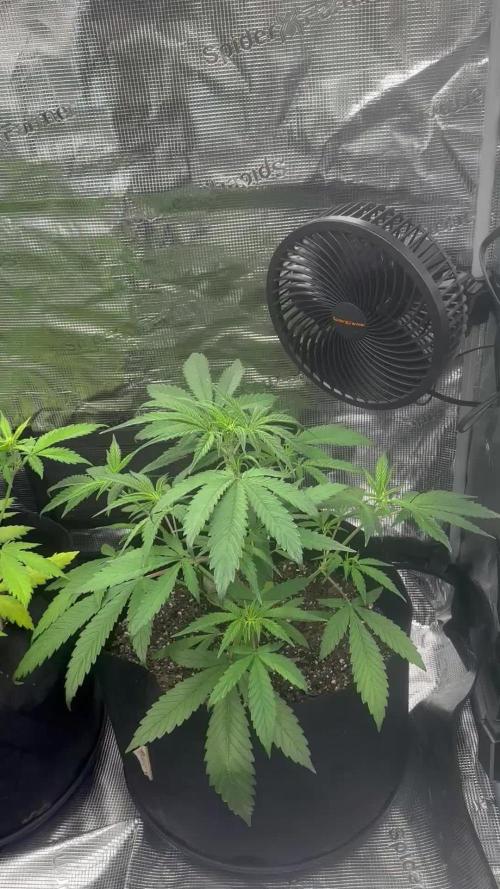
All three ladies have officially hit pre-flower! The transition is happening, and these girls are making it crystal clear—they're HUNGRY. Time to step up the organic feeding game.
All Three Ladies - Pre-Flower Mode Activated
Apple Fritter, Lemon Cherry (Right), and Lemon Cherry (Left) are all showing those telltale pre-flower signs—pistils popping, internodal stretch beginning, and most importantly, an increased appetite that plain water just isn't satisfying anymore.
Last Week's Feeding:
Roots Organic Veg Tea
Ratio: 1 tbsp per gallon mixture
Applied as a soil drench to boost available nutrients
The Reality Check: It helped, but it's not enough. They're telling me loud and clear that they need MORE as they prepare for the energy-intensive flowering phase.
The Organic Solution - Double Trouble Top Dress
Time to bring in the big guns! Preparing for flower means giving these girls a nutrient-rich foundation they can pull from over the coming weeks.
Upcoming Top Dress Mix:
Half-strength Roots Organic Terp Tea (bloom-focused formula)
Gaia Green All Purpose (balanced NPK for transition support)
This combo gives them:
Immediate microbial activity from the Terp Tea
Slow-release nutrition from Gaia Green
Support for both the vegetative finish AND early flower development
Enhanced terpene production (that's what we're here for!)
Application plan: Light top dress on the soil surface, then water in gently. The microbes will get to work breaking everything down, making nutrients available exactly when the plants need them.
Why This Approach Works
Pre-flower is the PERFECT time to top dress:
Plants are entering their hungriest phase
Organic amendments take time to break down—starting now means nutrients are available when flower really kicks in
The transition from veg to bloom nutrients happens naturally as different microbes activate
Less risk of overfeeding compared to liquid synthetic nutes
Key Observations
These girls went from "we're good" to "FEED US" seemingly overnight. That's pre-flower for you—the metabolic shift is real.
The stretch is beginning, which means they're pulling hard on nitrogen, phosphorus, AND potassium. The Gaia All Purpose will cover the NPK bases while Terp Tea brings the micronutrients and beneficial biology.
Larry June voice: "Organic garden, hand-crafted nutrients, you feel me?" 🎶
Next Week's Plan
Apply the Roots Terp Tea + Gaia Green top dress
Water thoroughly to activate the amendments
Monitor how quickly they respond to the feeding
Watch the stretch—may need to start LST or support stakes soon
Keep the music bumping and the vibes organic ✌️
Pre-flower is when the magic really starts happening. Let's give these ladies everything they need to absolutely THRIVE! 🔥🌿
Good soil + hungry plants + organic amendments = the recipe for terpy, flavorful flowers. Let's get it! 🎵


@Green_Peace
Follow
Reaching peak flower now so added PK into the mix for extra Potassium and Phosphorous over the next 10 days or so. Never had plants soak up this much nutrients without any burn (touch wod) so I'm really impressed with the Vitalink range. These 2 clones are at the back of the tent, and to the bottom and right of the screen in the timelapse.


@cheetah844
Follow
Nice growth but it does look like this one is going to be a thirsty girl. She already wants some additional nitrogen.
I topped every bud site on every plant, both indoors & outdoors.


@TEKNOGROW
Follow
CONTEST SWEET SEEDS
SWEET SEEDS
SWEET GELATO
GROWER ADRY
www.teknogrow.it
Instagram @teknogrow

shorts_status_processing


@Luv2Grow
Follow
Day 57 - Starting week 9 off with a gallon and a half of water and nutes today. She’s doing really well and getting big. Finally really starting to bud up a bit and not just pistils here and there. Not really doing any defoliating until she’s buds up a bit more but she’s getting there. She’s still stretching like crazy and when she seems to slow down, she gets watered and starts putting on the inches again.
Day 58 - Didn’t really do anything with her today. Just took her out of the tent to give her a look to see how she’s doing. It looks like she’s definitely starting to bud up and should be an amazing harvest, when the time comes.
Day 59 - Looking good and starting to stack up nicely. Still has got a long was to go but all is looking well. I did chop off a couple of lower branches that are completely covered and I’d rather her focus her energy on the ones that are getting the light. She’s gonna need some water again by Saturday.
Day 61 - Gave the girl about a gallon and a half of water and nutes today and removed a couple fan leaves as well. She’s coming along nicely and buds seems to be forming nicely as well. Not really putting out much of a smell yet but hopefully she’ll starting frosting up soon so I get get a good smell from her.
Day 62 - Not a whole lot new going on today. Removed a few dead fan leaves at the bottom and checked her out under a scope and looks like the trichs are starting to form.
Day 63 - It’s the end of week 9 today and she’s drinking like crazy. Going to give her some more water and nutes tomorrow. She’s really budding up nicely and looking pretty damn good. The stretching has slowed down a little so hopefully she’ll start packing on some weight and getting frosty.


@ThomFoolery
Follow
12/15
I don't know about this plant... I think the transplant was just too much stress and it's done. I knew it was a long shot with an auto flower. I'm going to give it 2, 3
more days. If I don't see a major improvement, I'm pulling it. It looks like the other one I started with this one is lagging too. I had an accident with another plant fallling over on it.
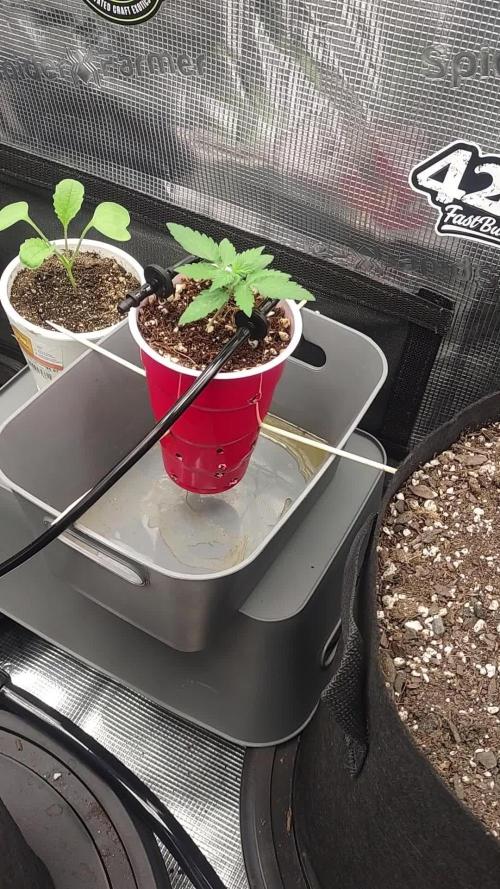
Anyway, I went all the way on the drip irrigation system. Ended up installing a main line and then I ran a 1/4 line off the 1/2 main line that runs down the center of the tent. I just couldn't leave it alone and ended up building a pretty decent system. If I add 6 or 8 emitters then I'll upgrade the pump. 80gph won't be strong enough for 8 lines. So it's a bit more involved than living soil, and I enjoy that, as long as I have time. One plant doesn't take a lot. Just check pH 2x a day and adjust if needed. It will swing about 3 points every 12 hours. So I set it to 5.7 or 5.8 and when I get home at night it's at 6.0 or 6.1. It is way more forgiving than dwc and if the pH were to drift bad, then I have plenty of time. It's only got to be right 6 times during the day.
3 days.. I didn't want to kill her, but I'm not going to spend 3 months growing a joint either.
12/16
Looks like she's getting stronger. Took a video of the drip system in action. I tweaked it and added 2 inline drippers so they each have half the cup. They seem to drip pretty even in my other tests. I'm watching close . I hope she takes off so I don't have to start over. Color looks good. My pH was lower than I thought. By .4 points. So I fixed that and the plant seems to have taken notice. Hell the pH was probably just gotten to where it was in range. I got so used to the pen being accurate I totally forgot to double check it. It's right now.
12/18
Changed the res and upped the nutrients to 0.9 from 0.6. She is growing very slowly. I am about to pull it and make room for some clones in another tent. I found a breeder with some genetics I am really salivating for and I may just jerk it out. That being said;
I think the increase in nutes has helped the color if nothing else. But with each day I'm more sure she is stunted.
12/20
She is picking up. Color is darkening up and size is getting within range. But she will be smaller in the cup. The latest pics are showing no issues yet. I think I can give her even more. Next res change I think we'll go to 1.0 or 1.1. just playing it by ear.
Need to check the runoff and make sure it's not building up any salts. Haven't been top concerned yet because we get a little runoff and I believe I am getting the entire substrate moist.
Watching... Waiting...


@Chubbs
Follow
Week 4 for these girls. They've doubled in some since last week. I took a couple of the bigger fan leafs off this week, also raised my lights up allowing some stretch. Starting to see some preflowers and pistols. So next week will be off to the flower stage.
Happy Growing.