The Grow Awards 2026 ๐Ÿ†
Likes
Comments
Share
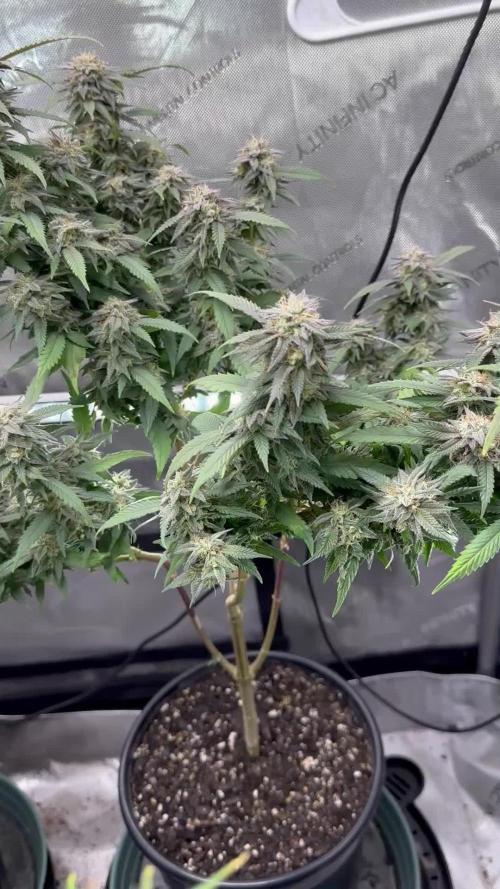
Shortly after they were switched to flowering (after week 3) the plants continue to stretch and then start to develop their first flowers. Now in week 7 all plants have very nice flower clusters all over the plant and side branches. They have grown to 45 cm (=Shiva Skunk on left side) and 40 cm (Serious Kush on right side of aisle) in height respectively and all plants have a nice dark green color, which shows they are healthy and also that the Advanced Nutrients schedule works like a treat. The Q6W-Gen.2 LED-Lamps are now dimmed to 100% (=three green LEDs on the dimmer) and work on FULL POWER, which ensures full fledged flower production. Both varieties have now started to exude their typical aroma. The Shiva Skunk starts to smell musky and sweet, while the Serious Kush smells 'gassy' and 'fuely' like its OG-Kush heritage. The flower clusters on the Serious Kush appear to grow denser than the clusters on the Shiva Skunk.
Likes
12
Share
@Siriuz
Follow
Starting week 14 Feeding the lady her last meal @1900ppm bloom nutes Day 94 ( Day 3 from. Week 14) Day 95 and Day 96 Very well, almost ready to flush again Day 97 Growing fat and smelling so good Full of Trichomes and resin Day 98 End of week 14
Processing
Likes
28
Share
@Hawkbo
Follow
This week they are all just putting on some weight still a few weeks left to go. Pics were taken on Monday video on Tuesday. The aromas are pretty strong in the tent in general. This one looks pretty promising I love the bud structure and the thick white pistils I think shes gunna fill out nicely.
Likes
85
Share
the c99s got ten days of plain water then came the chop at week 10 and 3 days with a fairly decent 30% amber all things considered !
Likes
9
Share
Man what a busy week. I left for a small vacation with the family and left the plants in the care of someone and luckly everything is still alive lol. Then today I almost forgot to post my weekly diary because I was busy build my new grow office and moving all the equipment in. The room I built is where all the plants well eventually end up ones my coco and perlite arrive. So one plant is 2 weeks behind the other I believe. That's why one looks smaller then the other. Both plants tho are doing very well and are coming along nicely. Hope to have then in the autopots by next weekend. Well happy growing everyone
Likes
7
Share
Day 36. Manipulating to even out canopy, don't be afraid to super crop kids. Lol. Continuing with maxigro every other watering til 15% runoff. Day 38. Mild HST on tallest branches to even canopy. Day 40. Here we go Steelers, here we go ๐Ÿ‘ ๐Ÿ‘.
Likes
30
Share
Another week in the books. They are getting close to harvest and I switched them to plain pH adjusted water. Another 1-2 weeks.
Likes
41
Share
@Fatnastyz
Follow
1-2 Day 58 from seed and start of week 9. She is on a chill day. 1-4 Cal/mag and drops. She will start flushing next water.
Likes
10
Share
@Its_Fruz
Follow
1 day 12/12 โœ‚๏ธ๐Ÿƒ 7 day 12/12 โœ‚๏ธ๐Ÿƒ
Likes
50
Share
@AsNoriu
Follow
Day 36. One girl is shooting the sky other still have that unhealthy look, made my mind - its genetics and i can't do anything. Girls got second feed, looks happy and hopefully will bring some nice flowers. Took some leaves down, spread a bit, but most of work will be done next week, if i will dare ;))) Last time used Root Juice, added Acti-Vera, increased Bloom and Heaven. Day 40. After last feed, girls got small rusty spots on 4-5 leaves total, cut out cal mag for couple weeks. Heavy training, its always tricky to decide what to do with Autos and i have almost no knowledge, but i have SPA Queen and Midget aka Margaret ;))) both different, but bushy, had to clear Midget really heavily and still loads future airbuds left, but maybe ... ;))) Girls drink 3 liters every day, highest rate ever, but i relate it to most powerfull exhaust ever. Some leaves on both plants got strange mutation, like leaf tries to branch out ... Never seen anything like this. But by height i presume it happend on first feed, late Root Juice aftermath ? Happy Growing !
Likes
11
Share
Likes
15
Share
@AdamCajda
Follow
we are finally geting closer to the end, had some minor over feeding issues but quickly sorted so pretty much no damage just few leaves have some signs of burns, nothing drastic one more week of normal feeding and then I will add pK 13/14 for a week and finally 2 weeks flushing I bought humidifier but It doesn't really do much work. Humidity is still around 50% so i hope good airflow will be anough to avoid any mould
Processing
Likes
8
Share
@Samkol
Follow
Its last day of first week and i was founded the 11th one outside the box... Alive!!! U can see him on last foto on diary album... Thenk's to taniesianie.pl for the jest all 11/11 seeds... Secend timer...
Likes
38
Share
Utopia Haze is a rare heavily sativa dominant hybrid (90% sativa/10% indica) strain created through back crossing Brazilian Sativa strains. This tasty little bud took home 1st Place for Best Sativa in the 2008 High Timesโ€™ Cannabis Cup and for good reason โ€“ with its potent 18-22% average THC level and long lasting cerebral effects, Utopia Haze is one powerhouse smoke. The Utopia Haze high comes on soon after you finish your first toke, hitting you with a strong cerebral lift that infuses you with a sense of hazy relaxation. Type: Feminised/Photoperiod Cultivation: Indoor/Outdoor Flowering Time (days): 70-75 Indoor Yield (g): Up to 650 Feminised Outdoor Harvest Month: October Feminised Outdoor Harvest Month Week: 3rd-4th week Aroma: Citrus, Woody, Pungent, Mint Effect: Cerebral Lift, Hazy Relaxation, Sleepy Welcome Everyone to the Final Entry of my Utopia Haze Grow ! There is so much to discuss ! I have been extremely busy as of late trying to get this Harvest together, but i am happy to have it here for you now ! I Seriously under estimated the amount of time, help from others, and my own necessary skills to pull this off.. and i still kind of screwed it up lol ! But its worth noting i have never actually done this before and trying to document it during....was extremely hard. It is next to impossible to work an iPhone with rubber gloves on ! First I want to discuss everything step by step so before you jump straight into the comments on how the end product is so small in "quantity" Rest assured i am happy with its"quality"...and thats all that matters to me because Life is a journey not a destination! and i have learned so much from this grow that I couldn't be any happy even if i messed some things up :) But at the very least I hope you read through this entry in its entirety with an open mind and focus more on the process, rather than just the outcome! I ran out of Ice & i was only able to wash three times..(normally I've heard you should go sometimes 5-6 washes) Preparation is Key & things will be much better next round :) Photos 1-22 These are pretty self explanatory but for those of you just tuning in now.. this is what happens to a very happy plant when you don't have the necessary tools to monitor key components of growing cannabis.. Ph, as well as EC levels play a very key role in the outcome of your grow lol that being said I was just able to save this plant by purchasing both tools but that doesn't mean the plant didn't suffer because of the prior events.. This was a Huge reason behind me choosing to turn this harvest into what i would consider "Solventless Hash Rosin" from "Ice water extracted Bubble hash". Pictures 23 The idea here is the process of using "fresh Frozen Cannabis" this has been discussed many a time online on such sites as instagram and here on grow diaries as well.. I personally have Never tried the process so i decided to try it out and make a judgement for myself.. Video 24 The Cannabis has now been in the freezer for 72 hours making it very well frozen.. as you can tell i struggled getting it all into the 25u Screen Wash Bag. One thing of note i would do differently is i will de-stem my next batch as i also believe this played a part in the amount of plant matter that escaped through the sieves. Photo/Video's 25-28 The idea here is "ice water Seiving" & especially with the bags that I am using here that are only have screen material on the bottom portion of the bag it is very important to have spaces in-between the screens to allow the water to pass directly through the screens into the bottom bucket with the least amount of resistance.. because the hash is so extremely temperature dependant if it gets warm on the side of the bag.. it will stick there and not make it to the bottom to become use able product.. 29 You do not need to use as much Ice as i used here lol... the idea is to keep everything very cold..i certainly achieved that but at the sacrifice of using so much that i ended up grinding product and producing "contaminants" but in the end they are just plant matter that i would be smoking when i rolled up my joint either way so.. I'm not super disappointed.. But it should be noted that what you want to achieve here is a Layering effect where you have the wash bag between two small layers of ice while the "water current" washes the Trichomes away allowing them to be separated by the screens setup below :) Before Starting the machine you should allow some time (i.e.;10-12minutes pre soak to allow the product to become saturated) before the first cycle. By video 32 I have just ran out of ice lol.. Video 33-34 Here I have a tip for you.. to separate the screens that you sieve through.. cut 5 gallon buckets to stretch them across nice and tight.. it'll make scooping your Bubble that much easier ! i learned this from the many "Frenchy" videos I have watched :) Picture 35 Here in lays the problem for most people.. drying your hash without loosing vast amounts of "Terpenes" whilst also stay ever vigilant against mold ! Thanks to all those videos I've watched on youtube.. id like to think this was one of my most successful parts of this process.. Things to Note; Terpenes start to seriously evaporate at temperatures 68F or 20C you need to stay as cold as possible whilst bringing the Relative Humidity in the space down into the 40-30% to stay away from that nasty mold ! I used my cold storage room in the basement.. with a dehumidifier running to keep the space at 45% RH & staying at a constant 15c. All while spreading the hash as thin as possible across parchment paper, on top of the white screens with a fan moving air across both sides of the paper. Pictures 36-38 These are some macros i took in the middle of my drying session I fell in love with the colour. Yes i know the black spots are plant material but they will get caught when i bag the hash & squish the oil out. Thing to Note; at this stage it is important to ensure you 'micro plane" the hash down as fine as you can whilst staying weary of the temperature... any "chunks" will hold pockets of moisture.. that lead to potential problems..ie; mold ... Picture/Video 39-41 Successfully planed bubble hash ready to be bagged and Squished ! Picture 42 Ive decided to follow Pedro.. from Pedros Grow Room and double bag to be on the safe side so i don't have any blow outs. So thats One 25u bag inside one 160u bag ! :) Pictures 43 This is almost 3 grams of the bubble hash from above, already melting in the bag.. this is where i ran into trouble again lol things started getting to warm in the house and i was only able to get one of the three squish's i did on video :( things started getting sticky. Picture 44 This is basically just a photo of the equipment I'm using; 3x5 LowTemp Cage in the frame I built myself, with a 20Ton bottle jack. Something to note here is this is an older Lowtemp model with only a single heating zone which is which i have it closed here heating Both sides of the press :) As well as the importance of having adequate pressure on your plates.. my rig is very overkill for the size of hash bags..lol Video 45 Here is the lovely press video.. its didn't quite work the way i wanted either lol my directional folding wasn't quite tight enough for a big "drip" :) &the Press was set to 65ยฐc Photo's 46-50 are pretty self explanatory :) I had a blow out.. but still managed to pull an 80% return from the hash once squished...& yes it tasted amazing :) Was it worth it in the end... that could be debated.. for some..i understand..its not your thing, but for those of us that are interested in making our own concentrates.. free from Solvents... I wouldn't make it any other way :) If even ONE of you reading this diary finds it helpful to reference for ANYTHING.....even if its "what not to do" ill consider it a success ! Thanks again for tagging along on this garden adventure.. its been one heck of a journey ! Much Love from B.C. Canada, Until Next time, Cariboo
Likes
6
Share
@IQuSX
Follow
Hi Topman! ...and 2 weeks passed as 1 - the pre-flowering was 10 days and now the 4-5th day of flowering! I think she will let her brothers shit!!
Likes
10
Share
Likes
9
Share
Likes
Comments
Share
Hola a todos!!! A esta laughing buda no la he atendido muy bien esta semana, noto cuando llega la noche que se engarran las hojas, para mi necesita una maceta mรกs grande., esta semana la pasare a otra maceta. He regado con agua y shanty 1ml x litro de agua.
Likes
36
Share
Info: Unfortunately, I had to find out that my account is used for fake pages in social media. I am only active here on growdiaries. I am not on facebook instagram twitter etc All accounts except this one are fake. Have fun with the update. Flowering day 8 since time change to 12/12 h. Hey everyone โ˜บ๏ธ. As the flowering begins you can already see a clear stretch of the lady :-). Yesterday 2 g GHSC Bio Bloom per l coco were added. In 2-3 weeks I will add another 1 g per liter ๐Ÿ‘. The tent was cleaned and everything was refilled. Have fun with the update. Stay healthy ๐Ÿ™๐Ÿป You can buy this Strain at https://www.barneysfarm.com/blue-cheese-34 Type: Blue Cheese โ˜๏ธ๐Ÿผ Genetics: Blueberry X Original Cheese ๐Ÿ‘ Vega lamp: 2 x Todogrow Led Quantum Board 100 W ๐Ÿ’ก Bloom Lamp : 2 x Todogrow Led Cxb 3590 COB 3500 K 205W ๐Ÿ’ก๐Ÿ’กโ˜๏ธ๐Ÿผ Soil : Bio Bizz Coco โ˜๏ธ๐Ÿผ Fertilizer: Green House Powder Feeding โ˜๏ธ๐Ÿผ๐ŸŒฑ Water: Osmosis water mixed with normal water (24 hours stale that the chlorine evaporates) to 0.2 EC. Add Cal / Mag to 0.4 Ec Ph with Organic Ph - to 5.5 - 5.8
Likes
21
Share
28 days and it started flowering. Saw my first pistol hairs today.