
Processing
Likes
Comments
Share


@CommanderCannabis
Follow
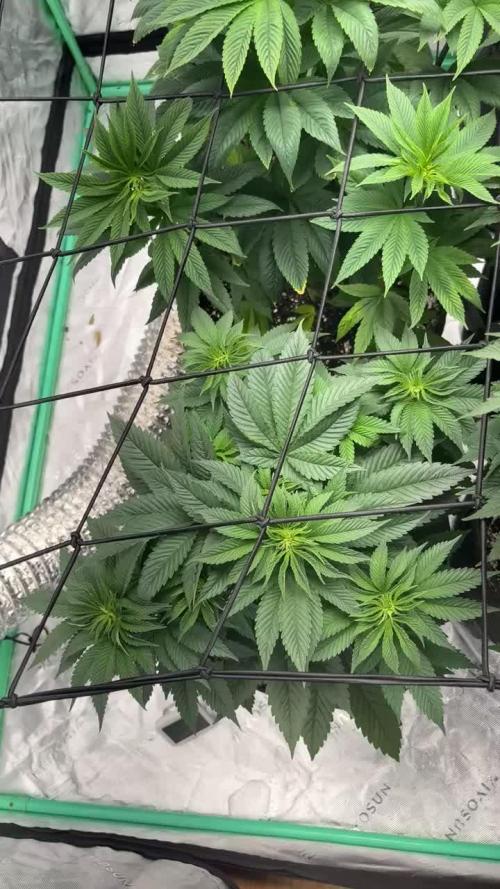
4-19 Growth continues. Seeing more pistils and branches are still expanding. Haven't had to defoliate and am keeping door open during the day to keep temps down.
4-20 Defoliated more lower branches which were not going to get big.
4-21 Defoliated big upper leaves which were blocking lower bud sites.
4-24 Flushed her out for first time yesterday. Installed a large container to contain the run-off.

Likes
8
Share


@JohnnyBarrel
Follow
Week 21
Daylight 12h20 - 7h45/20h05
Unstable weather, alternating heavy rain and wind quasi every days and sunny afternoons. Moderate temperatures around 14°C min / 23°C max.
Plants are safe in the veranda; the sun is lower on the horizon now and the angle of the light is now perfect for a good finish. I need to test the humidity level in the room but it seems reasonable. No signs of diseases or moisture.
Last weeks were hard with multiple aggressions: plants are like War Veterans with some damage and scars. The flowering process look not affected by this episode and harvest is approaching.
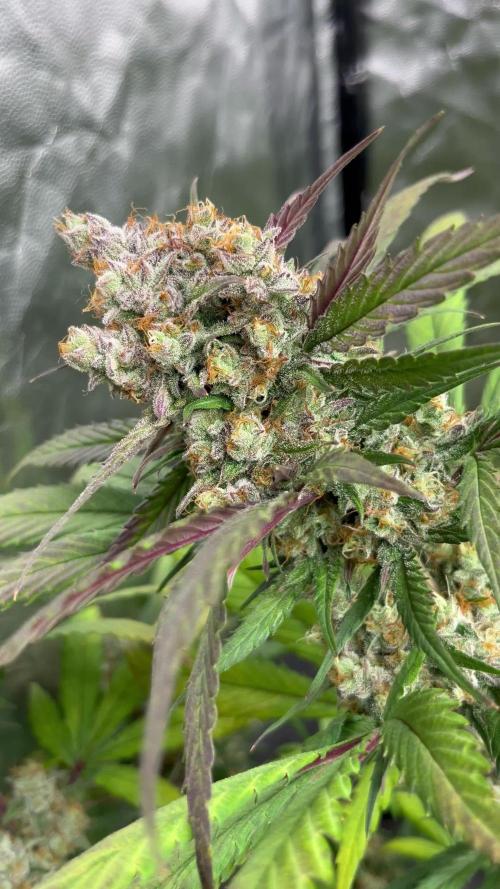
Brake Pad Breath: almost ready. Pistils are rusty colored, buds are thick and dense, firm and sticky. Subtle fruity aroma: tonic and stimulating. Most advanced plant: will be the first harvested soon.
2L watering / 2 days
flowering booster finish + water
flawless finish + water
Flash Back #2: ending the flowering cycle and starting maturation. Last plant infested by insects, may be the plant is reacting by accelerating the flowering: buds are not so dense compare with the previous plant. Pretty spicy smell and good resin production.
flowering booster finish + water
flawless finish + water
GMO x Zombie Kush: starting the last flowering stage. Recovering good and was less injured by caterpillar than the others. Pistils are long and the flowers will enlarge soon: need almost 3 or 4 weeks to be ready.
Grower master flo + bud XL
enzyme + pk 13/14
Royal Moby is tall and late flowering but seems producing lot of flower. With the stress the plant become hermaphroditic, I discovered some bag of males flowers. I hope there is no pollination between the other plants.
Grower master flo + bud XL
enzyme + pk 13/14


Likes
4
Share


@Ninjabuds
Follow
My Lit Marker plant is still on the smaller side, but it's definitely growing strong. The branches are thickening up nicely, and the leaves look just like the Permanent Marker plant from Lit Farms. Makes sense, since this plant is half that strain! I'm excited to see how it develops.
Okay, This past week has been absolutely fantastic! The weather has been incredible, and I've been able to keep the windows open almost the entire time. My plants are thriving in the humidity, and the VPD has been perfect. Everything just feels so balanced and in check.
Likes
7
Share


@HowieMcHowie
Follow
Es hat sich viel getan. Das Wetter war gut. Die Luftfeuchtigkeit und die Temperaturen sind teilweise extrem (40 Grad / 25 %Luftfeuchtigkeit). Die Pflanzen stört es soweit nicht. Die Auto Orange hat den Anfang gemacht. Mittlerweile (Tag 36) zeigen alle ihre Vorblüte. Die Auto Orange sind beide um die 60 cm. Die Lemon Kix sind alle sehr groß geworden. Da kratzen 2 an die 90 cm. Sie fangen auch an zu riechen. Der Wasserbedarf steigt auch. Giessen muss ich alle zwei Tage. Batboost bekommen sie bei jedem mal. Bloom wird bei jedem 2 Mal gegeben.
Ein gewisses LST habe ich durchgeführt. Die Pflanzenbieger kann ich höchstens 2 Tage dran lassen. Sind sie länger dran brechen mir die Triebe am Bieger. Wahrscheinlich wäre das runter binden und am Topf befestigen die beste Option.

Processing
Likes
4
Share


@donovanliam
Follow
This plant is out in the country the wind out there is helping the stock thicken. Growing good just the plants not close by so it doesnt get looked at daily or not even every 2

Likes
9
Share


@Spiritual_Herb
Follow
This new week since the soil is a soil improver specifically formulated for lawns, its task is to keep the pH around 8 and stabilize, there is peat that also acts as a buffer, I did a flush giving 2 liters of water since the vase is 3.2L at pH 5 to balance it with the runoff pH which is pH 8, since the pH is 8 the plant is unable to take nutrients as it should and therefore problems with curled leaves begin, which discolor, lose vigor (I wanted to do this experiment also for those who are new to it)

Likes
1
Share

@TTerpz
Follow
Start of week 6
7/25/25
Fed with nutrients: 7/25/25
Fed with nutrients 7/30/25
Fed with water 8/1/25
Processing
Likes
55
Share


@hawkeye_diesel66
Follow
She's growing nice and healthy. She recieved a good drink the other day. On day 33 she recieved a good cut and most of the bigger fans and keaves were removed as well as a fre lower nodes. She really didn't seem to be bothered by the cutting.

Likes
5
Share


@Ninjabuds
Follow
My gas tax plant is looking absolutely incredible right now. It's got these massive buds that are super dense and have this awesome dark color to the leaves. I'm so excited to see how it turns out when it's finally ready to be harvested. I've been checking the height, the thickness of the stem, and the density of the buds to get an idea of how much longer I have to wait. I think I might start flushing it soon.
The past few weeks have been so beautiful, watching the plants grow and change. It's amazing how something so small and fragile can turn into something so strong and vibrant. Now that they're getting ready to bloom, it feels a little bittersweet. I'm so excited to see the finished product, but I'll definitely miss having them around while they're growing.
Likes
2
Share

@Ziocannabis
Follow
Avrei potuto aspettare ancora una settimana per averne 1/4 ambrati, ma preferisco l’effetto Bomba😝, perciò lo tolta con tricomi Opachi
È molto forte come odore, nonostante L’aspiratore sia costantemente acceso , ma non al massimo, troppo rumore per via del tubo( appena possibile ne prendo uno nuovo e insonorizzato )
Non ne ha fatta molta e ne ero consapevole,ma ora che ho nuovamente la Led Marshidro Evo da 480 watt montata, torneranno i precedenti risultati gusto qualità e quantità
Ora ne mancano 3 da tagliare ma aspetterò con calma, visto che posso iniziare ad usare la mia terapia
Un buon proseguimento a tutti Voi
18/10 tolto tutto più tardi anche quest’ultima che da sul rosa è wow!!! quella che sta asciugando sa di frutta..agrumi!!
Sono rimasto molto soddisfatto ( una la sto già fumando) dalla Papaya cookies e la rifarò
Ora ho le gorilla glue appena nate


Likes
93
Share


@PEAKYPLANTERS
Follow
Hello friends. Welcome back to peaky's garden
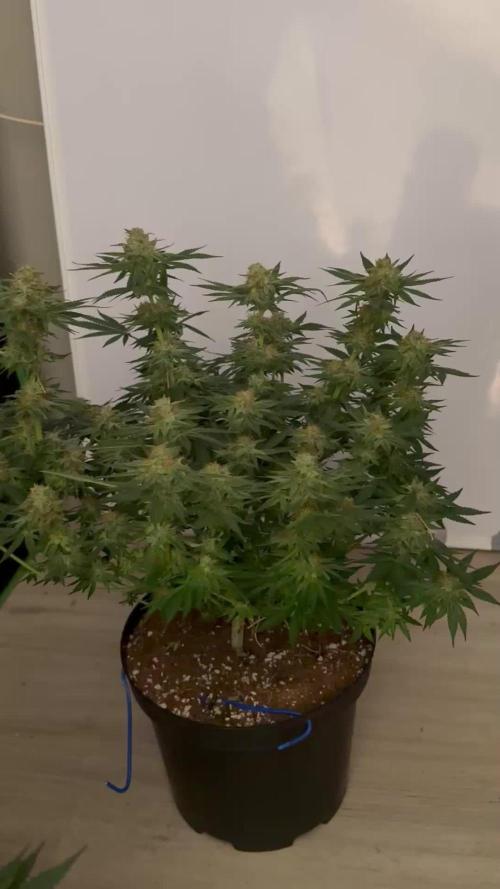
Second week of rinsing for this beautiful little girl who is already starting to show some signs Amber on these Trichomes
One of the strains is giving me huge satisfaction ,I think I've never grown such a big beast "autoflowering" wow I'm really surprised by its branching
I really like this strain a lot
Likes
21
Share


@NG420
Follow
Fattys are growing and seem to be thirstier.Used foliar spray to help the leaves and also started tucking. When the plant was topped pistils were seen for first time.
Likes
10
Share


@Jbcultivates
Follow
Great grow, dealt with some pests that took a few plants from me . But overall my best grow quality so far and I’m very happy with the grow!

Likes
23
Share


@JUSTOUKV
Follow
Might be its last my grow and its growing beast needs more time to do trainings looks like new top leaves look normal.try monster 👾 croping people its very interesting and 0lant goes bushy! Happy growing
Likes
21
Share


@CanadianFillmore
Follow
Welcome growfessors to another episode of growfessor theatre! 👽🌳💚
Tonight from the 4x4 the ladies move into week 7 and they get a change in nutrients. Out with Big Bud coco & sensizym, in with Overdrive.
Removed dead & dying leaves from each lady, added a support stake in Mandarin dreams & LSD, they was leaning hard!
Thanks for stopping by growfessors 👽🌳💚

Likes
12
Share


@Hex444
Follow
As I finally took a stab at LST, I noticed all the fine white hairs growing... is this the precursor to flowering? Very excited to see how this continues to grow!
Processing
Likes
49
Share


@Ganjagrandaddy
Follow
Update: A productive and busy week in the farm this week.
FFT#8 Got moved into the same tank as the other plants. Shebhas now thankfully started producing new roots and top growth too. With 2 weeks to catch up with her counterparts from germination alone , she jad a tall task ahead. Now with the recovery time and damage she took , her path is even more determined and set. I am hoping another week will give her some height to at least be flipped as her friends need to get into their flowering cycle now.
FFT#9 Is responding to her supercropping well and staying put now. She jas a nice sized canopy forming of around 2ft so far . I am mindful of the stretch at this point so want to set her up into a good foundation for tall colas when i flup them. The strainnis very easy to work with and tooknfhe bending and supercropping with ease. So far it is a dream to work with. She is starting to smell "pissy" as most do at this point so all good so far.
FFT#10 Is the biggest plant in the room at this point. Hwt stems are very thick and strong looking. Leaves are a nice dark green and very thick and large on her fans. They all had a defol earlier in the week and she has quickly replaced so much of her leaf matter already. A nice healthy and vigerous plant. She will be flattened a little more for the flip so I can manage her frame better.
All told these ladies are proving to be great strains as the other have been and I am looking forward to seeing what they can harvest too now.
Be well folks

Likes
9
Share


@MrGreen92
Follow
Chopped down and trimmed 2 of my plants today at the end of their 2 week flush, will cut down the last plant next week and put my harvest weight up for the 2 plants worth of dried bud.
Took about 4 hours to trim the 2 and I'm happy with the results, not sure how much is there but I'd rather weight til it's dry before I weigh it.
There was also some strange looking new growth at the base of one of the plants, quite a few shoots with flowers so went through it and got about 30 good looking seeds out of it bit weird in my opinion but fair enough.. gonna carry these with me in a tin and plant them wherever I see a good spot outdoors and see what happens 😋
Hung them up today to dry as I didn't realize they would eventually go flat and take ages to dry if left in the trays 🙄🙄 should be alright now hopefully 🤞
The bud are nice and dry now after 5 days hung up, gonna leave them up another day as I've got some bovida 62 packs coming tomorrow that I'm gonna put in the jars 😊 gonna chop down the rest of the last plant tomorrow as well then hang that up to dry.

Likes
28
Share


@TeamQuality420
Follow
So this week is the start of flower !! Woooohooo finally get to show what I'm made of !
Step one ) take all the big fan leaves
Step two ) establish a "light line" and take all small shoots that are unable to get the proper amount of light due to their distance from the top of the canopy. * These are the places we all wish would grow ! These are also the places that are at risk of
- hermaphroditism
- mold
- waste of energy for the plant.
** These are also some of the best places to take clones **
Continue to tie and secure everything in preparation of massize buds !
I hope some people looked at this like
" This took way too much off "
I took ALOT. Yes I push , I push hard to know how much they can take . Yes I would say 60% of plants DO NOT like a massive defoliating.
But, the ones who do , you will unlock a yeild like never seen .
It's the risk we take .
One thing I have noticed is when I'm gonna defoli , I don't combone high stress or toping + a bunch of other techniques .
Should have some pretty huge plants by two months !
Thanks for stopping by more notes and pictures to follow .
First week of flower was a great success!!! Unfortunately I did have covid this week so my pictures weren't exactly where I would want them .
For these genetics, it's crazy , they haven't been topped or LST'd and yet they are growing flat at the top !
*** I did have covid this week so my pictures weren't exactly up to par.
So I'll do my.best to make it up with notes ,
- this week very little flower stretch that is definitely a plus for people who want medium sized bushy plants . Not saying that this one won't stretch but so far there has been very little stretching .
- there are ALOT of nice shoots throughout the canopy, plenty of places to take clones *** this genetic clones very well so that is another thing to note ! So great clonability .
The end of week one I have seen very little stretching , in my opinion these could all be considered S1 . It interesting, even with no topping or training these plants NATURALLY grow FLAT! so for all you Screeners out there this is a primal genetic for that !!!
In to week two !!! Here
We
Go !!!
--------------------------
Find these world class genetics at :
https://www.exoticseed.eu/products/exotic-animal#:~:text=What%20is%20Exotic%20Seed's%20Exotic,be%20cultivated%20indoors%20and%20outdoors.
Or
https://www.seedsman.com/eu_en/exotic-animal-feminised-seeds
Find all about the nutrients that fuel this grow on here:.
https://diablonutrients.com/
Absolutely a life-changing nutrient company for me really brought my game to the next level.
