


Likes
Comments
Share

@MrNiceGuy332
Follow
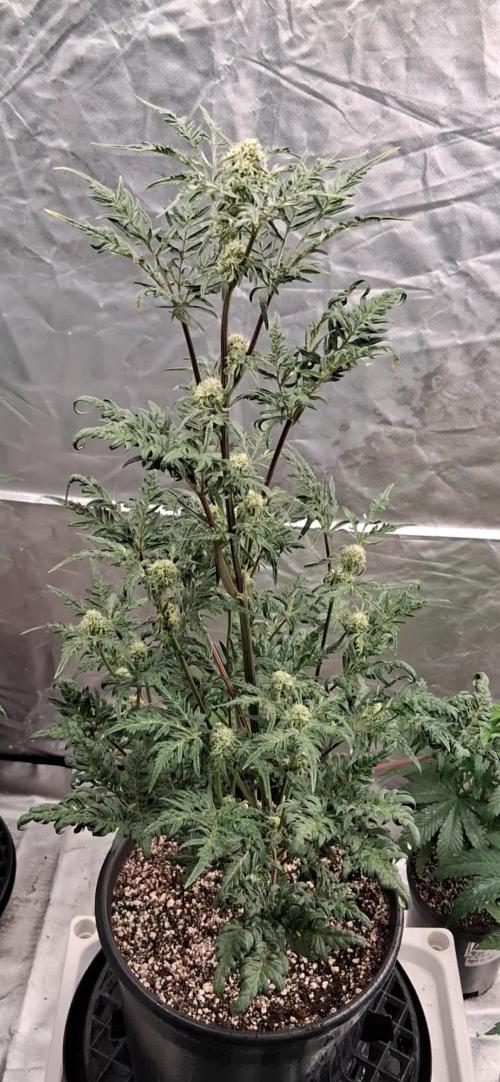
She is done stretching started to pack on buds cant wait to see what she can do i grew the photo this is 1st freak auto...

Likes
42
Share


@Master_weeda
Follow
Bonjour à tous les padawans et maîtres jedis
Tout d'abord merci à Tom de seedsman pour ses graines ainsi que greenhouse de me permettre de faire cette culture en m'offrant le feeding greenhouse
Je rappelle que cultive simultanément 9 pots de 10 et 11 litres dans une box prévu pour 4 et que je n'utilise que le strict minimum du matériel nécessaire à une culture correcte au prix le plus bas possible
MATÉRIEL CONFIGURATION
Box 80×80×160
Lampe led Lampwin 300 watts ×2
Ventilateur à pince 15 watts
Xiaomi Deerma humidificateurs 5L
Hygrometre thermomètre
Extracteur PROFAN 107 m3/h - 100
Prise programmable électronique ×2
1 pot carré noir 10 litres
Green house feeding enhancer
Green house feeding biobloom
Green house feeding biogrow
Substrat biobizz ligthmix
Fil de fer et pince coupante
Microscope
Petite balance de précision
CULTURE ÉTAPE PAR ÉTAPE
J'ai tout dabord fais germé ma graine avec le easy start de Royal queen seed et je suis agréablement surpris car franchement le taux de réussite est très élevé (17 graines sur 19) simple d'utilisation et très efficace.
Une fois la plantule sortie et d'une hauteur de 2 ou 3 centimètres je la prend délicatement et la place directement dans son pot définitif. Je préconise des pots allant entre 10 litres et 15 litres pour des autofloraisons cultivées en intérieur.
Le pot aura été préalablement préparé (video dans diarie) avec 30 grammes d'engrais greenhouse feeding biobloom et 30 grammes de greenhouse feeding biogrow, soit l'équivalent de 3 grammes par litre de substrat.
Je dépose donc la plantule dans son pot définitif je recouvre un peu de avec de la terre je tasse légèrement et j'arrose pour garder le substrat humide pas plus
Je place ma lampe led 300watts à environ 90 centimètres de la plantule avec un cycle de lumière de 24/24 pendant une semaine. Au début de la semaine 2 le cycle de lumière passera en 20/4 grace a un programmateur car c'est pour moi le cycle de lumière qui offre le meilleur rendement pour une autofloraison.
Jour1: léger arrosage
Jour2: léger arrosage
Jour3: la plantule commence à être plus vigoureuse mise en place de la ventilation pour augmenter sa masse racinaire et léger arrosage
Jour4: arrosage avec un litre et demi d'eau ph6.3 à laquelle j'ai ajouté 0.9 gramme de greenhouse feeding enhancer (soit 0.6 gramme par litre d'eau)
Jour5: aucune technique spéciale
Jour6: aucune technique spéciale
Semaine agréablement calme sans problème ni carence apparente
Que la force soit avec vous !


Likes
28
Share


@Solarcradle
Follow
August 10, 2019/Day 64/1 of Week 10: Last week, I watered minimal and had very little runoff. I have been watering every two days at a PH of 6.5.
Day 65: Watered with 3L at a PH of 6.4. Runoff PH 7.01. At 9 PM, light moved to 15" and A/C regulating tent temps to 24.7/76.5F to 25.3C/77.5F.
Day 68: Watered with about 2.5L at a PH of 6.43. Did not measure for runoff. Light still at 15"
Day 69: Moved light to 17" above canopy
End of Week 10 notes: Stop getting hair in my buds. lol Cheers to all the growers that wear hair nets, lab coats and gloves! I'm glad to see that she has very few amber trichome tips. She is mostly clear and starting to go cloudy. I want more time to beef up. Will be interesting to see how fast the trichomes continue to change and when her white pistil growth slows. 😁

Likes
118
Share


@SwissKush
Follow
Day 71 - BEAST!
a. her size is so large, and the buds are def "Big Bud"! there is resin everywhere, very fruity like pineapple express
b. will be topping off the DWC all week with 6.0 water.. gradually diluting the ripening formula, 1300ppm right now, end of week should be at 400ppm, then flush week
c. light schedule is now 14 hours on, 10 hours off. this allow the buds to mature properly and become potent, next week probably 12/12.
d. still drinking 6 litres of water a day
Day 72 - fat buds
a. her buds keep swelling outward, the calxes are exploding, some stigmas are turning brown, about 5%
b. these buds are very hard, cant understand how dense these are!
c. really happy with this strain!
Day 73 - 10th day of ripening
a. the pistils are slowly becoming brown, maybe 7% of the plant has matured
b. the smell is unreal, VERY fruity and gassy
c. ppms have been controlled at 1300ppm with plain water diluting the pool
Day 74 - flush beginning
a. pumped out 10L from the DWC, and added 10L of 6.0 water, 650ppm
b. the flowers are smelling very strong
c. the buds are becoming ripe, the stigmas are turning colors
Day 75 - pistils 30% orange/red/brown
a. set lighting intensity to 50%, simulating the sun moving farther away from the plant like in fall
b. drinking 5-6L a day still
c. the buds are very hard, thick and oily, the resin on my hands smells very good
Day 76 - maturing great
a. cutting down the temperatures, and humidity and lessening the intensity of the light always causes nice dense matuation
b. DWC running de-chlorinated tap water, 140 ppm
c. next week is all flush week, and turning to 12/12
d. she is still drinking 5-6 litres of water a day!
e. the buds are maturing very nicely, the smell is INTENSE!
Day 77 - mature buds
a. the buds are maturing, calyxes are swelling, and the buds are getting heavier
b. about 50% orange stigmas, trichomes there are still some clears left, no amber visible yet
c. DWC is being kept full of plain water, 160 ppm in DWC

Likes
7
Share


@MicroHidroGrow
Follow
Día 22. El estirón ha frenado. Las plantas están empezando a llenarse de flores. Se me hace extraño tener las plantas con esta forma, dado que siempre he usado cortes y LST. Se ven bastante bien, aunque cada vez que las miro, me dan ganas de cortarle alguna otra rama. Pero no quisiera mermar el rendimiento. Ya a esta altura sería más.contraproducente que otra cosa. Pero creo que debí haber sacado más ramas de las que saqué.
Día 24. Fui un iluso al pensar que el crecimiento había frenado. Hoy ya las plantas tienen 5 cm más que hace dos días. Voy a tener que doblarlas si siguen a este ritmo. Tuve que hacer un video, ya que no tengo lugar para sacar fotos en contra picado. Veo que se están llenando de flores y empiezo a imaginar el resultado final.
Día 26. Las plantas crecieron otros 5 cm en estos dos días. Ya estan 65 cm. Me empieza a preocupar, por lo que supongo que voy a tener que doblarlas un poco. Seguramente solamente doble las dos mas altas cruzadas entre si. Vengo ilusionado, pero sospecho que van a ser necesarias entre 7 y 8 semanas. Tuve que agregar solución, ya que había bajado mucho el nivel del depósito, y agregué un poco de bud blood. Voy a seguir usándolo hasta el momento del PK. Seguiré actualizando.


Likes
4
Share


@BelgianBudtender
Follow
Hey hey Growmies!
Smooth sailing for this little Samsquanch OG, in the begnning of the week I 3D printed a Hydro Halo to keep this girl moist as she sends out roots.
A couple of days later, roots had shot out of every direction so I removed the halo and started LST and leaf tucking.
This is where we start seeing growth! my first Mephisto Auto, Im excited
That's it for now Growmies, I hope you'll follow along with these great artisinal genetics!
Stay safe and keep Growing.
I'm still looking for decent Black Diamond OG seeds, or something very close to it genetically, I'm also looking to add a second tent/light to my grow space, if you can score me a great deal or sponsorship, hit me up.

Likes
12
Share


@Growing_Spartan
Follow
I trained them down to be more bushed out and watered with a PH of 6-6.7 and did a weekly water of Fish Shit. The humidity was at 57 then eased into a steady 52 for the rest of the week.
Likes
44
Share


@UKauto
Follow
She's a beauty.
Absolutely stinking 👌🏻
Getting frostier each day now, hopefully start packing some weight on.
Smells like really sour nose burning haha citrus is there but overpower does by the stinkkk 😂

Likes
1
Share


@FarithAriasFajardo
Follow
Aquí las fotos de esta nueva semana de vegetación para ambas plantas, cumpliendo así la white widow 23 dias de plantada y la zinfandel 16. La fotos corresponden al 21, 24 y 27 de abril. Por ahora no hay nada más que agregar. Ya que esta semana solo agregué algo de sustrato en ambas y el riego fue de agua reposada con una bomba dando oxígeno por 24hr y un ph de 6,1 a 6,5. Lo que no sé es si realizar alguna tipo de poda más adelante o si mejor las dejo crecer como son, ya que no sé mucho. Existe el temor de dañarlas o estresarlas demasiado. Lo pensaré, también recibo cualquier consejo u observación con ellas!


Likes
12
Share


@GREENPHOENIX6262
Follow
*Update* - Took a L on the first seed I dropped last week. dropped 2 more yesterday, Pics have been updated and germ dates as well.
Both seeds germinated nicely!!!
* Quick 4 day seedling update, See uploaded pics above* - 08/04*
*Day 7 Update, See below for specs*
Introduced Raw (NPK) Veg Part 2
Coco topped with worm casting and perlite
Light run - 18/6
Temps High 70 - Low 80's - Humidity - 78-91%
Moderate on the Myco
Frequent but light water feeds - Qtr Gallon each - Moderate coco top soil saturated.
Likes
50
Share


@Fibro_Witch
Follow
It was a good week for Night Nurse👍
Now that they're in the ground they're doing much better and putting out more growth.
The one on the end could have better color, since her new growth is a bit yellow. I gave her an extra feeding last night after I transplanted some Calendula into the bed since it's a good pest repelling companion.
We're getting some much needed rain today🙏
Otherwise there's not much else to report!
Update 6/26- I totally forgot to add that on Monday the garden got a spraying of horn manure. Horn manure is a biodynamic preparation of cow manure that's been fermented in a buried horn. This results in a material that's teeming with beneficial flora and fauna for the soil. Ideally it would be sprayed prior to planting in the spring as it encourages healthy root growth. I purchased the pre-potenized so that I only had to spend 20 mins stirring rather than an entire hour. That would have been brutal😵
I sprayed it at night when the earth is breathing in and used a spruce bough to sprinkle it over the plants in the garden. The extra icing on the cake was that there was a rain the day before, and another the day after I sprayed so it was well watered in.
Likes
11
Share


@Welshgorilla95
Follow
Pre flower some awesome growth little bit of nutrient burn but she'll be okay I know for next time 🏆 Rome wernt built on a day . :) happy
Update no lst applied she's really tall and spaced herself out well so I think I'm going to just leave her alone and give her feeds when she wants :)
Processing
Likes
22
Share


@DBpF4nZA
Follow
Kept an eye on her and basically tried to expose as many nodes and bud sites to as much light exposure as possible. The temperature is a bit cold with a cold wind. She seems to still be growing well albeit a bit on the slow side. Buds are forming with trichomes already visible.
Likes
162
Share


@nonick123
Follow
Día 72 (18/12/2023)
Empiezan las temperaturas frías... (tengo las luces encendidas de 20:00 a 8:00...)
Día 74 (20/12/2023)
Cogollos engordando y poniéndose duros a velocidad de crucero
Los colores morados de esta cepa son cada vez más profundos 😍
Día 75 (21/12/2023)
Riego: 1 litro H2O + Melaza 1 ml / l + Alga Bloom 3,5 ml / l + Sugar Royal 1 ml / l + Power Buds 1 ml / l + Green Sensation 1 ml / l - pH 6,24 - 875 PPMs
Desde esta semana, añado nutrientes Cal-Mag Amino 1 ml/l y Enzymes 2 ml/l de XpertNutrients
Día 76 (22/12/2023)
Nuestra planta se queda sola en la tienda porque su compañera se ha vuelto hermie... Espero no la haya polinizado
Relleno la parte superior del sustrato con 3 cm de Light Mix, ya que se ha compactado mucho
Riego muy despacio con 500 ml de H2O para que se asiente
Día 78 (24/12/2023)
Reviso diariamente en espera que no sea hermie o se haya polinizado
De momento todo va bien....
Añado un par de vídeos para que veáis los espectaculares colores morados que están mostrando 😍
En 20 años cultivando, nunca había visto una cepa tan bonita. Im in love 😂
Likes
10
Share


@DeltaEye
Follow
I put the plants into an NFT system couple weeks ago. I could have waited a bit longer for the plants to develop a stronger root system before placing the rockwool cubes into NFT but I was being impatient because of the slow start and wanted to get the plants under proper light. Now two weeks later they are growing well with good root development.
I switched the lights to flowering cycle about a week ago so they should start stretching soon. No preflowers yet.
Likes
Comments
Share

@GoodTimesOrganics
Follow
Herzlich Willkommen zurück!
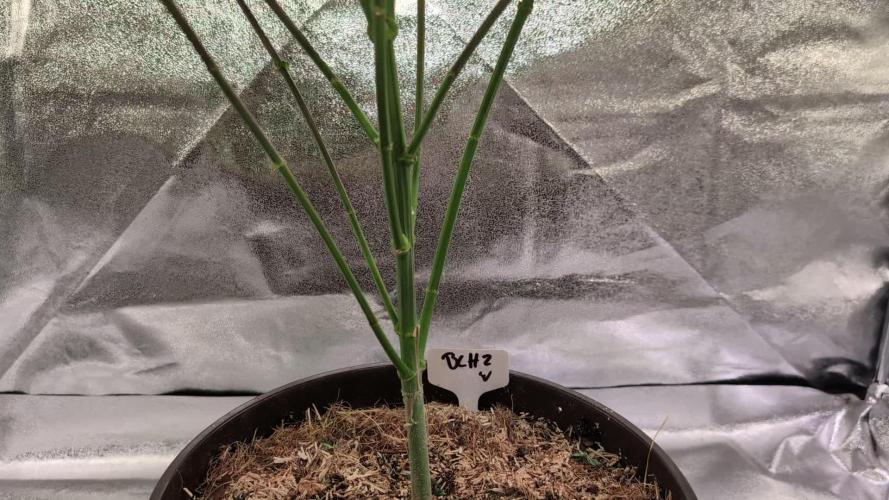
Nach Blütewoche 1 und dem wiederkehrenden runterbringen der Triebe unter dass Nett ist nun Zeit, die Pflanze ihre Arbeit tun zu lassen.
Ich hab die Pflanze jeden zweiten Tag angepasst, wieder unter das Netz geflochten und entsprechend die Blätter und Triebe unterhalb des Netzes abgeschnitten.
Somit kann die Pflanze die Energie in die oberen Triebe leiten und sich prächtig entwickeln.
Das ist mein zweiter richtiger Scrog Grow und aus dem ersten habe ich gelernt, dass Mann nur bis Blütewoche 1 runterbinden sollte.
Danach ist es wichtig, die Zeit des Stretches quasi auszunutzen um die freigelegten Triebe sich in Ruhe entwickeln zu lassen. 💚


Likes
18
Share


@VI_Cannabis
Follow
Start of the week my first grow light arrived!
I got it setup right away and then decided to transfer them into a bit bigger pots. 2 were still looking terrible and 2 were doing okay. One was tall and straggly so I had to try to prop it up after I transferred it. I placed them in a closet and then periodically checked on them throughout the week. A few days into the week I realized how bad the growlight I had ordered actually was. So it was time to decide.. option 1 was to let the plants just try to survive outside. Option 2 was order a better light and return this one. Option 3 was purchase a tent setup with light. After a bunch of research I decided on spider farmer and ordered a kit from them! (https://www.spider-farmer.com/?ref=Bigbuds420) to receive 3% off.
The kit was set to arrive in a week. The decision was made to keep them as indoor. 2 would be outdoor, 2 in the tent.