
Processing
Likes
Comments
Share


@Vayne
Follow
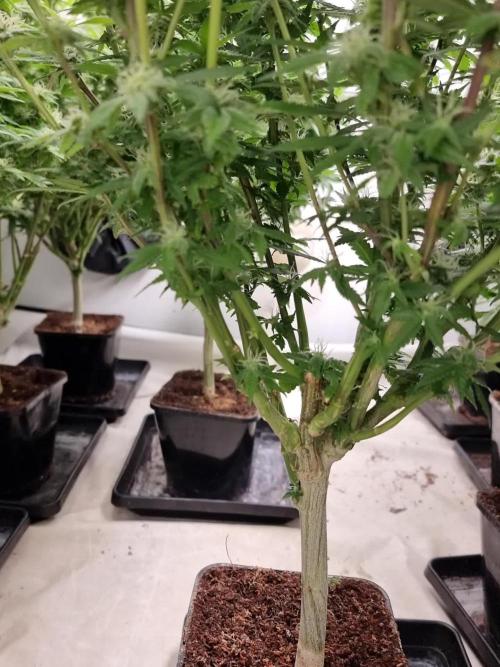
Have yellowing on tips of new growth. Also some discoloration on older leaves. Havent been able to narrow it down yet what it could be. Using ro water with calimagic ph'd to 6.0. And feeding 1 tbsp for a 5 gal bucket with organic blackstrap molasses once a week.

Likes
38
Share


@Green_Mountains
Follow
Another good week!! I defoliated the smaller of the 2 plants mid-week... I think she is doing very fine.
A small hiccup with the feed that same night. Only a few leaves are showing any sign on nutrient burn. I went ahead and fed them again today.
I plan on watering them in a day or two... they were very thirsty this afternoon!! So, I definitely need to up the watering. I've still been feeding 3 quarts twice a week.
Otherwise, all seems to be going well!!
They are frosting up very nicely!! So exciting!!
Peace!!
Update for grow question: @The8thChevron thanks!!! I pulled them and will hope for the best for now. So close to the finish line. If I see more trouble brewing I will pull the plant. I don't know how to answer directly to you on the grow question.... Thanks again!!

Processing
Likes
7
Share


@Kushizlez
Follow
Day 49-56
(Day 50) I hooked up my carbon filter to the humidity controller and it is keeping the room exactly at 65-70% RH night and day. It looks like it turns on about every 45 minutes for about 5 minutes so it allows me to run the co2 bag properly. I don’t even have to use my dehumidifier. The room is 100% dark now too. Even the small red lights on the space heaters.
Not going to feed anything other than foliars this week.
(Day 51) Blackberry #4 & #8 #9 and white widows #2 & #3 are all confirmed males. Chopped them down and recycled the soil. White widow #1 is the first official female and I’m starting to see pistils on the m39/zkittlez too.
Plants seem to be responding to the light fairly well. It’s hung 32 inches above the canopy which is as high as it can go without strapping it to the roof, which may have to happen one day. The plant can get within 6 inches of the light so I’m probably good. The ppfd output is 1800umols which is super high so I want to hang them as high as possible in veg. I wish I could rent a ppfd meter to see if I’m in range at 32”.
(Day 52) Blackberry breath #3 is the first official bbb female to show. I decided to scrap BCTG #2. It sounded like a good strain but after looking at pictures of people who have grown it online, it doesn’t look up to my standards. I found a very small patch of powdery mildew on one of the leaves so I’m not even going to start with that shit again. I’m really thinking about scrapping the m39/zkittlez and the white widow too. I’m praying that I get at least 4 females of BBB.
I tried super cropping for the first time today. A few of the branches I definitely squished a bit too much as they turned quite brown and looked dead within a day.
(Day 53) Despite the m39/zkittlez vigorous growth, I know it will be a shitty strain that will most likely herm as it’s from a bag seed of low grade weed. I’ve decided instead of scrapping it, I will use it for experimenting with a new chemical powdery mildew preventative. If it dies oh well. I doused it and chopped a limb off a few hours ago during lights on and it seems fine.
(Day 54) I’m about 90% sure BBB 6&7 are both female. #2 & #5 are looking like males but too early too tell. #1 is really tough to say. Just gotta be patient I guess. #3 has a great spread out structure, I hope it doesn’t stretch too much. The scrogging is a priority. I put up the scrog net just to see how it fits. It’s a little small around the edges but that’s fine. So it’s looking like out the 9, I would be lucky to get 4 fems if #1 & 7 would show forsure already. If #1 is a female I have my 4 and I can throw out the white widow. The white widow is just insurance at this point.
Super cropped plants have recovered nicely. Going to continue doing this more.
I’ve noticed that the plants that were put into my custom soil mix have very small fan leaves compared to the fabric pots of straight promix and dry amendments. Could also be the fabric pot is helping dry downs too.
(Day 56) I’m seeing some yellowing so I’m going to give a foliar spray just too keep some deficiencies at bay. All of the plants are stunted except the m39 and bbb#3. Node spacing has also reduced significantly. I can’t help but feel it’s from the intensity of my lights but maybe they just need a transplant into some new soil something. Luckily the stunt and droop is only really happening to what I suspect are male plants anyway.
Leaves are looking twisted and gnarled on #5. Going to move it into the veg tent for a while.
I’m going to mix up and amend my Destiny/coco blend today and transplant bbb#3 and 6 & 7 in a few days.
I mixed them up in contractor bags making sure to toss and turn vigorously.
Here is my blend:
2 bags 40L Destiny soil
2 bags 40L coco
700ml glacial rock dust
700ml oyster shell flour
700ml nature’s pride bloom
300ml basalt rock dust
150ml langbeinite
150ml nature’s pride veg
I am also going to try the Destiny top dress as it’s only 13 bucks a bag and full of good shit. I’m trying to not feed heavy in flower other than 2 or 3 top dresses and 2 teas and nothing after week 5. Because it’s taken so long for the plants to show sex, when I transplant into the 10 gallon pots, they should have more than enough nutrients too keep them going strong all the way through flower with just water. I’m a little skeptical about that though. Besides teas and dressings are fun. Everything should be broken down by week 8 or so.
Will transplant in a few days.


Processing
Likes
63
Share


@TheFairyBudMother
Follow
It’s so warm today! Of course I pulled all my plants out to spray with spinosad and feed/water.
*********
I use a Hudson 2L sprayer. My partner used to work in the film industry and they found this brand of sprayer gets the most thorough even coverage for makeup or whatever movie magic they use sprayers to create. It’s great.
*********
The larger gorilla glue has come around but I lost a few nodes. I’m seeing a little PMD, but I’ve been knocking it back when baking soda and water. I’ve been taking scalps, defoliating the big one gently and the little ones need almost daily lollipopping. I’m watching my ph and using more cal mag. I definitely feel like they are two different phenotypes.I have them on individual diets.
**********
Some fungal gnats come with the humidity so I topdressed with gnat nix. I don’t believe I overwater so I hope that’s the solution! I think I may wait another week or two and get things more stable before moving to flower. I will update video tomorrow when I have access to faster upload speeds.
**********
Added videos!
Likes
38
Share


@Tesla
Follow
Week 10 since switched to 12/12h. (it's in time if the first week of blooming is deducted.)
Trichomes're 80% cloudy. I didn't find any amber trichome yet. Pistils are 50% orange 50% white.
Today I started flushing the coco (a lot!). I really don't want any sign of fertilizer in my pot. So, from here no more food, only plain water.
Suggestions are always welcome!


Likes
3
Share


@Dmars
Follow
10/20 Day 86. Not really sure when to chop right now. I was hoping for a nice fade with some reds and purples but maybe it just won’t happen. Everything looks and smells great though.
10/24 Day 90. Finally getting some more leaf fade to go along with the trichs getting more cloudy. There’s still some clear trichomes in the mix so I’ll keep going a few more days, but at least I’m finally getting some signs she’s close.

Likes
4
Share

@LittleBigTrees
Follow
Feeding full strength apart from after dry periods.
After dry periods i feed at 33% but still maintain 20% run off.
I'm pulling fan leaves as they grow.

Likes
4
Share


@Facocero
Follow
È iniziata da poco la 4°settima, sembra stiano crescendo bene le piccole😍 in questi giorni mi sono dedicato a un po' di defogliazione e di giorno in giorno cerco di migliorare LST per favorire la penetrazione della luce.
Alzato il dimmer al 75% e ho allontanato un po' la lampada dalle piante e sembra stia o reagendo bene! Spero tanto di fare un buon lavoro! 💪 Ai prossimi aggiornamenti!
AGGIORNAMENTO: Sono passati 2 giorni dalle ultime foto pubblicate, si stanno infoltendo per bene le piccole😍 aspetterò ancora un altro po' per mandarle in fioritura,vorrei riuscire ad occupare più spazio superficiale possibile.
Sto alternando con le annaffiature fertilizzando moderatamente una volta si e una no.. per il momento sembra tutto ok!😎


Likes
11
Share


@D4I2N0
Follow
I have only one plant because the others were eaten by the slugs. And this plant was stunted for about 3weeks so she don't grow so well i harvested about 6 grams of dried nugs from her. The nugs are very frosty but small except from the top buds. The high is strong very potent, very sativa.

Likes
5
Share

@fadedgreentaurus
Follow
Strong week plants are bulking and showing signs of reveg, tops are all small popcorns these ladies should get huge and throw off a ton of tops.
Likes
38
Share


@Hempface86
Follow
Idk 🤷♂️ 🤷♂️ i've seen people with similar phenotypes, so I know it's not anything i've done.. Usually I am raving about Zamnesia Seeds but this grow was a real letdown. Especially because it's a contest grow, and I had put so much into it.. not very happy.The plant was ugly from the beginning.. deficiencies from the beginning.. and she's gotten the same treatment every plant I ever grow gets .. she produced a lot .. i just don't know how good it's going to be... Not a sugar leaf on the whole plant... No sweet smell .. i'm just glad this grow is over......... Okay, now that it's dried for a couple days. It's official, this grow was a complete waste of time.. I'm not gonna smoke one b off the entire plant. It's all going in the freezer for butter. It's absolutely trash.It's all larfie ruderalis 💩 .. no more autos

Likes
25
Share


@frostypaws
Follow
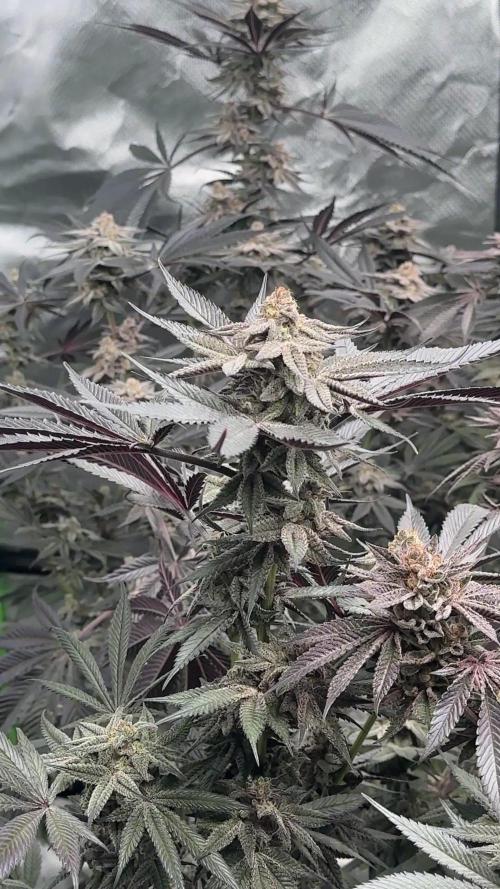
It looks so good the purple is so dark it’s black. Super frosty very pungent aroma. I’ll post the final weight in a few weeks.
**Jjust a quick update - dried weight after 21 days from the chop 410 g.
Not bad considering the light was only used for flower. Can’t wait to get a full cycle with this bad boy. **

Likes
8
Share

@Mannirumpel420
Follow
Der Unterschied ist wirklich groß und ich bin gespannt ob es Unterschiede im Zeitpunkt der Blüte geben wird.Der Stamm von der aus dem Zelt ist absolut robust und macht es schwierig die herunterzubinden,jedoch machte ich es dennoch da es für Automatics die beste Methode ist.
Likes
4
Share

@RBG
Follow
Date: 7/5/26
Week 16
Flower day 2
Going strong, little but of deficiency due to perm bluez ending early but just keeping her on a 1.6-1.9 feed and ween her down now, couple weeks left
Starting to produce purple flickers on her leaves, has a nice bright green/purple contrast and smells absolutely gassy cake batter atm, idk about bananas
Likes
16
Share


@DrShotzUK
Follow
So far so good,
Sugarlato seems like a healthy stable plant from green house seeds and so far it’s looking like one of the healthiest plants autoflower wise I’ve grown.
Hope during flower I see the same results

Likes
62
Share


@Reyden
Follow
Questa luce illumina che è una meraviglia 🤩 non potevo pensare che al 60% copre così bene e uniforme tutta questa superficie, ci sono ben 7 piante per questa volta e vedo che riesce a soddisfarle alla grande 😎🕸️✨🎶 andiamo avanti questa settimana dovrei allenare le tre ragazze di Seeds Mafia e poi la prossima mandiamo tutto a 12 ore piano piano e avanti tutta!!!
Grazie per essere passato e spero che ti piaccia il mio lavoro 😎✨🤞📸🌱🎶🌞💨


Likes
2
Share

@GasoGrow
Follow
Week 10, and the ladies can no longer support the weight of the buds. I’m just waiting for the trichomes to mature now, and then it’s harvest time.
