


Likes
Comments
Share


@PrairieFrostGrow
Follow
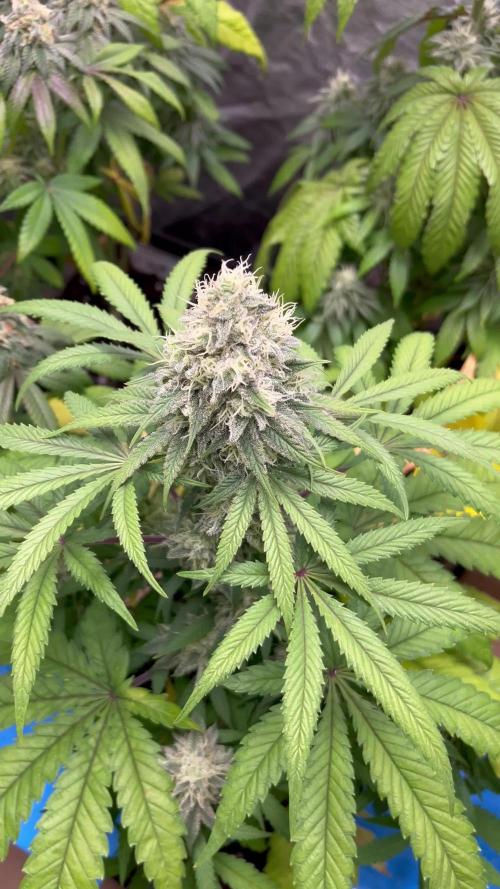
This little girl started her journey on April 4th with germination into a water glass and finished up on June 27/20 – Day 78 from germination. She was a fun grow and was very resilient through the whole run. She spent most of her grow time in a 20/4 light schedule. She formed nice frost levels and stayed to a very nice and manageable height of roughly 20” tall without topping or bending her main stem. She was not as fussy about nutrient levels and took them well. She does like her medium on the dryer side though. Small little auto bush of OG Kush crossed with Indica genes😃 She would make a nice a plant to run while you are vegging out some photos for 6 or 8 weeks as she is not very big in size but will swell up and yield decent weight👍
She was grown in a 3 gallon fabric pot with coco coir and maybe 15% perlite. She was fed salt based nutrients……..so sorry but they are flushed out and that is what I am more comfortable with. Focus on the early growth with microbes, fungi and kelp!! She was fed the normal pattern with pH being held around the 5.4 to 5.8 range in feeding. Then as flower approached, I gave the pots a more consistent look at the runoff numbers and she was running 7.8pH coming out of her!!!!! WTF. She stayed in her pot that she was planted in and fought this issue all through the rest of her grow.
The pH issues started surfacing around week 3….as we headed into flower of course. Scratching my head for weeks, I ultimately didn’t change anything other than really low pH feeding going in…….below 4 idea. For weeks she had 3.9 water going in and still getting 7.8 running off. I initially felt it was related to cheap fabric bags so I cut slits in the very bottom of the bags that stayed and tried transplanting other girls into plastic pots, which it can be fabric pot issues but I am not as convinced anymore for this run that there was an issue there, wasn’t sure about giving her Magnesium on top of Magnesium and therefore did I mess her up good on the inside early on in week 2 idea, out of options I changed back to RO water and that seems to have solved my issues……I was using tap water that was not filtered this run🤬 The pH was high so that was adjusted but with the ppm being at 185 to 200 range I chose not to buy a filter and just dechlorinated the water only. I was tired of lugging 5 gallon water bottles in and out of the basement😃 That is a difference from all other grows…..silly for not catching this by week 4! So…….back to lugging bottles in and out of the basement😂😂😂
She really started to take shape around weeks 7 and 8 and formed a beautiful little cannabis plant and grew to 20” tall and roughly 18” wide. Main focus with her was to just perform LST on side branches and let the top go…….I wanted to just let her go and see what would happen to her main cola for size and height……plus I don’t do that…….I always bend over the tops on my grows so this was a little different for myself.
She grew very nice leaves and a lot of them. This pheno had a lot of leaves to her and that is fine……its not really my first choice in characteristics of a plant though..…..so much more work at trim time……Green Poison XL Auto, SWS71, was a dream to trim👍 as a comparison!! She didn’t fox tail very much she firmed up her buds towards the end. The resin production was a little slower coming out in her but by week 7/8 she was getting pretty impressive😋😋😋 White and sticky!! She smelt of woods with citrus notes…..works for me👌
There were no issues at all retaliated to pests or bugs……I threw in a couple sticky traps but there weren’t any to catch. She handled the high humidity in this run great and there were no signs of any powdery mildew👍👍👍 She is a very stable strain from Sweet Seeds!
Day 63 was last feeding, flushed for almost two weeks. Rezin and Liquid Weight still given for one of the weeks but the last week was plane water. In hind-site I think I should have hit her with some Flawless Finish to help get that last bit out of her. She did feed on most of her nutrients but some of the lower leaves were still more green that I would have liked. She was cut down on day 77…..11 weeks is about what I suspect looking at her in week 7…….this was roughly 8 weeks flower time……makes sense😃
She grew for 75 days and then I decided what the heck…….she needs a hole in her stem to stress her out😃 I didn’t try breaking a branch but rather drilled a hold into the base of her stem……something new to try out. I think I will try more holes next time….max 3 I think……then I want to run a couple with cracking their stems and see if there is a difference👍 I feel more in control of a drill and its accuracy vs bending branches and they snap where they want to…….anyway it was worth a try!!!! Worst case, it made it easy to hang her as a whole plant to dry😃
This girl battled pH issues all her life and as a result the buds were not where I would have liked them. There were not fluffy…..but here were not as hard as I would like for rolling joints, so the whole girl went to concentrates She dried for 7 day as a whole plant, 2 days more in smaller branches, then 1 day curing in jars before dry ice sift. She yielded 74g of dry cured buds, 2.65 ounces. Not bad…..I don’t think her buds would have gotten a lot bigger but they certainly would have had more weight if they firmed up…..grower issue, not genetics.
So…..lets make some rosin from this girl🤩 The yields on this and making her hash a perfect colour are not what this process is about…..let’s get that out of the way right away……this is about another way to enjoy and consume my cannabis for my own relaxation and medicinal needs. Taking pictures of rosin is always a challenge…..it is always dark in the pictures unless you are using a nice DSLR to let more light in.
Rather than making bubble hash with water, I just used the bags to make a dry ice kief from the buds. Unfortunately I couldn’t get a block of dry ice and had to use these cubes…….don’t like these as much because there are too many surfaces beating your green plant material and your kief goes green before long when shaking. Could have done it with out ice all together…..nicer hash but lots left on the plant afterwards that way so yield is low. Used two bags in this extraction, the 220 as the bag for edibles and the 120 as the bag for pressing rosin to smoke…..dry ice hash rosin!! The yield on this from the 74g of bud was 22.4g kief. 220 bag was 12.6g and the 120 bag was 9.8g. Not great I guess but I didn’t want to keep going for 4 and 5 minutes with the bags…..these were roughly 2 minutes with the 220 being 3 minutes on the high side. You can certainly see that the 120 product is more golden in colour than the 220 but since I didn’t crazy, the 220 is still a very nice colour.
Last step on this journey was then to take the kief and make our rosin. I pressed product using 37um bags with the temp set at 160 degrees. All were done the same for the most part……roughly 4 gram presses, the same temperature, and the time. The first presses were 90 to 120 seconds. If a second press was done on the pouch, then it was at the same temp but for only 40 to 50 seconds. The yield on this was just shy of 7 grams…….6.77g…..roughly 30% yield from Kief???,…..roughly 9.2% from flower???…….would have likely done better right from flower😂 😂 😂 it was fun, regardless of the yield😃 Tasty rosin!!!! Can’t beat rosin for getting the true tastes of the plants. These numbers are absolutely due to my abilities with extraction.......sure don’t judge the genetics based on my returns......she is a frosty plant and will give great returns!!!👍👍 Several pictures show that, I hope!!
So that will wrap up this diary for Sweet Seeds Killer Kush Auto, SWS56. Certainly give this girl some consideration if you like OG Kush and also have space concerns in your grow. She is beautiful frosty little girl with a punch. Certainly get the usual woody and citrus notes from her rosin and she has a lasting high. She helps to get get you going and willing to finally start cleaning that corner of the room you have been avoiding…….watch out though…..distractions😃……next thing you know 40 minutes go by and you are staring at a box of DVD’s wondering what happened to CD’s…….cassette tapes (the art of the “mix tape”), 8 tracks, vinyl……ALBUM COVER ART Baby!!!!!! Then its either back for another rip, or get your crap done because the next rip leads into even less work getting done😃😃
Great job as usual @Sweet_Seeds !!! Looking forward to the next one……Cream 47 photoperiod……actually, already done germination and a new diary coming👍👍…..compare a 3 gal pot to a 5 gal pot, or a fabric vs air pot, and see what my yield differences are??
Thanks for the read and greatly appreciate the comments Growmies!!!!! Love spending time on a forum for growers to help fellow growers. Much grower love and thanks again for your time, opinions, and suggestions🙏🙏🙏
Cheers!!

Likes
15
Share

@eldruida_lamota
Follow
Que pasa familia, vamos con la sexta semana de floración de estas Gomu Gomu Mango feminizadas de HighBreed.
Vamos al lío ,se colocaron en macetas de 7 litros definitivamente.
El ph se controla en 6.0 , la temperatura la tenemos entre 24/20 grados y la humedad ronda el 50%.
El ciclo de Floración puse 12 horas de luz, el foco está al 100% de potencia.
De momento va creciendo, tiene buen color, van progresando y engordando guay
Comentar que superaron el estrés hídrico porque subí par de grados por la noche y va volvió a comer normal .
Gracias a Agrobeta por el kit para la temporada, unos jefes, siempre apoyando 💪.
- os dejo por aquí un CÓDIGO: Eldruida
Descuento para la tienda de MARS HYDRO.
https://www.mars-hydro.com
Hasta aquí todo, Buenos humos 💨💨💨
Likes
4
Share


@Nick1970
Follow
All looking very happy.
Slight nutrient burn to the tips.
Reduction in Bio Flores feed from 20 mls per 5 litres dechlorinated tap water. To 13 mls per 5 litres of the water. Also 20 mls of Bio Boost to the feed mix.

Likes
4
Share


@Zywap
Follow
Brewed a Tea for the ladies and there loving it, just transplanted the rest that weren’t into 3gal pots. they’ve all bounced back. Deciding on not using any synthetic nutes an just keep using the tea an maybe some other organic things. But the rest are bag seeds reason i’m not posting them lol but a little bigger then the crown royals tho i did start those about a day or two after


Likes
39
Share


@BigDaddyK
Follow
FLushing, may do 2 weeks.. smell is so gooooood !!!!!!!!!!!!!!!!!!!!!!!!!!

Likes
41
Share


@Mastr
Follow
Honestly guys she is amazing but bit slow flowering like northern light
Shame I have to cut 3 main cola top coz to close to light and she couldn't photosensitive and that's cause slow flowering so I decide to cut 20cm from 3 main cola 😢😢hope that work
Well I figure out why she won't flowering coz she too big for 6L pot thats why so I transplant bigger plant into 25L fabric pot and next day she start developing bud so happy 😊
Day 56 and finally preflowering is finish 🙌
Likes
3
Share


@Unculti_responsable
Follow
Esta semana la dejamos más tranquila a la Jack solo le hicimos un trasplante a 5 litros quedo bien , la dejamos recuperar unos días y después le hacemos las últimas podas y ya va a estar lista para florecer

Likes
293
Share


@Ju_Bps
Follow
Hello growmies 👩🌾👨🌾🌲🌲,
Let's go for one more try PS5 contest from @Fast_Buds 🔥
The seeds come from a win of Diary of the month, didn't remember wich 🤔.
Thanks to @marshydrococo2 and Mars Hydro Lighting for the FC 3000 and 6 inch fan kit 🔥🔥💕💕.
Day 0
I've put the seed in paper towel.
Paper towel + water + seedbooster 7 drop for 1l.
Day 01
Seed popped in 24h, 3/3, fast for seed stored since several months.
I'll keep only the 2 best seeds, the third will go to friend home
Day 02
Put seeds in plug
Day 03
#1 and #2 come out of soil
Day 04
#1 and #2 Leaves opened
Day 05
Looking good, keeping wet soil
Day 06
Looking good, keeping wet soil
Day 07
Looking good, keeping wet soil
Seeding box
Temperature around 26*C
7w led 24/24
Humidity 85-90%
💦 I vaporise the plug with water + roots
PH @6
I'll prepare soil and put in 1 liter pot and under light the next week .
Wish me good luck 🤞🤞
Have a good week and see you next week 👋
Thanks community for follow, likes, comments, always a pleasure 👩🌾👨🌾❤️🌲
Mars Hydro - Smart FC3000 300W Samsung LM301B LED Grow Light💡💡
https://www.mars-hydro.com/fc-3000-samsung-lm301b-led-grow-light
Mars Hydro - 6 Inch Inline Fan And Carbon Filter Combo With Thermostat Controller 💨💨
https://www.mars-hydro.com/6-inch-inline-duct-fan-and-carbon-filter-combo-with-thermostat-controller
Fast Buds - Gorilla Cookies FF🌲🌲
https://2fast4buds.com/us/seeds/gorilla-cookies-fast-flowering


Likes
3
Share


@Canadian_Bud
Follow
This one is now finally in it's new home. Homemade Aeroponic System after 11 weeks of low T5 bulb action This is an interesting strain as the last harvest was small and not what i had expected. Hoping this new system might bring up the numbers mind you the weed is a very nice smoke with very hard buds.😎


Likes
7
Share


@El_Bottanico
Follow
Week 8
Here came fall.
End of last week plant seemed hungry, the fade wasn't progressing as supposed so I gave her two nutes round with only water round in between them.
I used bottled feeding: biobizz biobloom + top max (2ml each per liter), ghe ripen (2ml per liter), solved micronutrients and calmag (not mixed, one time one the next the other, 1-0,5 ml per lt).
Solution EC was about 1,4, starting with 0,3 tap water.
She reacted well to the feeding in my opinion. now the fade is progressing more naturally.
I did observe that the plant under the less powerful COBS in the same tent are doing better then the ones under the sp250 wich has a higher par output, so I raised the light to 45-50cm from canopy. This had a positive effect on the plants imho. I'll stay a little bit further from the beginning in my next grow.
I took a sample under the microscope to take some tricho pictures, they look beautifully clouded but the buds still has to ripen some 50% more. Based on that I think we are arriving to an end in 10-15 days max.
Happy bottanic guys
Likes
18
Share


@Budhunter
Follow
Week 7 started, plants are going well, biscotti mints 1 looks a bit behind of biscotti mints 2.. I flushed both plants, one in the beginning of the week 7 and number 2 after it dried out from last watering yesterday..
breeder says plants will be ready in 8-9 weeks so now only water and watch the trichomes to harvest in the best time 🙌🏼

Likes
43
Share


@TheCannaProphet
Follow
~ GG4 SHERBET FAST FLOWER by FastBuds ~
Well fam, here we go again with another epic strain from FastBuds Fast Flowering stable. After having such tremendous success growing their Gorilla Cookies Fast Flower outdoors last year, I've decided to run another of their fast flowering strains outdoors this year... GG4 Sherbet Fast Flower!
The best description of this awesome cultivar comes directly from my friends at FastBuds which is as follows:
"Bred from extremely potent and flavorful Gorilla Glue and Orange Sherbet genetics, GG4 Sherbet FF (Fast-Flowering) takes all the best traits to the next level, offering a high-yielding strain that can produce up to 600 g/m2 in a 7-week flowering time. This super resilient Indica-leaning hybrid thrives indoors and outdoors, and in all types of climates while producing mouth-watering sweet, fruity, spicy and earthy terps that translate into a delicious sugary hazelnut aroma. Expect an extremely relaxing and overall happy effect that’ll leave you with a huge smile from ear to ear. It’s the perfect strain for growers of all levels of experience seeking low-maintenance yet highly productive photoperiod varieties that deliver quality and quantity without extra effort.
GG4 Sherbet FF grows chunky buds with long dark orange hairs and spade-shaped calyxes that get encrusted with trichomes by harvest time, giving them a gorgeous silvery-white appearance. This medium-sized photoperiod can reach up to 200 cm in height and yields up to 650 g/m2 while developing that typical hybrid structure. GG4 Sherbet FF grows with a stocky, bushy appearance, developing one sturdy main cola and fat side branches that support huge yields without much effort. This super-fast variety produces distinctive light-green buds with a high bud-to-leaf ratio, making your trimming sessions a breeze. It’s a top-notch resin producer that doesn’t need much maintenance and will thrive in almost every climate, rewarding growers of all levels with extremely flavorful resin that makes for outstanding hash end extracts."
________________________________________________________________________________________________________________________________________________________________________________________________________________________________________________________________________________________________________________________
The Setup:
This is going to be an outdoor grow, but I have started the GG4 Sherbet Fast Flower indoors as our weather is still too cold to put her outside (nighttime temp's dipping regularly into the 30's℉).
The plan is simple... let her grow inside under a 19/5 light schedule until the nighttime temperatures stay above the mid 40's℉, at which point she'll be moved outside and transplanted into the soil which I have already setup and inoculated with beneficial microbes, and then let the fun begin!🤪💚
________________________________________________________________________________________________________________________________________________________________________________________________________________________________________________________________________________________________________________________
Weekly Updates:
4/18- Here we go into Week Three for the FastBuds GG4 Sherbet Fast Flower. She's fully acclimated to her outdoor location now and all I'm waiting for is the weather to warm up!
4/20- 🍃HAPPY 420 FAM!🍃
4/22- The GG4 Sherbet FF continues to do well with good color and vigor, considering the cooler weather we're having right now, adding another set of leaves.
4/24- I gave her a good watering today and am getting ready to get some straw to spread over her soil mound to help keep the soil moist and reduce watering frequency.
There's another week for the little GG4 Sherbet FF. I'm really anticipating seeing her take off once our weather gets a bit warmer! Hope to see you next week... 😎


Likes
6
Share


@Deniguez
Follow
Stretch regolare ed omogeneo per tutte le bimbe! Ad oggi mi ritengo soddisfatto di queste genetiche!
Continuiamo e vediamo come procede
Stay fuc*ing tuned

Likes
127
Share


@DreamIT
Follow
🎃👹👽MONSTERCROPPING RED MANDARINE 👽👹🎃
____________________________________________________________________________________________
💀 12.2 everything is OK. tomorrow I try a new macro lens to photograph purple trichomes 😍
💀 13.2 ...
💀 14.2 Happy Valentine's Day
💀 15.2 ...
💀 16.2 Ready the carnival photos ... which is your favorite? 😁🦄
💀 17.2
💀 18.2 Red Mandarine bonsai shaped in the shape of a heart, with a ring in the center. Created to celebrate 3 years with my current partner, if you read, hello I love you <3
____________________________________________________________________________________________
📜👀 A look at the details of what I'm growing 👀📜
🍊💚 Red Mandarine F1 🍊💚 by 🌱🍭 Sweet Seeds 🍭🌱
📋 Details
⚧ Gender
▪️ Feminised
➰ Genes
▪️ 55% Indica / 45% Sativa
🎄 Genetics
▪️ Red Poison Auto (SWS39) хCalifornia Orange x Skunk hybrid)
🚜Harvest
▪️ 400 - 500 g / m²
🌷Flowering
▪️ 49 - 63 days
✨THC
▪️ 16%
✅CBD
▪️ 0,2%
🏡Room Type
▪️ Indoor
🌄Room Type
▪️ Outdoor
🕋Room Type
▪️ N/D
🎂Release Year
▪️ 2019
__________________________________________________________________________
👀📷🥇 Follow the best photos on Instagram 🥇📷👀
https://www.instagram.com/dreamit420/
🔻🔻🔻Leave a comment with your opinions if you pass by here🔻🔻🔻
🤟🤗💚Thanks and Enjoy growth 💚🤗🤟
Likes
10
Share


@Love_Cultivator
Follow
Sooo!
Now i started the mainlining... what a bad feeling it was chopping her down! :(
But i guess its a bad for a good (you get the idea of the expression..)
So I will clone the little side branches from the top apex to get some more babies, but i won't be very much focusing on them since the girls i want to show for the contest, are the two mother plants.
I did a small video, hope its gonna be viewable.
Sorry for the pics taken under the grow light...
The plant that i topped and bent, got some light leave changes, if anyone is commun with those symptomes plz leave a comment to teach me right :)
Keep the growing going!
Dearest L_C.