
Likes
Comments
Share


@Smokin_Joe
Follow
Day 92: Moved the lights to a different hanging formation to get a few more inches up, was at 16" distance in most areas. I probably only have one more trick up my sleeve to get another inch or two if I need it.
Video to give a full view.
Day 93: Fed with 1Gal of purified water, 6.65 Ph.
Day 94: Seems to be filling out, both leaves yet again, and buds now too.
Day 95: Power outage yesterday about 3hrs before typical lights out. Battery backup to the timer function in the power strip is probably dead or jostled out of place. It wasn't notice until it had been off for 90 mins, so we choose to leave the light off for the rest of the day as I didn't want to stress anything out by having the lights off for 90m on for 90m and then off again for 12h.
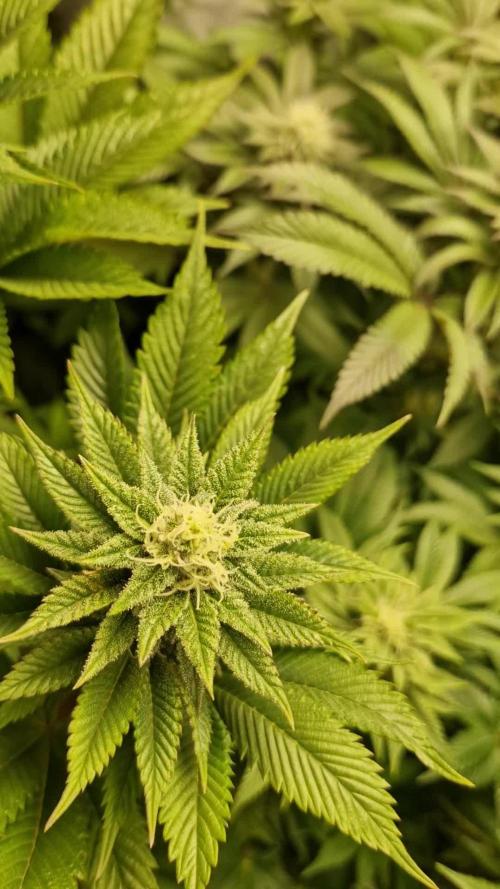
Day 96: Well I certainly understand the fruity smell growers referenced. Shout out to RockyRidger for the heads up - the smell is pervasive in the room even with the carbon filter in the tent. Wonderfully fruity and less musky, a bit diesel or citrus if you really get in there. I did another short round of defoliation, much less and more cautious than before. She has little crystals everywhere (better seen in white light tomorrow) near the buds and pistils. I can't seem to get the stickiness off my hands now and I've washed them three times with degreasing soap! Pics in the red spec as I kept just red on for 5 mins longer than normal as I finished up and fed her and wanted to get at least a pic or two in for today.
Fed with 1Gal purified water. 2tsp FFBB, 1tsp FFGB, 1.5tsp FFTB, 2ml AN B-52. 6.71pH / 825ppm in, 6.52pH / 1200 ppm out.
Day 97: Better shots of some of the glitter we've got going on.
Day 98: 🎶 ooo, that smell 🎶 (Day 28 Flowering)

Likes
41
Share


@AlphaNoob
Follow
All came through on the same day. Just waiting for the Barney’s Farm Runtz Muffin, hopefully will sprout soon!
Runtz Muffin came through 2 days after the rest


Likes
36
Share


@OGTrauma
Follow
i fucked it up, Yet still i had a chance of redemption as i got 4-6 weeks of flowering, yet to finish. Self Sabotage Is my passion but this one was unintentional as flowering was going bomb i thought they could require More nutrents as well. This one was a classical P K self inflicted shot in the cock. The small dots i interpreted as bug bites we're really p&k excess advising that i needed to shut my dick & stop snorting power point presentations.
AND i didn't consider that Barrier alas i can use only on soil not spray was a heavy punch on my already fucked nutrient schema & plague support so used it a Lot too!.
Thought AND Prayers on these beloved ones. As these lil green angels clings to life 420 homies!

Likes
15
Share


@902EastCoast
Follow
This strain was easy to grow right from seed. I think it will be one of my favourite strains this grow. Time to dry and cure. I will report the weight when dry. 💚✌️🏼


Likes
15
Share


@SweetheartOG
Follow
Girls doing well but have run into some calcium deficiency which will hopefully be fixed soon.
Likes
28
Share


@SooSan
Follow
Arrosage
Installation du grillage
Palissage
Lancement du système Autopot Easy2go
Dans l'ordre :
Blueberry
Dutch Passion
Blueberry
00 Seed
Blueberry
PEV Seed
Blueberry
Bulk Seed
Animal Cookies x Blue Monkey
Exotic Seed
Red Hot Cookies
Sweet Seed
DoSiDos x Purple Punch
PEV Seed
Purple Shot
Exotic Seed


Likes
25
Share


@Luna91
Follow
Hey There!
Nothing much to say,GOD I can’t wait to taste them!!!! Smell of pineapple is all over my room!! Look at the Digital Microscope!! I know I have at least two more weeks to go!! But simply cant wait🤣 this is my first grow! I studied a lot to make these autoflowers sth worth my time!
Likes
10
Share


@Thibaut
Follow
they did okay rough weather this week.
i made a little greenhouse for them good humidity if the sun in on it.
only gave them once ph water.
both strains grow equally atm
only this time i dont know about the feeding , someone recomend auto feeding? i have biobizz products and guano ,
keep growing ✌️


Likes
16
Share

@Naujas
Follow
112 days!!!! This week was very difficult for the girl, because it rained a lot, but from today the weather forecast promises only good weather, I hope it will be so, next Saturday, I'm going on a long vacation, the girl will be without me for 3 weeks, so I won't be able to hide her from bad weather, I will leave the automatic watering which I will control via wifi, once a week I will ask a person to come to water with nutrients and take photos, :) so there will be weekly updates, but with fewer photos:) good luck to everyone :)
Processing
Likes
32
Share


@www_dot_allgrownup_dot_co
Follow
Hello from New Zealand
10 days cloning, about to transplant into 8x ebb and flow bucket system.
System designed and built myself. Proven to deliver 8-12 week results.
System can be purchased from me (website under construction) via parts or a kit in a range of options. We will ship worldwide. It is fully automated and controlled from a single control box including lighting,fan control. Can be customised to run off 110v, 240v, 12v or 24v

Likes
12
Share

@farah4weed
Follow
Hello guys😍😍
We have reached the 5th week of flowering.
The plants are almost done with their longitudinal growth and most of the plant is focused on buds.
I used overdrive fertilizer this week.
The smell of the buds has increased a lot.
And the buds have a stronger smell than the mother (cakes n cream) and give off a stronger OG smell😍
Because I increased the temperature difference between night and day, the color of the buds started to change.
Thanks for commenting🙏
"farah4weed"


Likes
9
Share

@Growingdadel
Follow
Der greenhouse dünger ist sehr gut bisher. Keine Mängel zu sehen. Zusätzlich gibt's noch etwas phosphor plus (Hesi) und calmag (biobizz).


Likes
8
Share


@OG_NordGrow
Follow
So Leute nach dem toppen wuchsen 3/4 normal weiter eine wirkt leicht geschockt. Wächst aber langsam weiter. Die Paya Cookies ist immer noch leicht blass. Denke das die eine gefräßige ist , versuche sie mit einer sonder Behandlung zu boosten mal schauen wie sie reagiert
Likes
19
Share


@RFarm21
Follow
28 Janeiro- Harvest day!! Atualização em breve.
Esta strain demorou 114 dias, mais ao menos.

Likes
4
Share


@Radagast_
Follow
11.07.
Rainbow Sherbet 1# Day 77#
Rainbow Sherbet 2#Day 75#
On rs2#, during the storms, one branch at the very bottom broke, it grew like this, I didn't want to tighten it, it will probably break already during the next storms, but nothing serious.
Today is the end of the eleventh week for the plants.
There were storms all week and with the fact that they spent almost the whole week under stress (they were also under heat stress a couple of days before), I am certainly satisfied with the progress.
On Tuesday, they were watered for the last time, with clean water, then it rained, and the next day it rained all day, since then they have not been watered, as soon as the soil dries I will feed them.
Below in the table is the food that they received last time, but it is included in this week, and I introduced that as well.
Stay High and Keep Growing!!!
Likes
45
Share


@masterofsmeagol
Follow
7/3 Hot as fuck today. Japanese beetles were around. I killed a few. I'm going to have to go over and keep an eye on things. It reached 90° today for the majority of the day. I watered around 1pm as I noticed most of the bags were very light. I'm glad I held off on the BT. I've dealt with jpn beetles before so hopfully that won't be an issue. Things are getting big. It won't let me upload any pictures or the video I did. I may upload it to past week. Went back over at night and and plants looked dropy but it was after 7pm and they were just going to sleep.
7/4 Didn't take photos this morning. Found some jpn beetles. That's the damage I've been seeing. I went back over last night to hunt them but I only got two. There weren't any others. No biggie. I'll put some pics up from today after I get back
7/5 Didn't get a chance to check the plants out today. My intuition tingled around 1pm and I had just gotten home and I ran over to check them. They displayed minor signs of heat stress as seen in the pics (due to the super high humidity and 90° weather) and the bags were light. A few were REALLY light. I could see they needed water. I WATERED 4 1/2 GALLONS TO THE GARDEN. DO TO THE HIGH TENPS AND WINDS IVE HAD TO WATER THE LAST THREE DAYS IN A ROW. IVE SLOWLY STRARTED INCREASING VOLUME. I don't want to water until I get a shit ton of run off because I want to keep the nutes in my soil as long as possible. As you can see things are going great. Minor pests but notjing major. They're growing at a very rapid pace. I'll need to add another layer of supports soon and begin to LST some of these girls. I've got one seedling in a 10 gal and I'm pretty sure it's a feminized red runtz but it's in preflower and looks and SHOULD be a female but I haven't seen the white hair yet. Looks like a female preflower though. I do have one auto though in a 5 gallon tjats doing good too. I have a bunch of pics but the internet is too slow. I'll upload tomorrow. Started pouring around 6.
7/6 Poured sheet rain all night. After it had Bern super fucking hot and I watered my plants with 4 1/2 gallons. Oh well. If I didn't water we wouldn't have gotten the rain. The fabric bags makes watering easier. The wind will dry out the medium. We do have some rain in the forecast. A pallet fell over and knocked my 5 gal bucket with tje auto into a 10 gal seedling but it held the pallet up and didn't damage anything. Out of all the ways it coyldve landed it landed just right to not hurt anything. Everything is super healthy. I do have some random pest damage but it's minimal. I'll decide whether to use a spray or not. Didn't take pictures this morning. Was pressed for time.
7/7 Super hot even at 8a.m. Rained the majority of the day yesterday. Plants are getting HUGE. I'm going to have to build a second round of supports and should probably start some LSTing. They seem to like growing natural how they are (besides the original topping and FIMed. You can tell these are ALL very high % indicas. I'm seeing pistols spitting out everywhere. Event horizon and sherb cake seem to be in the lead. The seedlings have realky taken off. The one I put in the 50 has fan leaves the size of my hands.
7/8 Wow it has been extremely hot. It's going to be in the 90's again today. Checked my plants and it seems the GMOs seem to be using more water. Those bags were a little lighter. Seeing how there is no rain in for a few days I had to water. WATERED 3 1/2 GALLONS. LAST SEEDLING FINALLY SHOWED AS A FEMALE.
7/9 Bags are still heavy. Found ONE jpn beetle this morning. Plants seem to be bigger everytime I look.starying the stretch and spitting out some pistols. I took some pics of the pistles. I'll update
7/10 should've started a new week but I didn't. I'll make next week six days. Plants are starting ro stretch. Minor random pest damage but woth the heat they need lots of water. Noticed a couple dead interior leaves so I should probably go through everything and defoliate. I need to add another layer of supports as well.


Likes
9
Share


@SubliminalSociety
Follow
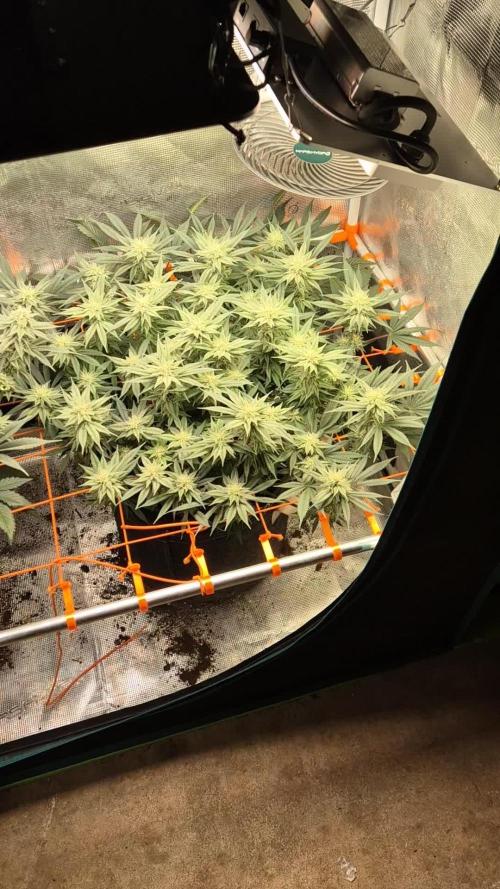
Week 9: Blueberry Auto's Packing on the Thiccness!
Yo growmies! Just swung by the garden, and let me tell you, my jaw hit the floor faster than a dropped joint! The Blueberry Auto said "sayonara" to stretching and is now channeling all her energy into thicc bud formation! YES!
Look at that main cola - it's practically bursting with juicy flowers! I also snagged a trippy video to show you this frosty lady in all her glory.
And the smell, oh man, the smell! It's getting intense like a skunk who just discovered high-end perfume. Hahaha!
We're getting closer to harvest. I can feel (and smell) it. How long will she keep on packin' the weight?
Stay tuned, growmies. High fives all around!
Likes
4
Share


@Drtomb
Follow
I'm 4 days into flower.
Topped all the plants nice and even. Then removed all bud sites below the top 4 on each branch. Leaving fan leaves intact. I allowed them to recover for 2 days. Then flipped the lights.
Blue Gelato 41 has filled in 2/3 of the tent well. Big leaves are forming and they continue to reach.