
Likes
Comments
Share


@TheSyndicate
Follow
Flushing one plant. The other plant i might start flushing next week.
Cleaned up the late flowered plant. Defoliated a few leaves.

Likes
18
Share

@eldruida_lamota
Follow
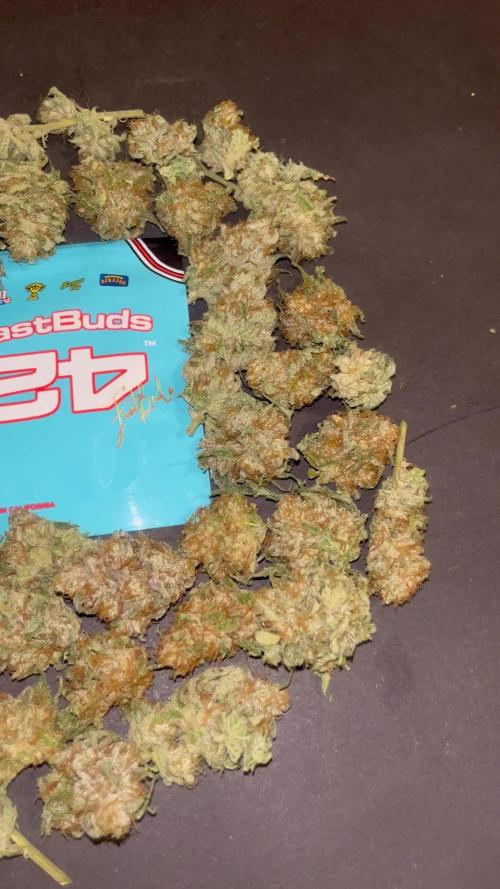
Que pasa familia, vamos con la cosecha de estas Purple Lemonade Fast Flowering, de FastBuds.
Por dónde empezar, las flores son poco compactas y van repletas de resina, tienen tonos por dentro muy bonitos, y tiene un aromas dulces y afrutados.
Es muy sencilla de cultivar, es de ciclo corto medio aunque también si le dais una semana más no pasa nada agradecer se agradece al final.
Mars hydro:
Code discount: EL420
https://www.mars-hydro.com/
Agrobeta:
https://www.agrobeta.com/agrobetatiendaonline/36-abonos-canamo
Hasta aquí todo, Buenos humos 💨💨💨

Likes
18
Share


@GanjaGecko
Follow
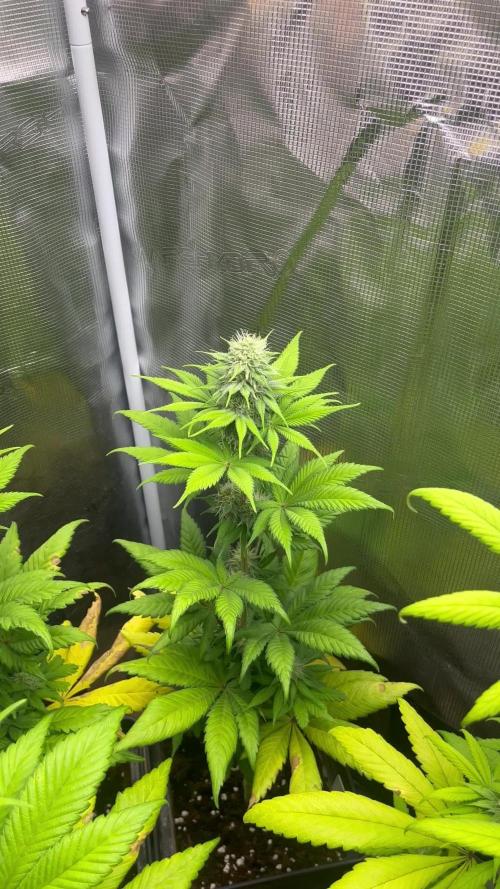
Woche 3
Die Ladys haben einen ordentlichen Schub gemacht. An Tag 20 sind an den Nodien die ersten Calyxen und ihre Stempel zu erkennen.
Deshalb wurde an Tag 20 der letzten Liter Substrat in die Töpfe gegeben. Als Blütedünger wurde jeweils 30g BioBloom von GreenHouseFeeding untergemischt. Als Bodenverbesserung gab es 12 Teelöffel Megaworm und als Blütebooster wurden 2 gehäufte Teelöffel BatGuano von Plagron mit eingemischt.
______________________________
Düngen/Gießen
Tag 18 gab es jeweils 500ml Wasser. Ph-Wert 6.0.
Tag 20 gab es jeweils 800ml. Ph-Wert 6.2
Höhe
#1 28cm
#2 26cm
Zu meinem bedauern hat leider ein Growdiaries-bug Woche2 gefressen.
Likes
20
Share


@adam_pawloski87
Follow
We are in Flush !! Was giving them GH Flora series + rapid start + cal mag
Likes
46
Share


Likes
9
Share


@Lifesgarden420
Follow
Another beautiful lady chopped and drying with that whole plant hang really looking forward to these but they are so Frosty and so dense thank you for these amazing genetic and this amazing contest you guys really know how to bring the world together thank you again 💚👑👊🏼😎💨🏼


Processing
Likes
2
Share


@Cogollo_eu
Follow
**Encontrarás la traducción a español al final de la descripción**
From/Desde: 23/09/19 || To/Hasta: 29/09/19
From day/Desde día: 22 || To day/Hasta día: 28
BlueBerry Cookies Diary / Diario de las BlueBerry Cookies:
https://growdiaries.com/diaries/38769-dinafem-039-s-blueberry-cookies-at-the-ocean
If you like this week, please hit a like, it costs you nothing! 👊. Thanks in advance 😉!
-----IMAGES & VIDEOS-----
I'm so sorry about the quantity of contents for this week and the following ones, as I've been telling I was under hard work pressure, and this week and the next one where the worst of them. In fact this week has some more images, but I decided to move them to next week or otherways next week is empty of contents.
V1: Timelapse week video that covers 4 days. At about sec 25 I performed the topping on the babies, as I told before abobe 5th node, and one of them abobe the 6th.
V2: This night I tried to make some videos of all the Cookies, but suddenly at 2:00 a.m my telephone ringed, I had to end up with the session, not a single BlueBerry capture and start to work 😲💻 (Server migration stuff... Damn unexpected boss calls!!)
P1: BlueBerry Cookies Left <--•--> Ocean Grown Cookies Right
-----WEEK SUMMARY-----
This week the growing was georgeous, the Ocean Growns have almost doubled in size, the went from 15 to 29 cm even topping them. I'm loving the branch distribution os this plants is very beautiful. The leaves of this Strain are specially Beauty
-----WATERING CALENDAR-----
28/09/19 DAY 27 - 1 l with all week nutrients @ (1.2 EC | PH 6.2 | 25.1ºc)
*****ESPAÑOL*****
Por favor, si te gusta esta semana dale un like, no te cuesta nada 👊. ¡Gracias por adelantado 😉!
-----IMÁGENES & VÍDEOS-----
Siento mucho la carencia de contenidos de esta semana y las que vienen, como he estado comentando he estado bajo muchísima presión de trabajo y esta semana y la siguiente han sido las peores de todas. De hecho esta semana tenía alguna imágenes más, pero he decidido pasarlas a la que viene, si no la semana que viene estaría sin contenidos.
V1: Un video Timelapse de 4 días. En el segundo 25 les realizo la poda apical a las pequeñas.
V2: Esta noche intenté hacer algunos vídeos de todas las Cookies, pero en mitad de la sesión, a las 2:00 a.m llamada del jefe, y a terminar la sesión sin una sola foto de las blueberries y aponerme a currar 😲💻 (Migración de servidores... Maldigo las llamadas inesperadas de los jefes!!)
P1: Ocean Grown Cookies Dere <--•--> BlueBerry Cookies Izqui
-----SUMARIO SEMANAL-----
El crecimiento de esta semana ha sido brutal, las Ocean Grown casi han doblado su tamaño, han pasado de los 15 a los 29 y eso que les he realizado la poda apical.
-----CALENDARIO DE RIEGO-----
28/09/19 DAY 27 - 1 l con todos los nutrientes semanales @ (1,2 EC | PH 6,2 | 25,1ºc)

Likes
4
Share
@eldruida_lamota
Follow
Que pasa familia, vamos con la cuarta semana de floración de estas Kiwi x Papaya feminizadas de Mavericks .
Vamos al lío ,se trasplantaron en macetas de 7 litros definitivamente.
El ph se controla en 6.0 , la temperatura la tenemos entre 24/20 grados y la humedad ronda el 50%.
El ciclo de crecimiento puse 12h de luz, el foco está al 80% de potencia.
De momento van creciendo a buen ritmo y tienen un buen color.
La flor está cogiendo forma y ya empezó a tricomar.
Gracias a Agrobeta de nuevo por el kit para esta temporada, unos grandes 🙌.
- os dejo por aquí un CÓDIGO: Eldruida
Descuento para la tienda de MARS HYDRO.
https://www.mars-hydro.com
Hasta aquí todo, Buenos humos 💨💨💨

Likes
20
Share


@LaGrassaFarm
Follow
Buena semana tengáis. Por aquí están las pequeñas cada vez mas grandes. Bastante contento en general con su crecimiento diario. En esta semana le he añadido a la solución de riego, CalMag, es un aditivo de calcio y magnesio, que en mi caso que riego con agua de osmosis, le aporta calcio y magnesio a la planta. Y esta vez le aporté el Vitalize por riego foliar, potenciando así su efecto. También he añadido otro foco al espacio de cultivo, para que tengamos las misma luz por todo el espacio disponible. En este caso de trata de un Nagasaki de 240W. Que ahora mismo lo tengo puesto al 50% de su potencia. Por aquí os dejamos hasta dentro de otra semana, un saludo y muchas gracias por todo el apoyo.

Likes
42
Share


@Dr_Boom
Follow
She's a real beast. I started the flush this week by removing all nutrients from her watering. I just overwater her a little, and remove the access. Going forward, I will continue just giving her a good diet of plain water to remove some of the salts from the soil. She's a little too big to take outside to really flush her. I'm sure this will work out fine. I had to continue tying up some of her branches to keep them from falling over. She's looking good.
Likes
18
Share


@Chubbs
Follow
420Fastbuds
GelatoAuto
Week 5
What up grow fam. Hopefully everyone had a great 420. These 3 beautiful ladies are growing amazing. Started there transition into flower this past week. So where starting to get some great growth and all in all the plants look super healthy. Happy Growing
Likes
42
Share


@Ukfarmer420
Follow
Hi guys entering week 7 veg on the scrog grow of strawberry chemdawg og and blackberry moonrocks under the marshydro sp3000.
There very small considering there on week 7 🤔 but now i realised that my light has been on 25% 🤣🤣🤣 now its on 50% until nov 1st when I flip it.


Likes
8
Share


@peterfly98
Follow
Day 21: the next watering will be with the full fert cycle starting week 4. Plants are bouncing back from lst.
Day 23: leaf tucking, defoliation and more lst.
Day 25: Very hot week, hitting 29°C but the plants are still growing fine
Likes
9
Share


@TeamQuality420
Follow
So for this week the training comes into play . So 1 ogkz was topped, 1 ogkz was broken , * note on the brake it was the best brake I have done , not because I am getting better at it mostly because the outer skin of the plant with the OG kz was much thicker and stronger than I'm used to so it broke quite easily. My guess is the correlation with the autoflower plays a big part in that. And 1 ogkz I just left it be .
Green crack
1 kept as a mother
2 were broke
2 topped


Likes
3
Share


@Narniaman
Follow
Grow on my closet at vegetative stage with a viparspectra 300. Start in the 20 litres airpot and transplanted to 60 litres geotextil pot. At week 11 I added an apollo 6 (136w real).

Processing
Likes
8
Share


@Greenbean15
Follow
Seeing lots of good development, Pineapple Express is almost there!
I went ahead and defoliated the light bleached leaves, trichomes are getting more cloudy. Spotted a few amber trichomes but not many... update- varies by bud. Trich’s appear mostly cloudy to me. Looking at harvesting maybe mid-week next week... 5 more days or so... maybe sooner if trichomes becomes more amber! Super excited to see how this Pineapple Express turns out! Went ahead and clipped the bud off her that had been pollinated, she was starting to open up some of the seed pods. Seeds look fully developed and are quite dark. Tester bud had a few seeds in it but not outrageously so, only a few.
Berry white is trucking along, lots of trichome development this week but buds still don’t seem to be swelling much. Smell coming off this little plant is fantastic!

Likes
16
Share


@Ladyblazed
Follow
Bud forming so fast!!!!!! Comparing to previous plants I growth in witch I used biobizz light soil I changed kind of soil in this one I’m using canna professional and the different is quite noticeable I’m really satisfied. I was worried that the small box I’m growing in would eventually make the plant suffer but it’s totally not, the plant is responding well!!
Started with the maximum dose of bud ignitor by advanced nutrient. I’m really exited for this lady can’t wait to se the beautiful complete resinous buds.. keeping growing with LOVE 💚
Likes
2
Share


@GhostBlvckPhant0m
Follow
“The Wock” 7 Weeks🤙🏾 Ladies are crushing its! I’ve for sure found 2 phenols I want to keep going based on structure and growth. The first was actually going to be a throw away. I didn’t like how lanky she was in her solocup stage. I instead topped her to slow down lateral grown and threw her in a 2 gallon bag to do her thing. She is now in a 7 gallon bag and has the best structure of them alll IMO. My 2nd pheno is a Tri-leaf mutation and it throws tops like no other! The perfect mother plant and is why I chose her as pheno #2. The 2 plants that were topped at the 5th node are bushing out more and more, just like it like it. There are 2 natural growing plants are doing great as well. They have nice bushing with one main cola. All plants will be defoliated 5 days before flip. The nose coming from these ladies is LOUD and I mean LOUD! Sour Candy and Burt Fuel! I’ll be taking cuts and flipping these ladies soon! Happy Growing PSGX Family! 🚀PSGX to the 🌕 #Phant0m