
Likes
Comments
Share


@Zamzam974
Follow
Salut les cultivars sa roule ?!
C+29 a C+38 début floraison je pense... Sa pousse bien. Bonne vigueur des autofloraison surtout la critical... Arrosage tous les 3 4 jours 1litre par pot apport de mélasse à chaque arrosage... J'ai jouter deux ampoule une Led de 15w et cfl de 23w équivalente à une 100w la Led fait 4000k 1500lumens et la cfl 2700k 1500lumens la plante transpire pas mal mai pas de souci de moisissures... J'installe la cfl 250w 2700k quand la floraisons sera bien démarrer... Tous conseils sont les bien venu merci je c'est pas si je vais a 12/12 pour la wombat qui est féminisé pour ne pas perdre en quantité sur les auto qui et mieux 18/6 sinon bouturage pour la wombat je suis dans l'impasse total pour le moment 🙄


Likes
4
Share


@DrStrains
Follow
Hello again,
Week 14 update is here and we are still packing weight not with the same speed cause i stoped feeding at the start of the week but its going awesome almost no clear heads all trichomes are milky/white. No red head yet so i decided to try and close the lights for couple of hours and then start again for the final week.im thinking from everything that i have read this far ill plain feed water 10 day and 2 days without water and last 2 days without lights that will give me 14 flush days and hoping for the best.
As you can see on the pics i had to turn the lamp to the side and put another one on the opposite end to see if i can push some more weight in there the last 4 weeks so now im actually using 600 hps and 250 hps with reflectors inside a 5x5 tent. Any advice welcome ty all . 😏


Likes
28
Share


@Luv2Grow
Follow
Day 64 - Starting week 10 today and she was dried out and read for water so she got two gallons of plain pH’d water. Other than that, there’s not much to speak of other than I’ll do a little defoliating on Thursday so a couple lower bud sites will be opened up more.
Day 68 - All looking good still and looking like she doesn’t have much more time left, she’s finishing quicker than I thought. Her trichs are about 75% milky and 25% clear so I think she’s got about 2 weeks or so left. She was pretty dry so she got one more round of nutes and then will be just plain water till the end.
Day 69 - She’s still chugging along nicely. No issues from her feeding of nutes yesterday and she’s still fattening up each day. Couple little spots where she could definitely still fill in but she’s got a little bit of time left so I’m sure she will.
Day 70 - The end of week 10 and looking over the trichs today, she’s just about all milky, was pretty hard to find any clear and picked out a couple amber in there. So it’s looking like she’s got a week or a little more left but will make my decision to chop when she has the amber I’m looking for, about 25-30%.

Likes
6
Share


@GODAXE
Follow
11.08.2024
officially D132 from seed.
this girls has became a realy fat lady she take 25% of the 5x5 tent. she is bushy like hell even if i have removed all fan leave.
Need to do some root prunning as the air stone is completly embed in the root ball, witch is really most darker that it should be, my nuts solution lightly die the roots but not this far. In the process i realized that the air stone was completly cloged, probably what cause the leave burn ,so switch it and add a second one for safety. the remaining root have been wash and get soak in 1% H2O2 solution for few hours.
really worried about bud roted, i decide to go for a 2 or maybe 3 shot harvest as lower and inner cola arent definitively ready and can still build up.
and some of tops cola show mostly milky trichrome and few amber one.
so 1st harvested from big top cola and some smaller side one for a total weight of 733.5g of wet sticky bud. looking for around 5oz of dry bud, so expecting easily 3/4pond from this mama😜

Likes
2
Share

@MafuMome
Follow
O fenótipo #1 foi colhido com 56 dias. O fenótipo #2 foi remanejado e permanece na tenda por mais uma ou duas semanas.

Likes
19
Share


@Xpie77
Follow
De planten zijn naar hun nieuwe huis gegaan. Derde week nu naar 12/12. De planten kregen wel wat root max schimmels en wat melasse en zeewiervoer. Info over deze soort: --------------Amnesia Haze------------ Amnesia Haze is een soort die perfect is om de dag met een glimlach te beginnen, dankzij het verkwikkende en stimulerende effect en een gevoel van fysieke en mentale helderheid. Met genetica die teruggaat tot de inheemse rassen van Zuid-Azië en Jamaica. Zijn opkomst is snel en krachtig. Een revitaliserende ervaring met aardse smaken en hints van citroen en citrus. Amnesia Haze wietzaden zijn te gebruiken voor de binnen- en buitenkweek. Deze planten produceren mooie stevige toppen met een hoog THC-percentage. Ook geschikt voor medicinaal gebruik. Eigenschappen van Amnesia Haze wietzaden – Heeft bij het roken een lekkere citroen- en citrussmaak – Deze wietzaden zijn geschikt voor de binnen- en buitenkweek – Zeer goed als medicinale cannabis – Dit is een soort met een hoog THC-gehalte – Geeft je een krachtige en high gevoel Informatie Amnesia Haze wietzaden Bloeitijd: 10 weken Genetica: Amnesia Haze 80% sativa, 20% indica Planthoogte buiten: 150 – 200 cm Oogstmaand buiten: van juli t/m oktober Opbrengst binnen: 550 – 650 gr/m² Opbrengst buiten: 200 – 900 gr/plant THC: 22% Link naar de shop:
https://seedsgenetics.nl/product/amnesia-haze-gefeminiseerd/

Likes
20
Share


@Mrs_Larimar
Follow
2023-03-15
Growing the Lemon T was very easy, she strated with Bold and hugee leaves and strong Branches
for my Taste she has to many Leaves- so i recommend a strict training on her.
she would have fit woderful ( after Training) under a SCROG.
so i had to strip many Leaves during Floweringtime, not to get Mildew
All The other THC- Strains ( the High Chameleon) has her as Ancestor,
You have to add one more Week in Flowering, until she was ready
i was in Holiday so i missed one Week in Documentation
Harvesting was abit Challenging due her strong smell, we had to open the Windows
but iam sure her taste will be awsome
so stay tuned for Smokingreport.


Likes
7
Share


@GrowwUp
Follow
Nothing new this week. She's still growing steadily and the nutes seem to be doing a good job so far. I'm using the Dual Fuel with a bit of Growth Solution to raise the EC to follow the Green Plant Nutes program and it feels like it's right so I'm keeping like that. The light is set to 100% as the plants are healthy and the weather is getting a bit too cold. As she grew too tall I'm starting some LST to bend her down to keep her at the same height of the other two plants. I upgraded my second inlet fan from a generic 150mm ball bearing fan to a 125mm Phresh Hyper Fan V2 w/ speed control. Now my tent is so much quiet with both Hyper Fans V2 working on blowing fresh air in and out. Maybe I get a Phresh Hyperfan V2 Climate Controller to manage them automatically next upgrade.


Likes
5
Share


@Mr_nugs_lover_David
Follow
Very strong amnesia smell, smells a little bit louder than the pheno #2 however the clasic amnesia smell it's awesome, cannot wait for her to be Ready!! 👨🌾💚 Stay tuned!

Likes
4
Share


@2x2UkGrow420
Follow
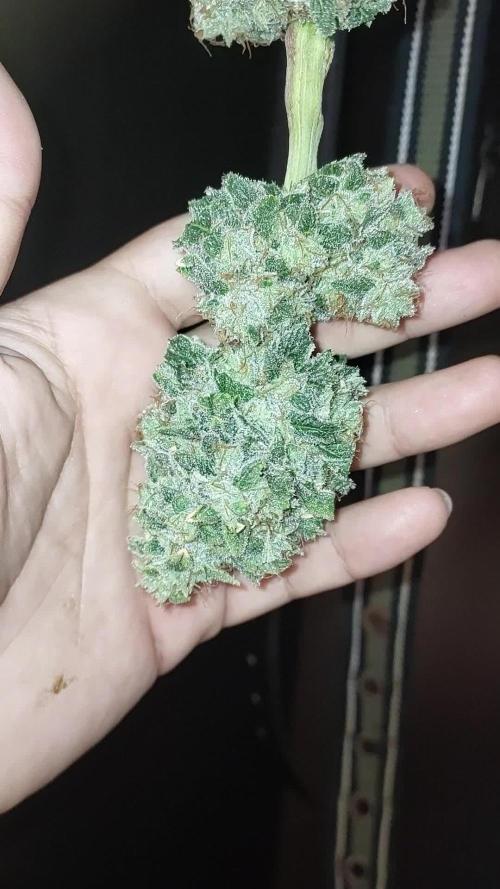
9weeks and 4 days seed to harvest, 125g dry weight👊🏻 Banging straight after a dry 💯 white ash, gonna be killa when had a good cure😎😤


Likes
21
Share


@MadeInGermany
Follow
Hey guys :-)
She is growing great and will be ready for the flowering tent in the coming days :-)
A few cuttings are taken beforehand.
Was poured 2 times with 1 l each.
I'm looking forward to the start of flowering :-)
have fun and stay healthy 🙏🏻
👇🏼👇🏼👇🏼👇🏼👇🏼👇🏼👇🏼👇🏼👇🏼👇🏼👇🏼👇🏼
You can buy this Nutrients at :
https://shop.greenhousefeeding.com/us/
👇🏼👇🏼👇🏼👇🏼👇🏼👇🏼👇🏼👇🏼👇🏼👇🏼👇🏼👇🏼
You can buy this strain at :
https://www.amsterdamgenetics.com/product/double-blue/
Water 💧 💧💧
Osmosis water mixed with normal water (24 hours stale that the chlorine evaporates) to 0.2 EC. Add Cal / Mag to 0.4 Ec Ph with Organic Ph - to 5.8 - 6.4
MadeInGermany

Likes
1
Share


@zzzzzzz064
Follow
On week 2 the woolrock got some mohoo, i fixed it by putting water mixed with "safe roots" from Hydrotek directly into the rockwool superfice.
After a couple days that problem was solved and the plant kept growing very well.
And also i started to train the plants (lst)
Likes
19
Share


@AsNoriu
Follow
Day 57. In this grow at certain stage i was happy that my cam is broken, but now i hate it !!! Girls are all purpling out, defoliation don't help to get colours, but even now - they are amazing ! That smell, frost, nuggy structure, i love them !!! Especially when i write it under influence of Tallest Kush ;))))
Only water, keeping tent doors open, that way temps are in low 20s and humidity ridiculously low (40 -50) for me ;)))
Middle Kush caught up sister by maturity, one cola starts to foxtail a bit.
Hope to get two weeks, but 9 days at least till chop...
Happy Growing !!!
Likes
2
Share


@Fonzy21
Follow
Per me sta venendo su una meraviglia.. Sono molto fiducioso nel gran quantità di raccolto che mi darà e soprattutto della qualità...
A
S


Likes
28
Share


@TeamQuality420
Follow
As you can see the white powdery mold is starting to lose my thoughts were getting a HEPA filter into the room .
2) because this mold mostly lives on leaves what I did is I locked out the soil. This was a technique passed on by a legacy grower in my area.The way it was explained is by making the pH higher than seven the plant would no longer be able to receive nutrients through the soil and it would have to eat whatever nutrients are left in the leaves. This woukd change the pH of the leaves aswell to help kill the mold .
Lastly I greatly increased my wind movement so that air would be continuously moving no matter what it was a little bit hard on the leave tips that burnt a little bit but at this point windburn on leaves is pretty irrelevant when you're looking at the whole picture.
I don't think this would have worked with any other genetics but exotic seeds mostly because from what I've seen with them is a very high resistance to mold and I think that played a huge part of the process.
Also having diablo nutrients monster wash, without that I do not think I would have won this battle


Likes
50
Share


@DogDoctorOfficial
Follow
🌱 The Road to Eternal Glory: My Eternity Grow Cup Journey 🌟
First off, a massive thank you to Grow Diaries, Plagron, and Zamnesia for organizing this groundbreaking competition. Your efforts in bringing growers together and elevating the craft are nothing short of legendary. To all the participants: I wish you the best of luck. Let’s make this an inspiring and memorable experience for everyone involved! 💚
Why I’m Excited
I can’t express how thrilled I am to be part of the Eternity Grow Cup. This is more than just a grow—this is about pushing boundaries, learning, and sharing the magic with this incredible community. For me, it’s also a chance to reconnect with an old friend: the Zamnesia Runtz. This was one of my all-time favorite strains, a true keeper, until an unfortunate heatwave took her away. But here we are again, Runtz and I, ready to make history together.
The Setup: A Glimpse of the Future
To make this grow truly legendary, I’m using state-of-the-art equipment:
• Lighting: The Future of Grow LED Black Series 600W or the germination, and after i am moving it all to my TM ecosystem Stay tuned, and controlled by the powerhouse TrolMaster Tent-X system, ensuring precision and optimal conditions every step of the way.
• Nutrients: A custom mix of Aptus Holland and Plagron nutrients—because innovation meets reliability in this grow.
• Medium: The ever-dependable Pro-Mix HP with Biofungicide and Mycorrhizae, ensuring strong roots and vigorous growth.
• Germination Station: Seeds will sprout in my trusted CannaKan Germination Station, which has never let me down.
Let’s Make Magic Together
This is more than a diary—it’s a journey filled with learning, growth, and shared passion. I invite you to follow along not just here, but on Instagram and YouTube, where the magic will truly unfold. Expect deep dives into every step of the process, tips, tricks, and, of course, a final smoke report that’ll be as epic as the grow itself.
From this moment until the last puff, this journey will be nothing short of epic. Together, let’s make it one for the history books—educational, inspiring, and unforgettable.
Stay tuned for the next update: The Germination Report. Let’s rise and shine, legends! 🌟
🌱 The Germination Report: A New Beginning for the Eternity Grow Cup 🌟
First and foremost, I want to wish the best of luck to all the participants in the Eternity Grow Cup. To our incredible hosts—Grow Diaries, Plagron, and Zamnesia—thank you for creating this phenomenal platform and competition. You’re elevating the craft, and I couldn’t be more thrilled to be part of it! 💚
The Journey Begins: Germination Success!
Every great grow starts with the perfect germination, and I’m excited to share how I kicked off this legendary adventure. Using my trusted CannaKan Germination Station, I started the Zamnesia Runtz seeds—my old favorite strain—with the hope of finding a pheno as extraordinary as the passion fruit treasure I once had.
The Process: My Way to Germination Glory
Remember, there’s no “one-size-fits-all” method in growing. What works best is what adapts to your environment. Here’s how I do it:
1. Choosing the Right Tools
• I use the CannaKan Germination Station, a tool I trust for consistent results.
• With cold temperatures in my setup, I relied on a heat mat to maintain warmth, though it was still a little nerve-wracking!
2. The 24-Hour Miracle
• Within less than 24 hours, the seeds had already sprouted and were ready to move into their next home. Seeing that spark of life so quickly is always magical.
3. Moving to Soil
• I carefully transplanted each seedling into tiny pots filled with Pro-Mix HP with Biofungicide and Mycorrhizae, which offers excellent aeration and support for root development.
• Each pot was labeled Runtz #1–5, ensuring I can track every pheno individually as the journey unfolds.
4. Sprouting Against the Odds
• Despite the cold temps, those little warriors jumped out of the soil within 48 hours! Their resilience and vigor have me beyond excited for what’s to come.
Tips for Germination Success
Here’s what I’ve learned to keep germination smooth:
• Consistency is key: Whether it’s moisture, temperature, or light, try to create a stable environment for your seeds.
• Gentle hands: Handle your seeds with care when moving them; they’re delicate at this stage.
• Adapt to your environment: No method is universal—always tweak your process to fit your conditions.
• Patience: Sometimes, seeds need a little extra time to sprout. Keep faith!
Next Steps: The Adventure Awaits
Now that the seedlings are up and thriving, it’s time to let the journey truly begin. I’ll be hunting for that passion-fruit-like pheno that captured my heart last time, but every seed holds the potential for greatness. For now, I’m keeping it simple: plain water, no nutrients—just letting them establish strong roots.
Stay Tuned for the Magic
This is only the beginning. I invite you to follow along on Instagram and YouTube, where I’ll be sharing photos, videos, and behind-the-scenes updates. Expect plenty of knowledge, tips, and excitement as we navigate this grow together.
To all the participants: good luck, and let’s make this Eternity Grow Cup one for the history books! 🌟
Genetics - Runtz https://www.zamnesia.com/6000-zamnesia-seeds-runtz-feminized.html
Nutrients - Plagron https://plagron.com/en/hobby
- Aptus Holland https://aptus-holland.com/
Controls - Trol MAster https://www.trolmaster.eu/
LED - https://www.futureofgrow.com/en
LED - https://www.thinkgrowled.com
Soil - https://www.promixgardening.com/en
Germination - Cannakan https://cannakan.com/?srsltid=AfmBOopXr-inLXajXu3QFgKXCXXos4F1oEvScjMKIB5MR5dk8-GJ-F49
DOGDOCTOR 15% off
As always thank you all for stopping by, for the love and for it all , this journey of mine wold just not be the same without you guys, the love and support is very much appreciloved and i fell honored with you all in my life
With true love comes happiness Always believe in your self and always do things expecting nothing and with an open heart , be a giver and the universe will give back to you in ways you could not even imagine so
As always, this is shared for educational purposes, aiming to spread understanding and appreciation for this plant. The journey with nature is one of discovery, creativity, and respect. Let’s celebrate it responsibly and continue to learn and grow together!
Growers Love To you All 💚
🔥 Germination Begins! – Runtz We Meet Again | Eternity Grow Cup 2025 | TM Chronicles Chapter 2 🚀 - https://www.youtube.com/watch?v=DlOK28XS_o4
Germination episode in 4K
