The Grow Awards 2026 🏆 


Likes
Comments
Share
@SamDo
Follow
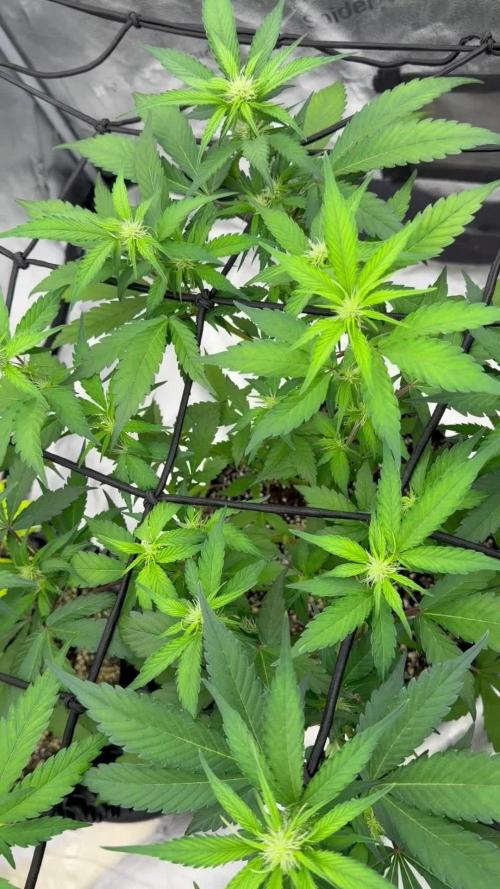
Hello,,, semaine 1 de floraison.
Les plantes se portent plutôt bien. Elles semblent vigoureuses. Le stretch a bien commencé, elles ont poussées de plus de 10cm cette semaine. Le remplissage du scrog est bien répartie même si il reste quelques imperfections😅.
J’ai aussi augmenté un peu l’ex, je suis à 1.6/1.7 maintenant,,
J’interviendrais probablement sur les plantes une dernière fois après le stretch fini, pour enlever ce qui ne donnera pas de belles buds.
Voilà pour cette semaine...
Happy grow...😎

Likes
58
Share
@Legendaryseedthumb
Follow
Day 9: they are all looking super healthy and ready to explode! I’ll just veg these fast. Let them grow a node or two more then top them all and wait some days then switch to 12/12.
I’m having 9 plants in the same tent.

Likes
Comments
Share
@BushDoctor740
Follow
I ended up adding a scrog net just to open them up some more and get that light penetration.Two of these ladies have took on a really good stretch on the main cola and have a Christmas tree appearance.The other two are short and bushy as I did break off the top cola on the one and trained her nice and even.These photos were taken on Christmas Day :)

Likes
45
Share
@tresplantes
Follow
Back from vcation after two weeks the Ladys Look beautyful and Full of Color
Today i will water them the last time on day 62 of flower and cut in the next 4-5 days
The zake should be a week faster than the other two but that isnt the case
The buds on all Ladys are dense and the smell is amazing cant wait to Test em out rauch


Likes
11
Share
@MRTHC
Follow
Well we finally reached the end. The last week was more cruise control. Just trying to remove the big fan leaves that's blocking any flowers. The trichomes looking kinda ready but still acceptable. During the last few days I maintained a daytime Humidity of around 60 and nighttime of 55. Temperatures are between 73 degrees and 67 degrees.
Two days before chop they got 48 hrs of dark and 3 days of no water to add to the stress. After the 48hrs darkness all the ladies Came out extra frosty. Loving the change of hues on the blue gelato. The vanilla Kush is very oily and very very strong smell. Not a strong smell coming off the OrangeGelato though. The green gelato has a creamy smell.


Likes
32
Share
@Ganjagrandaddy
Follow
Day 21 Veg today and all 4 ladies are looking mad for it !!
All vibrant and green with plenty of strength in their stems.
#1 has been trained this past week by pulling her 5th node over horizontal and keeping it held down by moving the peg along each day. Ideally it will need to be kept lower than the developing nodes from 2,3,and 4 which will be evened out as they progress to be the tops. This will avoid the topping and possible recovery time and also keeps the main intended stem. 7 healthy long thick colas is the intended aim using l.s.t and any other means necessary to get the best I can from this vigorous girl. #2 and # 3 are n on par with each other amd just about hitting their 5th nodes. I am going to try topping 1 and doing the same as #1 to the other.
#4 has got more size to her now but looks a way behind her sisters. hopefully she will catch up when she sees the attention her l.s.t siblings are getting.lol
So far an impressive few weeks for these genetics. So glad I have another few strains of the exotic auto range to play with too. Happy days. Until next time. be safe and well
DAY 23 UPDATE
I decided to F.i.m the #2 and #3 girls today so took some pics of their braveness. The #1 has been pulled further down and has a lot of willing competitors for main stems. #4 is still way too small to upset yet and may be left with no cuts and just some supercropping ( auto style). Be interesting to see the Fimming results when done too.
F.i.m = Bro science term coined from missed attempts at a straight topping of the maiming stem. "Fuck . I .missed" became the term for this method that can produce some really huge tops of multiple heads if caught at the sweet spot of the node lets see what we get.

Likes
8
Share
@GuniGugu
Follow
- BioBizz Light Mix soil
- BioBizz Nutrients used according to their schedule
- stopped LST
Likes
24
Share
@Grnhead
Follow
Just cruising along still. I’ve moved a few branches here or there for even lighting but that’s about it.
Trichomes are starting to become more prominent, especially in Pineapple Skunk, check out the photos!!
Buds continue to bulk up here or there. I only see amber trichomes on sugar leaves and haven’t seen any on the buds yet. Most are still clear.
Less than half of the hairs are orange so I think my schedule is still on track. I have 2 more weeks before the flush starts. I might start it early if I notice any one of them starting to mature. Since there are 3 plants and I want a single harvest day, I will try and time it so they are spread across the spectrum of early to mid harvest timing.
Thanks for stopping by!


Likes
5
Share
@Zeaiache
Follow
En su Nuevo suelo y con los microbios ganaron vigorosidad, las hojas están frondosas, y sus tallos engordaron, la verdad siento que prometen mucho 😈

Likes
24
Share
@MediciGrade
Follow
Many of the buds starting showing seeds 😞. There must have been more pollen released from the nanners than I had originally thought. The only stress I can think of is light stress. Either light leaks, light intensity, or perhaps a combination of both. All other conditions have been damn near optimal. I guess it could be genetics as well but I'm giving Crop King the benefit of the doubt. Its a shame too because they were just starting to show their fall colors and it seems like another 2 weeks is all I needed.
I will start the flush and as soon as I can get the runoff EC below .2 I'll unplug the light and let them dry in the dark for 48 hours before I chop them down.
Thanks for stopping by!

Likes
43
Share
@Regenwurm
Follow
Diese Woche nichts außergewöhnliches! Ich habe heute die Leistung auf 550 Watt erhöht. Klima passt perfekt, Entwicklung gesamt auch okay … die Ladies haben Durst und vertragen nicht mehr Dünger… die Indicas sind interessanterweise anfälliger für zu viel Dünger…. Für einen gleichen Start ist die Entwicklung sehr unterschiedlich! Immer wieder etwas Entlaubung da zu viele Blätter bei den Orange Sherbert…. Bis nächste Woche ✌️🏾
Likes
17
Share
@eldruida_lamota
Follow
Que hay familia, actualizo la segunda semana de floración de estas Runtz F1 automáticas de Zamnesia.
Vemos que las 5 están en perfectas condiciones, tienen un buen color y van creciendo a buen ritmo.
Empezaron a brotar flores hembra, ya estamos en floración.
Empiezo por supuesto abonando una pequeña cantidad de la gama Agrobeta.
La temperatura está 25 grados y la humedad anda entorno al 50%. Riego cada 48 horas.
Hasta aquí es todo estas próximas semanas veremos cómo van avanzando.
Agrobeta:
https://www.agrobeta.com/agrobetatiendaonline/36-abonos-canamo
Mars hydro:
Code discount: EL420
https://www.mars-hydro.com/
Os comento que tengo un descuento y para que compréis en la web de Zamnesia de un 20%, el código es ZAMMIGD2023
The discount 20% and the code is ZAMMIGD2023
https://www.zamnesia.com/
Hasta aquí es todo, buenos humos 💨💨💨

Likes
24
Share
@Finniegrow
Follow
NOTES:
Keeping pH at 5,8-5,9 through the entire Vegetation-phase. EC is now around 1,2 and i'm increasing it if needed. I'll be checking the levels regularly from this week since all of the hydroponic systems are now running. I'm going to add some ice cubes in to the nutrient tanks to cool nutrient solution a bit always when I remember to, even though temperatures haven't been an issue so far. Can't do any harm so why not I quess. I'm also adding a CO2-bag in to the tent above the plants.
Also I'll begin training my plants this week by topping them.
Day 22 (8.11.)
Lights are set to 70%, water pumps are now on for 24/7 (EBB's drain water is on lowest setting possible to avoid drowning the roots) and pH is 5,8-5,9 / EC 1,2-1,3 on every hydroponic system.
I topped all of my plants and cut off all of the lowest leafs with single tips and some of the small nodes starting from them.
Day 23 (9.11.)
pH-level keeps on raising so I'm gonna be measuring it pretty often. I'm correcting it by adding some pH- while filling up the nutrient tanks with small amounts of fresh nutrient solution at a time. Everything's going well and I can't wait to flower these!
Day 24 (10.11.)
Lights are now set to 80% power at 70-75cm height from the tops. I cut off the rest of the lowest nodes which I had left to some of the plants while topping them. I don't think they would get enough light when they are bigger.
Day 25 (11.11.)
Removed the lowest (three-pointed) leafs of each plant.
Day 26 (12.11.)
I moved the Led's a bit higher (now at ~90cm above plants) and set them up to full power. Plants are now around 11-14cm height and growing like crazy!
Day 27 (13.11.)
The growing has exploded and these plants are getting bigger and bigger. I'm going to defoliate them lightly and remove the lowest nodes so the plants have around 6 nodes each going forward, hopefully I'll get an even canopy.
Day 28 (14.11.)
I changed new nutrient solution in to the EBB-flood system which has the Ayahuasca's on it. I'm keeping the EC at around 1,3-1,4 and pH at 5,8-5,9 on every system. Also added small amount of Cal-Mag in to both NFTs.


Likes
23
Share
@UnorthadoxDude
Follow
Hey growmies! 👊
Welcome to week nine for Temperance this Tropicanna Poison XL Auto by Sweet Seeds.
Please check out the sister diaries: Sweet Zensation XL Auto & Orange Apricot Glue XL Auto
Massive thanks to Sweet Seeds for sponsoring this grow!
Daily Updates:
###
Week 9 Day 2 17:00 29/8
Photographed
###
Week 9 Day 3 06:00 30/8
Fertigated 3l
###
Week 9 Day 7 03:00 3/9
Photographed and fertigated 3l
Well Temperance is really starting to progress in flowering now, these buds are absolutely stunning, I am really excited to watch them develop. Purple pheno is really quite amazing to me and a first as a grower.
---
==========
Tent: 120cm x 120cm x 180cm
Light: 600w HID Elite Dual Spectrum HPS + Angel Wing Reflector
Air: 5" duct fan system with carbon filter ~300 m3/hour + RAM 9" floor fan + 4" intake fan
Pots: Air Pruner Fabric Pots 30l - UGro XL Coco + horticultural grade perlite (~20%)
Seeds supplied by Sweet Seeds https://sweetseeds.es
Nutrients supplied by Shogun Fertilisers https://www.shogunfertilisers.com
==========
Processing
Likes
12
Share
@GrowGuy97
Follow
Day 35 - Ladies are way taller than I could have ever imagined & starting to get extremely dark pruple😍 make sure to check back for daily updates & happy growing friends✌️🏼🌱
Likes
27
Share
@TheCannaProphet
Follow
~ FASTBUDS TESTER #2205 ~
Well friends, here we go on another 'canna-venture' together!
The grow room has had a complete remodel and some upgrades done to it including brand spanking new 4x8 and 4x4 tents and a Trolmaster Hydro X controller along with a new Control Panel.
This tester strain is one of six tester strains that FastBuds has graciously provided me with and I'm looking forward to seeing what this girl has to offer when she's grown to her full potential!
One drawback of 'testers' is I have little to no information on it other than its number and that it's an autoflower... 🤪 But, it's ALWAYS a blast growing them for me because not knowing a lot allows me to just concentrate on the essentials: Light, Environment, Water, Nutrients and possibly a bit of LST... not complicated, just basics like keeping a constant temperature and RH in the tent at a level that gives a good VPD, watering when almost dry and maintaining proper light levels according to their stage of growth.
____________________________________________________________________________________________________________________________________________________________________________________________________________________________________________________________________________________________________________________________________________________________________________________________________________________________________________________
~THE SETUP~
~Initially seeds were lightly scuffed, then soaked for 3 hours in 78℉ distilled water after which they were transferred to moist paper towels laid out in a Jiffy Pellet plastic starter tray with lid. Underneath the tray was placed a Mars Hydro Heat Mat with Controller that was set to 78℉ where they stayed until their tap roots emerged.
~Planted into Jiffy Peat Pellets that were hydrated with distilled water warmed to 78℉ with a 7.0 ph.
~Once roots emerge from the Jiffy Pellet they're transferred to their fabric pots.
~Grown 100% organic in a 4g Gronest fabric pot and a 3g fabric pot by Wraxly filled with Mother Earth 70/30 Coco/Perlite medium and initially amended with Dr. Earth 4-4-4 / Earthworm Castings / Dr. Earth Flower Girl 3-9-4 and Coast of Maine Stonington Blend Organic Plant Food 5-2-4.
~19/5 light cycle for the entire run with supplemental UVA added during flower. Lights are controlled by a Trolmaster Hydro X controller set for a 15min Sunrise/Sunset simulation.
~Top dressing every 3-4 weeks with slow release dry amendments and Earthworm castings.
~Straight water ph'd @ 6.2-6.8 when needed and bi-weekly Compost Tea's.
____________________________________________________________________________________________________________________________________________________________________________________________________________________________________________________________________________________________________________________________________________________________________________________________________________________________________________________
Weekly Updates:
12/15- Here we go into the second week of veg for the FastBuds Tester #2205 girls and they're on a roll! 😍 When I checked on them today they both were still moist so I let them go until I check them tomorrow. Basically at this point in the run all I have to do is make sure they don't dry out, fill the humidifier and watch them grow!
12/17- Yesterday I watered them both and increased the amount to roughly 0.25g each of de-chlorinated water with 3ml/g of Botanicare Silica Blast (added to begin to help strengthen their branches) and then ph'd to 6.4 @ 74℉.
I've also increased the output of the HLG 650R's to 35% which equates to about 230w at the wall which, of course has raised the temp's in the tent so I've also begun to run the A/C unit in the grow room which is keeping the temp's now at 75℉ in the tent. The RH is running around 75-78% RH giving a VPD of .67-.74 which I'll take! 😁👍
Other than what I've mentioned above, all I did was fill the humidifier with distilled water and watched my girls grow! 🤩
12/19- Today I watered them each with 0.25g of de-chlorinated water to which I added 3ml/g Fish Head Farms Fish Sh!t and 1 tsp/g Unsulfured Molasses which I then ph'd to 6.3 @ 74℉. I'm now watering through the bottom, filling the drip pan and letting the plant draw up the water into itself. I am also watering from the top, but only just enough to moisten the medium.
They're really starting to take off now, a sure sign their roots are beginning to get well developed. Their 4th set of leaves have emerged and I'm thinking over topping them in the next day or so.
12/21- Well, yesterday I went ahead and topped the #2 Tester #2205 taking off the 5th leaf set. Hopefully she won't stress out over this and starts shooting out those secondary branches. I left the #1 alone as she's not quite as vigorous as the #2. I may not top the #1 as a sort of comparison to see how each grows out.
Today I watered them both with 0.25g of straight de-chlorinated water each which was ph'd to 6.3 @ 74℉. I gave about 3/4 of it into their drip pans so they can draw it up into their medium, the rest I applied to the top of their medium just to moisten it.
Well there's two weeks of veg behind us now, Week Three of vegetation is beginning and they should really start to take off! 😍👍
😎💚 Thank you for checking out my passion in life! Please visit as often as you wish and I hope you enjoy this journey as much as I know I will! Grow Strong! 💪😎🤙
Likes
65
Share
@Dendegrow
Follow
Week 2 of the flowering phase flew by 🌱💨. Unfortunately, I may have overdone it with potassium or kept the water level too high – the classic signs of clawing leaves were evident. Thankfully, they seem to be recovering now and are back under control 💪🍃.
My IR night experiment is showing clear results 🌌: The plants exposed to infrared radiation at night stretched significantly more. This might be especially beneficial for this indica-dominant strain as it leads to better canopy distribution, improved airflow, and reduced risks of mold and disease. Plus, the light distribution is much more efficient now, which I’m excited to see pay off.
On the downside, my Orange Sherbert turned hermaphroditic 😔. It’s hard to pinpoint the cause – overfertilization seems unlikely since I’m using only organic nutrients. I suspect it might be linked to an E-field experiment I’ve been running. To confirm this theory, I’ll conduct a new grow with a similar strain next year to see if the electric field negatively impacts cannabis development.
Stay tuned for updates! Drop a like and follow along for more grow insights 🌿✨. See you next week!
Woche 2 der Blütephase ist wie im Flug vergangen 🌱💨. Leider habe ich wohl etwas zu viel Kalium gegeben oder den Wasserstand zu hoch gehalten – die typischen Anzeichen von Adlerkrallen waren sichtbar. Zum Glück scheinen sich diese jetzt zurückzubilden und sind wieder unter Kontrolle 💪🍃.
Mein IR-Nachtexperiment zeigt bereits deutliche Ergebnisse 🌌: Die Pflanzen, die nachts mit Infrarotstrahlung bestrahlt wurden, haben deutlich stärker gestretcht. Das ist besonders bei dieser indica-dominanten Sorte wahrscheinlich von Vorteil, da es zu einer besseren Verteilung des Blätterdachs führt. Dadurch verbessert sich die Luftzirkulation, das Risiko von Schimmel und Krankheiten wird minimiert, und die Lichtverteilung wird effizienter. Ich bin gespannt, wie sich das weiter auswirkt!
Leider hat meine Orange Sherbert gezwittert 😔. Woran das genau liegt, kann ich schwer sagen. Eine Überdüngung halte ich für unwahrscheinlich, da ich nur biologischen Dünger verwendet habe. Ich vermute, dass mein E-Feld-Experiment eine Rolle spielt. Um das zu bestätigen, werde ich nächstes Jahr einen neuen Durchlauf mit einer ähnlichen Sorte machen und prüfen, ob das elektrische Feld tatsächlich eine ungünstige Rückentwicklung der Pflanze verursacht.
Bleibt dran, lasst ein Like da und folgt mir für weitere Updates 🌿✨. Bis nächste Woche!

Likes
22
Share
@Fatnastyz
Follow
10-18
She hasnt even acted like I bent her top!
Recovered nicely. Her buds have turned upwards to welcome the light! 😁
10-19
Water, noticed some slight burn, will flush her next day or so. She looks pretty good other.
Spaced some branches just just a tad. Cleanin up, while she fattens!
Has a minty smell.
I know Im rough, very grateful for these beans Weedseedsexpress!💚😻
Ill get my shit together! 💪🤘
.

Likes
13
Share
@Oyziphar
Follow
GROW 😁
As you may already know, I have 2 varieties in my growroom. 👍
I have 4 pots of each species with 4 plants in each pot. So 16 plants Mother Gorilla and 16 plants Triple G. 👽
In the first weeks, the Triple G plants were the fastest growers. But since flowering, the Mother Gorilla plants have taken over. Most Mother Gorillas are now higher in length than the Triple Gs. They clearly have more Sativa influences than the Triple G. 💪
The 16 Mother Gorilla plants differ greatly in length.
On DAY 26 these are the various lengths (in cm) : 63, 67, 83, 83, 95, 99, 107, 110, 110, 111,, 114, 116,117, 126, 130, 134
The drastic pruning in week 2 has stimulated the plants enormously. The plants have been multiplied by 2 to 3 times in height since flowering
--------------------------------------------------------------------------------------------------------------------------------------------------------------------------------------------------
BLOOM 😍
The plants are now busy making new flowers. The plants with the most Sativa genes do not yet have that many flowers. But the plants with more Indica genes are already working hard to string the flowers together to thick buds. The scent of the flowers is fantastic.
--------------------------------------------------------------------------------------------------------------------------------------------------------------------------------------------------
WATER / HUMIDITY 😰
I have lowered the desired humidity again this week by 5% 👇 and the temperature is increased by 1 degree. 👆👇
The plants have made many new leaves. Every day (24 hours) the 4 pots (16 plants) get about 7 liters of water to drink. 😂
The '1.75 liter watering volume per plant' stated in 'Grow conditions' is therefore actually '1.75 liter watering volume per autopot'
Most of the water evaporates through the leaves and therefore the humidifiers evaporate less and less water. At the beginning of the week, I had to fill the two humidifiers with 7 liters of water every 24 hours, now every 40 hours. 👌