Likes
Comments
Share
@w33dhawk
Follow
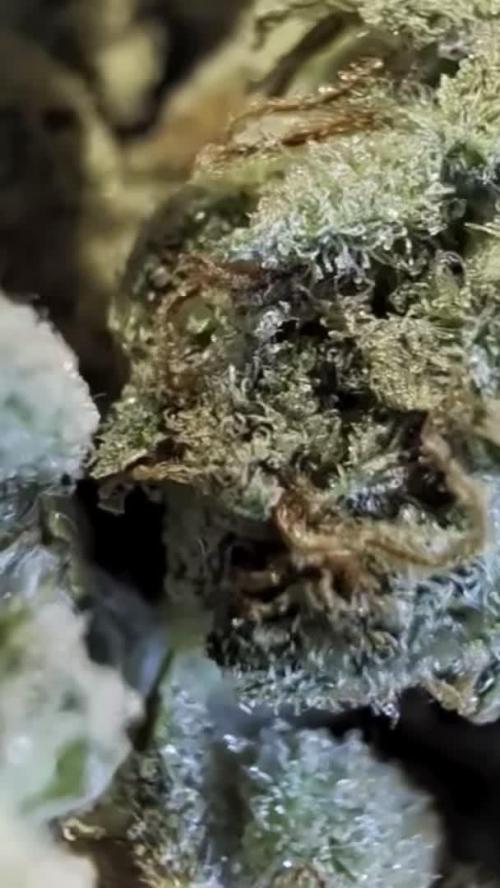
So Endspurt am 6.01.2021 werden die Ladys abgeschnitten trichome sind ca 85%milch und 15%amber werde noch Bilder am Mittwoch vom Schnitt kommen dann noch am Mittwoch nach geschoben
Likes
3
Share
@Sheesh
Follow
Ernte verlief reibungslos, Update nach 2 Wochen cureing
Likes
4
Share
We’re now fully in production mode!🔥 The stretch is definitely done, and she’s putting all her energy into bud development. The trichomes are multiplying nicely, and the smell is becoming more and more intense, fresh lemon with a subtle sweet twist.🍋🍬 The bud structure is quite different from what I’m used to, more airy and elongated, kind of sativa-like. Curious to see how this one finishes up. Still healthy, still cruising, let’s see what next week brings!
Likes
12
Share
Checkout my Instagram @smallbudz to see the Small budget grow setup for indoor use, low watt, low heat, low noise, step by step. 25/10/2019 - First feed I gave her 0.25ml on 250ml of water of Biobizz-Grow, with 6.5ph. 26/10/2019 - Leafs looking a bit crooked, and some pale spot lets hope its not fungus. (gave her 100ml of just PH 6.5 water) 27/10/2019 - Feeding day, gave her 250ml water with 0.25ml Biobizz Grow, 6.4PH (changed feeding to once every 2 days with a plain water interval) 28/10/2019 - Started LST 30/10/2019 - Feeding day, gave her 250ml water with 0.25ml of each Biobizz - Grow,Bloom and Max, 6.3PH, added carbon filter and it raised the temps to 29c 31/10/2019 - A tad too much of nuts, little burn tip. (Sensi Seeds warned me but I still goofed it)
Likes
4
Share
@Ferenc
Follow
Week 10: 20/4 light schedule, 150 mp water per plant 2x, no fertilization anymore. Day 65: Next week Tueasday/beggining week 11/ we need to harvest because they will come from the council to check the house😂 Well, the previous one finished in 69 days, but I think they won't be properly ready by next week. I tried it and made me high anyways. I would give at least 2 weeks more to be done. Tomorrow I will check the trichomes with magnifying glass. They are beautiful stinky girls. Flowers are getting thicker and pistils are getting brownish. Day 66: I checked the trichomes with magnifying glass and it will be ready by next Tuesday. 7 days left with this day. They are beautiful just check in the video (Day 66). Day 67: It is crazy the last 3 days was so hot here in London. Today was 38 degrees!!!!!! Poor plants even with ventilation it goes up to 30-31 degrees. Well, it is alright because direct ventilation goes on so they won't be cooked. 😓😛 Day 70: It is the last day when they receive water and they just get once and half of the daily intake. 2 days before harvest I will not water them. Harvest day is on Tuesday 30th of July when they are 72 days old. I have checked the trichomes all good they are matured nicely cloudy so now it is very strong. They are very stinky girls 😋 Day 71: No more water for them..... Tomorrow is harvest day!!!!!😋
Likes
35
Share
Impecable cosecha de Sweet Cheese, se llenó todo el espacio de secado de buenas cabezas, próximamente actualizaré números finales de cantidades pero hasta el momento se lo ve muy prometedor.
Likes
52
Share
I gave Isopropyl alcohol 70% equal parts water, 1 tsp cayenne, and kept enough for multiday application, what little population of aphids is left I shall catch them the next morning, opening the tent 10 min before lights on the clovers have yet to open, all the aphids hiding on undersides are easily visible, still none ever went near cannabis plant. Clovers are far tastier it seems. The alcohol kills on contact, the idea was to saturate the leaves with a light foliar application, and once I was done I ran it through the canopy with my hands making sure as much of the clover surface came in contact with the iso, once done turned on the fans and evaporate it quickly. Beautiful thing about Isopropyl is that it evaporates rapidly at room temperature way below boiling point leaving behind zero residual so nothing seeps its way into rootzones unless you spill it there. It is a magical solvent that leaves no trace that it was ever there. Resonant Frequency: A resonant frequency is the natural vibrating frequency of an object and is denoted as ‘f’ with a subscript zero (f0). When an object is in equilibrium with acting forces and can keep vibrating for a long time under perfect conditions, this phenomenon is resonance. In our daily life example of a resonant frequency is a pendulum. If we pull back the pendulum and leave, it will swing out and return at its resonant frequency. Objects combine to form a system, this system can have more than one resonance frequency. The resonant frequency is termed as the resonance frequency. The phenomena of resonant frequency used in the series circuit when the inductive reactance (XL) is equal to the capacitive reactance (XC). If the value of supply frequency is changed, we can observe that the value inductive reactance (XL) and capacitive reactance (XC) is also changed. Inductive reactance (XL) and capacitive reactance (XC) are inversely proportional to each other. When we increase the frequency, the value of XL increases, whereas the value of XC decreases. When we decrease the frequency, the value of XL decreases whereas the value of XC increases. At series resonance, when XL = XC. The mathematical equation of resonant frequency is: XL = 2πfL; XC = 1/2πfC XL = XC 2π f0L = 1/ 2πf0C ; f0=1/2π sqrt{LC} Where f0 is the resonant frequency, L is the inductance, C is the capacitance How to Calculate the Resonant Frequency of an Object? An object exposed to its resonant frequency can vibrate in symphony with the sound. The wavefronts pushing on the object will arrive at just the right time to push the object with greater and greater amplitude in each cycle. To get a clear idea of this concept one of the best examples is pushing a friend on a swing. If you push the swing randomly, the swing will not move very well but if you push the swing at a specific time, the swing will get higher and higher. Another example to find the resonant frequencies is to place the object next to a speaker and place a microphone attached to an oscilloscope next to the object. Then play the sound in the speaker at a given volume, and then without changing the volume slowly change the frequency. Now observe the oscilloscope, you will observe that at certain frequencies the amplitude of the wave, is proportional to the volume of the sound that the microphone is able to pick up. The frequency that is caught by the microphone will be greater than at surrounding frequencies. These are the resonant frequencies and are detectable as the sound energy absorbed by the object is re-emitted more efficiently at these frequencies. The precise moment that constructive interference happens the amplitude of the wave will spike at the precise frequency emitted. Q: Compute the resonant frequency of a circuit whose inductance is 25mH and capacitance is 5mu F? A: Known values are, L = 25mH = 25 x 10-3 H C = 5mu F = 5 x 10⁻⁶ F Formula for resonant frequency is, f0= 1/2π sqrt{LC}1/2π√L f0=1/2 ͯ 3.14√ (25 ͯ 10-3 ͯ 5 ͯ 10-6) = 450.384Hz Why Neodymium? Ferromagnetism is an exciting phenomenon observed in certain materials, known as ferromagnetic materials, that can retain their magnetization even after removing an external magnetic field. Ferromagnetic materials can become ferromagnets and interact strongly with other magnets and magnetic fields. A characteristic of ferromagnetic materials is their magnetization ability, distinguishing them from paramagnetic and diamagnetic materials, where weak magnetism exists temporarily. This unique property allows for making permanent magnets widely used in various applications such as motors, generators, speakers, and data storage devices. The ability to generate and maintain a magnetic field without the need for a constant external source of power makes ferromagnets highly valuable. An alloy of neodymium, iron, and boron discovered in the 1980s is ferromagnetic, yielding permanent magnets over 1000 times stronger than anything ever seen before. The name neodymium comes from the Greek neos didumous, which means "new twin." Neodymium magnets are made of an alloy of neodymium, boron, and iron. This allows them to simultaneously store impressive amounts of magnetic energy while being highly resistant to demagnetization. Because iron oxidizes quickly, neodymium magnets are coated to prevent rust from accumulating. The attraction between two neodymium magnets is so strong that if placed close enough together, they can collide and shatter. Neodymium magnets have an unusually high-temperature resistance, and they can even withstand heat exceeding 200 degrees Celsius. N50UH 1-1/2"OD x 1.065"ID x 3/8"
Likes
43
Share
Day 50 She is drinking 3 liters every 3 days. Noticed the tips are slightly nute burn so have lowered the nutrients slightly. Bud sites filling in and swelling nicely. Very frosty. Swapped big bud for overdrive.
Likes
18
Share
@Kmikaz420
Follow
Voilà dernier jour avant de couper . Demain la plante aura 14 semaine j ai pousser la flo et le flusch un peut plus que d habitude (histoire d avoir le plus de chance possible d avoir se goût et odeur de chewing-gum à la fraise après curring) voilà voilà encore un grow qui c est super bien passé (chose abituel chez fast bud mais qui mérite d être sous ligné !!! Leur plantes sont vraiment assez simple à faire pousser et surtout elles autorise LES ERREURS DE DÉBUTANT. ...du style ph non ajusté. Excès d engrais ou trop peut ...toutes ces chose font que même des débutant arrive à avoir une weed d excellente qualité après 10..15 semaines (je rappel qu une photoperiodique devrais pousser presque le double de temp!!! ) Et au final l herbe est souvent aussi forte voir plus forte que les strain photoperiodique !!! Et pour tous cela merci fast bud On se retrouve pour smoke test !!!! J ai hâte
Likes
148
Share
@BioBuds
Follow
Greetings my dear Jungletamers, So a major surprise came when @MarsHydroLED contacted us and asked if would like to try out their new SP 3000 light. Being a fan of Mars Hydro for years, we of course accepted their offer. We are totally in love with this light. I was when I saw it in another grower's setup and was in awe of its output and results. So with much pride and thankfulness for the presents the Universe bestowed on us, in the form of MarsHydroLEDS offer and the bountiful harvest of the last grow, (which I am thoroughly enjoying btw, such a great weed to have grown ourselves) we start out on a new adventure that we can't wait to share with you. With many lessons learned from the previous grow, a mighty producing strain in the form of Expert Seeds Gorilla Glue #4, a.k.a Expert Gorilla's and a tweaked super soil mixture, we are setting out to hopefully get over a gram per watt, preferably 1.5. The Setup A 4.5 (140 cm) x 2(70) x 6.2 (200) grow tent, giving me a .98 m2 workspace. This space is customized to my needs. A standing fan will provide airflow through the whole grow, a top fan will help guide cooler air past my lights onto the grow. 3 56 ltr pots will be the home for the plants when they are 2 weeks old, up to then in smaller jars. The Light The leading role and star of the show will be played by the Mars Hydro SP-3000, so kindly provided by MarsHydroLED, which we will test and review here and I might say, endorse. I'm very careful with who I endorse and support these days, but a company with that many wins in design, I'm talking ever since their first range came out in 2009 these guys have been raising the bar for the whole industry, I did not hesitate to support this leading brand. If you want to compete with these guys, you better bring some quality AND affordable pricing. Why do I endorse the SP-3000 without ANY hesitation? It is seriously THE BEST light on the market in this price range and size group. It has an enormously effective output in U/Mol and with 30% less energy waste comparing to older LED lights. Prove me wrong! And with a company holding a considerable market share selling thousands of units every month, competing on price and quality, one would think that customer service would suffer. Of course, also Mars Hydro is not perfect, but check the sheer amount of people that not only praise the light but also the service received, should the light somehow not perform up to par. It is this dedication to their customer base that made this company have a fanbase... Yes, a fanbase with a website and a wiki. So if you are looking to buy new lights, check out the END OF SUMMER OFFER at the Mars-Hydro Global Store on Aliexpress: https://marshydroled.aliexpress.com/ 👈 Check their offers but also their score, they ship from a warehouse near you so you don't have the extra import fees!! Cut out the middleman and have a deal on these lights!! At the moment I write this in August 2021, the lights are 408,20 euro when sent from Germany to the rest of Europe, that's 40 euro cheaper than the other Mars outlets, BUT EVEN 60 euros cheaper than ordering at a grow store!! The Strain: Experts Seeds - Expert Gorilla feminized regular. Don’t let the name fool you because Expert Gorilla is suitable for growers of any skill level. However, you do need to be an experienced smoker because Expert Gorilla is one of the most potent strains on the market. Lineage: Chem Sis x Chocolate Diesel x Sour Dubb Popularity: Extremely Popular Flavor/Aroma Profile: Chocolate, Earthy, Fuel Yield: 400 g/m2 Stress Tolerance: High resistance to disease Potency: 24% THC Flowering time: 58 - 63 days The Soil: Those who saw my Monstercropped Gelato #33 grow (you should see it if you didn't, I'm so proud of that grow), know about my super soil and organic nutrients/ permaculture tea combo that starred in my previous diary. Because of the great results, we are going to use the same recipe, adjusted some more with some new ingredients that will complete the mix and give an even more sustained super soil buffer. 20% Atami Bi-grow (very similar to ocean forest) 20% Atami worm castings 20% Atami Coco Coir 10% Hydrocorn 10% Peat powder 1 cup Fossil seaweed chalk 1 cup bonemeal 1 cup bloodmeal 1 cup Microlife 3-4 teaspoons of epsom salt 3 cups of activated biochar (activated with our own permaculture tea) I just made layers, starting with hydro corn on the bottom to aid airflow/run-off. On this I started layering the coco coir, Bi-grow, peat, castings, and amendments in a way that the more mature the plants get, the more phosphorous and less nitrogen they will find. Every time I made three layers, I would mix them by hand. This way we simulate natural soil, which consists of humic layers, composting plant waste, fungal and microbial life, and nutrients from fossilized sources. The Nutrients I will start with just adding 6.4 PH water, although this soil should buffer ph itself and regulate, after 4 weeks, I'll slowly be adding: - Biobizz Grow - Plagron Alga Grow - Biobizz CalMag - Biobizz Flower - Plagron Alga Flower - Biobizz Topmax - Melasses The Tea Some of you might remember the permaculture tea from my previous grow, I have a short video in my harvest page showing how we make it), it will star again in this grow. - (Rain)water - Comfrey (whole plants) - Dandelion leaves - Roots and leaves from the earlier grow - Minor periwinkle (Finca minor) is a plant we have in our garden, it contains an alkaloid that is associated with increased brain function but also is a light toxin for wee beasties and other unwanted guests like gnats (who hate it). - When flowering I add some wood ash to this mix Thank you for checking in on one of my grows again! Thanks for all the love on my previous grow, check it out if you haven't seen it!! Hug Bud
Processing
Likes
11
Share
going fine try trim away most fan leaves. Last day week 8. 2 more days with Nutrients then i am going last time with just Nordic spring water 💯🙏💪💪
Likes
2
Share
@Mastr
Follow
Hi everyone This week I did defoliation and remove most large fan leaves to get air flow and light will do same next week then I won't touch it until finish This week I feed my plant with 2ml bloom and 2ml top max 2ml activera Each Plant drink 2litre water every day morning and once a week just water Willing to start germinate new seed for next grow I order new seed today (bubble kush) Usually I veging for 4 weeks and 8 weeks flowering and always I get around 4 oz per plant ans I start growing last year so I'm new in growing but I learn how to veg very fast and strong the nutrients I use for start it cost €50 for 4 plant and you don't need any other nutrients just plain water and in flowering just feed with bloom and bloom booster
Likes
3
Share
@KcKush
Follow
* Increased ppm from 850 to 950. * They’ve been in veg for to long. I’ll be taking clones today. Atleast 2. I’ll probably cut the tops of since they hit the led light.
Likes
7
Share
A bit of defoliation early in this week with some LST, looked a little shabby after but they bounced back within a day or so. Also installed up right fan to blow air under and over the plants and small dehumidifier. Loving these plants and learning how to grow.
Processing
Likes
17
Share
@Mr_Bacon
Follow
I'm making a little contest in my grow room 6 ladies + one which will go outside 2 types of nutrients 3 different strains for each nutrient type 2x gorilla glue by fast buds 2x BlackBerry by fast buds 2x white widow auto by RQS +1 outsider (in a month or smth. It's my first grow ever, waiting for your comments and tips I Want to grow 1 type of each strain with use of green planet nutrients and one with nutrients from RQS just to see if the price of product really corresponds to its quality and is it really worth to pay more and lose so much time for preparing the right solution. there is 3 days of difference between 3 first ladies (2x GG + BlackBerry) and both White widow's and another 1 day to second BlackBerry and another one day for the WW which will go outside. ;) It means the first ladies already had full 5 days of light before the last girl came to tent :)
Likes
36
Share
@nonick123
Follow
Día 59 (29/07) Este cultivo no es muy entretenido con solo agua, asi que... Le hago supercropping a todas! 😁 A ver como reaccionan! Riego 500 ml H2O pH 6,5 SÓLO a OnionOG #1 Día 60 (30/07) Las plantas se están recuperando muy bien del supercropping! 😁 Todos las puntas hacia arriba! 💥 Come onnnnnnn! A por esa floración en 2-3 semanas! Riego 500 ml H2O pH 6,75 Día 61 (31/07) Las plantas se han recuperado genial del supercropping y están lanzando TODAS las ramas hacia arriba 😍 Un espectaculo la fuerza de estas plantas! 💥 Redistribuyo las plantas, para ver si OnionOG está más protegida del sol, ya que consume muchisima agua y voy a estar en unos días fuera... También reubico ligeramente la malla de sombreado, debido a que en mi latitud el sol empieza a incidir lateralmente por las tardes... Riego 500 ml H2O pH 6,55 OnionOG: Riego 1 Litro H2O pH 6,5 Día 62 (01/08) OnionOG me impresiona con su vigor. Sus ramas se están estirando de forma impresionante! OnionOG le hago una poda de partes bajas de las ramas para mejorar el flujo de aire y que concentre su fuerza en las ramas superiores Vuelvo a redistribuir las plantas en el invernadero dejando a OnionOG todavía más protegida del sol directo, para tratar de disminuir su consumo de agua estos días que no voy a estar... Pongo una protección "visual" en el invernadero en el lado que da a los vecinos (cara norte), porque he "cazado" miradas indiscretas... Riego 500 ml H2O pH 6,55 OnionOG: Riego 1 Litro H2O pH 6,5 Día 63 (02/08) Debido a que me voy de vacaciones unos días, adelanto el riego semanal con Té y la aplicación foliar de Kelp Riego con 1 Litro de Té Vegetativo de Lurpe Solutions. Preparación: 24 horas con bomba de aire (oxigenación) con ingredientes: Green Sunrise 8 ml/L + Insect Frass 16 ml/L + Hummus Lombriz 8 ml/L + Melaza 1 ml/L + Kelp Hidrolizado 0,25 g/L Aplicación foliar Kelp hidrolizado de Lurpe Solutions a 0,25 ml/l Día 64 (03/08) Cerrado por vacaciones Día 65 (04/08) Mi amigo viene a casa a hacer un riego con 1 Litro de H2O pH 6,5 💦Nutrients by Lurpe Solutions - www.lurpenaturalsolutions.com 🌱Substrate PRO-MIX HP BACILLUS + MYCORRHIZAE - www.pthorticulture.com/en/products/pro-mix-hp-biostimulant-plus-mycorrhizae
Likes
Comments
Share
@BruWeed
Follow
El 20 de septiembre entro en su segunda semana de flora. Ya le agregue el bud candy. Se encuentra muy bien, los cocos ya se pueden apreciar mas. Su olor es bastante fuerte.
Likes
74
Share
@Mr_Maes
Follow
We are officially in full bloom. The have been enjoying 6-7 hours of sun light per day for about 4 days now, then brought back in under the cobs. The girls are all exploding with growth and stacking what I expect to be huge buds.
Processing
Likes
16
Share
So I’ve only just realised how little these girls have been fed, I’ve just done a 10% run off and they had a low EC of 0.8 so I’ve just given them a high feed, hopefully I should see some difference in the plants over the next few days. I did this simply because they haven’t put on any weight and I’ve done my dates and they’re all @8 weeks and 4 days and they look more like 5 weeks to me, I’ve been over cautious of over feeding that I actually underfed. My bad lesson learned
Likes
20
Share
She's looking extremely healthy enjoying lactobacillus made by me and florians living organics full of 10 types of mycorrizae,humic and fulvic ácidas,aminoacids,vegetable hormones and beneficial fungus,also guanokalong extract which is also full of life man! She's just an organic happy girl in a soil full of micro life,thank you everybody peace ✌️ 💚 ❤️ 💛