


Likes
28
Share


Processing
Likes
3
Share


@Bigwhitty420
Follow
*Update Day 36 (1/26)*
Everything is looking up for the Berry and WW, Bubblegum got attacked by my cat. Lost a branch possibly two. =( Other then that it's coming right along.
Added scrog net
*Update Day 38 (1/28)*
Watered Berry and WW. Bubblegum was watered/fed yesterday.
*Update Day 40 (1/30)*
Watered/fed Berry and WW
Replaces my two 600w Vivosun, with a single 1200w Vivosun led/cob light. Nothing was wrong with the two 600w. Upgraded hoping it will save some money on electric.
*Update Day 41(1/31)*
Watered Bubblegum

Likes
29
Share


@Edenganj
Follow
These girls seem to be doing well so far. How much water should I be giving them now? What nutrients should I be adding now? (I am using sohum super soil as the medium)


Likes
106
Share

@Prof_Weed
Follow
Hail Satanas!
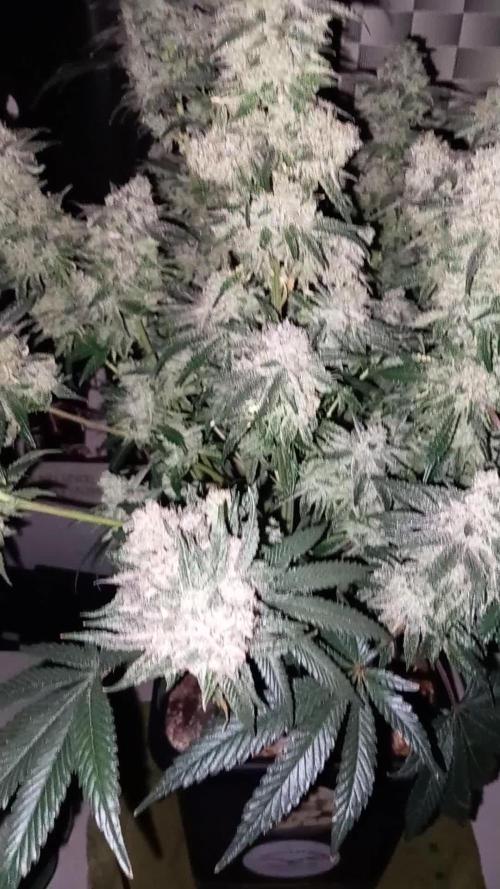
Madame Devil's Cookie is on the road to hell!
She is a little fat demon, sticky and healthy.
The smell is creamy and fine, not too strong which is Not bad.
she produces good chunky buds as there is no tomorrow...
She can handle everything without problems, a nice dutch genetic crossed with some USA stuff.
I will grow her again.
Bedankt!


Likes
8
Share


@BayAreaGrown
Follow
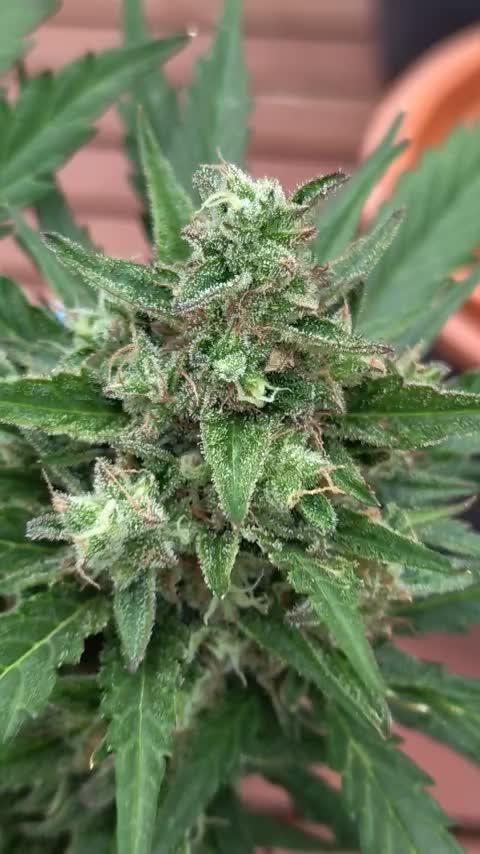
The plant is starting to show signs of early bud sights, and producing large fan leafs as well as good healthy gassy smell

Likes
11
Share


@NidoR420
Follow
Last week of Ozz! I’m getting some nice trichromes. Surprisingly, she doesn’t smell much, but she’s still beautiful. She also has the best ratio of buds to leaves out of the three plants of the same strain. I’ll start trimming Dorel by Friday and #4 this weekend to free some space. Then it’ll be Ozz’s turn on Sunday or Monday. The relative humidity levels are getting dangerously high, but the temperatures are still fine until next week. Since she’s covered, I have good hopes she’ll hold. No additional bud has rotted since two weeks ago :))
Likes
53
Share


@AutoCrazy
Follow
Finally getting around to adding the last few pictures before I took the Forbidden Dream down. I ended up taking it down a little early due to crappy weather!!
She was a pleasure to grow although I did get quite a bit of bud rot towards the end but the sticky weather in my neck of the woods did not help.
One takeaway from this grow was that mainlining is a fantastic way to train a plant and manage growth in a small space.
I didn’t get any pictures day of harvest which is unfortunate. She looked a lot fuller and ripe than in the pictures.
😎🌱

Likes
71
Share


@DogDoctorOfficial
Follow
Greetings, fellow cultivators! Week 6 has brought us to a pivotal moment in our Anesia adventure as we witness our green beauties reach new heights of vitality and vigor. Join me as we delve into the latest developments in our thriving veg garden!
Our Anesia girls continue to impress with their robust growth and lush foliage, each plant a testament to the care and dedication poured into their cultivation. From the graceful Future#1 to the energetic Zoomiez, it's a sight to behold and a joy to witness their journey towards maturity.
But the excitement doesn't end there! As we enter the final stretch of veg, anticipation is building for the transition to flower and the promise of bountiful blooms to come. With each passing day, our plants grow stronger and more resilient, ready to face the challenges of the flowering phase head-on.
And speaking of excitement, I'm thrilled to announce that Episode 1 of "Welcome to the Green Oasis" is now available on YouTube! Join me as we embark on this journey of growth and discovery, exploring the wonders of our green sanctuary and celebrating the beauty of nature in all its glory.
So be sure to check out the link in my bio and join us on this epic adventure. Don't forget to like, comment, and subscribe for more green goodness, and stay tuned for the next chapter in our Anesia saga. Until then, happy growing!
https://www.youtube.com/watch?v=8l_e2Jc2Q0E Welcome to the Green Oasis: Episode 1 - Tent Transformation! Direct link with full explanation of whats happening as the video is to big file to upload here
Genetics Red Banana Pudding = RBP
Apricot Oreoz = AO
Zoomiez = Z
Future#1 = F
https://anesiaseeds.com/
Plant nutrition - Aptus Holland - https://aptus-holland.com
LED Photons - Future of Grow - https://www.thefuturofgrow.com/
Controls - Trol Master - https://www.trolmaster.eu/
Watering - Autopot - https://autopot.co.uk/
Tent - Mars Hydro - https://marshydro.eu/
Love and attention - Me, myself and i
As always thank you all for stopping by, for the love and for it all , this journey of mine wold just not be the same without you guys, the love and support is very much appreciated and i fell honored and blessed with you all in my life, With true love comes happiness. Always believe in your self and always do things expecting nothing and with an open heart , be a giver and the universe will give back to you in ways you could not even imagine so
More info, the ocasional give-away and exclusive updates from all my adventures can be found - links in the profile description
Friendly reminder all you see here is pure research and for educational purposes only
Growers Love To you All 💚

Likes
18
Share


@BloodBath
Follow
I enjoy growing this strain so much that I decided to pop more beans and get another 2 plants going. It’s such an addicting aroma and beautiful strain to take care of and watch mature into plump fat purple nugs. I personally think this strain smells more like candy then anything else I’ve grown. Even Zkittles. This is a great strain for beginners or for someone lazy that just wants to kick back and enjoy the process. Thanks fast buds!


Likes
5
Share

@Ibgrowing
Follow
I upped the nutes to 4ml/l but started seeing purple discolouring on the lower fan leaves so I think I'll use less bio grow. It is quite weird because my other plant doesn't have this problem.
I wasn't able to inspect the trichomes as good so I'll also do it tomorrow.
The smell of this lady is a bit less strong than the purple lemonade but still very pleasant.


Likes
59
Share


@HarrysOG
Follow
lovely OG to grow, touched my plants with oil on my fingers dumb move hey see video. This is 1 of the easiest strains I have ever grown in 0ver 30 years, topped once no lst and thrive at a ph of 6.7 they use everything around 5litres in 4 days the pots are light and dry but not bone dry.
Likes
2
Share


@SamDo
Follow
Journal de culture – Semaine 4 de croissance (fin)
Je ne suis vraiment pas satisfait de la plante, que je trouve faiblarde et manquant de vitalité. Son développement est lent, et je suspecte que la température, qui descend peut-être trop bas la nuit, pourrait en être la cause. Cependant, même le pied-mère de cette variété n’a pas une croissance exceptionnelle, ce qui me fait penser que le phénotype de cette variété n’est peut-être pas très bon.
Pour ne pas perdre trop de temps, j’ai décidé de la passer en floraison aujourd’hui, avec un cycle de lumière 12-12. J’ai également changé la soupe et préparé 20 litres avec les nutriments nécessaires à la floraison. Sachant que cette variété a tendance à beaucoup stretcher, j’ai pratiqué du LST (Low Stress Training) pour recourber les sommités. Cependant, j’ai accidentellement cassé un apex, laissant seulement trois apex au lieu de quatre.
Bien que je ne sois pas satisfait de cette plante ni du pied-mère, je vais finaliser cette culture et passer à une autre variété ensuite.
🇺🇸Cultivation Journal – Week 4 of Vegetative Growth (End)
I’m really not satisfied with the plant; it seems weak and lacks vitality. Its development is quite slow, and I suspect the nighttime temperatures might be dropping too low. However, even the mother plant of this strain doesn’t show great growth, so I’m thinking the phenotype might not be very good.
To avoid wasting more time, I’ve decided to switch it to flowering today, setting the light cycle to 12-12. I also replaced the nutrient solution, preparing 20 liters with the ingredients required for flowering. Knowing this strain stretches a lot, I applied LST (Low Stress Training) to bend the tops. Unfortunately, I broke one of the four apexes, so now there are only three left.
Even though I’m not happy with this plant or the mother plant, I’ll finish this grow and move on to another strain afterward.

Likes
4
Share

@Chucky324
Follow
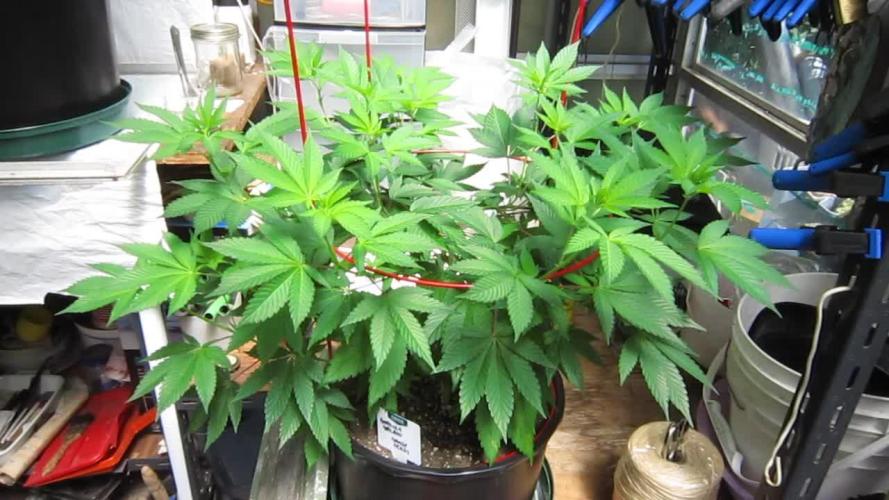
Hello. This is the end of week 9 and the beginning of week 10 of veg.
The plant is doing good. It's sticky when I work with it.
Sorta a citrus type of smell.
I've been pushing the branches under the rung when they get long enough... training...
OK. Keep Growing Straight.
Chuck.


Likes
39
Share


@J_diaz420
Follow
Se hace defoliación extrema 5 días antes del corte para intentar hacer madurar la planta de forma mas pareja.✌️👨🌾🏻
Likes
57
Share


@SmokieMcPot
Follow
2 girls 1 cup week 3!
Thanks for stopping by and checking out my experiment.
They're getting a little big to be taking individual overhead pics everyday now. They always both end up in the same shot no matter what. Will still update daily with pic. Got a new cam that can do timelapse. Almost sent it back until I said fuck it and tried TWO layers of sunglasses. Diff colors too. One more of a FLD filter color, one more of a UV filter color. Both are polarized as well. I'm sure the night vision footage will be trash with the IR behind the lenses, so the timelapse will have res checks/changes and night prob edited out. Stay tuned for that!
Going 1/2 strength GHE week 3 light feed and actually changed RES last night. Was looking at em and already noticed WG was drooping more than it should. Normal transportation and growth/energize cycles are expected, but was looking overwatered. GC if you look in vid "d14" in first and second set of fingers showing interveinal chlorosis. PH has been between 5.52 and 6.4 (lowest and highest), and averages a swing in a 12hr shift from 5.71'ish to 6.17'ish. Not uploading notes again like last week, but you'd get the idea if you saw them, I take notes lol. So PH wasn't an issue. They've been averaging a 7-15ppm drop in res per 12hr and has only been climbing again due to ph down additions. I should prob change RES mid week so it's not a high concentration of ph product. So they're DEF eating proper, have stable ph swings, optimal res Temps and dissolved oxygen is good. WG taking on more water to get the nutes, causing leaves to droop from excess water. GC moving nutes from old growth to the new growth. So they're hungry.
Ghe claims 62.5ppm nitrogen, 275-375ppm target per mixture below. Mixed and measured in between each addition to get my numbers.
-2gal Water/calmag/hydroguard 215ppm
-Micro 4.9mL - 170ppm
-Grow 4.6mL - 100ppm
-Bloom 3.4mL - 60ppm
Nute concentration - 330ppm (nailed it again GHE)
Water - 215ppm
Total - 545ppm
Ph'd to 5.6 final tds 563ppm
Mars Hydro TSW2000 on theeee way to finish these girls off right.. some of my worries are settled. For now...
*they just ate 32ppm since this mornings RES chk/adj... I was thinking I'd have to swap RES once mid week once they get older, but think they may benefit from it sooner than later. Tap roots popping out by the chute for the air line, the temp sensor, and the main stack.. going to have to pump the res out pretty soon to avoid root damage. Timelapse will turn out pretty sweet if I would quit bumping the damn camera, and stay TF outta there 🤣.
**these girls are starting to BLOW UP! Figured I'd bump their feed up a bit today because they told me to. Eating as much as they are as quick as they are I'm going to have to be on top of it or shit will go south quick.. so, for the record..
GHE wk 3 "light" feed 3/4 strength
Projected nitrogen - 93.75ppm
Projected TDS - 412.5-562.5ppm
2gal water/calmag/hydroguard 202ppm
Micro - 7.35mL 229ppm
Grow - 6.9mL 145ppm
Bloom - 5.1mL 97ppm
Nute total - 471ppm
RES total (after ph corrections) - 690ppm
May have to hit them harder if they keep eating like they are. Trying to borderline optimal without crisping their leaves. So I am watching the TDS to see how theyre eating. Aiming for 10-15ppm per 12hr. If they eat more, feed em more. Eat less, feed less. Seems to be working so far, just like last time. May up my calmag TDS of my spring water/tap mixture to 250ppm from the 80'ish it ends up being after mixed. I'm sure they want more calcium too. It can't hurt right??
Wedding Glue couldn't be happier with its bump up in nutrition... can't wait for this timelapse...
***realized I messed up settings on timelapse after the fact.. pissed I missed out on the footage from its night and day shift today. Uploaded footage from after RES change with more food for em to eat, sped WAY TF up cause I decided to grab a frame every 3sec vs 1min. Trying 2min this time and stop/save/start vid every 12hr. Fingers crossed it turns out. WG was happy ASF and let me know with a big ole wave. And some BIG growth over the time. Have tied em both down again to avoid topping, yet. . Looks like just wiping off the two leaves that got effected by my carelessness wasn't enough. Few drops of something got on GC in two spots shown in pics. Note taken, wash it off next time or just be more fucking careful.. got it. On a surprising note... RES level not only dropped 600mL, but also dropped from 690 to 645ppm (total tds). So they're eating MORE with the increased feed... doesn't suprise me much, but heard auto's don't like to be over 6-700?? Nute concentration @ 471 yesterday, and it's dropping FAST... will probably fatten up their plate on Sunday and go with a RES change, full strength week 3 GHE.
****tired of reading this shit yet?? Here we go with yet another RES change.. just bumped em up YESTERDAY! they're still showing signs of hunger, WG more than GC. Can't let these girls go hungry now can I? A couple bucks in nutes down the drain is better than letting em starve.. Plus they're more attractive when their leaves aren't full of water. So here goes... starting to smell in the tent..
GHE wk 3 light feed
Projected nitrogen - 125ppm
Projected ppm - 550-750ppm
2gal spring/tap, calmag, hydroguard - 248ppm
Micro - 9.8mL 362ppm
Grow - 9.2mL 189ppm
Bloom - 6.8mL 111ppm
Nute total = 662ppm
RES total (after ph correction) - 940ppm
Just realized if I delete timelapse from wyze app, it deletes from gallery too. Fuck, another good one... my bad. I think I got it now... side note, guess I have to count cotyledons as first node since these bitches wanna grow some arms from what mangled pieces are left next to em. Need to grab some 91% before I go cutting on these girls though, so they stay for now.
*****d19 mars tsw2000 showed up two days early! hung it during the "night". timelapse updated, day 18 and 19. lots of growth under the fans, and WG trying to push GC tf out of the cup lol. Training rods installed for the mains, and all the 3 fingers are plucked. Ended up plucking a 9 finger from WG and a 5 finger from GC to make way for the under growth. Feel like Bruce Almight parting a bowl of soup lol
******didn't want to post a pic of my girls in distress, but documenting everything else, so why tf not. swapped out the clear sight tube for a more UV friendly agro green. Marked the tube in the same spot as the clear, but it was almost a gallon more in reality at the same mark. I was drowning them with no air gap below the upper growing chamber. After measuring, it was submerged by about 5/8th inch. Sorted that out, and took almost all day for em to perk up. On top of that, the new light and adding another oscillator changed my environment. No more humidifier in the tent. Thought I lost both of them.. Soggy leaves, spotting, etc. Backed nutes back down to 3/4 strength wk 3 due to slight curling in new growth and one lighter tip on one new finger. Shortened the training rods tonight and started with some bondage. Prob the last time they'll get tied down before the net gets used (if needed) here in a week or so. Backed off to 16 DLI from 20 until they really perk up. End of week 3
Likes
23
Share


@Christo
Follow
Late to the party ….. anyway.
Germ’d in final 12.5L airpots. Just water and root juice at ph 6.8 so far. First 2 pics are day 14
Pictures 3 and 4 are day 15 all the other pics are day 18 and 19
First “feed” solution today (day) 19
LST on all 11 (one didn’t pop) everything seems to be on track an looking good so far …….