
Likes
Comments
Share


@Kush_queen
Follow
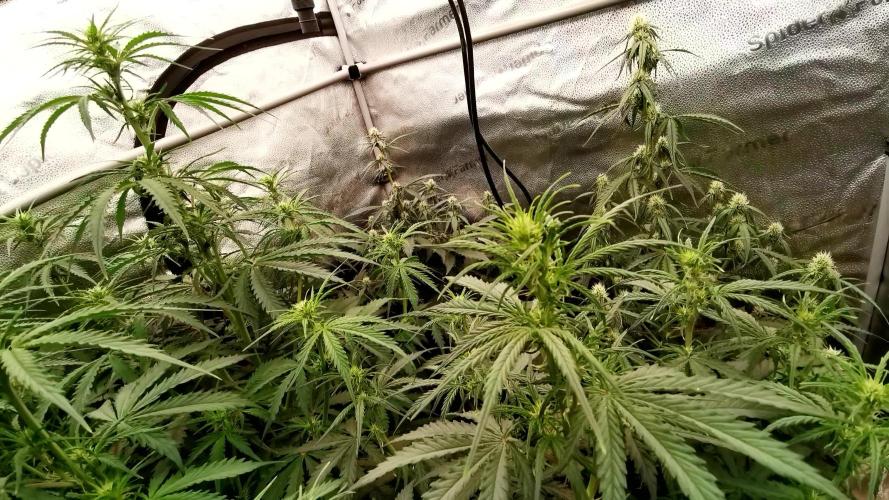
Well this week I had to give the girls a fairly big trim they were beautifully bushy but they were struggling for space so I cut back the heavy shade leaves that were covering bud sites
I am also adding bloom to there feed from now but they are doing really well and the smell in the tent is devine.
💚🙏🌱🙏💚🙏🌱🙏💚


Likes
80
Share


@Roberts
Follow
Pure Ice cream close is doing great. I hst her canopy early week. I switched her light time to 12/12 today to get the flowering process going. I also trimmed out a lot of bottom growth and started defoliation on the dense canopy. I will be doing more in about 2 weeks. Mainly I am concerned with keeping her stretching down. So she don't get too close to the light. Every thing has been going well for most part. A few Challenges ahead, but I think I will get through them. Thank you Spider Farmer, and Pure Instinto Seeds. 🤜🏻🤛🏻🌱🌱🌱
Thank you grow diaries community for the 👇likes👇, follows, comments, and subscriptions on my YouTube channel👇. ❄️🌱🍻
Happy Growing 🌱🌱🌱
https://youtube.com/channel/UCAhN7yRzWLpcaRHhMIQ7X4g

Likes
9
Share

@HowtoBubatz
Follow
The Bruce Banner girls went wild this week! 💪
At the start of the week, all three were sitting on IFCO crates to even out the canopy, but #2 stretched so much that she had to be moved down to the floor. She’s officially the tallest now and really taking off.🚀
#1 started stretching more as well and keeps growing strong, while #3 is still a bit smaller but catching up nicely.🌿
All three look healthy and vibrant — deep green color, no signs of stress or deficiencies.💚
They got a light defoliation this week, just removing a few big fan leaves that were shading lower budsites.🍃
A proper defoliation will come once the stretch phase is over.
Environment:
Temp: 25–26 °C
RH: 55–60 %
PPFD: around 900–1000 µmol/m²/s under the Spider Farmer SE5000
Controlled by the AC Infinity AI system 🌡️
They’re drinking a lot #1 still the thirstiest one, taking about 4 L every 2 days, while #2 and #3 get the same amount roughly every 3 days.💧
Overall, they’re stretching beautifully, stacking up nicely, and looking more impressive each day. Can’t wait to see them finish the stretch and start focusing on those buds.✨🔥

Likes
2
Share


@PINUFLA
Follow
Día: 72
Riego: 1L x Pl.
- SoloTek Bloom 3mlxL
- HeavyBud 3mlxL
- Vitamax 1mlxL
- MonsterBloom 0,3gxL
Día: 75
Riego: 1L x Pl.
- ProSilicate 1mlxL


Likes
22
Share


@drgreentips
Follow
I feed water till the day 10 mark now shes had the chop filled the smell proof weed dryer and the was left hung for drying
Processing
Likes
17
Share


@Majormolasses
Follow
I can’t believe it’s week 7 already these weeks have been flying by these lady’s have been really easy to grow so far not much slowly them down I have been putting them threw the ringer with trying new stuff and they both are doing great I’m thinkibthe bigger lady’s actually a male it’s funny how the bigger stronger faster ones are usually males and the lady’s grow low and slow hmmmmm.


Likes
6
Share


@Elfasitoencasa
Follow
Semana 5 Floración.
Día 69(12/10): Estamos bien, hoy regué con grotek, monster bloom, y la Abby esta mas despierta. De a poquito veo el comienzo de los tricomas. Veremos mañana.

Likes
46
Share


@LittleBigTrees
Follow
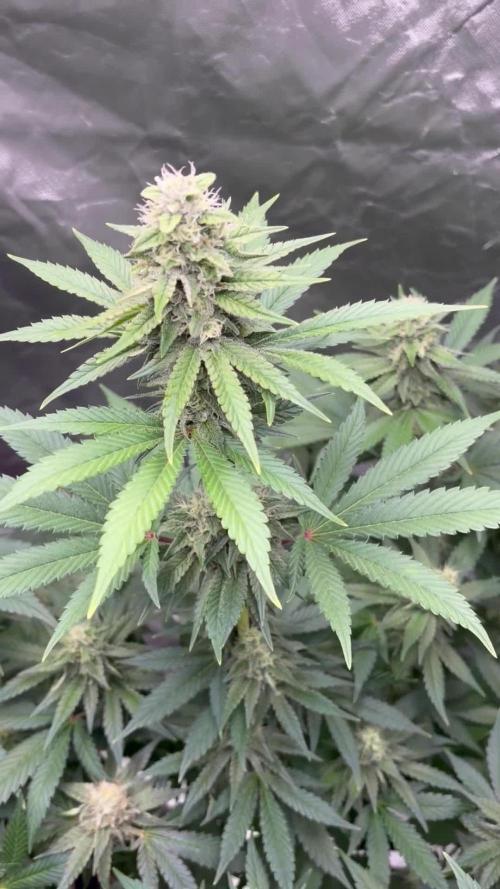
Defoliated a few leaves but nothing major .
The smell is starting to get strong funky and like orange juice (very different smelling from other orange smelling strains ive grown , trichomes are forming and the plant is sticky to touch !
One plant has very few stigmas a trait I've only seen one before after crossing kalimist x super lemon haze . Anyone know why it happens ? I can't find much online regarding it .
Anyway I'm into week 5 now see you at the end of it

Likes
5
Share


@0xcrlt
Follow
August 12 - Day 64 - Watered with 3L of water, BioGrow, BioBloom, and TopMax.
Likes
15
Share


Likes
91
Share


@PEAKYPLANTERS
Follow
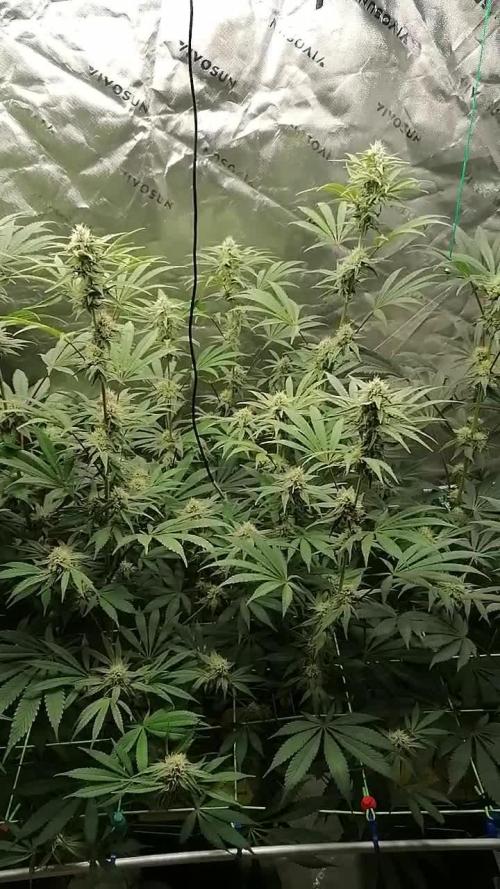
Ladies and gentlemen ... Welcome to the prairies of Queen Peakyplanters.
An enchanted Weed valley where the maximum is always giving to improve the daily life of our girls.
Our three WEDDING GLUE grow very different from one another and their structural height and much shorter than the cousins that are next to therefore they did not bring many lower ramifications above the network.
Anyway ... the apical top of the front plant is becoming huge!
Happy and abundant harvestings to all
Likes
8
Share

@MO_PureLeaf
Follow
Ja die 4/5 hat angebrochen, die Pflanze wächst gut und die buds werden immer praller :) die Pflanze wurde auch sehr frostig! Und wenn wir schon bei den terpenen sind, sie riecht sehr süß mit einer Holz Note dabei das macht richtig Bock das Zelt zu öffnen. Dafür das die Pflanze die kleinste is riecht die mehr als die Strawberry und Cream Caramel. Ich hoffe aber sehr das die Pflanze keine Bananen bekommt wie die strawberry ich werde beide Pflanzen die übrig sind ab jetzt mehr kontrollieren müssen.
Likes
49
Share


@KurbinTurbin
Follow
I am thinking about getting either a light rail system or more lights for next grow, every day and half I am moving the lights At least 2 feet.

Processing
Likes
17
Share


@Hoodoo
Follow
2020-08-11 Another week gone by... Plant 01 is still fattening up, drinking normally. Plant 02 has been completely choked out of the lights so it's not doing very well. Keeping the nutrients the same as they are both pretty steadily drinking. Some death amongst the lower leaves on plant 02 and the buds are getting trichomes but not getting very fat. Plant 01 is very dense and sticky af. Excited to harvest in a couple weeks!
The tent is definitely ugly as hell and the vegetative state clearly went on for about 2 weeks too long (first time grower) while I messed up the nutrients and other things that caused them to grow slowly. The 2nd plant never really recovered. I have continued defoliating and super-cropping plant 01 away from the light and keeping the distances even... It's an ugly canopy, can't wait for the next one so I can get it right!!

Likes
15
Share

@Brujha77
Follow
Woche 6 Blüte
Die Bud's entwickeln sich langsam und legen an Masse zu.
Außer Tank füllen ist nix zu tun 🥀
Sonntag gab's nochmal Green Bull für alle 3 🍀🍀
Likes
3
Share


@AdirondackGreen
Follow
Pulled 8 7-9g colas on the first struggler, well short of my qp per-plant goal. Ill increase my plant and yield count as I pull the rest. Still have 2 more plants that ahve gone another week and didnt miss the feed this one did. Hopefully we still get at least ~10oz from this run :(

Likes
3
Share


@Bncgrower
Follow
We are in the middle of week, i decided to prune my 2 girls (topped on 6th July) and adjust LST, they having a good development and i think why not? I will flip to 12/12 when she's completly recovered, i believe a two or tree days..
Good growing ✌️🌱🌿🍁

Likes
3
Share


@Joaka
Follow
se ve un crecimiento rapido de ambas cepas, se espera que antes de terminar la 3ra semana se aplique el apical a cada una.
Likes
Comments
Share


@GrowDiaries
Follow
Wrap up of the Award Day at Spannabis 2025 with Adam iLL!
That’s a wrap on an epic awards day at Spannabis! Congrats again to all our growdiaries.com community-voted winners for shining in the growing world! Thanks to everyone who joined us!
#Growdiaries #Awards