The Grow Awards 2026 🏆 


Likes
Comments
Share
@RastaGrow
Follow
GldaniGrowShop Thank you so much for bringing and giving me the strongest :)

Likes
111
Share
@Salokin
Follow
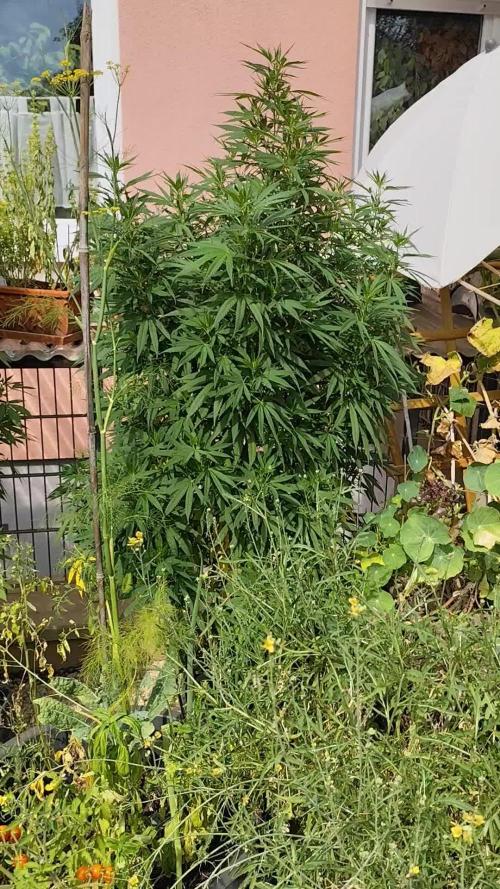
Hey Growmies,
she has bounced back phenomenally, so much that she has gotten extremely hungry. The feed shown here is the already the strong feeding suggestion, but I first saw a few leaves with a nitrogen deficiency, when I decided to up the veg nutes to pre flower levels, I now started to see signs of magnesium deficiency. I decided to add 10 ml more if calmag to the mix and will see if that’ll fix the issue.
Other than that, she has started to develop a massive rootball and almost stretched by 12 cm. Will probably veg her for another 2 weeks by the looks of it and then flip her once she has filled the scrog. She is already starting to smell quite strong for her not even being in pre flower.
I also want to point people in the direction of the photone app, a very helpful little helper that’ll help you getting a good guess of the ppms at your canopy.
Big shout out to Patricia at Zamnesia for given me the chance to try this amazing strain.
Here is the code that’ll give you 20% in Zamnesia‘s online store, just input ZAMMIGD2023 at checkout.
Thanks for stepping by and until next week!

Processing
Likes
5
Share
@Bombtofu
Follow
I need to get my l.s.t. done. Plan to this weekend. Have been alternating waterings between regular water and water with 2.5ml of fox farm grow big. Have watered all times with 200ml of water and the solution water mix. Been keeping the humidity at about 45% temp around 68. Can tell a huge difference in sizes of the plants and their container sizes. Will be going with at least 3gal pots next grow. Still using a 25w light as well. Will be upgrading that asap. Thanks for the view. And as always, stay safe.


Likes
21
Share
@UnkleSkunk
Follow
now we wait for the enlargement of buds ...
the plant has remained low and compact ......
the branches and the trunk are very resistant and hard, unfortunately it has yielded a thread that held it and the plant has grown a bit ' strange, but the scent is not at all .... I think the plant will give me definitely less than what I'm used to (over 50 gr)


Likes
6
Share
@JohnnyBarrel
Follow
Week 19 - Flowering week 9
Perfect time for harvest CaliFunk. One of the only plant not really affected by pests : the flowering was good and the final product look great despite of the little yield.


Likes
73
Share
@Reyden
Follow
Purtroppo mi hanno chiamato a lavorare e vado via in mare 3 giorni a settimana più al bar a dare una mano a una amica per cercare di fare qualcosa per partire ad ottobre…
Le ragazze sono state un po’ trascurate ma stanno bene anche da sole…settimana scorsa ho fatto un bel flush da 3 litri L una con acqua fredda prima di dare da mangiare più pesantemente
Questa settimana ho fatto infuso con 15 bucce di banana per dare una spinta PK per questi bei fiorellini e incrociamo le dita di vederle fiorire profumatamente tra qualche settimana perché la scorta non è delle migliori 🤧🤡🤲🏻😶🌫️
Chiedo scusa a tutti per non essere stato presente ma cercherò di recuperare piano piano anche se saltando alcuni passaggi
Buone cose e buone vibrazioni a tutti noi 😁🙃
Likes
3
Share
@High_Class
Follow
A lot of stretching happened the first week. Week 2 so far so good. I will lollipop at the end of week 2. Thanks for watching.
Likes
25
Share
@crystal_garden_0
Follow
Good week, buds are just starting to get bigger, slower than the other strains I have in the same tent. Getting frosty, no complaints here.
Likes
11
Share
@Grow_Mary_Green
Follow
Geerntet - Getrocknet - Ausgehärdet
- Am 76 Blüte Tag im Dungeln geerntet.
- Dann zum Trocknen für 6 Tage im Karton aufgehangen.
- Danach in Gläsern ausgehärtet.
Ergebnis der Ernte:
Blüten:
A: 56,39 g.
B: 49,54 g.
C:
9,46 g.
Blüten gesamt gewicht (Getrocknet): 115,39 g.
Likes
19
Share
@Growbody
Follow
Hallo und herzlich willkommen zu meinem Growbericht Outdoor 2025 mit den Sorten Power Flower Feminized, Royal Medic Feminized und Special Kush #1 Feminized, alle 3 von Royal Queen Seeds. Es ist das erste Mal, das ich Töpfe für den Outdoor grow verwende, bisher waren alle Gorilla grows und direkt in die Erde gepflanzt.
Die URL der Power Flower Feminized: https://www.royalqueenseeds.de/feminisierte-hanfsamen/120-power-flower.html
Die URL der Royal Medic Feminized: https://www.royalqueenseeds.de/cbd-samen/148-royal-medic.html
Die URL der Special Kush #1 Feminized: https://www.royalqueenseeds.de/feminisierte-hanfsamen/138-special-kush-1.html
Die Planung für den Grow ist, die Samen in easyplug Anzuchtwürfeln keimen zu lassen und danach in 0,6L und 2,2L Plastiktöpfen, dann letztlich in die neuen komplett doppellagigen ROOTIES 15 Liter Wide Version Stofftöpfe umzutopfen. Sobald die Witterung es zuläßt, sollen die Pflanzen an die frische Luft.
Es ist schon eine Weile her, das der Grow losging, die Bilder sind jetzt aktuell.
Tag 162: Wieder ein Hitzetag, kaum Wind. Gewitter sind angekündigt, bis jetzt gehen die im Schwarzwald und den Vogesen runter, der Rheingraben bleibt bisher trocken. Die Mädels bekommen weiterhin 3x am Tag Ihren Cocktail. Kein weiteres Höhenwachstum.
Wenn's dir gefallen hat, schau wieder vorbei ✌️😎
Likes
100
Share
@MadeInGermany
Follow
Hi people :-)
This week everyone has developed very nicely and is slowly coming to an end 🤗🌱🍀.
The Orange Sherbert was placed in the darkroom yesterday and will be harvested tomorrow :-).
Everyone else will continue to be flushed. Blue Gelato # 41, Her Majesty F1 and Sour Diesel will be harvested next week.
The next week is the gelato letzt.
Then I will gradually add all the harvest pictures 😍👍
I wish you all a good start into the week, let it grow 🌱🍀 and stay healthy 🙏🏻


Processing
Likes
12
Share
@Mistertemps
Follow
Almost Done!!! The trichomes look cloudy now starting the flush now
Likes
6
Share
@MindFlowers68
Follow
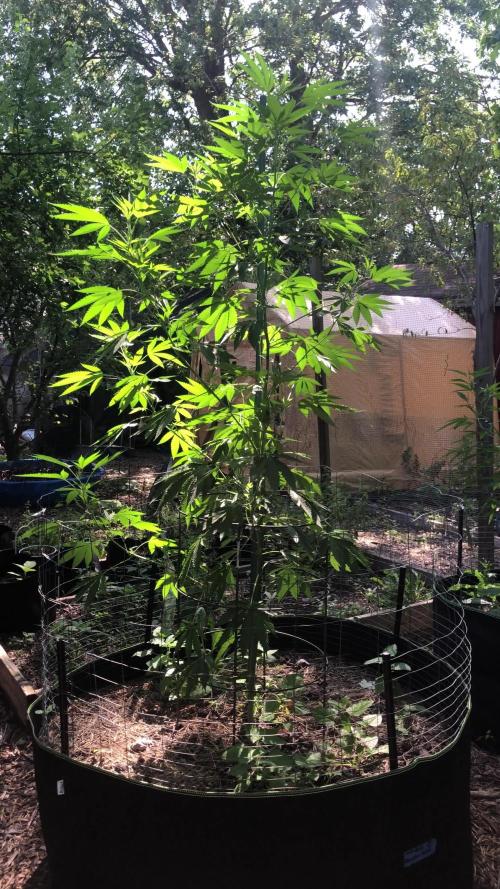
Still vegging strong. Stacking nodes at little tighter and stetching out more horazontally. Her structurr is slightly jacked from the tree but is making an awesome comeback.


Likes
12
Share
@Solarcradle
Follow
Easy grow, nice sticky, dense trichome filled colas from a smaller plant. I am very please with her smell of sweet, earthy and pine. Hits to the head were after the first couple of inhales. A nice cerebral buzz followed. Energy kicked in and I feel like being creative. :)
Sorry about the picture quality. I am waiting on a sale to buy a new camera that I have my eye on.
Likes
11
Share
@Dendegrow
Follow
Apricot Auto – Harvest coming next Monday 🌕✂️🍑
Despite the HPLV infection, she’s developed quite well 💪🌿
Harvest is scheduled for next Monday, following the lunar cycle 🌕🔍
The goal: to test if moon-based harvesting improves terpene production 🌬️👃
It might be a bit early, but this is all part of the experiment
Let’s see how it goes – stay tuned! 🚀📷
Apricot Auto – Ernte am nächsten Montag 🌕✂️🍑
Trotz der HPLV-Infektion hat sie sich echt gut entwickelt 💪🌿
Geerntet wird nächsten Montag, passend zum Mondzyklus 🌕🔍
Ziel ist es, herauszufinden, ob die Ernte nach Mondkalender die Terpenproduktion steigert 🌬️👃
Vielleicht ist es etwas früh, aber das gehört zum Experiment
Wir schauen mal, wie es wird – bleibt dran! 🚀📷
Likes
92
Share
@gottagrowsometime
Follow
D91 Still a couple of weeks to go at least. She is putting on nice long bud mass as all bud I'll get off her will have very few sugar leafs. And with the top 30cm of the nodes bent outwards it's allowed the light to reach down deeper into the plant itself, and well, you can see the results, bud sites galore. Not much left to do with her. I threw her into a heavy flush for 24hrs first flush run-off was coming back at 2900, way too high, salt and nute residue is been left behind because of the poor P-K uptake that control the spread and uptake of nutes. Got her down to 980 today with her final flush before going into her rest. After the flush I poured 100ml of 2ml/l of cal to help break down the nutes behind so the plant can uptake them, this is very important when doing a flush to lower your TDS add some cal to it as this will keep the plant sucking not only thr water and leaving the nutes behind, cause you need cal espically in subs with nute build up it has to be broken down and will help to avoid nute lock or going into an unwanted flush to early.
I'll be dropping her next feed by 200ppm down to around a 1000. I will still give the nutes I've been given just a little less and she needs to get ready for a flush but be kept with enough to keep her mass of growth going. RH is between 55-60%:air been blown in is reading at 48-50% temp is 22c in tent it's 21.7c in the dark and 27-28c with the light on. With my new 4inch intake smart fan im going to set it up so it blows 100% air in at the top and a 4inch intake fan will suck out 80% I'm hoping by doing this it will change the RH of the room 48-50% into the tent creating the same environment. The air that is brought in is filtered by a carbon filter, no need for 1 to blow the air out.
19/3/22 As you can see I have the RH as best as I can get in my grow room, I've installed the smart fan and inserted the sensor giving me 57%RH 75F in the tent, with the light off, it's rather hot today, much hotter than normal, it's normally 21c in my room it's 24.5 today. RH is at 50% in room, hopefully by installing my old intake fan in the lowest part of my tent and suck out 80% While 100% gets blown in on top will bring the tents RH to the same as the room, that's the hope anyways. But 57%RH is still okay, not optimal but not too bad neither
21/3/22 So, I tried out my new method. Of having my smart intake fan suck in 50RH and a bottom intake fan at the end sucking out older air at a lesser speed had it running for 8hrs, no change in humidity whatsoever just dropped the temp by 1.5c. I think the fact I have a 70x70 with so many plants has set the RH and thankfully it's not what it was which was touching on 80rh at some days. A bigger tent and I'll really be able to dial in my grows now I have all the tools to control RH/TEMP from S/H. For now 57%RH when it's low and 62% when the lights are on for a few hours. Stays around 57-60% atm for around 85% of the time. Temp is constant and doesn't change without my control within a range of 4-6c change difference, this number I have no problem in changing and I'll be making my tent a lot cooler after this wk ends. I'll be keeping her at 18c with lights off and 28 with lights on. As for the plant, she has fully turned the corner and I can say whatever the issue was, which no 1 can still tell me what it was not do I know. It wasn't a def because it was so random and hit all different levels of growth. But, thankfully she has passed it, am really dialing in this coco grow. I know exactly how much water she takes without spilling a drop of run-off unless I want it to. The buds, well, they are small at the moment but they are so fucking dense and hard I really hope they get at least 30% bigger of the next 2 wks. The last few days some has but on at least 10% bud mass and all sites have moved out of pre-flower (stigma), so growth is over for the plant, it's just bud sites now, how you can tell is your sites will start to give off their aroma and will start to get sticky to the touch. 85% of the plants buds are all in the same range mature wise or only a few days out from their sister buds. Still some 15% that still has stigma but as this is at the bottom of the plant I know she will not grow anymore but maybe a little if any around these sites.
21/3/22 GRRRRRR stupid rust spots all over her again today, yday she got a mix of all the nutes above, one of these nutes is causing this, I am 75% sure it's overdrive. Really annoying, as there is no deficiencies, no signs, just these poxy rust spots. So annoying, as NO 1 can tell me exactly what they are, it's not a def, the plant ozzs health, she's the pic of it, every leaf stands tall, very good color, slight old nute burn very little on about 10% of the leafs but these stupid rust spots are stupid. Overdrive, or 1 of the nutes is doing this, I reckon it's this as it's only been given that the past 10 days and I'm nearly sure this is the cause, but I can't be sure, and until I figure it out I really don't feel comfortable moving forward with the AN line. Sadly I think I'll be dropping everything but big bud, bud candy&voodoo juice.
22/3/22 Was going through my buds and man, they are so sticky you would nearly say they are done until you look close at them, there still full of pistils, white hairs, the bud growth will come past them, so there is still a big push yet to come so I was hoping to start dropping the micro nutes but I think that would be a massive mistake and cost me dearly on harvest day. Fuck it, I'll flush the shit out of it for 2 weeks on flawless finish and then a week on water and 2-4 days in the dark just on water. With much thought I pushed the PPM back up to 1450. I've decided to drop overdrive. After 24hrs of flushing my coco like crazy I'll be happy to start her back on nutes in 24hrs when she's drank the 2.8-3.2l of water she's currently holding, the run-off from that was 1800 btw, but with salts and so on from the last feed I've learnt with AN the PPM reading is what you give it, not always the Run-off. Yeah I'd trust the PPM reading 2moro if i was doing another ppm run off test, but as im not ill go by what im putting into it, cause my weekly flushes/flushing in general in pretty good, very little nute lock experinces with mixing so many nutes
22/3/22 Messaged AN and sent them pics and info, by going through my nutes and the fact that I gave some big bud in the same window as overdrive causes these rust spots. Thankfully I finally have an answer as to the rust issues. Just a bad mix with nutes that shouldn't come into contact with each other. Thanks AN
Thanks for reading, drop a like and I'll know u drop by and I'll do the same
gottagrowsometime