
Likes
Comments
Share


@AlexJekomust
Follow
Speedy Boom auto started flowering, is now 1 month old and has grown tremendously in width, stayed as small as I wanted, I started following the Advanced Nutrients Flowering Fertilizer Program

Likes
10
Share


@Beardacious_buds
Follow
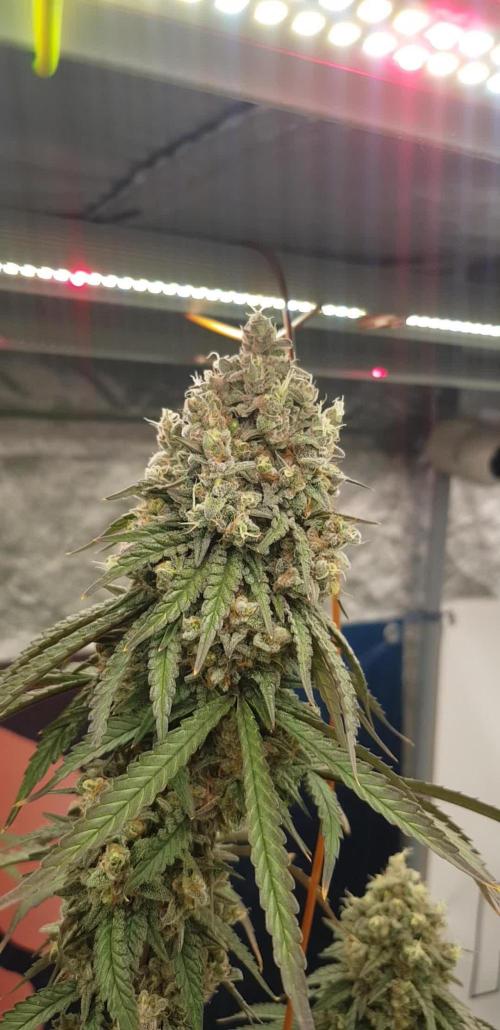
Packing it on. Starting to color up. Anvil already showing her beautiful colors. Aliens Berries is a shorty and not getting as much light and starting to get a little airy… way she goes.


Likes
2
Share


@Haisenhemp
Follow
Fogponic+DWC technique, relativamente resistente tanto a temperaturas como a enfermedades, soporta bastante bien tratamientos agresivos. Buena calidad de flores, aroma sutil pero denso.

Likes
6
Share


@flitflitz
Follow
KarmaIntraveritisGrow
Cada vez tengo más claro que este cultivo no será nada del otro mundo. No están creciendo especialmente. Y hay un motivo.
Mi otro cultivo es prioritario y el espacio disponible es el que es.
Reciben muy poca luz directa, apenas un par de horas, están todos el día a la sombra. No puedo luchar contra eso. Y se lo noto, las pobres parece que quieren pero que no pueden.
De todas maneras seguiremos hasta donde sea que lleguemos.
Tnt complex 2 veces/semana a razón de 2.5 ml/l
Powerzyme 1 vez a la semana, 2 ml/l
Supervit 1 vez/semana, a razón de una gota cada 4 litros
Lo estipulado por hesi pero no, me he vuelto a colar y les he doblado la dosis de tnt un dia, se me va la olla, estare pendiente de la reacción. La última vez no pasó nada...veremos
MP - ✅ . ahí va, parece que va a su ritmo
GZP - ✅ . Habrá dos fenotipos distintos, también? uno con la distancia internodal más corta que el otro que parece que tira más pa' arriba. No sé... Apreciación mía🤷🏻, me estaré volviendo loco?.
Seguimos!
Likes
12
Share


@CannaDiaries420
Follow
22-01
Already in week 5 and the topping is taking off its results.
*I ended the grow of nr: 3, just bad genes.
but more light for the other 3 plants.
24-01:
Applied another round of LST today. This time to create 4 main coala's and a wide and full deck of leafs.
When the plants start to get more busy i will add an scrogg technique and do a little defoliation at the bottom of them
to take even more profit of the LST.
26-01
I added Mega worm from plagron to the soil to give the plants a big boost so that they are ready for a strong flowering phase.

Likes
10
Share

@GERGrowDesigns
Follow
Welcome to Flower week 8 of Sweet Seeds Mental Rainbow F1
I'm excited to share my grow journey with you from my
Sweet Seeds Project . It's going to be an incredible ride, full of learning, growing, and connecting with fellow growers from all around the world!
For this Project , I’ve chosen the Feminized Photo strain Mental Rainbow F1 :
Here’s what I’m working with:
• 🌱 Tent: 120x60x80
• 🧑🌾 Breeder Company: Sweet Seeds
• 💧 Humidity Range: 40
• ⏳ Flowering Time: 7-8weeks
• Strain Info: 22-30%THC
• 🌡️ Temperature: 26
• 🍵 Pot Size: 16
• Nutrient Brand: Narcos
• ⚡ Lights : 600W x 2
A huge thank you to Sweet Seeds for allowing me to try my Best with this amazing collection from Photo Strains they managed to Sponsore . Big thanks for supporting the grower community worldwide! Your genetics and passion speak for themselves!
I would truly appreciate every bit of feedback, help, questions, or discussions – and of course, your likes and interactions mean the world to me as I try to stand out in this exciting competition!
Let’s grow together – and don’t forget to stop by again to see the latest updates!
Happy growing!
Stay lifted and stay curious!

Likes
53
Share


@CanarianGrow92
Follow
All good so far, just sprayed them with anti-insect just in case (thats why the leaves looks shiny or oily) also noticed that the one i have in the right corner streched more the first week than the other 3 but that one is bigger since the beginning.
Added 120g per plant of biobloom (3g per liter) and increased the light to 315w 😁

Likes
10
Share

@Jardin33ro
Follow
Buenas! Ultimas semanas, ya pasamos al overdrive y tratare de ir bajando la fertilizacion de a poco. Se ve el engorde, se ve el aumento de resina y el olor va cambiando un poco con respecto a semanas anteriores. Vamos a tratar de mantener temp baja y humedad controlada ( 24° C y 60-65 HR) pero no es tan facil, se acerca el verano y sin aire acondicionado todo el dia encendido es complicadisimo. Pero yo soy casero, hacemos lo que podemos con lo que tenemos. Disfruten de las toronjaz como yo lo hago, deleitense

Likes
21
Share


@MG2009
Follow
01/01/2022
Potting up and amending with
5-2-4 to give a little kick before mid flower
#6 is first girl to show herself, also got two different males and only difference is that one is lighter green and other darker green
(also dark green one seems to drink more than lighter green) 💚. Other than that structure is very similar I wonder which is a better breeding male? I guess I might pollinate and LABEL TWO BRANCHES ON each female one for each male. and find out.🙏🏻
01/06/2022
#3 showed today, reppoted and into flowering closet, along with#6,who showed earlier this week lights at 14-10 see how they respond to that schedule, which should help use up the 5-2-4 going into week 3 should help with her stretch. Which isn't really that much I believe maybe double her current height, which I will check at lights on.Week ,#3 if I think of it I'll give a good fungal dominant tea.


Likes
5
Share

@CanarianGrow92
Follow
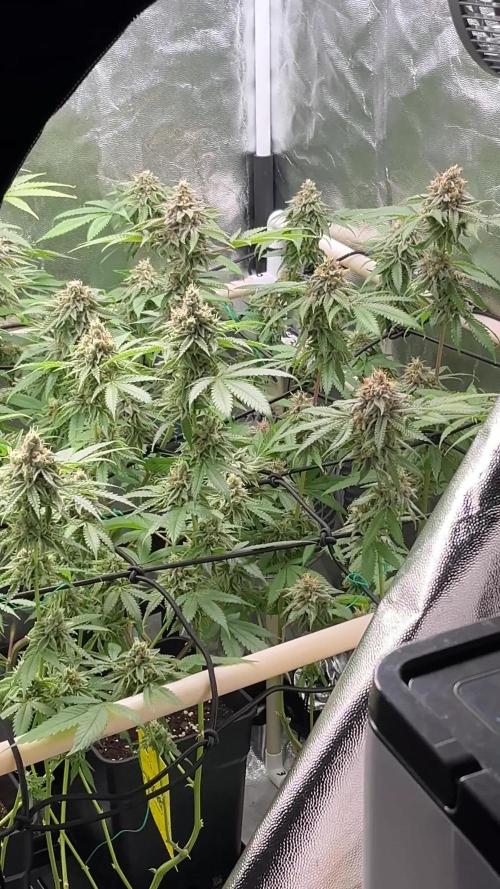
First week of flowering for the girls.
We started with some master bloom from Xpert nutrients and continue with master root also from xpert nutrients.
We placed a net above the poants to guide some of the taller branches and create a more equal canopy.
We defoliated some lower leaves and for the rest it looks quite good, some plants showed a little sign of overfeeding so we lower the dosis this week.


Likes
8
Share


@Ferenc
Follow
Hi there! Some more LST is done especially on Orange Sherbet and Wedding Cheeskace. Purple Punch and Frosty Gelato remain small and it is too hot now they were burnt also I removed some leaves. Outside is 30 degrees inside 38 OMG. They are not in my house so just see them once a week harder to look after them... They are flowering also all good hopefully the heat wont damage them that much. Lamp distance is back because it was a bit too close also I guess...
Likes
105
Share


@Green_Friends_Inc
Follow
Commencing Week 9 - 1st week of flowering - Day 57 from germination - Day 6 of 12/12 on December 19th
All is well. Much has happened. Clones and bonsai training. 818 already has pungent, awesome scent. GZ are still beasts. RD & BH have fantastic natural shape.
D.61t/10f
RDs Sativa growth is showing off now and stretching out as expected. looking beautiful. what she lacks in Veg State growth is definitely made up during bloom. hoping she fills in the holes of the canopy


Likes
35
Share


@StonedandSteady
Follow
*Pablo Escobar Fem* look$ Wonderful and Growing Up Phenomenally Fine into her 4th week from #DivineSeeds our others are Super and Breed by #thehumancannabiniod #AlienBloodGenetix #SmokinPlantaz #TNBNaturals #Foop 12th W/ Flower 3rd/4th/5th W/ Veg
Yo!!! Thanks Again for All the Love and Support my fellow Growmies and Growmets!!! This Magnificent and Magical Lady is Growing into her 12th Week of Flower in our 48×24×60 ViparSpectra Official Club 🌿 ®️ Grow Tent and under our #Osree QB1000w and #GrowStarStore Kokokala QB1000w and our Tomatoes×3, Sunflowers×5 and The 5 Brand New and Fresh Starts are Wonderful with a Huge Hint of Fantastical Fire is my #SalamiLegF3×2 by Broski #thehumancannabiniod #DankFlowGenetics #EastCoastSeedBank #FireAlienRomulan by Broski #AlienBloodGenetix my #PabloEscobar and #Opium by Team #DivineSeeds #DivineSeedsBreedingCompany Growing under our #Growatt 600w with #FoopOrangicBioSciences and #TNBNaturals The Enhancer Co2 Despersal canister and ph'd them w/ Declorinated watering w/ TNB ph Up and Down! Totally Top Quality Topz all Around! Thanks Again #GallowGlas420 #HarleyGrower #thehumancannabiniod #AlienBloodGenetix #SmokinPlantaz #TNBNATURALS #FoopOrangicBioSciences #as420.ca #divineseeds #divineseedssquad #divineseedsbreedingcompany #BioFlux #ThrivingDesign Family's and Teams!!! Your Genetics are Merry Magnificent, Mega Marvelous and Mighty Medical! Love um!!! I really Can't stress enough how Thankful and Grateful I am of All of you and what you've Shared with Us! Means the World!!! It's definitely a Pleasure being able to Grow with these Phenomenal Grow Lights! Please Enjoy! BudBrothers4-Life! Cheers Famz!!! Much Props and Much Topz!💯🔥 #Osree #GrowStarStore #Growatt #TNBNaturals #TNBTeam #FoopOrangics #GrowYourOwn #Bliss
https://instagram.com/growerschoiceofficial?igshid=1pgx0qx86038u
https://www.instagram.com/alienblood_genetix_official/
https://instagram.com/as420.ca?igshid=1t8j7pcf3aw2p
https://instagram.com/tnbnaturals?igshid=1brotdb4385sz
https://instagram.com/divine.seeds?igshid=osxe2v7en33v
https://instagram.com/fooporganicbiosciences?igshid=5bg74agl6e6s
https://instagram.com/growstarstore?igshid=yz71hq8q4eeg
https://instagram.com/youngufireblaze?igshid=atzh9ue6hy1d
https://instagram.com/thehumancannabinoid?igshid=17k159pumklkq
https://instagram.com/gallowglas420?igshid=qzzp2y5llzuj
https://instagram.com/harleygrower?igshid=ndy7zh8y0k5g
https://instagram.com/beardedbudbrothers?igshid=dpow775jzr5j
https://instagram.com/thrivingdesign?igshid=vqhwa4k8ts9g
https://instagram.com/everflux?igshid=1533qou84mpvi
SmokinPlantaz YouTube channel Link: https://youtube.com/channel/UCDKJthWoS6-miAhq_lLb_-w
LEDTonic YouTube channel Link: https://youtube.com/c/LEDTonic
LEDTonic Lights Hints Link: https://youtu.be/XT6e_ZwLVK0


Likes
26
Share


@MadeInGermany
Follow
Harvest day 64
Hey guys :-)
Finally it was time to harvest :-) .
This time I did wet trimming again.
For the next plants I will dry upside down.
They were cut by habd and placed on nets.
The fruit stays constant at 62% until it goes into jars to ferment.
Have fun with the update and stay healthy 💚👍
👇🏼👇🏼👇🏼👇🏼👇🏼👇🏼👇🏼👇🏼👇🏼👇🏼👇🏼👇🏼
You can buy this Nutrients at :
https://greenbuzzliquids.com/en/shop/
With the discount code: Made_in_Germany you get a discount of 15% on all products from an order value of 100 euros.
👇🏼👇🏼👇🏼👇🏼👇🏼👇🏼👇🏼👇🏼👇🏼👇🏼👇🏼👇🏼
You can buy this strain at :
https://www.exoticseed.eu/de/hanfsamen/lemon-candy
Water 💧 💧💧
Osmosis water mixed with normal water (24 hours stale that the chlorine evaporates) to 0.2 EC. Add Cal / Mag to 0.4 Ec Ph with Organic Ph - to 5.8 - 6.5
MadeInGermany

Likes
7
Share


@wascanna
Follow
👹 Oni Seed Co.
🍭 Dub Trop BX1 // Dubble Trop x Tropicanna Cookie F1
🍓 Straw-Picanna // Strawberry Bananna x Tropicanna Cookies
🌿 Tropicanna Kush // SFV OG x Triangle Kush
🔥 Sunburn // TKT (Triangle Kush x Tangie) x Tropicanna Cookies
🍁 BLOOM WEEK 2
📅 Day 1
- Adjusted LST
- Drinkin'
📅 Day 2
- Wet top soil for microbes.
- Plucked a few leaves.
° Likely a top dress tomorrow
📅 Day 3
- Bloomin'
📅 Day 4
- Bloomin'
📅 Day 5
- Bloomin'
📅 Day 6
- Bloomin'
📅 Day 7

Likes
6
Share


@Gromie
Follow
Started the new nutes a few days ago w/ epsom salt. Before that, for a day & a half, I used plain pH'ed water & trimmed off affected leaves. Such a slow grow 😕


