
Likes
Comments
Share


@Mr_nugs_lover_David
Follow
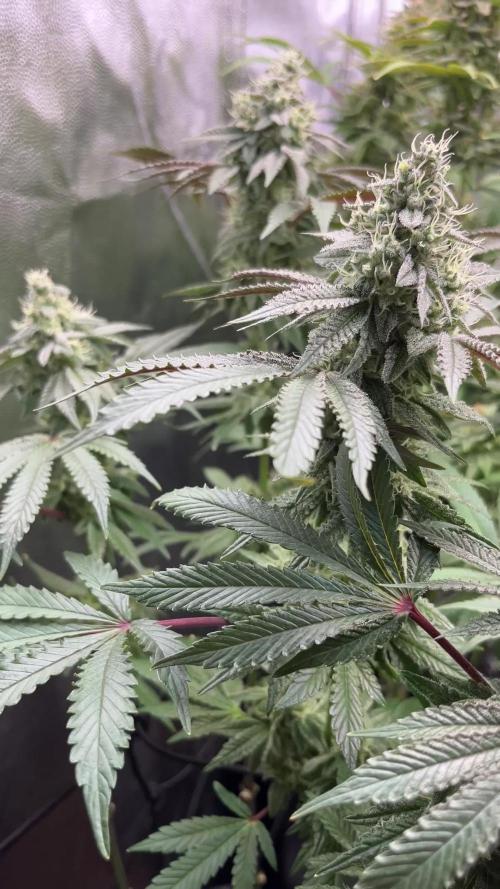
The plant is looking absolutely gorgeous, healthy and strong, no issues so far, she was Transplanted into her definitive 15L pot for this season amended with the complete line of biotabs, I've added to this 15L pot 3 slow release tablets (one for every 5L of soil) and also mixed 2 table spoons of startrex for every 10L of soil and right before transplanting this lady I've sprinkled a couple of grams of mycotrex on the transplant hole, after the transplant was done I watered with 1g per liter of water of bactrex and 1ml oer liter of water of orgatrex

Likes
5
Share


@Organic_LarF
Follow
Hello
This lady is getting nicer curves by the day.
Next week coming ill continue downsize the nutrients, certainly no N no more.
Last 2 days she didnt get no N too.
Still 3 weeks to go.
Keep on growing 🍀🍀🍀🍀


Likes
5
Share


@Ieiogrow94
Follow
Eccoci qui...
Per problemi di lavoro ho tardato un pò la pubblicazione delle foto, la piccola è molto vigorosa ed emana un forte odore.. Già si può vedere la resina che si inizia a formare sulle cime in alto...
Sono estremamente soddisfatto della sua crescita finora e sono sicuro che mi riserva sorprese, odore veramente intenso.
Grazie a tutti per il supporto, NON VEDO L'ORA DI RACCOGLIERLA 🔥🌲❤️

Likes
22
Share


@HighlyEduc8ed
Follow
Week 3 of flower
So we had a power outtage due to a storm that came through. Lost power from 10a-6p which is most of my day cycle. So there is that.
The plants looks really well. Noticed a bit of spotting so I added some cal/mag with my last watering. Buds are hella frosty you can definitely see the Banana Butter cups coming through.
Thanks for stopping by please leave a like and tips and advice are always appreciated.


Likes
15
Share


@Rebola
Follow
Big bud strain is the one with smalest buds, but thats my fault, not an easy life for her, many problems with ph result in slow growth..
New growth is now more green, but i think its to late for the recovery so i dont expect to much from her 💔
The others have a few brow spots and yellow leaves but overall they look good 🙏
Watering 3L + nutes every 2 days.
Day 45
Buds are getting more fat now 😍
But they have a bit nute burn, a little more on #2, i will reduce the nutes..
Big Bud is still very fragile, with signs of heat stress.. 🙁
Smell is very sweet in the tent 😋


Processing
Likes
11
Share


@Hawkbo
Follow
These are doing pretty damn good for the most part. I figured out with the green buzz the only thing in bloom that raises ppm is the base bloom and the more PK which is good to know. Also been using lower ppm for the autos and they seem healthier than usual. These pics and the video were taken on Day 36.
Likes
30
Share


@PEAKYPLANTERS
Follow
ladies and gentlemen
Welcome to peaky house gardens
We begin to rinse the roots non-stop since this girl has also gone over with feedings.....but no problem...we will eliminate any residue with a simple balanced pH 😉👩🌾🏼

Likes
5
Share


@JerMeds
Follow
Went ahead and numbered them all.
I checked them earlier in the week and they looked a little pale green so I upped there nutrients to around 800-900 ppm and they seem to love it.
They getting Sensi Cal-mag with every feeding to help with the rust spots on there leafs. Other then that no issues to report. They going threw a lot of water, 1-2 gallon a plant every day.
The bud sites are growing bigger and and more sticky everyday. I can practically watch them fatten up and they are starting smelling really good.
P7 is getting massive. She has 240 true watts on her, I'm not sure how much more she will stretch but I went ahead and LST her main stem. I can swap her with a smaller girl if she outgrows her corner.
I'm thinking I will defoliate her lower area tomorrow.

Likes
54
Share


@Hou_Stone
Follow
It's too hot, I had to switch my hps to 400w
--------------------------------------------------------
Grow Room: trafika urban hydroponics 100x100x200 cm
Lamp: kit trafika urban hydroponics ballast & lampe HPS : 250-600w
Extractor & carbon filter : Mars hydro 6 inch 402 CFM ( power 3/10 )
Soil : 20% perlite, 20% vermiculite, 60% universal soil
Average daily temperature & humidity : 24-30°C 40-60%
Average nigth temperature & humidity : 14-22°C & 50-70 %

Likes
17
Share


@AmokNewb
Follow
Day 22: Well we made it to the beginning of week 4! Who would of thunk! So we are starting week 4 on a good foot. No issues at this time and growing really well. Still such a squat plant. The nodes spacing is only like a half inch apart. WTH 🤷♂️🏻 Other than that the PH in my reservoir is dropping, usually it rises a bit everyday. I will have to remedy that before my midday feeding. I mean it was at 5.85-5.9PH so not out of whack but I was hoping for a drift of 5.9-61ish before I had to do a top off or change of the solution. Did some more light LST and leaf tucking last night before bed and will probably have to do more this afternoon.
Day 23: River and Clara are growing really fast now. However I did notice the darkening of some of the new growth tips and a potential N burn. I believe this to be from a faulty PH tester I bought from nutetools dot com. Junk! So back to my old cheap meter. I will have to empty and clean out my reservoir today and make some more sauce for my plants so that I know it is PH’d correctly. What a pain in the ass. I am going to have a chat with them this afternoon for perhaps a replacement. Other than that onward and upward.
Day 24: Not a whole lot to say today. Filled the reservoir yesterday. Sat and tried to figure out how to LST these super squat plants. I am thinking a couple haircuts are in order today. I think this will be beneficial to the little bud site that are partiallly blocked, but also for me to see what the structure looks like to get a better idea what I am working with 🤪 I am also thinking of upping my watering schedule to 4 times a day during lights on. I feel they are starting to drink a lot more and are probably just about to go into flowering mode.
Day 24 Update:
So I took the plunge and did some major defoliation and retied up all the LST work I did previously. They look so pissed off at me now… lmao. 🤬 You can see the before pics in my previous post from this morning. Also posting pics of how tiny my node spacing is..
Day 25 06/25/2021 - Today should be pretty hands off. Just letting them do their thing after the harsh treatment they got from me yesterday. (Defoliation and LST). I’m assuming they will need a couple days to recover, but, I will say they do look a bit less pissed off today than yesterday. Still no signs of sex. the tops are a nice bright green and the leaves are starting to deform like it really wants to flower. Hopefully, I didn’t screw it up by defoliating. The wait for flower continues.
Day 26: These plants have bounced back awesomely after my heavy handed defoliation and LST. Putting on an inch a day and growing faster by the minute. They must have loved my nutrient ratio last feeding. I am going to do the same mix again today to refill the reservoir. Speaking of reservoir and watering… I think I am watering a bit munch per feeding as I am going through 5-6 gallons every 2-3 days for two plants. So I think today I am going to finally go to a 4 feed per day schedule and drop the time from 1min 10secs to 50secs or so. They should realistically only be getting a gallon a day a piece and still get good runoff to avoid any salt buildup. Have a 4inch and 6inch stretch a scrog nets ordered as well. Other than all that I think this first grow is going great so far!
Day 27: Another day of mostly hands off and just watching the stretch. If my scrog nets come today I will hang the first one and that is about it today. Last night however, I did find a few pistils on Clara the smaller of the two and the no longer late bloomer. I also got my new Milwaukee MW804 4in1 ph/ec/tds/temp pen. Excited to have a reliable testing tool. One more grow day in the books! Cheers!
Day 28: Well last day of week four. I was really hoping it would have started flowering by now, but we will hope for week 5. I got my scrog nets late yesterday afternoon and I put the first 4” net up. As you can probably see by the pics I really have no clue what I am doing. Also these plants are so so squat and compact I almost wish I had a 2” net. But, I think they are in stretch mode so we will see how that might effect my ability to a rig these a bit better. My plans for today are to do a quick clean and rinse of the reservoir and refill with a new batch of mutes I mixed up in the middle of the night last night. Then just let them grow I suppose. Not much else for me to do. 🤷♂️🏻Now on to week 5 tomorrow and continue to have a good grow. Cheers! 🥃

Likes
5
Share


@Steevoh978
Follow
Plants are growing strong. Gotta do some trimming. The smell reminds me of old school weed smell.

Likes
12
Share


@Staffedition
Follow
Привет друзья. Моей растихе сегодня 112 дней
20.10 перевёл свет в режим 12/12
Начал применять LST технику на 19 дне и продалжаю применять её через день, а 18 августа добавил ДЕФОЛИЗАЦИЮ
С 20.08 ДЕФОЛИЗАЦИЮ делаю каждые 3,4 дня
С 20.08 LST технику делаю каждые 4.6 дней
На сегодняшний день влажность 54%
5.09.2023 заметил высокий Ph 7.9
С 48 дня Ph не ниже 5.8
На сегодняшний день Ph 6.0
Начал кормить с 60 дня Canna Terra Vega
PPM 870
Всем мира и добра!
Не забудь поставить лайк❤️, если понравилась как прошла неделя
И читайте наш TELEGRAM: https://t.me/smail_seeds
#Smail_Seeds 😀
Likes
Comments
Share

@Jardin33ro
Follow
Son 2 plantas de esta genetica. Una es mas vigorosa que ptra, pero son muy similares en cuanto a su fenotipo. En esta semana ya notamos el engorde que se viene propiciando luego del overdrive. Tratamos de a poco ir bajando la EC para llegar 0.0 en el corte. La luz sigue baja procurando mantener una buena seleccion de terpenos y resina.
Likes
7
Share


@Bingbings_garden
Follow
Hello growers
Last week for this girl. Going to run her out for 7 days with lights then 2 in darkness. No more water for her she should have enough to finish off the run
Swelling around the middle and bottom more so than the tops but she is covered nugs all over. Smell is amazing with 90% cloudy trics with some amber. Leaves are fading and dropping now so she is pretty much done.
Next update should be her havest
Noticed after all her leaves started to drop the bottom sites are purple/green
Love it
Processing
Likes
4
Share


@Green_Thumb
Follow
Noticed some slight tacoing on leaves, changed to my 18/6 light schedule to help control temps and give some rest. Noticed some nute burning also, will full flush next week.


Likes
11
Share


@m0use
Follow
Memes for the fastbuds meme contest
Memes for the fastbuds meme contest
Memes for the fastbuds meme contest
Memes for the fastbuds meme contest
Likes
54
Share


@Rasta_Faraev
Follow
20.01.21. 45 дней Халкберри. Халкберри действительноно побил мой рекорд по скорости зацветание. Переход длился всего одну неделю. Видимо я рано сделал 12/12 не дав ей восстановиться после стрессовых тренировок.пришлось подставить 10 см платформу под горшок, чтобы не опускать сетку. Но, тем не менее она очень толстая и пышная дама. Кушает отлично, толстеет, лбрастая стимами, а они у неё очень крупные. Породистость чувствуется. Следим дальше. Всем спасибо за ваше внимания, друзья)) .