


Likes
4
Share


@Exoticfarm99
Follow
Está semana el viernes 4 echamos te de compost aireado que lo tuvimos 24h cocinando y el sábado 5 defoliación agresiva de satélites y ramas que no le daban la luz


Likes
19
Share


@Ieiogrow94
Follow
Finalmente siamo tornati dopo che sono stato male.
Le bimbe esplodono e mostrano il colore rosso in molte di loro!!!
Finalmente si vedono i colori della fioritura!
Aspettiamo il raccolto a breve!!!
🔥🔥🔥🌲❤️🔝
Likes
101
Share


@TOTEM
Follow
Moved the light 20cm up and it seems like she appreciated the change.
Now that the temperature and the humidity level are more stable, she should grow faster.
UPDATE: TOPPED!
My 2 Royal Highness are still seedlings, while all the other plants (Gorilla included) are getting bigger and bigger every other day. Let’s say I had to top these ladies (also) to wait the Highnesses. Come on babies!! ❤️
Likes
7
Share


@Cthoff
Follow
Well am happy with the outcome and the way I grew it. I might do things slightly different next time. Be more proactive instead of reactive.
4.65 oz was the total weight (dried + trimmed)
Smoked a little already before curing and was such a smooth and clean hit. No harshness in my throat and it was a clean high but more of a head high. That should change after a few weeks of curing in jars but nonetheless a comfortable high!


Likes
16
Share


@valiotoro
Follow
Hello everyone week 2 has passed for this Tropicana Cookie auto by Fast Buds 😎
this plant is doing very well growing at fast pace and with a beautiful green colour on the leaves.
Topping & LST for my girl 😎
wish you all happy growing!

Likes
44
Share


@SooSan
Follow
12/12 + 35 jours
Vu qu’il y a 16 plantes mais que sur growdiaries on ne peut mettre que 8 variétés j'ai divisé en 2 diaries pour le bas de la tente
1️⃣
🏠 90x60x90
☀️ FC-E 4800 => puissance a 20%
🍁
1x Black Bomb / Philosopher Seed
2x Amnesia Lemon / PEV Seeds
1x Blueberry / PEV Seeds
1x Blueberry / 00 Seeds
1x Wappa / Paradise Seed
1x Dark Phoenix / Green House Seed
1x Quick Sherbet / Exotic Seeds
1x Mango Cream / Exotic Seeds
1x Banana Frosting / Sensi Seed
1x Hindu Kush / Sensi Seed
3x Fast Mix / Sweet Seed
📎 https://growdiaries.com/diaries/122084-grow-journal-by-soosan
📎https://growdiaries.com/diaries/124052-grow-journal-by-soosan
2️⃣
🏠 30x60x50
☀️TS1000 => puissance a 50%
🍁 4x Quick Sherbet - Exotic Seed
📎 https://growdiaries.com/diaries/122080-grow-journal-by-soosan


Likes
77
Share

@RockoCalenberg
Follow
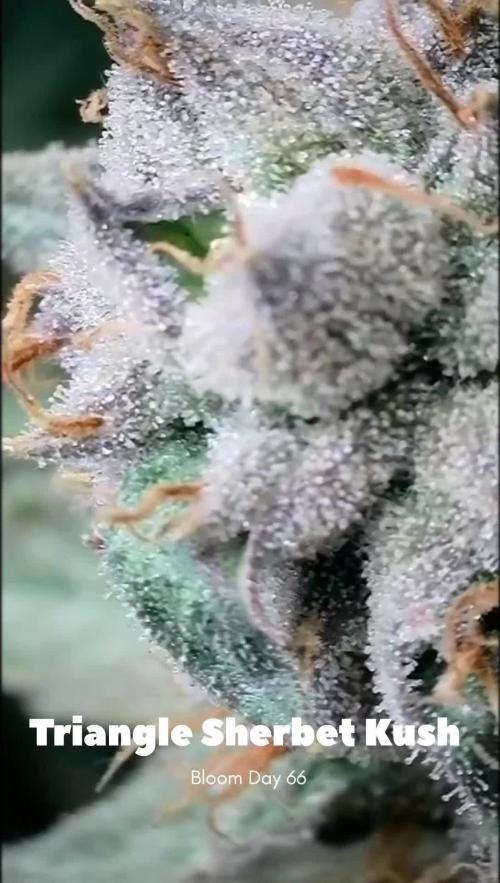
Blütetag 66 / Tag 126 –
Final Ripening – Kush bereit, Gusher kocht noch
Der Dutch Passion Double Run geht jetzt klar in die finale Reifephase.
Beide Pflanzen zeigen sehr deutlich ihre genetischen Unterschiede – vor allem beim Reifetempo. Während die Triangle Sherbet Kush schon stark nach Ernte aussieht, lässt sich die White Gusher 33 noch etwas Zeit.
🌡️ Klima
Klimatisch wurde es diese Woche wieder etwas kühler und feuchter.
Das merkt man im Zelt sofort: Die Luftfeuchtigkeit steigt schneller und der VPD wird etwas schlechter.
Ohne Klimaanlage lässt sich das nicht immer perfekt ausgleichen, aber in dieser späten Phase dürfte das die Pflanzen nicht mehr wesentlich beeinträchtigen.
🌿 Pflanzenstatus
Beide Pflanzen befinden sich sichtbar im Endspurt, allerdings mit unterschiedlichem Tempo.
Die Triangle Sherbet Kush wirkt inzwischen nahezu ausgereift. Die Buds sind massiv angeschwollen, dicht und schwer. Viel Wachstum passiert nicht mehr – sie konzentriert sich jetzt hauptsächlich auf Reife und Harzproduktion.
Auch die Blattstellung zeigt das deutlich: Viele Fächerblätter stehen im typischen Kanu-Modus und wirken fast unbeweglich. Die Pflanze signalisiert ziemlich klar, dass sie langsam fertig ist.
Die White Gusher 33 dagegen braucht noch etwas Zeit. Sie wirkt insgesamt etwas aktiver und schiebt stellenweise sogar noch leicht nach, obwohl einige Buds schon recht weit aussehen.
Struktur / Genetikvergleich
Gerade jetzt zum Ende wird der genetische Unterschied besonders sichtbar.
Die Triangle Sherbet Kush bringt klassische Kush-Struktur:
extrem kompakte, schwere Buds, dicht gestapelt und massiv angeschwollen. Die Blüten wirken fast wie gegossen.
Die White Gusher 33 ist ebenfalls sehr frostig und kompakt, wirkt aber insgesamt etwas struppiger und leicht blättriger aufgebaut. Zwischen den Buds sitzt etwas mehr kleines Blattmaterial, und durch das leichte Foxtailing wirkt die Struktur lebendiger.
Kurz gesagt:
• Triangle Sherbet Kush: kompakte, schwere Kush-Buds
• White Gusher 33: etwas sativa-lastigere Struktur mit Foxtails
🔬 Blütestatus / Trichome
Bei der Triangle Sherbet Kush sind bereits einige bernsteinfarbene Trichome sichtbar. Viele Köpfe sind milchig, aber noch nicht vollständig durchgehend trüb.
Eigentlich wäre sie schon fast im Erntefenster, darf oben aber ruhig noch etwas weiter Richtung Bernstein gehen, damit auch die unteren Buds sauber ausreifen.
Die White Gusher 33 ist hier noch etwas zurück.
Milchige Trichome nehmen zwar zu, aber Bernstein ist noch kaum vorhanden.
Dazu kommt, dass sie stellenweise weiterhin Foxtails bildet – teilweise sogar an kleineren Buds, bei denen man dachte, sie wären schon fertig. Genau das macht das Timing etwas tricky.
Was beide Pflanzen aber deutlich gezeigt haben:
Diese Woche wurde noch einmal kräftig eingezuckert. Die Harzproduktion hat sichtbar zugelegt und der Geruch wird zunehmend stechender und intensiver.
💧 Pflege
Die Nährstoffphase ist abgeschlossen.
Gegossen wird jetzt nur noch mit klarem Wasser, damit die Pflanzen sauber in die Endreife laufen können.
⏳ Ausblick
Jetzt beginnt das klassische Ernte-Timing-Spiel.
Die Triangle Sherbet Kush wäre vom Gefühl her eigentlich schon bereit.
Die White Gusher 33 braucht dagegen noch ein wenig Zeit.
Darum heißt es jetzt: Geduld.
Eine Ernte in etwa einer Woche ist gut möglich –
es kann aber auch sein, dass die White Gusher noch etwas länger stehen bleibt.
Viel fehlt auf jeden Fall nicht mehr.
🏁 Wochenfazit
Kush ist bereit.
Gusher braucht noch.
Grow on 🌱
Rocko
Flower Day 66 / Day 126 –
Final Ripening – Kush ready, Gusher still cooking
The Dutch Passion Double Run is now clearly entering the final ripening phase.
Both plants are showing their genetic differences very clearly – especially when it comes to ripening speed. While the Triangle Sherbet Kush already looks very close to harvest, the White Gusher 33 still wants a little more time.
🌡️ Climate
The climate this week became a bit cooler and more humid again.
You notice that immediately in the tent: humidity rises faster and the VPD drops slightly.
Without an AC it’s not always easy to balance perfectly, but at this late stage it shouldn’t affect the plants too much anymore.
🌿 Plant Status
Both plants are clearly in the final stretch, but moving at different speeds.
The Triangle Sherbet Kush now looks almost fully matured. The buds are massively swollen, dense and heavy. There isn’t much growth happening anymore – it seems to focus mainly on ripening and resin production.
The leaf posture also says a lot: many fan leaves sit in the typical canoe position and hardly move anymore. The plant clearly signals that it’s almost finished.
The White Gusher 33, on the other hand, still needs a bit more time. She looks slightly more active overall and in some places she even keeps pushing a little more, although some buds already look quite advanced.
Structure / Genetic Expression
At this stage the genetic differences become especially visible.
The Triangle Sherbet Kush shows classic Kush structure:
extremely compact, heavy buds stacked tightly and swollen to the maximum.
The White Gusher 33 is also very frosty and compact, but overall appears a bit rougher and slightly leafier. There are more small sugar leaves between the buds, and the light foxtailing gives the flowers a more lively structure.
In short:
• Triangle Sherbet Kush: dense, heavy Kush buds
• White Gusher 33: slightly more sativa-leaning structure with foxtails
🔬 Flower Status / Trichomes
The Triangle Sherbet Kush already shows some amber trichomes. Many heads are milky, though not completely cloudy yet.
She’s basically already inside the harvest window, but it wouldn’t hurt if the top buds develop a little more amber so the lower buds can fully mature as well.
The White Gusher 33 is still slightly behind.
Milky trichomes are increasing, but amber is still rare.
She is also still producing some foxtails, even on smaller buds where you would think development was already finished.
One thing that became very obvious this week though:
Both plants got noticeably more frosty. Resin production clearly increased and the smell is getting sharper and more intense.
💧 Care
The nutrient phase is finished.
From now on the plants are only getting plain water as they move into the final ripening stage.
⏳ Outlook
Now it becomes the classic harvest timing game.
The Triangle Sherbet Kush feels almost ready already.
The White Gusher 33, however, still needs a bit more time.
So for now it’s simply about waiting a little longer.
Harvest in about one week seems possible –
but it could also be that the White Gusher stands a bit longer.
The finish line is very close now.
🏁 Weekly Summary
Kush is ready.
Gusher still needs time.
Grow on 🌱
Rocko


Likes
6
Share


@Kendoda
Follow
The heads are starting to swell now , the lowers are looking undeveloped still. I might do a little defoliation to let in some more light next week.
I’ve noticed the first bit of change in a couple of the old lower fan leaves this week. At this stage I’m not too concerned. Buds are frosty, sticky and dank smelling.

Likes
3
Share


@UrbanBoer
Follow
This one is going to be weirdly exciting like all grows… but nothing beats growing strain you know nothing about down to to it’s ID. This is why this diary is dubbed Unknown Strain, and a lot more journals will be dubbed unknown strain.
eg.
Unknown Strain #1 - these strains are seeds I’ve collected and forgot to catalogue
Unknown Strain (dealer/grow name #1) - I have it this way,to indicate where or from whom did I get the seed, but failed to get the accurate information regarding the strain. Alike this particular diary. I received seeds from my friend saplug16.20_exotic_genetics. Check out his work on instagram, his my mentor in growing. But I go overboard when it comes to growing.
Ever since I’ve seen YouTube videos of growers growing weed plants like bonsais, I started growing my plants like I am growing actual bonsais, LST them in shapes and size while using defoliation and topping to achieve aesthetics. This type of growing is not focused on yield more for the hobbyist who grows for themselves and close friends. But I want to see if I can get more yield with this type of growing bud.
Processing
Likes
38
Share


@GardenSchool
Follow
February 16, 2021 (Week 6, Day 43): Very nice canopies beginning to develop now. Growth sites are apparent and growing vertically. Had to slow Unknown 1 down just a little bit because it's outgrowing the other plants; brought branches down level with other canopies. I watered today with 4 liters per plant + 2ml/l pH Perfect Grow + 3ml/l pH Perfect Bloom + 1ml/l Cal-Mag Plus at 5.6 pH. Runoff sitting at a perfect 6.5pH and 900ppm. Loosened all remaining LST ties to promote upward growth. It's officially wall-to-wall leaves in here now. I hope there's lots of great growth this week so we can switch to flower soon! Turned down humidity again. Now averaging 55% rH and 74℉. Please feel free to leave any feedback! Since this is my first grow I want to make sure everything is looking right! Happy growing! 👻
February 17, 2021 (Week 6, Day 44): Saw between .5-.75" vertical growth over the last 24-hours. Canopy is coming along nicely. Everything is growing very evenly - I only had to adjust one branch to keep it in-line with the others. Hopefully they'll continue to grow even with each other. Medium is still very moist after watering yesterday. Gelato 1 seems to be drinking a bit more than the others, but I'll keep watering on the same schedule to promote adequate drying of the root-zone. Averaging 55% rH and 77℉. No other news today.
February 18, 2021 (Week 6, Day 45): Another half inch of growth overnight. These ladies are trucking along and flowering is just around the corner. With this growth I'll definitely be switching to flower on day 50. Medium is still moist, lightly tilled topsoil. LST is holding down the main branches well while allowing a bit of stretch. Hopefully this progress keeps up! Averaging 55% rH and 74℉.
February 19, 2021 (Week 6, Day 46): Growth on growth on growth. Plants tacked on between .75-1" of new growth overnight. Soil was bone dry this morning and pots were super light. Watered with 4l per plant + 3.5ml/l pH Perfect Bloom + 2ml/l pH Perfect Grow + 1ml/l Cal-Mag Plus @ 5.8 pH. Runoff sitting at 6.6 pH. The plants are starting to drink a lot and I barely got any runoff. I will add a quarter teaspoon of my Humboldt Nutrients Big Up flower powder to kick-start the plants and switch them to flower. I took four fan leaves off Unknown 1 as they weren't getting any light. Took all remaining LST ties off of Unknown 2 as it is lagging behind the others (as usual). Averaging 55% rH and 74℉.
February 20, 2021 (Week 6, Day 47): Manifolding is coming along nicely. Defoliated bottom-most node on each growth stem on each plant. Soil is only moist after watering yesterday - these plants are getting thirsty as hell. Tilled half inch of top soil. Everything looks great today. The anticipation to switch to flower in a few days is killing me! Happy Saturday everyone! Averaging 55% rH and 75℉.
February 21, 2021 (Week 6, Day 48): Another inch of growth overnight. We are up to 12" in total height now. Was aiming for about ~16", but since this is my first grow I am not trying to be exact, I just want to make sure these things fit in my tent after the flowering stretch. Everything is looking great for the switch in two days. Soil is slightly moist - tilled top half inch of soil. Adjusted a couple of branches on Unknown 1 to keep growth level. Plants are looking perfectly healthy! Gelato 1 is spitting out pistils and pre-flowers like she just can't wait to start. Smelling really creamy and sweet. Averaging 55% rH and 74℉. Nothing else for today. 😺
February 22, 2021 (Week 6, Day 49): It's the last day of veg! Plants will sleep at 8:00pm and wake up at 8:00am from now until harvest. Medium is quite dry but I will water tomorrow morning with my first batch of flowering nutrients. I'll use Advanced Nutrients Big Bud and Botanicare Sweet Raw for the first 4-5 weeks, and then I'll switch over to Humboldt Nutrients Big Up flower powder for the last several weeks to finish it off. I'll feed just a tiny bit of the finisher tomorrow to give the plants a potassium/phosphorus boost to induce flowering. Really excited for the next step in this process! Now I am trying to finish up my plan for drying and curing so I don't ruin all this work in the last week! Averaging 55% rH and 74℉.
Stay tuned - the fun is just beginning! 👻

Likes
8
Share


@Youngun
Follow
Very slow this week until I realised the timer was switching on for 15 minutes an hour into darkness, this has put me a couple of weeks behind schedule, should of been flushing for harvest this week instead I’ve been flushing for a couple of days to rid of nutrient lock, after 3 days of water I added just the pk and they’ve bounced back and the buds getting chunkier they’ve also needed a lot of defoliation throughout the week, 2 of the ladies are more a glue pheno in size, structure and a smell of pine, the other is a real chunky blueberry, hopefully I’ll get to the end with no more problems
Likes
6
Share


@Krissci
Follow
Day 1
Kosher 1 is strong, bending my strips straight..nice to LST should be a strong producer
Kosher 2 is a good example of how a plant heals if the branches are snapped.
Stiff branches but very strong plant
Likes
27
Share


@Trickybis82
Follow
OK,
So I'm into final 14days and started Flushing them on water. So every 3days I will change the water until 14days are up. Then I can begin to harvest and hang finally lol.
It's been alot to learn and take on board this run I am jist hoping the final product is as beautiful as she smells and looks.
I do not there is still growth spouting and hair that are still white. However I am assuming that another 14days will be sufficient and that all hair would have turned Amber.
Speak soon.
Peace and love growmies. ❤️
Likes
3
Share


@letmegrow85
Follow
Hingen nun 4 Tage im dunklen Zelt, danach noch 2 Tage im trocken Netz, jetzt im Glas.
Likes
14
Share


@KannaKullektiv
Follow
Sie ist soweit. Die Farbe ist intensiv und sie richt verdammt gut.
Zum schnellen trocknen im Zelt, habe Ich jeden Zweig einzeln aufgehängt und versucht die Relative Luftfeuchtigkeit zwischen 58 - 62% zu halten und die Temperatur unter 18 Grad Celsius zu bekommen.
Sobald die Stängel knacken schneide ich die Buds runter und lege sie im Zelt in Pizzakartons damit sich die Feuchtigkeit gleichmäßig verteilt.

Likes
4
Share


@DarkVarein
Follow
Smells likes Candy and Orange, really good strain, and hits really hard.
Likes
12
Share


@ChitownCannaChica
Follow
Chopping her down at the end of the week! About 10% amber right now. Getting all the nutes flushed out and she smells just like candy gum! Amazing! Great density for an auto with all that’s been thrown at her from Mother Nature✌️🏻💚🌿💨