
Likes
Comments
Share


@CanadianFillmore
Follow
Howdy growfessors 👽, chopped down two LSD, what a great strain! One of these two ladies performed way better than the other and I'm excited to see just how much more weight and bud she packed on.
Thanks for stopping by growfessors 👽🌳💚
July 11 update, one LSD plant 92 grams, the second plant 95 grams, 187 total. Plants have a great fruity, berry taste and great heady high.


Likes
18
Share


@DaddyPrime
Follow
3/24 start of wk 3 of flowering. This strain has decent internodal spacing. About 1 or so inches in between each bud spot. Looking forward to how the buds progress. There hasnt been too much of a stretch since flowering has started
3/29 starting to produce some smell

Processing
Likes
8
Share


@Max1973
Follow
Day 14 - Clay balls arrived, all looks good.... 😎
**the rust and damage on the first leaves is nothing to worry about,
the ice cream container water level dropped below the root level, fixed it,
but was cool to learn how fast hyrdo dmg can occur.... 👍
Day 17 - Lookin good... vid....
👍😎👊

Processing
Likes
51
Share


@Silverback_Guerilla
Follow
12/15:
Some plants are taking too long to transition and stretching beyond my space constraints, so I dialed the photoperiod back to 12/12.
12/16:
Fed today and rotated edge plants. Added another 150w of 3000k below the canopy.
Sucrose Overdose and Muscadine Wines are still stretching...raised lights again.
12/17:
Worked on ventilation...no A/C necessary now, as I'm using another AC Infinity 6" fan to intake outdoor air into the closet whenever temps reach 75f..and it's been cold as hell outside.👍
The final trick will be to replace the 6" exhaust fan with an 8" so as to be able to fully exchange the closet air faster ...but that's gonna have to wait til next season.
12/18:
Supercropped a Muscie... again... now she's doing the "letter 'S' thang. I'll force the curves tighter over the new few days if she keeps stretching.

Likes
30
Share


@Sense63
Follow
🌿 Woche 4 – Vegetative Phase (27. Oktober – 2. November 2025)
Nach drei Wochen stabiler Entwicklung ging es in Woche 4 in die entscheidende Aufbauphase.
Die Pflanzen haben sich sichtbar verdichtet, die Kronen geschlossen, und die Spider Farmer SE3000 liefert bei 55 % Leistung (≈ 480 µmol/m²/s) gleichmäßiges Licht über die gesamte Fläche.
Am 27. Oktober war dann der große Eingriff fällig: erstes Topping und leichte Entlaubung bei allen sechs Pflanzen.
Das Ziel: strukturierter, flacher Wuchs – die Basis für das kommende LST-Training und ein gleichmäßiges Canopy.
🗓️ Chronologie Woche 4
27.10. ✂️ Erstes Topping + Entlaubung Alle 6 Pflanzen getoppt (oberste Nodie entfernt). Je 1–2 untere Blätter/Triebe entfernt. Keine Stresssymptome danach.
28.10. 🌱 Erholungsphase Blätter wieder aufgerichtet, neue Spitzen sichtbar. Kein Gießen. Licht 55 % @ 60 cm Abstand.
29.10. Kontrolle & Beobachtung Erde weiter getrocknet. Wurzeln an Topfböden sichtbar → Umtopf-Zeitpunkt erreicht.
30.–31.10. (geplant)
💡 Klima & Licht (Woche 4)
27.–29.10. 55 % 60 cm 25–26 °C 55–60 % Optimales vegetatives Klima, keine Hitzespitzen.
30.–31.10. 50 % 65 cm 24–25 °C 60–65 % Nach Umtopfen zur Stressminderung.
01.–02.11. 60–65 % 60 cm 25 °C 60 % Wieder Aufbau der Lichtintensität nach Erholung.
🌱 Strain-Layout / Pflanzenstatus
Front L/R Cherry Poppers 🍒 Kompakt, kräftig, gleichmäßiger Austrieb nach Topping Bereit für LST ab 5.–6. Nov.
Center-L (gelb) Karate Kit 🥋 Etwas gedrungener, dunkles Grün, kräftige Mitte Wuchs leicht langsamer, aber stabil.
Center-R (terracotta) Lemon Orange 🍋 Größte Pflanze, sehr vital, breite Blätter Beim Umtopfen leicht tiefer setzen.
Back L/R White Gorilla Haze ×2 🦍 Buschig, dichte Struktur, kräftige Stiele Leichte Mg-Symptome → Bittersalzgabe nach Umtopfen.
💧 Gieß- & Nährstoffplan (Übersicht Woche 4 + Vorschau)
24.10.
Düngung (vor Woche 4) Orgatrex 2 ml/L 0,9–1,1 L Letztes Vorgießen in 5 L-Töpfen
27.–29.10. — — — Keine Bewässerung, Substrat trocknet für Umtopfen.
30.–31.10. Anwässerung Bactrex 1 g/L 0,8–1 L Nur zur Wurzelaktivierung, kein Orgatrex.
03.–04.11. Erste Nachdüngung Orgatrex 1,8 ml/L + Bittersalz 0,5 g/L (nur WGH) 1 L pH 6,2–6,4, langsames Angießen.
07.–08.11. Nur Wasser — 1–1,2 L Erhaltung der Bodenfeuchte, keine Zugabe.
🧠 Beobachtungen & Pflege
Erholungsphase: 1–2 Tage nach Topping leicht verlangsamtes Wachstum, danach starke Triebneubildung.
Bodenleben: aktiv, feine Myzelstrukturen sichtbar.
Keine Mangelanzeichen: außer leichtem Mg-Bedarf bei White Gorilla Haze.
LST: Beginn voraussichtlich 03.–06. November (sobald neue Triebe 4–5 cm lang sind).
Entlaubung: keine weitere vor Mitte November.
✅ Fazit – Woche 4 (27. Oktober – 2. November)
Diese Woche war der Übergang vom Aufbau zur Strukturphase.
Das Topping am 27. Oktober hat den Wuchs geformt und die Basis für das spätere Training gelegt.
Die Pflanzen zeigen kräftige Triebe, gesunde Farbe und aktives Wurzelwachstum.
Mit dem Umtopfen zum Wochenende beginnt die letzte große Wachstumsphase der Vegi-Stage.
Vitales, harmonisches Wachstum, starker Wurzeltrieb, perfekte Vorbereitung für den „großen Umzug“.


Likes
3
Share


@DjHairy
Follow
Week 12 and the plant is still going strong. It’s fading fast and plumping up. Trichroms are about 80% cloudy and 20% clear. Almost no amber. At this point I’m only giving the plant PH water. Plant still looks like it has some weight to still put on.

Likes
Comments
Share

@Topshelf_only
Follow
5 day since switching to 12/12 did a bit of defoliation tonight .both plants are already feeling quite sticky and there is not a pistol insight yet. The cyco additives definitely make a huge difference to the nuggets at the end

Likes
4
Share


@QixxGrows
Follow
Day8: First day of the new week. I assume still pretty much focusing on roots, as the top didn't really do much today.
Day9: Nothing special. But she's growing
Day10: Still roots, it seems. Very little happening up top.
Day11: Effort being put into growing the top leaves. They increased in size. I assume that the next node will start tomorrow - kicking off the switch into Veg.
Day12: Next node already showing :D
Day13: I put in a humidifier and changed the cycle of the extractor to keep more moisture in the growbox. My humidity was way too low.
Day14: This time the humidity was too high. It was sitting at around 95% when the lights went on.

Processing
Likes
10
Share


@Jazin
Follow
Flush with 12L of water PH 6.4 to each plants. Then, wait 15min and add 6L to each plants.
Purple color have been started to show!
Likes
14
Share


@Snickelfritters
Follow
10/21- Flower has begun!! I've been gradually removing growth from under the canopy that I dont anticipate will become sizeable buds. Now we wait for the stretch. Took a few clones to try my hand at that.
Air is drying out big time lately. I'm probably going to have to give in and buy a humidifier because it's going to be essential to keep my buds from drying out too fast and keeping these plants in healthy rh range.
Despite humidity swings, plants seem to be doing well across the board so I already have a leg up on my last grow. I sprayed for bugs as a precaution. Neem and peppermint Castille soap diluted in water was the choice. Left a residue on my plants though so live been keeping my light between 30-40% and gradually turning up the intensity each day until I reach where I was(70) I dont want to burn my leaves because I have treating for bugs before.
I will add pictures this weekend. This is posted on Day one so there's really not too much change to show in the plants. Really excited to see how they develop over the next 2 weeks.
10/24
Added pics of two plants. I accidently deleted my shoot of GZ 2 and I don't feel like taking them out of the tent again because it's a bit of a pain with the net. It's much taller than it's sister and maybe the healthier plant at this point. Moby dick is a bush, very healthy even still.
No real signs of flower yet. They do seem to be stretching a bit but when you look everyday it's hard to tell. I'm hoping to have a really nice canopy in a week.


Likes
1
Share

@peterfly98
Follow
The week has been going great, the tent is full and among the two guavas there is also a frostbanger from fast buds that had a slow start but is catching up quickly and is growing tall since I didn’t do any lst. The guava in front is starting to produce tricomes and her sister is getting there. I’m watering up to 2L every other day and this week was enhancer week. Final lst and I’m not touching anything until they stop stretching, then I’ll defoliate a bit.
Last day of the week, day 35 and growth is very fast, maybe faster then previous runs. Light still at 75% at 35cm, around 700ppfd, DLI 45. I’m not sure if I want to push it more in order to minimize heat into flower.


Likes
32
Share


@Hambone
Follow
10/16
So the girls are doing well. They have been watered twice now and #2 is a bit smaller. They are absolutely exploding veg wise and raising the light was necessary as #2 was much to short, will be updating with transplant soon!
10/18
Ok so transplant happened today. They were growing so quick we needed to move them as soon as they were water ready! They got transplanted into 5g fabric style pots. Did 2/3 Fox Farms "ocean forest" and 1/3 perlite mix. Used same nute mix for watering on the transplant, will change that up soon. See pics and video for more info!
10/22
There seems to be a nitrogen lockout. I'm guessing it was the unneeded cal mag add. Learned our lesson! Upped our grow big and giving the first water in big pots. Other than that they are growing amazing!

Likes
13
Share


@MistaOC
Follow
02.01. Tag 43
Hey Leute frohes neues! 🎆🎈🎊
Es geht gleich zum Jahreswechsel mit Problemchen weiter…
…weshalb verfärben die beiden vorderen Pflanzen sich so stark? Die vorne links hat meiner Meinung nach ein calmag Defizit. Was sagt ihr? Und die vorne rechts sieht irgendwie überdüngt aus aber bei meiner Dosierung und der aktuell guten Performance könnte die auch einfach noch was Dünger brauchen? Wie seht ihr das?
Gegossen:
10L Osmose Wasser
20ml CalMag
20ml BioFlores
10ml BioBoost
VPD 1,3
Temp 25
RLF: 58%
LED 100% (480w)
——————————————————————
05.01. Tag 46
Was ist hier los?
Hab ich überdüngt?
Ab jetzt erst mal nur Wasser mit calmag
Sicherheitshalber!
——————————————————————
08.01. Tag 49
Heute gegossen. 10L Wasser mit 10ml calmag.
—————————————-
Likes
48
Share


@BelSun_420
Follow
Hey folks,
Transplant done today, May 30th, into the final pot. Now she’s in Buddha’s hands 🕉️😄
This one was tricky to transfer—I knew it would be tough since I let the roots grow too much due to lack of time to properly focus on this project and the extra time wait for the order with the Leca base to arrive!
That made it hard to separate the soil from the rootball and position it over Buddha. I really should’ve done it at week two, or starting in a smaller pot to avoid all that root chaos! 😅
But hey, let’s see how she responds and what the final result will be!
🤞🏻💚🧡
-------------------------------------------------------------
31/05/2025
When I cleaned the roots, she wilted a bit—as expected—but just a few hours later, that same night, her leaves were perky again, showing that everything went smoothly and she's full of strength! 😄 Today I cut a small branch and a leaf that were growing in the direction I want to twist the plant into a spiral, as you can see in the video. A few more hours and she should be perky again 🙂

Likes
10
Share


@HideAndFly420
Follow
Day 64 my baby is going really well by now, she s been running fast until now and I think that’s enough with fertiliser. From today o start my flush, I will give today my last dose of regulator and from next irrigation just on controlled water until the end of maturation, I want this baby to eat everything .
day 65 started flushing. ph controlled water at 6.0 i think 20 more days at max before m
Day 68 First check with micro today. The baby looks already milky and amber on the top buds but the rest of the plant is still transparent. I’ll wait at least until this weekend for a re check maybe I’ll cut her in two rounds. As I be been watching a lot with micro I noticed so many dust and other stuff on the buds so I think I’ll wash her in water.
Today watered ph 6.
Let’s see!
🌱🔥🌱🔥🌱🔥🔥
Likes
92
Share


@DogDoctorOfficial
Follow
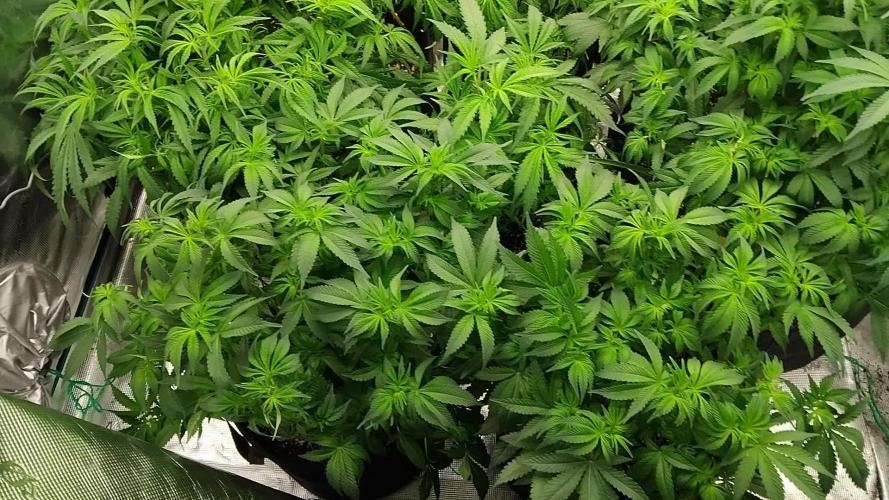
Week 9 - First Week of Flowering 🌸
The dark period has ended, and these ladies came back into the light fully energized and ready for action! It’s just the first week of flower, and they’re all praying, stretching, and absolutely thriving—filling up every inch of the tent. This grow space is officially packed from wall to wall, with each plant competing for its share of light and showing off some of the biggest, healthiest leaves I’ve seen yet! 🌱
A few strategic plucks here and there have kept airflow smooth and light penetration balanced. Those big leaves? They’re a sign of happy, healthy growth. Large leaves help the plant capture maximum light energy, essential during this stage, especially as they start focusing on developing those flowers. When plants grow huge, vibrant leaves like these, it means they’re well-nourished and content in their environment—a true testament to the well-balanced conditions we’ve got going in the tent!
Flowering Parameters 🌡️
Room Environment:
• Temperature: 26.7°C
• Humidity: 63.3%
• CO2: 960 ppm
• VPD: 1.29 kPa (prime zone for flowering health!)
Lighting:
• Light Intensity: 835 PPFD (ideal for boosting flower growth)
• Solution: pH 5.96, TDS 460 ppm, temp 21.1°C
• Medium: Moisture: 100%, TDS: 520 ppm, Temp: 21.6°C
Carbon Filter Installation & Smell Management 🌬️🌱
With the transition to flower, the scent profile is already starting to kick in—crazy for the first week, right? 🌸 To keep everything fresh and under wraps, I’ve set up a carbon filter system. Here’s how it’s working: I’ve connected the filter to my Aerofan, which pulls air directly from the tent. This air is cleaned by the filter and released into the main room, where it then passes through another filter before exiting my space. This dual-filter setup means no scent escapes into the wild, keeping things stealthy and the grow room a peaceful, scent-contained environment. Perfect for anyone concerned about keeping their home free from that telltale aroma! 🕶️🌬️
Enhanced Lighting with Emerson Effect 🌞
This week, I’ve introduced an extra 15 minutes of red light at the beginning and end of each light cycle. Why? Well, this red boost taps into the Emerson effect, enhancing photosynthesis efficiency, especially during the flowering stage. By stimulating a little extra wake-up and wind-down light, we’re mimicking the natural sunrise and sunset experience for these plants, which can help reduce flowering time. Not only does it encourage smoother transitions into day and night, but in theory, it’ll help these ladies finish a bit faster, while giving them a little nudge to build more substantial, quality flowers. 🌇
Nutrient Adjustments 🌱
Now that we’re in flower, I’ve swapped out the Start Booster for P-Boost and TopBooster to specifically support flowering needs. Here’s why:
• P-Boost brings in additional phosphorus, vital for energy transfer and cell division as the plant channels more resources into budding sites.
• TopBooster supports the flowering phase by improving flower quality and density, helping to build those big, aromatic buds we’re after.
These changes bring the nutrient mix in line with what’s most beneficial at this stage. All this precise dialing in is easy to manage thanks to the TrolMaster system. From pH to nutrient scheduling, the TrolMaster ecosystem and ThinkGrow LEDs have been the ultimate teammates in this grow journey, giving me real-time data, fine control, and peace of mind. 💯
(Not introducing UV light just yet, but stay tuned as that’s coming soon for an added boost!)
Looking Forward 🌟
Next week, we’ll be upping the reds, giving us an even greater chance of activating those flowering signals for a smoother, faster transition through the cycle. I’ll keep tweaking and fine-tuning every parameter to make sure these ladies get exactly what they need to thrive.
Big thanks to the TrolMaster system for keeping everything in balance and optimized, along with the supportive Grow Fam following this journey! Your enthusiasm, advice, and support are a huge part of this grow’s success. Keep following for more updates, and stay tuned for what’s next! 🌿✨
P.S. Deep Dive: TrolMaster’s MBS-S8 CO₂ Sensor & Smoke Detector 🚨
The MBS-S8 CO₂ Sensor from TrolMaster is a powerhouse for growers, especially when it comes to optimizing plant growth and efficiency in a controlled environment. This sensor continuously monitors CO₂ levels and integrates directly with the TrolMaster ecosystem, giving you real-time data on CO₂ concentration. Ideal levels of CO₂ can significantly boost growth and yield during certain stages, so understanding and managing CO₂ is key. With the MBS-S8, I can control CO₂ levels precisely, keeping them within the optimal range for photosynthesis. This sensor is a game-changer because it adjusts CO₂ delivery automatically, giving plants exactly what they need without any extra monitoring from me.
Meanwhile, TrolMaster’s Smoke Detector is an essential safety device, especially in spaces with electrical equipment, lights, and heat-generating components. This detector can be set up to alert me instantly via the TrolMaster app if any smoke is detected, allowing me to respond immediately to any potential issues. Fires and smoke are rare in controlled grow setups but having this safety measure provides peace of mind and lets me focus on the plants without constant worry. It’s an incredible tool for any grower prioritizing safety and proactive monitoring.
Discount Codes so you can save big on your next check out 💚💚💚
Kannabia - DOGDOCTOR 30% off
SeedsmanSeeds - DOGDOCTOR 10% off
CannaKan- DOGDOCTOR 15% off
terpyz.eu - DOCTOR 15% off
The Neutralizer - PORKIT5-DOG 15% off
As always thank you all for stopping by, for the love and for it all , this journey of mine wold just not be the same without you guys, the love and support is very much appreciated and i fell honored and so joyful with you all in my life 🙏
With true love comes happiness 💚🙏 Always believe in your self and always do things expecting nothing and with an open heart , be a giver and the universe will give back to you in ways you could not even imagine so 💚
Friendly reminder all you see here is pure research and for educational purposes only
Growers Love to you all 💚💚💚


Likes
169
Share


@SlowpokeFuegobud
Follow
🍊 🐶 💜 🐘 🍊 🐶 💜 🐘 🍊 🐶 💜 🐘 🍊 🐶 💜 🐘 🍊 🐶 💜 🐘 🍊 🐶 💜 🐘 🍊 🐶 💜 🐘 🍊 🐶 💜 🐘 🍊 🐶 💜 🐘
Welcome to week 11, my fellow growmies!! 💚 💚 💚
DAY 72
Watered with 4ml bloom + 2ml pk + 4ml growzyme, humics, bigfruits + 2ml calmag + epsom 💧
DAY 73
Watered with tester bottles, because I will be gone for 5 days 💧💧💧
All went ok, the dawg girl was really dry and light-weight when I got back, but now looking stressed at all. 🙏 💚 Good girl!!
Thanks for stopping by, it's a true pleasure to have you as visitors!! 💚 💚 💚 😘
💜 🐘
______________________________________________________________
About Sour Tangie Dawg cannabis seeds
Sour Tangie Dawg is a sativa dominant cross between the famous Tangie and Chemdawg. Expect a combination of sweet & fruity mixed with a gassy, jet-fuel flavour. The amazing mix of citrus, tangerine, pine and gasoline produces uniquely rich, dank buds. The powerful sativa high is strong, uplifting and long lasting, great for creativity and socialising.
Chemdawg is the parent of OG Kush, all Diesel strain originate from Chemdawg. The Tangie is originally a Skunk hybrid strain but extremely fruity with the trademark Tangerine flavour. This strain is potent with THC-levels over 20% alongside very generous yields of top quality weed, very suited for hash and rosin producers. If you’re looking for a strain to produce the best tasting concentrates this Sour Tangie Dawg is a proven winner! She easy to grow and the perfect choice for SCROG growing due to her growth speed and stretch. We advise switching to 12/12 light when 75% of the net is filled. For outdoor growers the harvest period is early October. Indoors she’s finished after 9 weeks of flower - fast for a sativa dominant strain. We recommend growing in soil with organic nutrients for the best tasting weed.
Get some fantastic genetics here: https://supersativaseedclub.com/ 💜 🐘
___________________________________________________________________________
SETUP:
80x80x180 cm Zelsius
240W Full Spectrum LED IR UV dimmable
DW240H-A6-HS
Heatsink color red
LED Chips:
512pcs SAMSUNG LM301H + 24pcs Osram 660nm + 8pcs Osram IR 730nm + 8pcs UV 385nm
Color mix: 2700K + 4000K
2,8umol/J
Driver HLG-240H-C2100B
Coverage: veg 5x3ft / flower 4x2ft
Product size: 628x205x68mm
Green Buzz Nutrients
Shouts go out to my sponsors @GreenBuzzNutrients, thanks so much for your support! ❤️
If anyone would like to try their amazing organic products, use code GD42025 for generous 25% discount (for orders of minimum 75€) ✨
https://greenbuzznutrients.com/
Biobizz Lightmix
custom exhaust fan 320/270cm³/h
Carbon Active Granulate 240cm³/h
tab water pH 8 - EC 0,25 with Calmag to 0,5
Advanced Hydroponics pH minus Grow + Bloom to pH 6.2
🍊 🐶 💜 🐘 🍊 🐶 💜 🐘 🍊 🐶 💜 🐘 🍊 🐶 💜 🐘 🍊 🐶 💜 🐘 🍊 🐶 💜 🐘 🍊 🐶 💜 🐘 🍊 🐶 💜 🐘 🍊 🐶 💜 🐘
Likes
19
Share


@Iamdisabl3dsgirl
Follow
This weeks update as we finished out week four and started pre flower on these 420 fast buds Gorilla Glue
Likes
2
Share


@MountainGrowBR
Follow
finally it reached the size needed to start training. topping done on the 5 knot and lst in the form of a star.
