
Likes
Comments
Share


@Chucky324
Follow
Hello.
I've harvested the Mega Mouth. WOW!!! I'm very impressed with this strain. Over 1.5 k for 5 plants. and it was finished by Aug 20 with the tents help.
I'm trying some new (for me) categories to add to my report.
Plant Stretch (PS) 1 to 5- 1 is hardly any stretch.
Bud Mutation (BM) 1 to 5- 1 is a beautiful normal bud- 5 is big weird growths like foxtails.
Trim- How easy or hard it was to trim up 1- you blow on the branch and hang it up. 5- Is very hard to trim takes a long time.
About- Best guess on the THC % (I've been smoking a long time)
Resin- 1 is super slippery 5- is very sticky like Gorilla Glue.
Size of Buds (SOB) 1- is very small 5- is the biggest buds
Dense- 1- is the lightest or fluffiest 5- is the rock hard buds your bud buster has trouble busting up.
Plant #1 Wet Trim 1647 g
PS. 3.5
BM 3.5
Trim 4
About 21%
Resin 4
SoB 4
Dense 4
Finished Dry Weight 289.5 g or 10.33 oz.
Plant #2 Wet trim 1606 g
PS 3,5
BM 3.9
Trim 4
About 22%
Resin 3
SoB 4.7
Dense 4.3
Finished Dry Weight- 302 g or 10.78 oz.
Plant #3 Wet Trim 1635 g
PS 3.7
BM 3
Trim 2.8
About 20%
Resin 2.8
SoB 3.7
Dense 4.5
Finished Dry Weight- 314 g or 11.21 oz.
Plant #4 Wet Trim 1753 g
PS 2.5
BM 2.5
Trim 3
About 22%
Resin 4 Falls off easily- Clumpy
Dense 2.5
Final Dry Weight- 343.5 g or 12.26 oz.
Plant #5- Wet Trim 1787 g
PS 3.5
BM 3.7
Trim 3
About 24%
Resin 2.5
Dense 2.5
Finished Dry Weight- 355.5 g or 12.69 oz.
The taste is sweet and smooth to go down with a nice balanced buzz. There was some pests around. I found thrips damage in veg and got some Spinosad to take care of that. Saw some fungus gnats around but they didn't do much damage. Easy to grow and trim. This is a recommended strain.
Chuck.

Likes
2
Share


@GrowChico
Follow
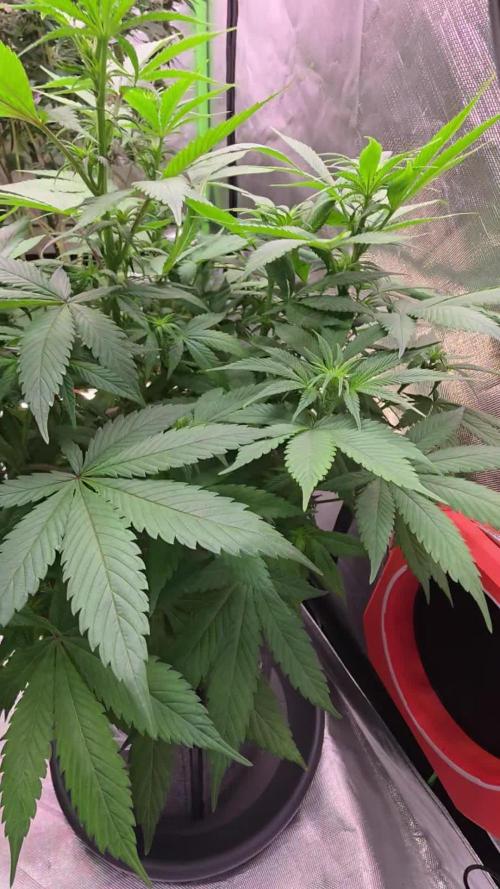
She is looking really good. I transplanted her to my springpot autopot system.
The pot is a nature's living soil and fox farms ocean forest.

Likes
8
Share

@all_about_420
Follow
Das schnelle Mädchen legt in der zweiten Blütewoche einen ordentlichen Sprint hin. Der hormonelle Umschwung nach dem Lichtwechsel ist in vollem Gange: Die Internodien strecken sich deutlich und die Spitzen hellen charakteristisch auf, während sich die ersten feinen Blütenansätze (Pre-Flower) formieren. Die Umstellung auf das volle Programm von Advanced Nutrients trägt sichtlich Früchte. Die grüne Perle zeigt keinerlei Mängel, strotzt vor Energie und baut dank des vorausgegangenen Trainings ein wunderbar gleichmäßiges, stabiles Gerüst auf, um die zukünftige Last der Buds problemlos zu tragen. Die Fast Buds Genetik beweist hier absolute Performance.
Die Blattfarbe und die Vitalität sind wirklich perfekt getroffen. Halten wir den Ball flach und beobachten nächste Woche, wie sich die ersten echten Bud-Strukturen ausbilden!

Likes
Comments
Share

@DogDoctorOfficial
Follow
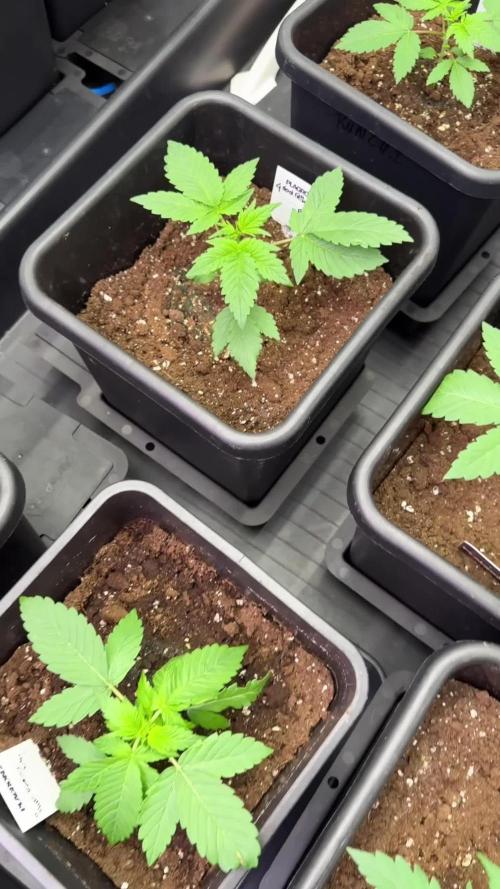
🌱 Week 2 – Purple CousKush Auto | Pheno B | Building the Foundation
Hello everyone, and welcome back to another chapter of my 8×8 Adventure, where every seed gets the opportunity to tell its own story.
This diary follows Purple CousKush Auto – Pheno B, and while her sister surprised me with an unusual mutation during the first weeks of life, this lady has chosen a different path. She is developing with beautiful symmetry, strong vigor, and exactly the kind of structure that makes a grower smile every time the tent opens.
Every phenotype teaches something different, and that’s exactly why I enjoy documenting them individually.
⸻
🌿 Week 2 Development
This week has been all about establishing a strong foundation before explosive vegetative growth begins.
From the very beginning, Purple CousKush B has shown excellent vigor. Her internodal spacing remains tight, the stem is becoming noticeably thicker, and every node is producing healthy new shoots with vibrant green growth.
The leaves are broad, healthy, and reaching confidently toward the light, showing no signs of nutrient deficiencies or environmental stress.
Compared to last week, the increase in biomass is obvious. She has transitioned from a small seedling into a young plant that is now preparing for the next stage of development.
Everything looks balanced.
Everything looks happy.
⸻
🌱 Beginning Low Stress Training
This week also marked the beginning of her first Low Stress Training (LST).
Rather than forcing the plant into shape later, I prefer to begin gently while the stems are still flexible.
The main stem has been carefully bent, encouraging the plant to redistribute auxins away from the dominant top and toward the lower branches. This simple technique allows more growing tips to receive equal light while keeping the canopy flatter for the weeks ahead.
One thing I always appreciate about LST is that it works with the plant rather than against it.
There is no cutting.
No high-stress recovery.
Just gentle guidance.
Even after the initial bending, she responded beautifully. The side branches immediately began reaching upward, showing exactly why this training method has become one of my favorites for autos.
Watching a plant adapt within hours never gets old.
⸻
🌿 Plant Health
Overall health continues to impress.
Thick central stem
Strong lateral branching
Excellent leaf color
Tight internodal spacing
Healthy vigorous new growth
The foliage remains lush without appearing overly dark, suggesting that nutrition is right where it should be.
She’s developing into a compact but powerful little bush that should have no problem supporting a heavy canopy later in flower.
⸻
🌍 Environment
The entire room continues to provide an ideal environment for vigorous vegetative growth.
Temperature, humidity and VPD remain within the target range, creating stable conditions that allow each phenotype to express its genetics without unnecessary stress.
Consistent airflow keeps fresh CO₂ moving throughout the canopy while strengthening stems naturally, and the lighting continues delivering an even PPFD across the entire garden.
Healthy roots create healthy plants, and maintaining environmental stability is just as important as choosing the right nutrients.
⸻
🌱 Nutrition
Purple CousKush Auto is growing in Plagron substrate, receiving the same carefully controlled feeding schedule as the rest of the 8×8 project.
This run is built around the Plagron nutrient line, supplying everything needed for healthy root expansion and vigorous vegetative growth while avoiding unnecessary excesses during these early weeks.
Rather than pushing rapid growth, my goal is to establish a strong root system first. Healthy roots become healthy stems, healthy stems support healthy branches, and healthy branches eventually become beautiful flowers.
As always, balance beats excess.
⸻
📸 This Week’s Observations
One of the things I enjoy most is comparing sisters grown under identical conditions.
Same room.
Same lighting.
Same nutrients.
Same environment.
Yet every plant still develops its own personality.
While Pheno A became the little rebel, Pheno B is showing textbook development, responding perfectly to gentle LST and already building the structure that should carry her through flowering.
Both are beautiful.
Just beautifully different.
That’s the magic hidden inside every seed.
⸻
🌿 Looking Ahead
Over the coming week, I’ll continue adjusting the LST little by little, allowing the secondary branches to rise evenly while maintaining a low, open canopy.
The goal isn’t simply to make the plant shorter.
The goal is to create an even platform where every future cola receives equal access to light and airflow.
For now, there is no need to rush.
She’s exactly where she should be.
Healthy.
Strong.
Growing with confidence.
⸻
Thank you to Plagron for providing the foundation for this grow, Zamnesia for helping make this incredible project possible, and Grow Diaries for giving growers around the world a place to share, learn, and inspire one another.
And thank you for following another week of this 8×8 Adventure. Whether a plant follows the textbook or decides to write its own chapter, every phenotype has something to teach us—and that’s what makes this journey so rewarding.
Growers Love and see you all in Week 3. 🌱💚
Likes
37
Share


@DogDoctorOfficial
Follow
🌱 Week 2: Mutant Magic in Full Swing! 🌱
Hey Grow Fam! Another week, another step forward in the adventure with these Mentha de Croco beauties. Week 2 has been nothing short of fascinating—the variety in leaf shapes is absolutely mesmerizing. These tiny mutants are already showing their unique personality, and I’m loving every second of watching them grow! 🌿✨
Tent Conditions: Consistency is Key
The setup remains the same as last week, keeping these little ones in the perfect environment to thrive:
• Temperature: Stable, warm conditions for steady growth.
• Humidity: Maintaining high RH ensures they’re still enjoying tropical vibes as their root systems develop.
• Lighting: The Future of Grow (FOG) LED at 200 PPFD continues to deliver just the right amount of light to keep the plants growing compact and strong.
Nutrition: Introducing the Organic-Mineral Boost 🌿
This week, I started feeding the plants with the incredible Aptus Holland organic-mineral line. It’s been a game-changer, and here’s why I love it:
What’s Organic-Mineral Nutrition?
• Combines the benefits of organic matter (microbial health and soil vitality) with the efficiency of mineral nutrients (direct uptake by plants).
• Supports balanced, steady growth while boosting plant resilience.
This Week’s Feeding Schedule:
• Regulator (0.15 ml/L): A silica-based product that strengthens plant structure and helps regulate stress, ensuring the plants stay strong and sturdy.
• CalMag Boost (0.25 ml/L): Calcium and magnesium are essential for cell wall development and chlorophyll production, supporting lush, vibrant growth.
• All-in-One Liquid (1 ml/L): A comprehensive blend that delivers all the essential nutrients in one easy feed, perfect for these little mutants finding their stride.
• Start Booster (0.25 ml/L): Packed with root-stimulating microbes and nutrients, this product ensures strong root development and prepares the plants for explosive growth in the coming weeks.
Why Aptus?
I’ve been a huge fan of Aptus Holland because their line truly focuses on building strong, healthy plants from the ground up. The results speak for themselves—happy plants, explosive growth, and vibrant health at every stage. true believer here and way before being sponsored by them .
Mutant Leaf Love: Celebrating the Unique 🌿
The highlight of this week has to be the unique leaf patterns these plants are developing. Each one seems to have its own story to tell—serrated edges, funky symmetry, and a whole spectrum of textures. They’re tiny but mighty, and it’s so exciting to see the potential of these genetics from Terpyz Mutant Genetics come to life.
Mutants always bring surprises, and it’s a beautiful reminder that diversity is what makes this journey so rewarding.
Reflections & Tips for Fellow Growers 💡
💚 Feed Lightly, Grow Strong: For young plants, keep your feed gentle to avoid overloading them. Start slow and adjust as they grow.
🌱 Celebrate Differences: Each plant will grow at its own pace, and unique traits are part of the magic. Patience is key!
💧 Stay Consistent: The foundation you build in these early weeks sets the tone for the entire grow. Stable conditions = happy plants.
Shoutouts & Grower’s Love 💚
Big thank you to @Terpyz Genetics for these funky mutant seeds, @Aptus Holland for their stellar nutrition lineup, @Future of Grow for the lighting that keeps these beauties thriving, @Pro Mix Soil for the best one i have encountered so far and @Grow Diaries for being an amazing platform to share this journey.
And a HUGE shoutout to all of you—followers, growers, or just curious passersby! Your love, support, and shared passion for growing make this experience truly special.
Stay tuned for more mutant magic in Week 3. Let’s grow, let’s grow, let’s grow! 🌟
Genetics - Mentha De Croco
https://terpyz.eu/products/menta-de-croco-fern-type?_pos=1&_sid=e9237cbcb&_ss=r
DogDoctorOfficial Discount Codes @ terpyz.eu - DOCTOR 15% off
Nutrition - @aptusholland
https://aptus-holland.com/
Led Power @ F.O.G. Future Of Grow
https://www.thefuturofgrow.com/en/online-store/BLACK-SERIES-600-p489093171
Controls @ TrolMaster
https://www.trolmaster.eu/tent-x
As always thank you all for stopping by, for the love and for it all , this journey of mine wold just not be the same without you guys, the love and support is very much appreciloved and i fell honored with you all in my life
With true love comes happiness Always believe in your self and always do things expecting nothing and with an open heart , be a giver and the universe will give back to you in ways you could not even imagine so
Growers Love To you All 💚

Likes
13
Share


@Green_claws
Follow
Week 3 veg...
The Upgrade is Official: From the Floor to the Throne.
Finally got the girls into the tent and under the new light getting dialed/settled in.
After roughing it on the bedroom floor for a while, I’ll be honest—they’re looking a little beat up and battle-worn right now. But the "dark days" are officially over. We’re in recovery mode now, giving them the space and tech they deserve to thrive.
The Game Plan:
Light Acclimation: I’ve got the new LEDs cranked to the top of the tent. I’m letting them adjust to the new spectrum and intensity without the stress of being blasted too soon.
The One-Week Buffer: I'm giving them a solid week to find their legs, find their rhythm, and start reaching for that light.
I’m not sweating the current look these girls have absolute beast genetics, If any plants can bounce back and explode, it’s these ones. Now that the environment is locked in, it’s time to see what they can really do.
Watch this space 👀
Thanks for dropping by
Peace and love. Grow on ✌️💚

Likes
18
Share


@Silverback_Guerilla
Follow
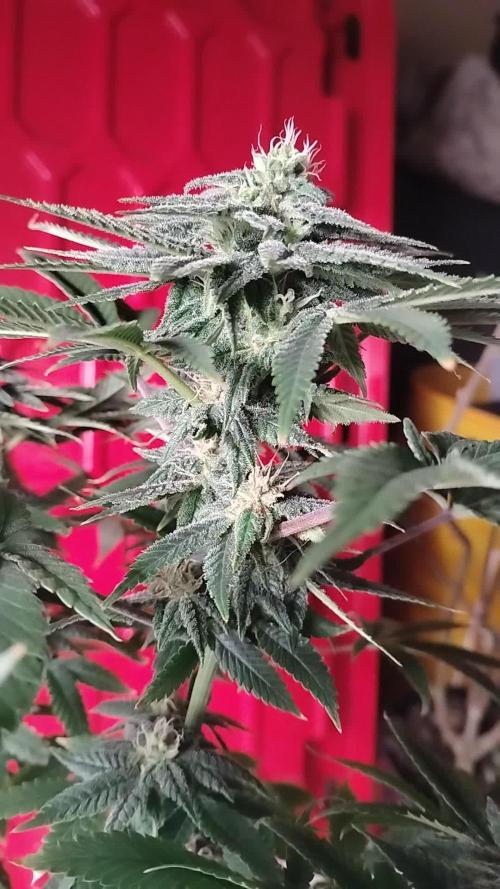
11/17:
I fed today but didn't have time for much of a photo session.
Gave them One, Signal, Sweet & Sticky, Cha Ching, and started them on LiquidSoil.
11/19:
Still fattening, and beginning to frost up as well.

Likes
61
Share


@WhiteEdge
Follow
23.04.2024
Continue into week 8
Replaced all filters in the system and cleaned them.
Mixed a new batch with the following components:
20+25ml AN Connoisseur Bloom A+B
Total volume: 34 liters
Electrical Conductivity (EC): 1.0
Target EC for this week: 0.8-1.0. Adjustments will be based on plant observations.
Performed one long misting session (3 minutes).
Environmental Conditions:
Outside temperatures going up, today is raining but this week start higher temps and humidity
Wedding Cheesecake: One girl is gonna finish in this week, Two others probably in next. Frutti terps in this, Two pheno in total from 3 girls'
Tropicana Cookies: Phenomenal strain; One girl is going to finish this week and second couple days after . Two pheno in Tropicana's girls
Purple Lemonade: Tall plants, massive producer, all three girls will be in 9 week provably. Here so far all three girl share same characteristics and bud structure
Beautiful and high odor in the room!
Lighting Parameters: PAR Map: Maximum PPFD is 950, minimum PPFD is 650.
VPD: Ranges from -1.1 to -1.2.
Daytime Temperature (DT): 23-24°C.
Nighttime Temperature (NT): 19-20°C.
Leaf Temperature: 21-22°C.
Light Distance: 45-55 cm from the plants.
CO2 Levels: 700+ ppm.
HLG Scorpion Diablo: Set at 70%, positioned at a 45-55 cm distance.
Girls drink less water, so for this week and till the end of flowering new misting timing's
Daytime: ON for 70 seconds, followed by 30 minutes OFF.
Nighttime: OFF for 70 seconds, followed by 35 minutes OFF.
Nutrient Tank (NT):
pH: Maintained between 5.80 and 6.00. Stable PH, small drifting up and downs
EC: 1.05.
Temperature: 19-21°C
25.04.2024
TrolMaster toys arrived! Purchase new DST2E, DSP2E, DSH2E, AMP3+probes. Another DSH2E and DSP2E ordered to complete this grow box!
Replaced all filters in the system and cleaned them.
Mixed a new batch with the following components:
25+30ml AN Connoisseur Bloom A+B. Total volume: 17 liters
Electrical Conductivity (EC): 1.05
Tomorrow Tropicana Cookies harvest! Put bucket with this girl on separate line for flushing
Wedding Cheesecake also finish soon, probably in next week, Wednesday think...
Purple Lemonade still need full week or more...Exceptional odors
Temps and humidity outside start to raises, hope i will finish this run before Tropical heat
Lighting Parameters: PAR Map: Maximum PPFD is 950, minimum PPFD is 650.
VPD: Ranges from -1.0 to -1.1.
Daytime Temperature (DT): 23-24°C.
Nighttime Temperature (NT): 19-20°C.
Leaf Temperature: 21-22°C.
Light Distance: 45-55 cm from the plants.
CO2 Levels: 700+ ppm.
HLG Scorpion Diablo: Set at 70%, positioned at a 45-55 cm distance.
Daytime: ON for 70 seconds, followed by 30 minutes OFF.
Nighttime: OFF for 70 seconds, followed by 35 minutes OFF.
Nutrient Tank (NT):
pH: Maintained between 5.80 and 5.95. Stable PH...
EC: 1.05.
Temperature: 19-21°C
26.04.2024
Connect TrolMaster components into the Tent-X system. Program DSP2E, Temperature DST2E, Humidity DSH2E, as well as the AMP3 sensor with PH and EC probes, are all in place.
After calibrating the probes, AMP3 module works perfectly! It has a quick response in measurements, is accurate, and I am very happy about the possibility of online monitoring of liquid values.
After day off use i can tell that all readings are very consistent, compared with Milwaukee, totally without all over the place measurements. Perfectly steady and on spot receding!
The Program device runs flawlessly all day, and I hope it has solved all the problems I had with DH48-S timers.
The humidity control operates without errors throughout the day, and it’s nice to see in the app when the module is active.
Raise light as much as i can..50-55cm from canopy. Set off misting time from 30min to 35min @ day time , and from 35min to 45min @ night time
Flush Tropicana Cookies' for one more day, tomorrow harvest, prepared tent for drying with humidifier , ventilation and temperature and humidity controllers
PAR Map: Maximum PPFD is 850, minimum PPFD is 500.
VPD: Ranges from 1.0 to 1.1.
Daytime Temperature (DT): 23-24°C.
Nighttime Temperature (NT): 19-20°C.
Leaf Temperature: 21-22°C.
Light Distance: 45-55 cm from the plants.
CO2 Levels: 700+ ppm.
HLG Scorpion Diablo: Set at 65%, positioned at a 50-55 cm distance.
Daytime: ON for 70 seconds, followed by 35 minutes OFF.
Nighttime: OFF for 70 seconds, followed by 45 minutes OFF.
Nutrient Tank (NT):
pH: Maintained between 5.80 and 5.95. Stable PH...
EC: 1.05.
Temperature: 19-21°C
28.04.2024
First harvest in this run! Tropicana Cookies No1 is a winner.) First Tropicana Cookies is harvested on 89 day from seed. Total 55 days off flowering.
Fast flowering indeed as fast in vegetative stage. Cut this girl in branches and hang upside-down in smaller tent for drying
Set RH @ 55% , temperatures not able to control so they will be something around 20-21 in drying tent
Second Tropicana will be chopped within a couple off days. Checking trichomes with microscopes can tell that one Purple Lemonade is also going to finish in next days
Somme lady's will take full 9 weeks or so..
Lowering light intensity, EC in tank start to raise slowly so i will start to adjust according to condition. Currently 0.85EC is perfect strength i think
PAR Map: Maximum PPFD is 850, minimum PPFD is 550.
VPD: Ranges from - 0.9-1.0
Daytime Temperature (DT): 23-24°C.
Nighttime Temperature (NT): 19-20°C.
Leaf Temperature: 21-22°C.
Light Distance: 45-55 cm from the plants.
CO2 Levels: 700+ ppm.
HLG Scorpion Diablo: Set at 65%, positioned at a 45-55 cm distance.
Daytime: ON for 60 seconds, followed by 30 minutes OFF.
Nighttime: OFF for 60 seconds, followed by 35 minutes OFF.
Nutrient Tank (NT):
pH: Maintained between 5.80 and 5.95. Stable PH...
EC: 0.85.
Temperature: 19-21°C
Week 8 off Flowering in Summary
80 litter off RO water,
120ml+150ml AN connoisseur A+B
45kW electricity in total for light, Pumps and AC Infinity Fans. 42kW for Light + 2kW Dehumidification + AC Infinity ventilation
Week start @ 1.1EC, nutrient strength., week finish with 0,87EC
Tropicana Cookies is first harvested on day 89 from sprouting , week 8 off flowering
Purple Lemonade is on second place with harvest on day 91, last day off 8 week off flowering
PH was stabile and move from 5.70 min to 5,9 max.
Light distance for this week - 50-55cm from tallest top , PPFD levels around 900 in center, trough whole week. Lowest reading 500 @ corner
Temperature are from 20c at start off day to 24.5c max at some points.
Night temps around 19.5-20c. Outside humidity is generally low
This week i have install TrolMaster AMP3 sensor and humidity, temp and program devices
Day RH is moved from 45% to 55% max, at night times drop to 45-48%
Lighting Parameters: PAR Map: Maximum PPFD is 900, minimum PPFD is 650.
VPD: Ranges from -1.0-1.1.
Daytime Temperature (DT): 24.5°C.
Nighttime Temperature (NT): 20°C.
Leaf Temperature: 22°C.
Light Distance: 45-55 cm from the plants.
CO2 Levels: 700+ ppm.
HLG Scorpion Diablo: Set at 65%, positioned at a 45-55 cm distance.
Daytime: ON for 70 seconds, followed by 25 minutes OFF.
Nighttime: OFF for 70 seconds, followed by 35 minutes OFF.
Nutrient Tank (NT):
pH: Maintained between 5.8 and 6.1
EC: 0.87-1,1.
Temperature: 20-21°C
Likes
35
Share


@StonedandSteady
Follow
1st Day of Flower: 2nd Feed Humboldt
Let's Grow and Stretch Out to Fill your Mighty Branches with Giant Gorgeous Budz Ladies! Happy Birthday HoneyBuns!!! I Love you so Much and Thankful to be your Man and Husband! It's been a few days since I gave the Ladies thier 2nd Feed of #HumboldtCountysOwn Nutrients and they look Super Awesome!!! We'll definitely Grow back to everything here soon! I'm Glad it's May 1st and Flipped to Flower and also to Celebrate my Wonderful and Beautiful Wife's Birthday!
11th w/ Veg and Flowers Update #Pre-Sexed🚺 #SuperCropped #Defoliated #Lollipoped
Good Day and Happy Growing Everyone! These Ladies were Growing into thier 11th Week of Veg and Looking Totally Tight and Phenomenally *Femed* from the Right!
#Pre-Sexed 4/9/21 #Opium/#PabloEscobar *Fems* breed by Team #DivineSeeds #DivineSeedsSquad #DivineSeedsBreedingCompany and #SuperCropping continued! I'm Very Excited and Extremely Gracious!!!
Heck Yeah Growmies and Growmets!!! Check Out these Confirmed Females with thier Wild Pistol Hairs popping and I'm still Training and Widening them Out with #SuperCropping Everything looks Expanded and Growing Great!
After #SuperCropping the plant will Grow Bushier, Produce More Buds, and possibly even Produce More THC! This is how the plant naturally responses to danger and protects itself! Growers take advantage of this technique to get Bigger Yields and More Potent Buds than would be produced otherwise!
Getting Trained out into thier 11th Week of Veg and Looking Mighty Fine!!! Thier getting Humongous and Hearty in thier 10 gallon Grow Bag from Broski #www.as420.ca These Cannabis plants are Camping out in the Closet for a week or so! Lol
This is my 2nd run using the Osree.Light QB1000w and Everything is Mesmerizing!!!
My #Opium and #PabloEscobar *Fems* from #DivineSeeds Regs: SalamiLegF3's×2 and FireAlienRomulan look$ Outstandingly Awesome and Growing Up Phenomenally Fine into thier 11th week of Veg in our 2- 10 gallon The Grow Bags from Broski #www.as420.ca and also 2- 5 gallons as Well! Our others are Super and Breed by #thehumancannabiniod #AlienBloodGenetix #TNBNaturals #Foop
Yo!!! Thanks Again for All the Love and Support my fellow Growmies and Growmets!!! These Magnificent and Magical Ladies were Growing in our 48×24×60 ViparSpectra Official Club 🌿 ®️ Grow Tent and under our #Osree QB1000w and #GrowStarStore Kokokala QB1000w and our Purple Rose Cutting×2, Aloe Vera Cutting, Maters×3, Morel Mushroom, Lavender×3, Sunflowers×5 and The 6 Brand New and Fresh Starts are Wonderful with a Huge Hint of Fantastical Fire is my #SalamiLegF3×2 by Broski #thehumancannabiniod #DankFlowGenetics #EastCoastSeedBank #FireAlienRomulan by Broski #AlienBloodGenetix my #PabloEscobar and #Opium by Team #DivineSeeds #DivineSeedsBreedingCompany We Grow with #Growatt 600w with #FoopOrangicBioSciences and #TNBNaturals The Enhancer Co2 Despersal canister and ph'd them w/ Declorinated watering w/ TNB ph Up and Down! Totally Top Quality Topz all Around! Thanks Again #GallowGlas420 #HarleyGrower #thehumancannabiniod #AlienBloodGenetix #TNBNATURALS #FoopOrangicBioSciences #www.as420.ca #divineseeds #divineseedssquad #divineseedsbreedingcompany #BioFlux Family's and Teams!!! Your Genetics are Merry Magnificent, Mega Marvelous and Mighty Medical! Love um!!! I really Can't stress enough how Thankful and Grateful I am of All of you and what you've Shared with Us! Means the World!!! It's definitely a Pleasure being able to Grow with these Phenomenal Grow Lights! Please Enjoy! BudBrothers4-Life! Cheers Famz!!! Much Props and Much Topz!💯🔥 #Osree #GrowStarStore #Growatt #TNBNaturals #TNBTeam #FoopOrangics #GrowYourOwn #Bliss
HumboldtCounty'sOwn:
Email: [email protected]
Phone: (707) 725-4119
Toll free: (866) 872-9434
Humboldt Bottling
Po Box 429 · Fortuna, CA 95540
HumboldtCounty'sOwn Website Link: https://humboldtcountysown.com/
HumboldtCounty'sOwn Instagram Link: https://instagram.com/humboldtcountysown?igshid=1qj809qkkwych
https://instagram.com/divine.seeds?igshid=1r90iwe9xiwz8
https://instagram.com/thehumancannabinoid?igshid=17k159pumklkq
https://www.instagram.com/alienblood_genetix_official/
https://instagram.com/as420.ca?igshid=1f116alw054wp
The Grow Bags: https://www.as420


Likes
Comments
Share


@Cloudfan101
Follow
Last week of Veg. Continue defollating from the bottom up. They be thiick.
Likes
10
Share


@daRealOG
Follow
She started growing quite fast and even though the height was quite manageable I decided to try some LST to try to improve the final yield.
235 PPFD
15.3 DLI
Likes
54
Share


@MrJones
Follow
The yield this run was just amazing, the VIPARSPECTRA XS-2000 performed very well, they run so cool, it's just crazy, you can set the lights about 10 inches from your plants at 70% without fear of burning them, sweet seed cream mandarin auto al, always yields very well, this harvest was even better, largest amount from any Auto Flowers yet, I know that you folks that grow DWC can push it a bit better but when grown in the soil the terpenes and flavors seem to be a click better in my opinion. If you have not tried these seeds you just have to, you will not be disappointed!

Processing
Likes
21
Share


@LittleBigTrees
Follow
Plucked a few more leaves but other than that just feed them this week including bloom.
Also gave them some rice starch (from boiled rice water collection) on day 42 as a boost for the microbes 👍
Turned the IR off now and turned up to 34000lux
Likes
45
Share


@Gruenerfinger85
Follow
So meine Pflanzen Freunde es ist soweit dieses ist mein letzter Eintrag für diesen Strain.
Die Blüten haben sich sehr gut entwickelt manche Buds sind in der Struktur rund, fest und dicht andere wiederum sind nicht so dicht bewachsen sondern ein bisschen fluffig.
Die #1 und #4 waren von allen als erstes fertig, hier habe ich darauf geachtet das die Trichome schön wolkig sind ich wollte die Pflanzen auf dem Höchsten THC Stand ernten.
Anschließend kam die #2 und die #3 hat von allen am längsten gedauert.
#1, #2 und #4 wurden am Tag:74 gehackt,
#3 hat am längsten gebraucht ganze 7 Tage am Tag:81 wurde diese außergewöhnliche Schönheit gehackt sie hat auch die meisten Knospen getragen.
In der letzten Woche ist alles ruhig verlaufen als nächstes kommt der Smoke Bericht und das endgültige Wieg Ergebnis , leider habe ich doofi vergessen das nass Gewicht zu notieren zum Glück habe ich ein zwei nass Ergebnisse somit kann ich um den Daumen peilen was raus kommt.
Likes
40
Share


@SubliminalSociety
Follow
Week 15 - unstoppable growth!
My measuring stick is at its end. It only reaches 180cm and we are above that. It's getting hard to reach and prune the top but I'm not giving up.
Temp is stable, humidity at a nice level, lots of sunshine. This summer is really something.
But we had a huge storm. Nothing a little tape cant fix. One of the early branches broke off, but my net caught it and with a little tape it's as good as new

Likes
1
Share


@Olduffybastard88
Follow
Look how much these beauty's stretch as they went into flower over the moon with the size of these plants
Likes
2
Share


@Bandit600
Follow
Wachstum ist gut 👍. Wie immer bei zamnesia bin noch nicht enttäuscht worden. Danke


Likes
7
Share


@UrbanBoer
Follow
This strain must be exclusive to this parts of the world let alone this country, besides my mentor or people we know separately only a handful of us are aware of this strain’s existence. It has been a couple of years, matter of fact the last time I heard or smoked this strain was during the lockdown days of COVIVI, I should kiss myself on the forehead for collecting this strain’s seeds.
I would be lying if I gave you a run down of what to expect… I don’t even remember it’s scent nor how the bud looks like.
Though I am loving how the seedling is loving the grow medium, but to better legitimise my growing skills in future I must just get seeds from reputable breeders, knowing myself, I will be a bee when it comes to selecting strains, I’ll probably get myself these reddish strains from sweet seeds or purple strains from sensi seeds.
Looking forward to tackling hurdles of growing this strain.
Likes
101
Share


@DevilsBud
Follow
10/10/21 new week for Afghani Gold
Growing almost a month now did some topping last week and today started to LST the main everything going great so far plants loving the new FC-4800 so as i 🤩 absolutely no extra heat is coming of them 👌🏻
I maybe will top some more but as far it Goes for LST this will be the only thing i will do to the plants let the rest grow freely
14/10/21
Growing very nicely giving them the watering and nutrients when they need it . I am trying to understand plants better by looking at feeling soil etc instead of a regiment. And learning we do every day because bin growing in 11L pots but now in 8L pots so that means that there gone be smaller then my first grow . But hey got now 12 plants going on and not 4 so that will help lol
15/10/21
Did some small defoliation and some of them get light penetrating better
visit www.marshydro.eu
for your best gear and use the PROMO CODE: DEVILSBUD
Fully marshydro supported Setup:
Marshydro GT120x120x200
Marshydro FC-4800 LED lamp
Mars Hydro tent handy info
●【Lock All Light Insid】MARS HYDRO Grow Tent Interior is made of diamond mylar. Non-toxic to the environment, no harm to plants. High-quality 1680D canvas being double stitched, (ALL OTHERS BRAND grow tent is 601D canvas) which is tear-proof for perfect light locking, No light leaks or rips at all.
●【Durability Grow Tent】Stable Metal corner adapters and poles are the trustful supporters of the tent. No rusting nor paint-falling. Quick easy tool-free installation. Carries strong heavy-duty SBS zippers, double layer lining to create a light-proof seal.
●【Easy Observation of your Plants】Special peeks window made by double layers of cloths. Observe the growing conditions of your plants without opening the tent and avoid disturbing plants. The peek window also serves to dissipate heat and ventilate air.
●【Removable Tray Keep Clean】The package includes a removable waterproof floor tray to hold soil and fallen leaves. The tray can be taken out easily to wash. Removable and water-proof makes cleaning easy.
●【Good Ventilation&Fast Assembly】 Circular double-sleeved vent holes with adjustable nylon strap for air circulation by exhaust fan, ducting, carbon filter, or reflector. Better allows proper light, heat, and airflow. Quick tool-free installation. Reinforced by a sturdy metal frame to ensure security and stability, supports up to 140lb. Perfectly safeguard your plants to thrive even in winter.
