
Likes
Comments
Share


@KingSalomonsWeed
Follow
Notfallprotokolle treten in Kraft.
Grund?
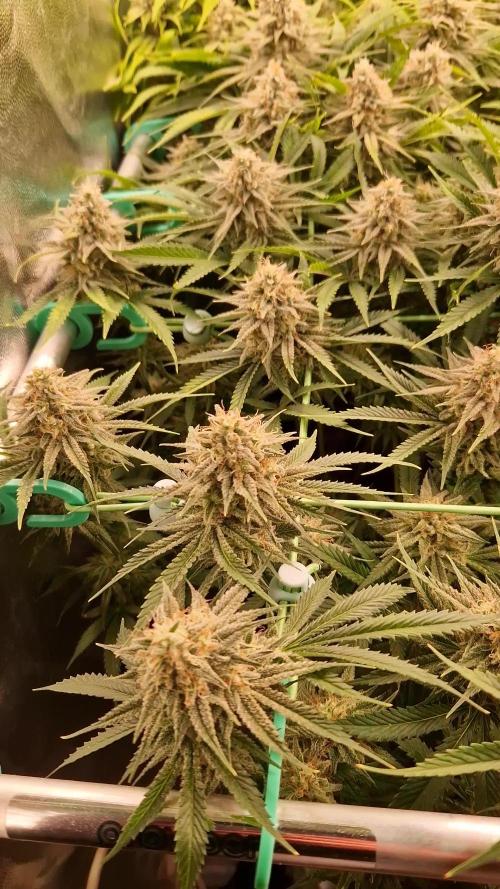
Gelato 41fast
UNKONTROLLIERTE GEWALT.
Obwohl ich sie einige male sehr zärtlich dazu überredet habe (ok, es knackte einige male) in andere wuchs richtung zu wachsen, nimmt sie ¾ des grow room an platz ein. Und, das ist keine Beschwerde. Sieht von oben fast aus wie ein sea of green (zufall).
Und überall, diese watte Bällchen.
Ich bin entzückt!
Update. Es wird wasser mit Wasser gegossen, welches ich aus einiger Entfernung per Hand aus einem wasserlauf hole.. 😛
Die Phylaxien der Gelato 41 fast sind anders.
Heftig. Sind superdick lang und schnell wieder braun.
Bud Körper bilden sich und sind hart.
Und das überall. Ok tiefer gleich kleiner.
Am 001.009.021 wird sie 71 tage alt.
35 in Blüte.
And, what the phylaxien!
I mean they re unnormal.
Never seen phylaxien growing so massive (i mean pls look at one phylaxie., i think theyre big,) and then as FAST they go brown.
Boah difficult to explain.
I checked the soil. Wet enough.
Looking my Gelato 41 FAST. She is everywhere healthy.
I read this is a monster genetic
But to see, how it grows!
This strain is (so far) different from all the others i made with before.
First its a photo. (accidently because I'm a idiot)
Than 2 weeks untrained growing.
Than not vey lovefull i showed her her new grow direction.
And the smell. Of Gelato 41 fast is..
The smell of Gelato, 41 fast.
Heavy smell on your fingers from everywhere. Steam, sheet,,, buds are becoming sticky.
I mean i smell vanilla schololade.
My Next noise means she smells like an gelateria.
And YES! SHE IS! FAST!
GREAT! WORK(till now).👍🏻 👊
I tried to make some defoliation... You wont see on the photos. Just 3 leaves and 8 little buds somewhere i found.
O8. Oo9. I cut off 2 side branches.
I knewed it before that they will take only energy from the GELATO 41 FAST.
But holy mother earth, she got enough of this.POWER!
And its me a little ankward, because im the only one till now, who got an growdiary of this FABULOS HEAVY SWEET SMELLING STRAIN!
And., the BREEDER SEEDSTOCKER, himself is watching this GROWDIARIE!!!
And holy mother earth... Im so a noob.
First I thought it was business, advertising.
The contact, i mean.
Than, after i joined the original website of SEEDSTOCKERS, and i read what i really bought!
THE PENNY FALLS..
Its the FLAGSHIP.! (
.
So im the advertising?
Oh je oh je. I do my best, but remember, please,
(and because of some little mistakes i did)
.
.
.
OK OK ok ok, big mistakes!
It is not the yield another grower can go for it, what i expect i will harvest.
But HiGHEST Quality!
This is what i expect.
And dont get me wrong,
I build an joint of some fast dried micro buds.
Brought to a friend.
After the third time Jonny goes out(because after one or two breathes he forgotten jolly Rogers). He Realized it. "Hey i hold the joint now all the time (15 min). Why don't you say a word?"
"I knewed it. But i just smiled. Looking about how long it takes till you notice it!"
He thought a few seconds "Longer"…
Both began to laugh.
So the quality i try will be heaven!
DID YOU REMEMBER THE SEED
WHEN I FELL IN LOVE?
SMARAGDGREEN.
10.09
Everday you can see the buds go with more flesh.
And sticky as nothing i had before.
Smelly? Yes. It is!
It seems that i had an Sativa dominant phenotype
Like the leaves form. (and from some fresh harvested i smoked, with 75 % milky trychomes, and the rest clear... 😛 Heavy uplifting, motivated you start to do something! As you start to moving you discover that you re really stoned).
And my 0.36 m² tent is from the GELATO 41 FASTer as i never seen any Cannabis so quick blooming, sticky everywhere.
ABNORMAL! in a great way.
And i think, soo small arent they. Or?


Likes
11
Share


@GREENPHOENIX6262
Follow
* 02/08 - Week 1 Flower - Flushed out veg nutes - Feeding only flower nutes - light feeds to begin - heavy water feeds in between - bend clips have been applied until the end of the week*
Likes
25
Share

@TrickzGrowz
Follow
Ich bin jetzt schon verliebt in die Terpene der 7th Wave! Ich kann es kaum abwarten. Die Buds sind steinhart und schwellen immer dicker an!

Likes
12
Share


@mowsgrows
Follow
Letzte Spülung, zum Wochenende oder kurz danach wird geerntet.
Der Geruch der Zkittlez ist einfach genial, Fruchtig und Gassy.
An der Hermi ist wirklich wenig Fleisch an den Buds, sie erinnert mich ein wenig an leichtes revegeging von der Struktur.
Die nur getoppte Pflanze zeigt eindeutig die Besten Ergebnisse. Sie hat die dichtesten Trichome und erscheint im Vergleich silberner als die andeden Beiden.
Es ist für mich klar, das dieser Strain nicht die beste Wahl für LST und Mainlining war. Wer jedoch Topped und ein wenig Training macht, wird sich über saftige, Harze Blüten freuen
Die Topcolas werden jetzt gegen Ende übrigens fast zu schwer, ich werde sie stützen

Likes
7
Share

@RBG
Follow
LA is doing lovely, she's was originally the tallest but after folding her like a lawn chair after a big day on the beers her upward growth has slowed right down and she's starting to push outwards like I was anticipating. LA punch is an unreleased genetic from Cali connection. I suggest if you top her to top her once. Relax on the defoilation and let her grow out. She is quiet compact and wants to stay together so you need to try and be forceful to get your way but do be careful. Doesn't like stress in the sense of defoilation and topping early on but handles high PH, high EC and high temperatures so far but obviously not for long otherwise you can seriously stunt your ladies.
Light went from 60% to 90% over Week 5 to Week 6, next 2 days she'll be at 100% ready for flowering.
2 set AC infinity bar lights will go in over this week as well as my scrogg net.
Nutrients this round
Floramax veg1
Floramax organabud
Floramax flowering enhancer ( 1/4 ) dose
Flairforms roots
Sleepz with the fishes ( pythoff )
Cyco platinum series silica
Floramax calmag
E.c 2.2
Ph 5.9-6
Let's gooo
Likes
4
Share


@Growyourownathome2x2
Follow
Thursday 16th march day 59 Harvested a couple days earlier then planned as my humidity was getting a bit high and worried about risking mold I decided to chop, have to get a good dehumidifier soon, everything looking lovely, nice and dense with very strong fruity potent smell definitely the best looking plants I have grown to date not the biggest buds but they look quality, chopped plants whole gonna do my best to keep the temp and rh% in the dry room as close 60/60 as I can to get a nice slow dry, 🍁😎 I only took the wet weight from 1 plant back left plant was 270g with large fan leaves removed

Likes
16
Share


@MadeInGermany
Follow
Info:
Unfortunately, I had to find out that my account is used for fake pages in social media.
I am only active here on growdiaries.
I am not on facebook instagram twitter etc All accounts except this one are fake.
Have fun with the update.
Flowering day 26
since time change
to 12/12.
Hey everyone 😃.
Another great week goes by.
Last week, instead of 2 g of GHSC Powder Feeding, I only gave 1.5 g p l of substrate so that I can give you another 1 g per l of substrate next week so that it lasts until the end :-).
It is developing very well and the buds are starting to grow :-).
The week was poured 3 times with 1.1 l each time. once of them GHSC Enhancer was added :-).
The bottom shoots have now also been removed :-).
As always, the humidifier was refilled every day and the lady was checked for her health.
I hope you enjoy the update.
Stay healthy and let it grow 😊🍀.
You can buy this Strain at
https://www.barneysfarm.com/blue-cheese-34
Type:
Blue Cheese
☝️🏼
Genetics:
Blueberry
X
Original Cheese
👍
Vega lamp:
2 x Todogrow Led
Quantum Board 100 W
💡
Bloom Lamp :
2 x Todogrow Led
Cxb 3590 COB 3500 K 205W
💡💡☝️🏼
Soil :
Canna Coco Professional +
☝️🏼
Fertilizer:
Green House Powder Feeding
☝️🏼🌱
Water:
Osmosis water mixed with normal water (24 hours stale that the chlorine evaporates) to 0.2 EC. Add Cal / Mag to 0.4 Ec Ph with Organic Ph - to 5.5 - 5.8


Likes
18
Share


@eldruida_lamota
Follow
Esa familia, actualizamos las northern light xL, hay una de las 3 que destaca del resto por tamaño y flores, pintan muy bien, se ve buen color y bastante vigorosas, tutelamos 1.
Bajamos humedad y temperatura, a estas alturas estamos pensando en el siguiente proyecto con varias geneticas de zambezaseeds.

Likes
6
Share


@LoganatorDude
Follow
Even though it says 80 Gallon pot, it’s really 400, it just glitches out when I enter 400 and converts to say only 80.
I know she looks bad! I know.
She has only been managing a nutrient lockout with horribly low pH for far too long! The Hydrated Lime has indeed fixed the pH! Resulting in my next inbound set of problems. The original soil from the second 2.3L pot she was in was too strong! She needs to get her roots out into the larger pot, but that only gives her so much more space. Plus in that larger black plastic pot, the hot dry sun at 7,000 ft in elevation, really heats up those pots! When it’s 98F later, that sounds like torture! Maybe it was enough to balance out the more concentrated stuff towards the inside of the root mass. But I don’t want her roots to stop there! The time is now for her to go into the 400!!!
The soil is 6.5 pH through and through. The peas are about to bloom! She has just avoided lockout and is picking up momentum! The 400 gives her a huge diameter for her roots! Something I sincerely hope her genetics will take advantage of. The soil is rich and alive! The temps in 400 will be so much better!
Now I must prepare for my Arch Nemesis!
The Butterfly!!!!!!
Lol
But seriously. They find my plants attractive, and decide to serve my plants as food for their offspring!!!! Not okay! Last year their success rate on my plants was a fat 0!! But they did some serious damage! I am prepared this year!! I will watch with vigilance for any butterflies around my plants specifically. I will spray my plants down regularly with diatomaceous earth! Not too much obviously! I know less is more when spraying that stuff! No mother wants to give her children food with razor blades in it!
And as always there is always next year! I can’t let a phase of mice and men get the better of me. However!!… that’s what I said LAST YEAR!!!! Lol. This year IS next year!
Anyways she looks rough right now on Day 58 but I tell yah what, she has very recently made a dramatic turnaround for the better!!
…I hope!
Happy Growing!
StrongTrees💪🌳
Processing
Likes
37
Share


@RickJames_Mcdank
Follow
She is doing better now with the Nitrogen she looks much better but she is a heavy Nitrogen feeder. And the Plagron Start Up is doing really good its like steroids for ht eplant. Next week monday I will start to flip the switch to 12/12.

Likes
13
Share


@CalimannpackZ
Follow
Just added Mephisto 3 sour crinkles and 2 double grapes to the equation. It was meant to be 4 sour crinkles but one seed still ent popped so I’m hoping it will! On to the grow where I haven’t trained any plants it’s a fight for space but I’m happy with most of the plants few fast buds wedding still ent properly flowered yet week 7 on but am happy with a couple glues and the 3 runtz the runtz is frosty! The grape Walkers are starting to swell and fill out big time I am happy so far with it all had a couple burns and defincys through the 7 weeks so far but got over them! The grape walkers are the big budded plants then the frosty ones at the back are runtz then the rest are glues! Started defoliating plants

Likes
17
Share


@Brujha77
Follow
Außer warten und Gießen ist gerade nix zu tun😜🍀
Tag68
Es geht Richtung Ende. Schätze noch maximal bis ca. 17.05. Dann dürften die Damen es geschafft haben👍
Likes
34
Share


@GreenLion
Follow
Hello everyone
This second week of flowering stage, she looks good. Watered with early flowering stage nutrient. Some colas are longer than others.
Likes
16
Share


@Tipton
Follow
The stretch has gone nuts... Growth has been amazing... Nothing to really complain about besides they're hungry hungry hungry lol

Likes
3
Share


@Weedzoks
Follow
Welcome everyone
Here is the diaries of a friend, this is his first culture.
He chose for this session five Hulkberry from Royal Queen Seeds, a BubbleGum offered by Zamnesia, as well as a Big Bang Auto from GreenHouseSeeds.
All these ladies are under HPS 600W, 150cm square area.
Here we go!

Likes
14
Share


@420DeepGrow
Follow
Gracias al equipo de MSNL Seeds, Marshydro, XpertNutrients y Trolmaster sin ellos esto no sería posible.
💐🍁RS11:
RS11 es uno de nuestros nuevos híbridos 50/50 perfectamente equilibrados. Creamos RS11 cruzando Pink Guava x OZK x Sunset Sherbet con la intención de crear una variedad que ofrezca medidas iguales de efectos edificantes y relajantes. Aclamada como una de las variedades más sabrosas del mercado, su sabor agrio y dulce a bayas viene con un potente rango de THC del 27% al 31%.
💡TS-3000 + TS-1000: se usaran dos de las lámparas de la serie TS de Marshydro, para cubrir todas las necesidades de las plantas durante el ciclo de cultivo, uso las dos lámparas en floracion para llegar a toda la carpa de 1.50 x 1.50 x 1.80.
https://marshydro.eu/products/mars-hydro-ts-3000-led-grow-light/
🏠 : Marshydro 1.50 x 1.50 x 1.80, carpa 100% estanca con ventanas laterales para llegar a todos los lugares durante el grow
https://marshydro.eu/products/diy-150x150x200cm-grow-tent-kit
🌬️💨 Marshydro 6inch + filtro carbon para evitar olores indeseables.
https://marshydro.eu/products/ifresh-smart-6inch-filter-kits/
🍣🍦🌴 Xpert Nutrients es una empresa especializada en la producción y comercialización de fertilizantes líquidos y tierras, que garantizan excelentes cosechas y un crecimiento activo para sus plantas durante todas las fases de cultivo.
Consigue aqui tus Nutrientes:
https://xpertnutrients.com/es/shop/
💻 Trolmaster Tent-X TCS-1 como controlador de luz, optimiza tu cultivo con la última tecnología del mercado, desde donde puedes controlar todos los parametros.
https://www.trolmaster.com/Products/Details/TCS-1
📆 Semana 3:
Muy buena semana, he aplicado un riego solamente con agua de manantial para reducir la cantidad de sales acumuladas en el sustrato y se ha notado una mejoria .
Creo que le quedan unas dos semanas por estirar, parece que va a ser una buena cosecha.
Se mantiene un buen control del cuarto de cultivo gracias a @marshydro y @trolmaster.
Mantengo las dosis de 1/3 de nutrientes recomendados por el fabricante.
Potencia del foco 80%

Likes
14
Share


@Korinthius
Follow
Well, this slow started lady has started to take off. Any concerns about her slow start are gone. Root system is extending nicely into her new home, She is not drinking a ton, but that is of no surprise at this age.
I can confirm, I did start her off a little low in her net pot, but next week, when she gets topped, I will be able to add some extra clay pellets for stability.

Likes
2
Share

@eldruida_lamota
Follow
Que pasa familia, vamos con la quinta semana de floración de estas Orange Sherbet Fast Flowering, de FastBuds.
Agradezco a Agrobeta todos los kits obtenidos de ellos 🙏.
Vamos al lío, El ph se controla en 6.2 , la temperatura la tenemos entre 22/24 grados y la humedad ronda el 50%, añadimos ya varios productos de la gama de Agrobeta.
Las próximas semanas veremos cómo avanzan.
Agrobeta:
https://www.agrobeta.com/agrobetatiendaonline/36-abonos-canamo
Hasta aquí todo, Buenos humos 💨💨💨
Likes
5
Share


@CHEFCHAPO
Follow
It's Amazing Strongest Strain Resistance,this place in 950m from the level of the sea all days Wind days becouse Strain is resistance of wind becouse have good root systems,this strain XXL <3 not XL
PS. WATERING every 2 days 2L and Barrier in Vegetation Stage only Sprey
Likes
5
Share


@AustinRon
Follow
TH 1Q2025 - Week 4 - Bolt I
(ON Haze X Original Haze) X Northern Lights #2
“Todd’s Haze”
Objective
- 8 Female Plants, Topped ONCE @ Flip, 12” when topped
- Modified Sea of Green
Seeds Wet: 1139PM, 28.2.2025
Germinated: 2.3.2025
Flip: 21.3.2025
Harvest: 77 Days, DATE: 6.6.2025
_________________________________________
Weeks Summary:
- Photos indicate we’ve been overdriving our plants. Lime - Yellow Green, Stressed lowers. NOT Relaxed.
- Tue - EOW We’ll run moderate light, Low-Moderate Feed (EC: 1.1)
__
Fri Mar 28, 2025
TH 1Q25 8:B:1:1
All plants have lifted, with minor praying at least.

Applied Remaining Gallon of Root Steering solution. TODAY we switch to Rooted Leaf Medium @ 1.3 mS/cm.
At this point the Coco should be WELL BUFFERED with CalMag - Reducing Calcium to normal level, we should be able to run w/ NORMAL Calcium levels, no boots. We’ll see
We need
- more nitrogen evident in the plants
- to get from 351 - 750 µMol/m2/s
- To ramp EC from 1.2 - 1.6
When the girls are receptive . . .
__
Sat Mar 29, 2025
TH 1Q25 9:B:1:2

PRE-CUT Foliar of MOMs (15 Min before taking Cuts): [ 1, pt]
- Cal Mag Fuel: [ 2.5, ml]
- Lush Green: [ 0.625, ml]
- Resin Bloom: [ 2.5, ml]
Wrap Label below Top Node
Top to Node 3, Cut plunged in water
- [x] 8 Cuts, “Todd’s Haze”
- [x] 2 Cuts, Lemon Jeffery
Dip Tray
- Rooting Powder, Aloe Gel
- Top + 2 Nodes
Cuts to Rooting Cubes
- Cut 45° just below 2nd Node
- Gently Abrade cuticle of stem below 2nd Node
- Dip END in
- Rooting Powder
- Beauveria Bassiana
- Fresh Aloe Vera Gel
- Afix IN Prepped Rooting Cube - 1/4” from BOTTOM NOT THROUGH
- Place in Rooting Tray, Cover
“Cut Foliar Solution”
When All cuts in Dome, Foliar (1 pt) w/
- PCAL 1660: [ .25, g]
- KelPak: [ 1, ml]
- CalMag Fuel: [ 1, ml] # Acidification of PCAL 1660
- Photosynthesis Plus: [ .75, ml]
DAILY UNTIL ROOTED -
- [x] Verify Rooting Cubes are adequately hydrated
- [x] Light Foliar with Cut Solution
Take Cuts WHEN All Phenos are WELL into 6 Nodes
- When ALL Cultivars have At Least 6 Nodes:
- Top to 3
- Use Crown as Cut for Labeled Pheno
- [x] Prep Cut Dome
- [x] Pull Seedling Mat (78°F) for use UNDER Cut Dome
- [x] Rooting Prep
- [x] Rooting Powder
- [x] Beauveria Bassiana
- [x] FRESH Aloe Vera Gel
- [x] Root Riot Cubes MOISTENED / NOT WET
Cut Spray Solution
- [x] KelPak: [ 4, ml, gal]
- [x] PCAL1660, [ 2, g, gal]
- [x] Photosynthesis Plus, [ 6, ml, gal]
- [x] Check All Pots for Emergent Roots
Once we’ve roots at EACH pot - Switch to Normal Fertigation . . .
Fertigation: 1 Gal, EC: 1.2-3
- [x] Primer A&B: [ 5, ml]
- [x] CalMag Fuel: [ 2.5, ml]
- [x] Silica Skin: [ 2.5, ml]
- [x] Lush Green: [ 2, ml]
- [x] Root Anchor: [ 2, ml]
- [x] Peak Bloom: [ 2, ml]
- [x] Photosynthesis Plus: [ 6, ml]

__
Sun Mar 30, 2025
TH 1Q25 10:B:1:3
Fertigation: 1 Gal, EC: 1.2-3
- [x] Primer A&B: [ 5, ml]
- [x] CalMag Fuel: [ 2.5, ml]
- [x] Silica Skin: [ 2.5, ml]
- [x] Lush Green: [ 2, ml]
- [x] Root Anchor: [ 2, ml]
- [x] Peak Bloom: [ 2, ml]
- [x] Photosynthesis Plus: [ 6, ml]
- [x] TM-7 (µNutrients): [ 0.5, tsp] # Teabag Style Infusion

__
Mon Mar 31, 2025
TH 1Q25 11:B:1:4
Fertigation: 1 Gal, EC: 1.3
- [x] Primer A&B: [ 5, ml]
- [x] CalMag Fuel: [ 2.5, ml]
- [x] Silica Skin: [ 2.5, ml]
- [x] Lush Green: [ 2, ml]
- [x] Root Anchor: [ 2, ml]
- [x] Peak Bloom: [ 2, ml]
- [x] Photosynthesis Plus: [ 6, ml]
- [x] Quillaja 60 Powder: [scant]
IF Initial appearance at Lights on doesn’t suggest “Relaxed, supple,” we’ll run @ EC: 1.1 Until resolved . . .
__
Tue Apr 1, 2025
TH 1Q25 12:B:1:5
We’re Running Lowered Light. And reducing EC to 1.1 until we’ve plants that seem REALLY HAPPY.
Fertigation: 1 Gal, EC: 1.1
- [x] Primer A&B: [ 5, ml]
- [x] CalMag Fuel: [ 3.0, ml]
- [x] Silica Skin: [ 2, ml]
- [x] Lush Green: [ 2, ml]
- [x] Root Anchor: [ 2, ml]
- [x] Peak Bloom: [ 2, ml]
- [x] Photosynthesis Plus: [ 6, ml]
- [x] TM-7: [ 0.5, g]
- [x] Quillaja 60 Powder: [scant]
- [ ] 
__
Wed Apr 2, 2025
TH 1Q25 13:B:1:6
EC: 1.1
LightIntensity: [ 400, µMol/m2/s]
We only watered 220 / plant, about half of what we’ve been delivering.
Foliar: # 1 pt Spray Bottle @ Lights ON
- [x] Solar Rain: [ 2.5, ml]
- [x] Silica Skin: [ 2.5, ml]
- [x] Photosynthesis Plus: [ 1.5, ml]
- [x] Quillaja 60 Powder: [scant]
__
Thu Apr 3, 2025
TH 1Q25 14:B:1:7
EC: 1.3
LightIntensity: [ 401, µMol/m2/s]. # Staying low, waiting for plants to resolve
Fertigation: 1 Gal, EC: 1.3
- [x] Primer A&B: [ 5, ml]
- [x] CalMag Fuel: [ 2, ml]
- [x] Silica Skin: [ 2, ml]
- [x] Lush Green: [ 2, ml]
- [x] Root Anchor: [ 2, ml]
- [x] Peak Bloom: [ 2, ml]
- [x] Kelpak: [ 4, ml]
- [x] Photosynthesis Plus: [ 6, ml]
- [x] Quillaja 60 Powder: [scant]
