
Likes
Comments
Share


@DniceWJ
Follow
Day 1 I’m looking forward to more days.😍
LSD journey September 14, 2021 day one of germination temperature is 71°
My germination technique is to put the seed into the soil And keep the little pot warm and wet, light schedule is 18 hours of light. I’m using a MARS HYDRO Grow Tent Kit Complete TS 600W LED Grow Light 2x2ft Full Spectrum Indoor Grow Tent Kit 24"x24"x55" Hydroponics Grow Tent 1680D Canvas with 4” Ventilation Kit for Grow Setup Kit Tent Kit (Amazon) , General hydroponics power grower Kit (Amazon). The grow light is 8” from the pot keeping my little girl warm. Starting today I will be following the recommended feeding schedule for week one floral micro 2.5 mL a gallon floral Gro 2.5 mL a gallon floral bloom 2.5 mL a gallon, I will be doing this once a week increasing the amount of nutrients as needed. I will be Change your nutrients every 7 to 10 days and topping off with fresh water between nutrient changes on September 21, 2021 I will be topping off with freshwater and adding nutrients on September 22, 2021

Likes
9
Share

@DerEkstaseHase
Follow
3 Headies haben angefangen zu Schimmeln, ich hab sie dann sofort entfernt.
Schade, aber ist ja noch n Haufen dran.
Dann Daumen drücken und hoffen das die Pflanze die paar Tage noch übersteht.
Ich habe den Luftentfeuchter aufgestellt!

Likes
6
Share


@GermanGrow182
Follow
Larry und ak wachsen gut, die Autos unterscheiden sich etwas in der Wuchsgeschwindigkeit, obwohl gleicher Boden, Wasser zu und genetik 🤷


Likes
52
Share


@Salokin
Follow
The High intensity was to strong (clearly my fault) in the beginning which stunted her overall stretch, she however still delivered super dense, terpene and trichome loaded buds.

Likes
3
Share


@Ogbangbang2981
Follow
oh did I add I noticed she showing sex this morning as the sun rises
so this morning Feb 18 6:22am I decided to up my nutrients
with the first bottle of nutrients I mixed was on a early veg level so I just add 2ml of each my fox farms advance nutrients along with some algas ( made with seaweed somewhere on the island ) which is a root stimulant and a few drops less than a teaspoon of molasses. and gave my baby a deep feed hope I dont regret this hope I dont get nut burns .

Likes
5
Share


@Happydays58
Follow
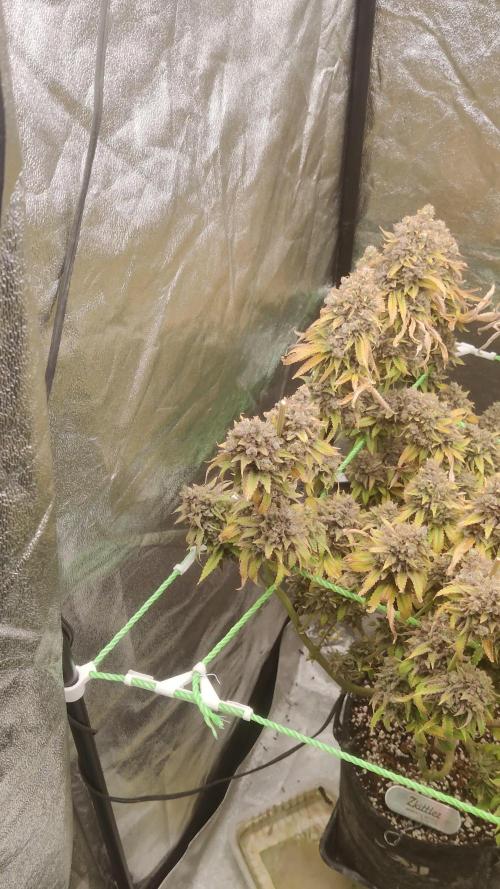
03/12 - Day 68
Girls are putting out some really nice aromas! I’m assuming this is the last push for this strain, buds are really tight and super hard when squeezed on (B) & (C)
All around the trichomes are still pretty clear and no amber yet.
Processing
Likes
11
Share


@OrganicAlphapak420
Follow
Fed only distilled water every 3 days. They getting thirsty now. They grew about 2 inches n looks like they are done strething . Now they are fattening up real nice. Especially the super skunk auto in the back right corner. ..so far no problems. Just watering them wen needed n watch the temps n humidity daily. So far the most easiest n relaxing grow I've done...will update next week...good luck on your grows.
Processing
Likes
52
Share


@CBD_Sweden
Follow
@MephistoGenetics,
Hi all the happy people here in GrowDiaries.
This is my second cultivation ever and it will be fun to try a bigger space than my closet grow.
First, I'm just going to say I'm done with the construction of my new growroom.
The room is 2.14 meters by 1.7 meters and has a ceiling height of 2 meters.
It provides a floor area of 3.6 square meters.
I use a 54 Watt Lightwawe T5 for germination and 2 Pcs 400 Watt HPS lamps.
I have a channel fan that replaces the room air about 40 times an hour to get a comfortable environment in the room, the air enters a fresh air intake from the outside.
The air is purified through a carbon filter to then leave the room to the rest of the basement.
Then I use that heat to heat the rest of the basement.
I will use 10 pcs 15 liter Autopots to grow with and a 100 liter water tank that supplies the pots of water and nutrition.
I will grow completely organically in soil and will watercure my buds to get the best possible medicine for me.
But there are no cultivation rooms to be displayed here, so I continue with what is most important.
Today I have put my seeds in paper towel and hope the seeds have germinated within a few days.
I am very excited to see how the new growroom will work and how this Stilton Special will turn out.
Strain Name: Stilton Special F1
Genetic heritage - Sour Livers F3 x Northern Cheese Haze F3
Strain behaviour - Stilton grows well from the off, and develops into a stout but branchy specimine that leads to a fine yield of awesome flowers. She's not too stretchy but also is sizeable enough with good growth, to train and shape to your liking. Flowers develop pretty fast and grow to a good size, it may to advised to clear out some undergrowth and if needs be a very gentle defoliation mid-way through the grow, although leaf tucking may suffice well enough.The end product is of top shelf quality and she doesn't lack in yield either.Give your garden, nose, and body a treat and be sure to indulge in a slice of Stilton this year, You won't regret it.
Size - 50 - 70 cm
Structure - Medium height but bushy
Flower Density - 9/10
Indica/Sativa - 65/35
Cycle Time - 65 to 70 days from sprout
Yield - 90 to 140 grams as a single plant
Best Method for overall high yield - 9-12 per 1,2m x 1,2m sq in 10-15 Liter pots (Soil)
Aroma - Very strong, Cheesey/fruity/sour/spicey/ with a dash of coffee.
Taste - Dank berries
Effect - Good hybrid powerful but balanced effect
Medicinal Benefits - TBA
Best Grown - Indoor/Greenhouse
Cannabinoids - TBA
Extract information - Ideal extract candidate - High in resin, oil and terps.
.................................................................................................................................................................................................................................................................................................................................................
2017-08-21. Started to germinate the seed.
.....................................................................................................................................................................................................................................................................................................................................................
2017-08-23. Seed germinated and put in small pot in the humidity dome.
.........................................................................................................................................................................................................................................................................................................................................................
2017-08-27. Slow and steady she grows.
----------------------------------------------------------------------------------------------------------------------------------------------------------------------------------------------------
2017-08-28. Transplanted to the 15 liter autopot.
--------------------------------------------------------------------------------------------------------------------------------------------------------------------------------------------------------------
2017-08-29. New movie of the girl and a new pic of the grow room from now.
-------------------------------------------------------------------------------------------------------------------------------------------------------------------------------------------------------------
2017-08-29.
Hello to you who read my diary, I just want to say that I am pleased that you have chosen to check in with me and in my diary.
I just want to say that I do this for myself and for a steady flow of my medicine.
Everything you read and see in my diary is 100% honest and I will never distort or beautify anything here.
I document my crops so that I can learn from my mistakes and also to look back at those different crops.
I try to update with pictures every day and with text if something special has happened in the garden.
This is my strainhunt for the best medicine and the beginning of my journey with cannabis and the cultivation of it.
-----------------------------------------------------------------------------------------------------------------------------------------------------------------------
2017-08-30. Cleaned the room this morning, just vacuuming and cleaning with chlorine solution. Im testing the fan to control temp and humidity, it works great.
Added a movie. Everything is looking great right now.
------------------------------------------------------------------------------------------------------------------------------------------------------------------------------------------
2017-08-31. 3 new pics.
--------------------------------------------------------------------------------------------------------------------------------
2017-09-01. New pics and a video of the room from today.
-----------------------------------------------------------------------------------------------
2017-09-02. New pic
----------------------------------------------------------------
2017-09-03. Video of the girl this morning.
----------------------------------------------------------------------------------------------------------------------
2017-09-04. Week 2 starts, new pics.
----------------------------------------------------------------------------------------------------
2017-09-05. KL 08.00. Cleaned the room this morning, just vacuuming and cleaning with chlorine solution.
KL 12.00. The girl got 2 liters of water with nutes in it, added a video.
----------------------------------------------------------------------------------------------------------------------
2017-09-06. KL 08.00. The girls woke up after their beauty sleep, the leaves are always a bit down after 6 h of darkness, but they will stretch now when the HPS lamp starts.
Everything looks good and I keep trying to tuck the leaves so they get the maximum amount of light where needed. Added pics and video.
--------------------------------------------------------------------------------------------------------------------------------------------------------
2017-09-07. Day 17 from sprouting. I have never tested PH in my grows, when growing organic in soil iv learned that it adapt PH by it self. But im curious by nature so i had to test.
Kl 10.00 Tested PH in the soil, it was 6.9 and tested my tap water and it was 6.8. Added video of the girl.
Kl 22.30. New pics
------------------------------------------------------------------------------------------------------------------
2017-09-08 KL 08.00. Good morning, added new video.
2017-09-08. Kl 23.50. Gave every girl 3 liters of water and nutes, added new video.
--------------------------------------------------------------------------------------------------
2017-09-09. Kl 21.00. Defoliated a lot and added pics.
------------------------------------------------------------------------------------
2017-09-10. Kl 08.00. Last day of week 2. New video.
2017-09-10. Kl 23.00. 3 new videos.
-----------------------------------------------------------------------------------

Likes
6
Share


@ForbiddenBotanist
Follow
everythings on time. Probably another 2 weeks maybe 3, of veg. No water today, probably tomorrow with fert again. thats all for now
Any input or tips always appreciated!
-
Likes
20
Share


@Xabii
Follow
PH is going down down down, corrected it with PH up up up.
I don't know why it dropped ~0.1/hr when EC stayed pretty much stable, roots look fine, no smells so... ???
Did defoliation as usual, the NL #1 + 2 need it every couple of days, the Ori is just fine, doesn't need anything.
Also did LST and lollipoping.
Smells get more intense
Likes
4
Share

@Jabbamo
Follow
_______________________________________________________
Di. 3.3.
- Pflanzenhöhe 90cm (mitte)
- Supercropping (mitte)
- Toplight Abstand auf maximum 50cm nach cropping
_______________________________________________________
Do. 5.3.
- 3,3 Liter pro Pflanze gegossen (ca. 300ml Drain)
1,2 ml / Liter "Calmag"
1,0 ml / Liter "Bio Grow"
3,0 ml / Liter "Bio Bloom"
1,0 ml / Liter "Top Max"
Ph 6,3 / 600 qqm
_______________________________________________________
So. 8.3
- inter canopy lights (ICL) installiert
_______________________________________________________

Likes
30
Share


@Togoutouseg
Follow
J'ai lancé la floraison le 24 avril !!
J'espère que mes plantes vont faire de belles fleurs 🌱🌴

Likes
13
Share


@CURATI_DA_SOLO
Follow
Ancora rimango pietrificato dalla struttura di questo gioiellino di Green House seed....sta diventando veramente alta con internodi relativamente corti. Ha iniziato anche a mettere germogli veramente ovunque! Questa è la seconda volta che coltivo questa genetica e ricordo che anche la prima volta fú un successo, anche se questa volta penso lo sia ancora di più! Anche grazie ai fertilizzati di CANNABOOM ( stavo utilizzando plagron per queste fanciulle ma poi ho deciso di cambiare la loro dieta) che sinceramente hanno fatto il loro grandissimo lavoro ! Già alla seconda applicazione ho potuto notare tutto il loro potenziale! Il CALMAGSI e veramente eccellente un prodotto con calcio magnesio ferro e SILICIO! Veramente questa azienda offre prodotti di qualità elevatissime a prezzi veramente modici! È il bello è che sono anche super concentrati, ce ne sono parecchi che ne basta 0.1 o alcuni addirittura 0.02 quindi parliamo che puoi fare veramente molti litri! Ma adesso tornando alla nostra carissima KING'S JUICE AUTO, penso che questa coltivazione sia veramente un grande successo...(almeno lo spero)
Ringrazio veramente tanto i ragazzi di CANNABOOM per avermi consigliato al meglio ogni piccolezza, e ringrazio anche GREEN HOUSE SEED per la loro scrupolosità nel consigliarmi che seme coltivare! Spero di fare ancora tanti diari per queste due aziende a mio parere LEADER NEL SETTORE!
Miraccomando restate sintonizzati! Alla prossima settimana!!!! Grazie mille a tutti voi che mi supportate sempre anche con un semplice mi piace!

Likes
7
Share


@cwgrows
Follow
Going off what other people say about 2x-3x growth during the preflower stretch I decided it's time to flip!


Likes
5
Share


@weedelicious
Follow
Day 64:
I've been on vacation for four days now. However, I was able to keep an eye on everything remotely using the spiderfarmer app. They look great. The Pink Cookies and the Purple Kush have grown quite a bit taller. The buds have generally grown larger and the first frost is visible. I watered all the plants with 2 liters of water mixed with fertilizer and Cal Mag. More shoots have also woven into the web.
Day 65:
Not much has changed since yesterday. The plants look healthy and happy. I lowered the light by 10 cm. I hung the fan over the lamp and set it to a faster speed. The flowers look beautiful. Since the Pink Gelato is growing taller now, I had to adjust the humidifier a bit. What varieties are you currently growing?
Day 66:
The girls are doing well! Today I defoliated the plants again. I decided to remove some of the leaves so that the top buds would grow nicely and I'd have as few popcorn buds as possible. I hope it wasn't too much. I also watered all three plants with 2 liters of water mixed with Hesi-Bio-Bloom and Cal Mag. Unfortunately, it's still quite warm in the tent. Do you have any ideas how I can get the temperature down?


Likes
25
Share


@JonnyKush
Follow
hello growmies! day 51 finally the pre-flowers begin to appear. I apologize for the few photos but unfortunately they really filled the box and I find it difficult. overall I have to say they look in perfect shape! I will keep you updated thanks for passing by. like and comment! good day and beautiful growth to you 🌳🌱
Likes
6
Share

@SzkolaZiola
Follow
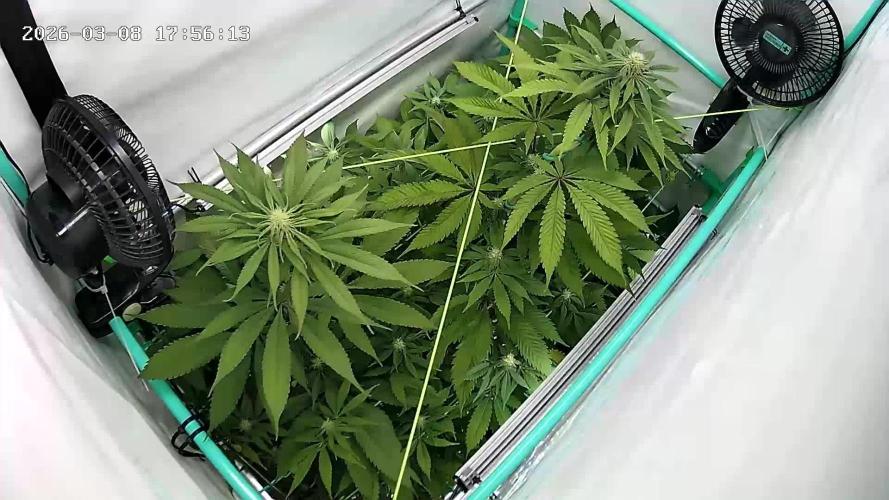
Day 60 of 12/12
HARVEST TIME
They are soooo fine I barely have words.
Weak-neck gland trait is a fact. I was collecting FRESH, "WET" (non-dried) flowers for Fresh Frozen - the amount of trichome heads just breaking off during that process was astounding. Air was full of trichome heads every time I touched a branch or a bud.
I repeat - it was non-dried flowers, straight from a branch, from alive, watered plant - and I collected a few grams of loose heads in my TrimBin. Crazy stuff. I also pressed it and I got top-shelf rosin - without dryiyng and sieving or bubble ice wash. Mind blown 🤯
8 plants
60 days (8.5 weeks) of flowering under 12/12
4x4 ft tent
466W Mars Hydro light
= 2166g
of Whole Plant Fresh Frozen material (just trimmed buds + some trichome-covered leaves)
Now floweres are in deep freeze -36°C waiting to be washed for bubble hash and pressed into live rosin in the near future.
Likes
13
Share


@J_diaz420
Follow
Primera semana de floración y a medida que crecen los brotes los voy pasando bajo la malla tratando de dejar los brazos más altos en las orillas, se ha regado foliarmente con delta 9 el cual se dio en dosis baja al sustrato al comenzar fotoperiodo de floración.
