
Likes
Comments
Share


@OrganicNature420
Follow
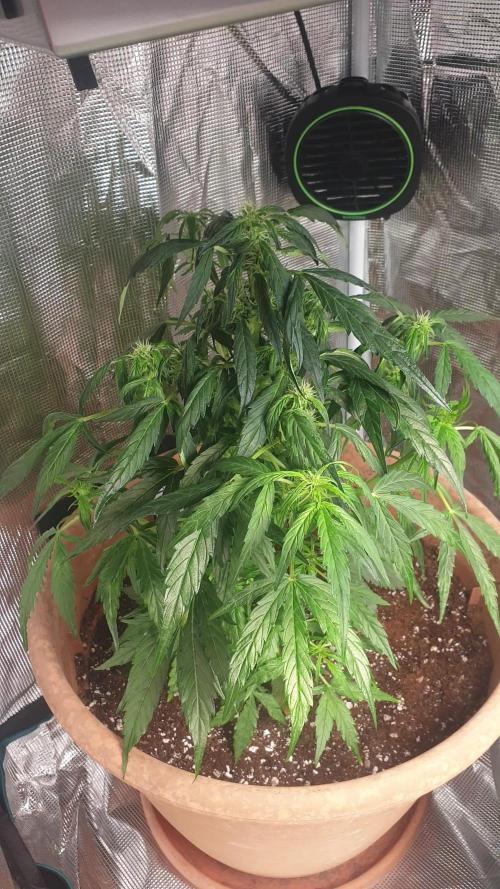
Germination date 🌱 12/07/2021
Day 71 23/09/2021
Strain 🍁 Humboldt Purple Matcha (2nd time
(Sherbinski x HSO)
THC% • Unknown
💡 Mars Hydro FC4800
• Power draw 480W + 5%
• Max coverage 5 x 5
• LED 2070pcsSamsungLM30B1&Osram660nm
• Max Yield 2.5g / watt
• Noise level 0 DB
• Removable Driver +2m cable
• Daisy chain (multiple lights)
https://marshydroled.co.uk/products/mars-hydro-fc-4800-led-grow-light-samsunglm301b-commercial-greenhouse-medical-indoor-kit 🇬🇧
https://www.mars-hydro.com/buy-fc-4800-480w-4x4-energy-saving-full-spectrum-commercial-led-grow-light-mars-hydro-for-sale 🇺🇸
PROMO CODE • (ORG420) DISCOUNT 👍🏻 marshydroled.com
⛺ Mars Hydro 120 x 120 x 200cm
📤📥 AC infinity 6inch
💧 10lt dehumidifier
❄️ 3.1kw air con system
💉 Nutrients GreenBuzzLiquids
Organic Grow Liquid • 1-4ml until 2wk flower
Organic Bloom Liquid • 2-4ml flower stage
Organic More PK • 2-4ml +wk3 of flower
Organic Calmag • 1-2ml/lt whole grow
Fast Plants Spray • first 3days at night lights off
More Roots • 2-5ml veg +2wks flower
Fast Buds • 5ml +wk2 of veg until 1wk flower
Humic Acid Plus • 2-5ml whole grow
Growzyme • 2-5ml whole grow
Big Fruits • 2-5ml flower stage
Clean Fruits • 5ml flush 1wk
Ph powder
Root Gel
Living Organics
PROMO CODE • organicnature420 15% off ✌️🏼
https://greenbuzzliquids.com/
🥥 Growing Media • Coco Coir
Notes 📝
💚💚💚💚
Happy growing fam ❤️🌱🍁👍🏻

Likes
86
Share


@CANNASIM
Follow
------GENERAL COMMENT------
We arrived pass mid flowering as we are now starting week 5 of flower. No issues, bumped up a bit the Sensi Bloom to 2.5 after 3ml, and have seen the girls darken a bit, so i decided to go down a bit to 2ml this week, maybe stick to this dosage depending how the girls react.
The tent have become small for or two ladies, no way to train them more, there is no space. Decided to move forward without a mid grow flush.
Still on the 1.5l of water every other day, one base + recharge + pk booster, other with pk booster + natures candy + velokelp alternating.
Today was the last Pk booster - Big Bud dose, now we will cut the Big Bud and enter with the Overdrive, the rest will be as is.
------GG. AK47 COMMENT------
I'm loving to grow this strain, so curious about the smoke, and the outcome, this one exceed my expectations a lot seen that it was a gift seed...
She is less dark than the BB but still a little dark, and a bid very bid of tip burn, so -1ml of sensi /l should be fine.

Processing
Likes
22
Share


@EelGrows
Follow
Week 8:
Day 50-53: All seemed well with the White Crack plants, gave em their normal feed on day 51 PH'd to 6.5 and measured runoff PH(only got enough from WC#1 and #2). WC#1 read an astoundingly low 5.3 PH!! Like what??? No visible signs of stress or deficiences, but leaves feel less healthy than the other 2 White Cracks. WC#2's runoff measured at higher than ingoing at 6.7PH, which I think means I'm under feeding her. She looks insanely healthy though, so will just up her and WC#3's doses next feed, as they both look like very similar phenos and leaves feel and look healthy on both plants.
Day 54-56: Ok so decided to flush WC#1 like I did with the 4 Assed Monkeys because runoff was more tha 1 whole PH off from ingoing last feed on day 51. Ended up with a runoff of 6.5PH, same as ingoing feeding immediately after the flush read 6+PH(took 4L of 6.5 PH'd water with regulator). Fed WC#2 and #3 with their scheduled calmg feed but I added some super PK this time to get the PH of the soil down a bit. Ended up getting 6,2-6,4 runoff on both plants, very happy with results of all my runoff now. Finally got that behind me...
End of Week 8:
WC#1 seems to be finishing the fastest, along with 4AM#1(if we go by the orange pistils). WC#2 and #3 have really stretched a bit more these past few weeks catching up to WC#1, and they all look amazing! Really stoked for the end of the month!

Likes
11
Share


@Nookandplant42o
Follow
sorry for this week of delay, I didn't have internet modem broke in the week of the photos, but we're back and moving on with this beautiful girl, increasingly fat and fragrant something like high color cake and very compact buttons as usual at Hydro I look forward to this coming soon!😉


Likes
4
Share


@Nznoob
Follow
Taking nice form with a huge number of flowers filling the net..it’s good to see the scrog method working the way it says it should in all the reading I done on it.havnt really had any problems throughout the entire grow yet.huge fan of the XL auto pot system.fist time grower and first time user and things couldn’t of been easier.also got the new veg room up to a point where I can start getting the second lot comfortable.any suggestions would be good

Processing
Likes
6
Share


@CelticGrower
Follow
I'm really impressed with this strain the growth is explosive and no issues at all so far, she has had som lst done and light defoliatian. Hopefully she is starting to go into flower soon, she smells quite strong already.

Likes
241
Share


@Tropicannibis_Todd
Follow
💩Holy Crap We Are Back At It And Loving It💩
Growmies we are at DAY 49 and she's just killing💀it👌
👉We are in full on flowering , gotta say the pink to redish hairs look amazing , not to mention the frost 👈 even the stems and branches are sticky icky 👈
OMG I LOVE THE PINK PISTOLS 👈 👉 BUT THE MORE IT FLOWERS THE LESS THEY ARE SHOWING 😭
So Shit , I gave them just a tad to much nutes on the first few feeding 👈 But I have since fixed it
So I'm still doing some low stress training 🙃 and some defolation 😳
Lights being readjusted and chart updated .........👍rain water to be used entire growth👈
👉I used NutriNPK for nutrients for my grows and welcome anyone to give them a try .👈
👉 www.nutrinpk.com 👈
NutriNPK Cal MAG 14-0-14
NutriNPK Grow 28-14-14
NutriNPK Bloom 8-20-30
NutriNPK Bloom Booster 0-52-34
I GOT MULTIPLE DIARIES ON THE GO 😱 please check them out 😎
👉THANKS FOR TAKING THE TIME TO GO OVER MY DIARIES 👈
Likes
36
Share


@Ganjagrandaddy
Follow
Day 63 flowering: Well here we have it Growmies. 63 days of Marsian sunshine and plenty of enriching feeds and we have reached the crux point.
The Strawberry Cola finished beautifully and was taken out 4 days ago. She has been in the dark along with the Monster mash who went in yesterday. Both girls had begun to show amber trichromes with the scope so we're ripe for pulling . More on those with ther harvest reports .
Herz Og looks so edible right now . she still has clear trichromes around and no real signs of amber ones to concern me.yet. A few more days should see her finish perfectly I hope. She isnt a huge plant but the quality on close up is amazing. I am now only using water until she finished to leech through the Dragon force to avoid any after taste in rhe buds.
We are getting to the best bit now but also the hardest part . The waiting to dry and not rushing it is always the most difficult part for me.lol
Enjoy the pics and I will catch you on the harvest reports. Be safe and free growmies
UPDATE #####
The final lady is now hanging with her stable mates for a low and slow dry. The dark period had her sweating more oils for sure too so she needs to benleft alone to dry them into her buds now as she dries. shebfinishwd perfectly. Next update will be harvest hopefully soon. watch this space!!!!

Likes
49
Share


@masterofsmeagol
Follow
7/4 SUN was poking out a little bit. Plants loved that little feeding and seen to he noticeable larger this morning. I'm considering starting the nutes. At least the organic ones as well as upping the water intake I've been scared to water with all this rain and my experience last time. I plan on applying BT this afternoon and doing some work on the bottoms of the plants. I also saw a chipmunk in my cage so I have some spots in my fence that need to be patched. I know I can't compare this year to orher years as these are seeds and all the other years were clones. I CAN say for certain that my plants are healthiest they've been out of any of my journals. Previous plants were much larger but I was fighting numerous fungal, pathogens and pests at the sane time. Ear wigs would've lollipopped most buddies by now but I've seen no sign of them. I'm going to apply more poison where they were and add some rat traps inside the cage for the chipmunks. Once I fix the cage I think I'll be good.
UPDATE: Went back over and fixed the holes on my cage from high winds. I found an old wire trap or cage and just cut sections and ziptied them to the existing wire and to the structure thus covering any open holes. I'll need to put lathes aroubdvtge outside because if a rodent REALLY wanted in they could get in. My belt had been wearing thin but I use shit until it breaks (yesterday the heal came off my shoe lol) so I was working hard sweating my nuts off and my belt gives out totally. At least ive got the major stuff done. I took a few videos too. I'm imagining it was this little bit of sun that gave these plants that boost of growth but I'm wondering if the added nutes had anything to do with it. Bags weren't light and I could feel moisture in the soil so I didn't water. I'll check again tomorrow morning. Since I didn't see many plants or even leaves for that matter with damage I decided to hold off ob the BT and the plant doctor. Only time will tell if that was the right decision.
7/5 Plants look fantastic. I see a few more holes in leaves sporadically amd I'm hoping it's pillars. I've seen lots of lightning bugs on my camera though and grasshoppers are abundant. Not one growth shoot has been chewed (knock on wood) which is what the earwigs had always done. I watched a video from last year and by nowcthey had lollipopped all lower leaves. It may not be the best weather growing season wise but despite the rh consistently in the 90's I still don't have pm or fungal pathogens. Need to get the BT out. Didn't water as we've had all that rain. I'll water either tonight or tomorrow morning. Sunny high in the 90s low is 66. Tomorrow looks good too.
UPDATE WENT BACK OVER AROUND FIVE. IT WAS 88 DEGREES SO I WANTED TO CHECK THE GROW BAGS. THE POTS ARE FINE. IT WAS HUMID AS HELL. ONE PLANT WAS SLIGHTLY DROOPY BUT VERY LIGHT AND DRY. I FOUND TWO OTHERS THAT SEEMED LIGHTER THAN THE REST BUT HADNT DROOPED. I MIXED TWO GALLONS OF WATER WITH 1TSP KANGOROOTS AMD PHED IT CLOSE TO 6. I FED THE 3 PLANTS THAT WERE SUPER DRY LIKE A HALF GALLON AND SPRED THE REST OVER THE OTHER EIGHT PLANTS. THEY WERENT DROOPING BUT THEY WERE VERY DRY. I PLAN ON A FULL WATER TOMORROW. I WOULDVE DONE IT TODAY IF THE TEMPS WERENT SO HIGH. ITS RAINED A MONTH STRAIGHT SO I HAVENT HAD TO WATER. I MADE A COUPLE VIDEOS BUT I'LL HAVE TO UPLOAD TOMORROW.
7/6 Another super hot day. I hefted the pots and they still had some weight but I could tell they were dry. This rain has messed up my watering schedule. Well it made it so I didn't NEED to water. These are big plants now. I need to get a schedule to stick too. They're going to probably need a gallon a piece at least. I'm still nervous watering. Right now I'm just reading the plants. I added .5tsp kelp me/you to 1 gallon of water to help with heat stress. I fed an additional two gallons to the garden this morning including the two container plants in the back. They were dry on top too but I know they have water deeper down. Next watering I'll be more consistent and try to give them there 10%. It's great having the bags elevated. I can finally see when I start getting run off. I could even measure the ph of it instead of relying on that meter. Ill check the ph when I go back over. Still a few 🐛 holes but they are few and far between. I really don't want to spray for such a small problem but if I cant find them at night that's what I'll do.
UPDATE: Another 90 degree day. I went back over and gave the garden a gallon of water as they were dry and it didn't rain. Tried to use a soil ph meter to check ph. First couple were 6.4, 6.5 then I got 7.3 and I accidently dropped it. Then I got somethings that were high eights and even one 9! Obviously the Meter shit the bed. I'll lower the ph of the water slightly when I fully water tomorrow and I'm going to measure the runoff.
7/8 I must've messed up the journal again as the dates are off. GAVE PLANTS A FULL WATERING. Each girl got a gallon. I couldn't upload my videos this morning as I had to break up a fight. 3 on 1. Didn't give me a chance to put the videos up. I'll take some stills then I can upload them. I took stills and they all uploaded but didn't fucking save. I'm nit going to keep trying to upload if it's not going to. Noticed a few more holes in leaves and one skeletinized leaf so I need to either spray the bt or something more versatile. I'm putting more poison around the cage and de between the bags. I'll go check things out tonight. Sick of writing a book and uploading to just hace them disappear
7/9 Did a quick video today. Noticed the bags were fairly light despite the plants being soaked amd the pallets wet. I was pressed for time. I gave two gallons to the entire garden. I hope that will hold them over until tomorrow. I'll need to up how much water I give them. Going with a gallon and a half next time. I see more pillar spots and a moth took off when I shook the plants this morning. So I'm gonna have too apply the BT. I figure if I go over before dark tonight I might be able to see aju nocturnal insects around. Luckily my dad feeds the birds and they are always there. I think they help with pests.
UPDATE IT WAS A LITTLE COOLER TODAY BUT MICH MORE HUMID. I WENT AROUND SIX TO MAKE SURE THE GIRLS WERE OK WITH WATER AND TO GIVE THEM A TREATMENT OF BT. I WENT THROUGH THE GARDEN ANDCGOUND THREE LEQVES TO DEFOLIATE AND LITERALLY A COUPLE LEAVES ON TWO PLANTS WITH PILLAR HILESM WHEN I ARRIVED TWO BIRDS FLEW OUT. A HORNET CAME IN WHILE I WAS THERE. THIS DO LESS APPROACH SEEMS TO BE REALLY WORKING. I DODNT SEE NEARLT ENOUGH DAMAGE TO WARRANT SPRAY8NG MY EXTREMELY HEALTHY GIROS WITH ANYTHING. ILL KEEP AN EYE ON THEM AND CLEAN THEM UP A BIT. I DO NEED TO INSTALL THE VERY8CAL TRELLIS FOR SUPPORT. THEYRE PRETTY HEALTHY THOUGH. ONE PLANT IS ABOUT AS WIDE AS IT IS TALL. STILL......PLANTS ARE EXPLODING AND ITS GETTING TIGHT IN THERE. I NEED TO GET THE TRELLIS UP THOUGH.
7/10 I went over and was planning to water. Plants were wet and it's raining. Top of the medium was moist but the bags were light. ONE bag was super light but seeing that we are having showers all day and an additional half inch of rain coming tonight so I didn't water them. Especially since they looked great. Decided to to spray BT yet as the damage is so small and i think the birds have been taking care of the pillars for me. Now I'm wondering if I should've gave that ONE plant a little bit of water but it will be find. Did a video. I'm being careful not to over water. Last year this is when all my buddies were devoured by earwigs. And no senescence like the years before. I think it was hust those earwigs. I haven't lost shot for leaves. Even the stalks are bright green and look amazing.


Likes
21
Share


@Hydronaut
Follow
Started my Autoflower journey in soil a few grows ago, and was happy with 2-4 ounces. Using my hydro cabinet with this strain was off the charts compared to soil. Maybe 8 ounces when dried? Time will tell, but this lady put out!


Likes
48
Share


@AsNoriu
Follow
Day 117. Trim jail and heavy upload session for 24 hours at least. Don't like to keep photos, so ill upload each plant separately and will delete them. Phone camera is still cracked and off-focus, but they are all nice !
Day 128. I knew that those plants will be smallest, but Mini was in centre and her buds were still not nuggy nuggy ... sadf .....
#1 67, #2 68 , #3 75 , #4 56. 266 total .
836 from 720W is good, not my best, but good, just that airy quality ....
Happy Growing !!!

Likes
3
Share


@SSKNFbyHAZE
Follow
⚡️⚡️ Instant Organic Feeding starts here!⚡️⚡️
Hey Growmies~!
Everything’s looking good! This plant has a naturally brown stem, but her strain sometimes shows purple or brown stems that break through the outer layer. I’ll share a picture of one of her sisters I grew before!
This instant organic feeding method really helps plants reach their full potential. It reduces the chance of mistakes and lets the plants absorb nutrients right away and as needed.
I’m working on an easy guide to making these nutrients and cultivating microbes at home. I’ll share it soon, and I hope you’re as excited as I am!
Stay safe, take care of each other, and feed your plants organically and instantly!
[3rd Week Feeding for a 9-10 Week Strain]
- 20-30ml of homemade liquified veg nutrients per liter of water
- One feeding with a pinch of sea salt per gallon, mixed with the veg nutrients
1 Corinthians 10:26
---------------------------------------------------------
[WEEKLY NOTES]
9/18
I’m noticing that this plant is also showing signs of stress.
I’ll be addressing it soon, similar to how I’m handling the issues with SSKNS Grow #2.
Once I feed her with the home-cultivated live microbes, she should start to recover and reach her full potential.
I’m hoping to see improvements within 6 to 72 hours.
I’ve just prepared the microbial cultivation and took some photos. I’ll be recording the process separately
Thanks for sticking with me through this!
9/19
She was fed with SSKNF Grow #2 @ 9/19 - 12:23PM
Hoping to see releaf tomorrow morning for update~!
9/20
This plant has moved past the 3rd node where the leaves were touching.
I believe I caught the deficiency just in time before it caused more stress.
The leaves haven't returned to their normal color yet, but new growth has started again.
It might take a day or two for the lower shoots to fully recover and begin stretching.
9/21
Next morning, the plant seems to be recovering and growing again.
The fourth set of leaves has clearly separated from the third, which were previously touching.
It will be a full 48 hours today at 12:23 PM since I fed the Home Cultivated Microbes.
I'm eager to see the side shoots catch up and grow faster now.
Fed on 9/19 at 12:23 PM — first signs of recovery showed about 6 hours later.
Likes
15
Share


@Kurow
Follow
This week is dedicated to finalizing the pot and nutrients for the rest of the lifecycle, looks like it took to the nutrients very well not much new upwards growth but new leaf sites appeared!

Likes
3
Share


@Mr_nugs_lover_David
Follow
Beautiful strain to grow, she ended up. With a smaller size compared to her sisters but she's a big quality lady very frosty and sweet, the aroma of this sticky flowers are super sweet and floral, just so wonderful, I love this strain and I'm glad I have black cherry punch in my garden the 5 of them with the same aroma 🔝 can't wait to croptober

Likes
9
Share


@Franco123
Follow
the sprouted seedling and a seed that they had given me some time ago and a cross of black Domina x NY diesel o super skunk? I don't remember however I selted it to make a mini jar grower than a peanut butter jar
Likes
11
Share


@JoeyGonz
Follow
My only regret is not mainling all. Everything is growing great still got couple few weeks left. But the difference in bud growth is still my topic cause there really no other issues. Buds from the bottom to the top of the mainline ones are all basically the same size. All on the same growth rate. I know due to shape and open canopy yada yada.. Fimmed, the canopy is more bushy. I mean I can see the bottom from the top, I know that's one of the main rules.. But just the leaf growth is different too... So of course buds on bottom still gonna be more popcorny. I still defoliate a little every few days.. Nothing crazy, just wanna irritate her a little. So going forward I'll only do one fimmed with my grows the rest mainlined..Just to get an idea how each one reacts to both grow techniques but still get my weight.
Likes
9
Share


@Northerngarden85
Follow
Yes everything is fine looking to maybe try lst next time round with some.
Likes
10
Share


@TheGreenQueen420
Follow
The pistols are turning a brown colour this is the end of week 2 going into week 3.
Does anyone know if this is normal with LED lighting?
I have put a close up on the video.

Likes
45
Share


@SensimillaP
Follow
Started the flush last week, these ladies still need some time but contest ends in 18 days. One more week and chop them down.