DawgHaus Did a Gorilla Glue Auto as one of my first autoflower plants in the early days and was kinda turned off autos but didn’t really have a clue what I was doing at the time. So I’ve decided that while I’m setting up some stuff I’ll go back and have another go at autos while the space is available. The aim for this grow is low budget and low maintenance. Using the poles that came with a cheap outdoor greenhouse to support the light in a cupboard I’ll be using for veg and maybe more autos from this point.
Day 1: Opened up the seeds and dropped them directly from their flashy packaging straight into a glass of dechlorinated water where they all floated at the top.. Stuck them in the cupboard and left them for 24 hours.
Day 2: Gave all the seeds a light tap and they all sank to the bottom of the glass. Removed them one by one from the glass and planted them directly into some cell pots filled with coco coir and perlite I had lying about. Left them with a drop of water, put a sandwich bag over the top and stuck them under LED set to 24hr on.
Day 3: Late on in the day all the seedlings have popped the soil at the same time. 25ml of water fed to each one. Even though it’s such a slow process definitely get excited doing fresh seed.
Day 4: The little cotyledon leaves have opened up and the first true leaves can be seen in the centre of each. Turning more and more green every time see them.
Day 5: All are looking established now. They’re quiet short, first true leaves look like they developing well and the stems are starting to look a lot more sturdy. Keeping the bag over the top of them to lock in the humidity, will probably transplant tomorrow and give them their first proper feed.
1 like
2 comments
Share
Used method
Glass Of Water
Germination Method
1
Week 1. Vegetation
5y ago
1/12
4 cm
Height
18 hrs
Light Schedule
24 °C
Day Air Temp
5.8
pH
No Smell
Smell
60 %
Air Humidity
20 °C
Solution Temp
20 °C
Substrate Temp
19 °C
Night Air Temp
11.36 l
Pot Size
0.1 l
Watering Volume
60 cm
Lamp Distance
Nutrients 2
VeloKelp
0.25 mll
Remo Micro
0.25 mll
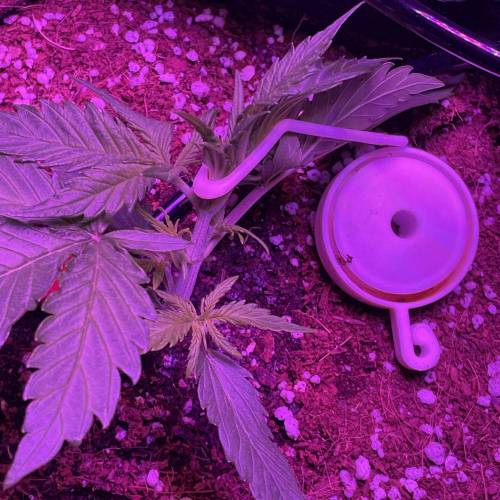
DawgHaus Day 1: A large root can be seen at the bottom of each cell pot. Filled 3x 3 gallon pots with coco perlite 60/40 mix and transplanted each seedlings into its forever home. Not messing with micro-bacteria and all this time round as the nutes have everything that’s needed, fresh coco and a good feed will be more than enough for these girls. Watered them each with 100ml of water mixed with with a small amount of Velokelp and stuck a bag over each to lock in the humidity. Once the transplanting was over I setup a little DIY drip irrigation system with a 10L reservoir. Feeding schedule will be at 1/4 strength of advise dose as recommend by FastBuds and Remo Nutrients. Set up the timer for the lights and drip irrigation system to kick in tomorrow. The lights will change to 18/6 and drip irrigation will kick in just after lights on.
Day 2: Lights turned off for the first time after 24 hour light for the past few days. After 6 hours of darkness the seedling are looking healthy as fuck. The first true leaves are now developed and they’re all bright bright green. Drip irrigation timer did its thing for the first time today and I’m well happy with the result from my little DIY kit, hopefully all runs smoothly with it for the rest of the grow.
Day 3: The cotyledons have started praying upwards towards the light. The bags over the top of the plants have a good amount of condensation on the inside so I’ve cut a couple small holes in the top of each bag to let a little air in. Turned drip system off for a couple days to avoid over watering.
Day 4: Tiny second set of leaves can be seen in the centre of each plant. Made the air holes on bags bigger to get the ready for them to be removed. Drip system still turned off.
Day 5: Drip irrigation system is working as it should and environments holding up so all is good. Plants are looking good and seem fairly well rooted. Removed the bags from the top of each pot and turned on the humidifier and set it to 60%. Only thing left to do on this setup up is get some trays under the pots so they’re not sitting in puddles during the feeds.
Day 6: All of the plants first true leaves are praying up to the light and the second sets are starting to properly develop. Really happy with all the seedlings so far. When it comes to autos these seem like the business. Fans turned on today and drip irrigation set back on its timer. Found some old metal grilled shelves that have worked out perfect for trays for the irrigation.
Day 7: Second set of leaves are beginning to rise up, another week I reckon and I’ll look into hanging the MH bulb so these girls can explode. Very happy with these seeds so far. Gave them their first foliar spray with a 5ml of Velokelp and 5ml of Magnifical mixed into 1L of water. Turned the oscillating fan up a notch too as I’ve got it set up a fair distance away and I didn’t feel the breeze was catching them enough. Mixed up a new stronger feed this evening so it’s read for the droppers coming in tomorrow.
3 likes
2 comments
Share
2
Week 2. Vegetation
5y ago
1/16
6 cm
Height
18 hrs
Light Schedule
24 °C
Day Air Temp
5.8
pH
No Smell
Smell
60 %
Air Humidity
20 °C
Solution Temp
20 °C
Substrate Temp
19 °C
Night Air Temp
11.36 l
Pot Size
0.1 l
Watering Volume
60 cm
Lamp Distance
Nutrients 4
VeloKelp
0.5 mll
Remo Micro
0.5 mll
MagnifiCal
0.25 mll
DawgHaus Day 8: The humidity has been dropping so I’ve turned on the humidifier to keep thing around 65% RH. Apart from that the day and night temps seem to be perfect. Nothing much new to report on them apart from how green and healthy all three of these plant actually are. Increasing the oscillating fan worked perfect, all the plants are wiggling away every few seconds as the breeze hit them. Should have nice strong stems after a couple weeks 💪 Second set of leaves are starting to pray up to the light and are starting to visibly move up a level from the first set. Looking forward to seeing how they react to their stronger feed. Lowered the light after the lights have been on for about 6 hours to 45cm from the top of the plants. Will maintain this distance from the top until the MH bulb is hung.
Day 9: Humidity has corrected with the humidifier and climate conditions look on point. On the plants all the leaves are praying up and a tiny stem can be seen separating the nodes.
Day 10: Climate sitting on point. Second set of leaves are starting to spread out and are getting wider.
Day 11: It’s tiny but the 3rd nod can be seen in the centre of the second set of leaves.
Day 12: So today I pick up so bit from my local hydro store. Got some Dyno Myco and from what I’ve read I really wish I got that stuff in the mix of this. The second set of leaves is almost as big as the first set and it looks to me as if this strain has 5 points on each leaf.. transplanted a few periods I’m running in another set up and filled the extra space in this room with them to let them veg for a bit.
Day 13: I feel like these plants are looking as healthy as they can. Everything is running smoothly and they’re looking like they’re starting to take a bit more of a feed so will adjust the feeding timer with the next batch of nutrients mixed.
Day 14: 3rd node is clearly coming through and the plants in general seem like they are starting to get bigger at a quicker rate. I’d say they’ve a fairly decent root system going on by now as I can see they’re drinking a bit more. Will have a play about with timers later to see what’s best. Will hand the metal hallide tomorrow and watch these things start to explode over the next week 🤞 mixed up new nutrients for the next week with increased doses.
2 likes
comments
Share
3
Week 3. Vegetation
5y ago
1/26
13 cm
Height
18 hrs
Light Schedule
24 °C
Day Air Temp
5.8
pH
No Smell
Smell
55 %
Air Humidity
20 °C
Solution Temp
20 °C
Substrate Temp
19 °C
Night Air Temp
11.36 l
Pot Size
0.2 l
Watering Volume
60 cm
Lamp Distance
Nutrients 4
VeloKelp
0.5 mll
Remo Micro
0.5 mll
MagnifiCal
0.5 mll
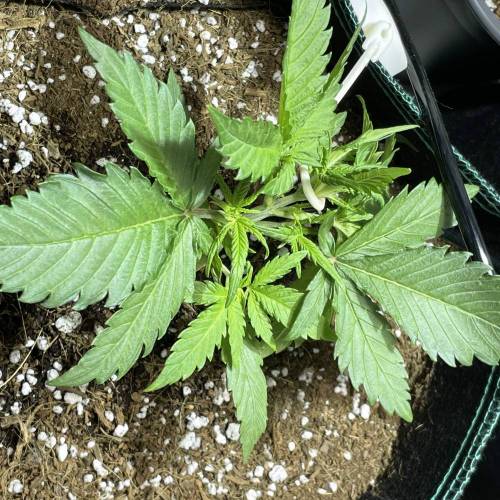
DawgHaus Day 15: Ended up being flat out busy today so never got a chance to hang the Metal Halide light, will hang it on Wednesday just as the lights go off. Let the irrigation system run an extra minute to let the new solution soak into the medium. The tops of the plants are praying up to the light and there are nodes appearing on the stems between the leaves.
Day 16: Very impressed with the consistency of these genetics so far. Fair play to the breeder. Every time I check them I can notice a massive difference and with how healthy the new growth coming through looks I can already tell these girls are gonna love a bit of LST.
Day 17: Green and healthy and no signs of issues on any plant. They are starting to look proper strong and like they are ready to be tied down.
Day 18: Started Lst today. Rested some yo-yo ties on the top of the coco and used the hooks to pin down each plant to the side. All nodes on the plant now have full sight of the light at equal level.
Day 19: The parts of the plants the have been pulled down have started to bend back to point towards the light. Gave them a slight bend back but not to much today.
Day 20: The digital timer I’ve been using for the irrigation pump has glitched out a few times this week and wiped the settings.. this time though it stuck on and pumped all the water left in the reservoir into the pots. The medium has not had a complete soaking but there wasn’t enough left in the reservoir to flood and instead there was a bit of run off. Refilled reservoir and gave the plants another slight LST adjustment. I got a bit of Dyno Myco c and had some left over so just top dressed a little on each plant.. doubt it’ll have much effect at this points but it’s better to use it than not to..
Day 21: Removed my trusty old LED which i use for starting all my seeds and hung a 600w HID light with a Metal Halide bulb. Hung at 60cm (I will lower it throughout the week but for the first day I’ll or two I’ll keep a good distance and see how they react to it. Running the light at 400w for the next week and a half then once I notice her going into flower I’ll replace the bulb with an HPS. Getting this done a week later than I would have liked but it’s give me the other vegging plants in the room the chance to establish themselves in their new pots. I manually turned the drippers on and off for a minute and will continue to manual control until a new mechanic timer comes in the post. Removed the yo-yo’s from each plant and reattached as close the new growth at the top as possible and bent it down. After bending them I tuck the leaves behind each other to open up some space for light to get through to the lower nodes. I think it’s to do with the LED I have used but I feel that the nodes have a very short space between them. I will maybe invest in a new one for the next runs and just use the one I have been using as additional lighting in flowering for future grows.
5 likes
comments
Share
Used techniques
LST
Technique
4
Week 4. Vegetation
5y ago
1/27
18 cm
Height
18 hrs
Light Schedule
25 °C
Day Air Temp
5.8
pH
Weak
Smell
270 PPM
TDS
55 %
Air Humidity
20 °C
Solution Temp
20 °C
Substrate Temp
19 °C
Night Air Temp
11.36 l
Pot Size
0.5 l
Watering Volume
60 cm
Lamp Distance
Nutrients 5
VeloKelp
0.5 mll
Remo Micro
0.5 mll
MagnifiCal
0.5 mll
DawgHaus Day 22: Humidity is dropping to 50% at times under the metal halide but I’m not too worried as I want to start dropping it coming into flower. Plant look far better under the more natural looking light. Whacked it up to 600w for the first 6 hours of lights on today. Not a mark in sight on any of the leaves and the new growth is starting to push up from the bottom. I’m hoping that by the end of the week the plant will have reached the netting that I put up when they where seedlings. If not I will lower it to their height for the start of the pre flower so I can spread them out as much as possible. Noticing massive growth on the lower parts of the plants the metal halide is doing it job nicely. I have tucked the new fan leaves under the old ones to reveal the nodes and I’m start to bend the stem clockwise round the pot. All the leaves looking really healthy and the new nodes, growth is becoming rapid with major changes every time I check the plants and they’re far easier to feed than photos due to requiring less nutrient.
Day 23: Added a .25 of natures candy to the nutrient mix. Usually I would charge my coco with worm castings and feed nature candy the whole way through but my local hydro shop didn’t have any of the stuff I use in stvock when I was mixing the medium for this. 🤦♂️🏻 The main reason I’m doing it in veg with no microbiology in the medium is so the Dyno Myco I top dressed and mixed in at the top has something to feed on if it works. I know that using Dyno Myco as a top dress isn’t ideal but I couldn’t get my hands on it until about a week or 2 after these girls where started. Also threw an air stone that I had lying around from an old dwc set up into the reservoir to oxygenate the water a bit.. don’t know if it will have much effect in a drip system though? If anything it’ll help with mixing.
Day 24: Added a new timer to the drip system and have set it to run for a second watering schedule so the plants will now be watered twice a day. First time being just as the lights come on and second time is 30 mins before lights off. Due to needing more water I have replaced my 10L reservoir with a 30L one. The new nodes and lower growth are exploding. On one of the plant the stem has split in the centre slightly and I’m not sure if this happened while I bent it today or overtime while it’s been getting pulled down already 😅 I’ll keep and eye on it and be a little more gentle with this one for the next week. I’ve already noticed that she was the slowest grower so hopefully it doesn’t slow her down. The other two are really growing well, not much bigger than the slow girl but they are showing better reaction to the LST. I’d say by this time next week they’ll be twice the size 💪💪
Day 25: The plants are really growing , which is getting me excited to hang the HPS. At the beginning I will be using my Omega 600w HPS with super lumens with an air cooled tube, for the pre flower and mid flower. Then when i move the photoperiods from that room I will need the ballast back for my flowering room. At this point i will hand my 250w jmaster blaster HPS and hang my LED beside it. Equaling around 500 watts with UV for the last weeks and the ripening period.
Day 26: Stuck another fan in the room to boost circulation. There isn’t a single bit of the room where you can’t feel a breeze. Because of the extra air flow I’ve lowered the light to 40cm above the top of the plants. The lower nodes are starting to develop more and push their way through. Continued with LST, plants main stems are really strong and can tell they have deep roots.
Day 27: I have noticed that the plants are beginning to show their pistols so I have decided to mix up the pre flower feed (.5 of full Remo range, will be logged in next weeks diary and not next week as what I have logged is what I fed the majority of the week) and flush it through the medium so it can start getting ready to stretch over the next couple weeks. Re bent the tops down, the lower growth have finally nearly match the height of the main node. While bending the plant at the back of the room I accidentally snapped a leaf off from the top node, hopefully this doesn’t cause to much stress. Over the next week I will continue the training and will begin to lower the net and start scrogging.
Day 28: Has been a pleasure vegging these auto flowers and they have reacted brilliantly to the LST. First time implementing drip irrigation and I’ll definitely do it again though some equipment upgrades are required as due to what I’ve been using I have had to manual control the pumps at times. Today I stuck a couple of plastic boxes with holes drilled into the lids to catch the water from the irrigation runoff. Changed the time of the irrigation to as the lights come on, and then 3 hours before they switch off. The plants sitting on the boxes are now level with the net so as they stretch i will pull them through and spread them accords the net. Due to them becoming level with the net I will lay off the LST. End of week 4 and no signs of any stress or burn, they are all thriving in they’re environment. I will re hang the LED tomorrow and hang it above the photos and move these to one side and stick my HPS above them. The spectrum of the HPS will help the plants stretch more during the pre flower stage.
likes
comments
Share
Used techniques
LST
Technique
ScrOG
Technique
5
Week 5. Flowering
5y ago
1/11
22 cm
Height
18 hrs
Light Schedule
25 °C
Day Air Temp
5.8
pH
Weak
Smell
270 PPM
TDS
55 %
Air Humidity
20 °C
Solution Temp
20 °C
Substrate Temp
19 °C
Night Air Temp
11.36 l
Pot Size
1 l
Watering Volume
60 cm
Lamp Distance
Nutrients 7
VeloKelp
0.5 mll
Remo Micro
0.5 mll
MagnifiCal
0.5 mll
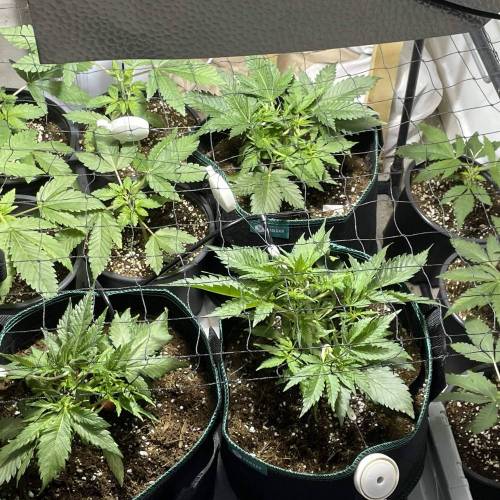
DawgHaus Day 29: Got a new tent sorted for the photoperiods so will move them across tomorrow when I get a minute to set it up. At this point I’ll hang the flowering lights. Will be doing a 15 plant run with these autos next time. Pre flower is really strarting to come through and you can see these girls are ready ready to start stretching.
Day 30: New tent build and photo periods moved across. The HPS light is hung and the humidifier has been removed. Have raised the plants up to around an inch below the net. Light cycle staying at 18 hours. Gave the plants minor adjustments with LST.
Day 31: Can really see the plants starting to stretch to the HPS. One of the plants has already reached the net while the other two aren’t far off. Adjust LST ties on all plants and pulled and tucked the flowering sites into the net. Plants are all praying to the lights and seem to be transitioning to the new climate really well. Humidity is now running around 54% when lights first come on steadily dropping to 48% before the lights go off
Day 32: Starting to pull them all under the net now. I have attached yo-yo ties to the net and hooked them on to the main cola. Trying to maintain an even canopy. Everything looking really health.
Day 33: Bounced back from the pulling through the net so I tucked the main tops back under. Starting to noticed the lower branch’s push their way through. Lots of hairs starting to grow out of the tops. Emptied the water catching trays for the first time since putting them there and there barely much there. Plants must been really enjoying the feeds.
Day 34: Had a busy day today so haven’t had a chance to check anything. Excited to get back in the garden tomorrow.
Day 35: Pre flowers look great. Happy enough to calm down with the scrog and let them do their thing. Will be still doing the odd tuck or tie to keep things even though. The genetics are unreal I’ll definitely be growing again due to the simplicity of them. They ask for nothing. Looking forward to the final result now cause I know it’s gonna be potent stuff.
1 like
comments
Share
Used techniques
LST
Technique
ScrOG
Technique
6
Week 6. Flowering
5y ago
1/13
35 cm
Height
18 hrs
Light Schedule
25 °C
Day Air Temp
5.8
pH
Normal
Smell
420 PPM
TDS
55 %
Air Humidity
20 °C
Solution Temp
20 °C
Substrate Temp
18 °C
Night Air Temp
11.36 l
Pot Size
1 l
Watering Volume
45 cm
Lamp Distance
Nutrients 6
VeloKelp
0.75 mll
Remo Micro
0.75 mll
MagnifiCal
0.75 mll
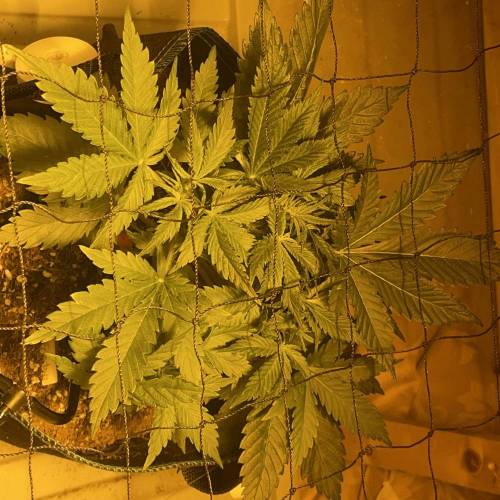
DawgHaus Day 36: Water from the taps is getting really cold so I’m having to fill my reservoir the day before to let the temperate go up, refilled reservoir with new mix, .5ml/L of everything from the Remo Range apart from the Grow. I took a few grams of Dyno Myco and dissolved it into 100ml of water and mixed it for around 5 mins. Added to the reservoir, I would only recommend doing if you have good circulation and water movement in your reservoirs as it lumps up at the bottom of left in still water. Preflowers are doing their thing and you can really see the plants starting to stretch up.
Day 37: A couple of tops on the plants are pushing much higher that the rest so I have adjusted them under the new. Plants are all praying and loving the new food. Feel like it’ll be towards the end I’ll notice the myco
If it has much affect at this point. Have noticed a couple of brown spots appearing on the plant at the back and the leaves slightly yellowing, not much but I’ll monitor it.
Day 38: Did another ‘final’ complete re tuck and I think I’m happy with the spread now. I’ve tucked a lot of the fan leaves down and tried to open up the lower parts of the canopy for more air circulation. Looks really good. Definitely starting to noticed a slight Potassium deficiency on the plant at the back. Will keep and eye on here and see how she goes.
Day 39: So the effect of the potassium deficiency are starting to kick in. I’m going to up the Astroflower and bloom nutrients by an extra .25m/l bring it to a total a .75m/l. Increased the amount of time the drippers are on to 2mins. The only thing I can’t get my head round is how long this plant will take to complete. If it’s demanding more feed maybe it’s further on than I think.. Apart from that everything is looking good and all the tops are already bending back towards the light. Trim the two lower sets large fan leaves from the plant. I planed to grow these without removing any leaves but they had been damaged due to sitting directly on the medium for long period of time.
Day 40: noticed a massive difference in them today after 24hours of the new feed. Plant that was suffering the deficiency has now started to bounce back, seems like she’s turning more green. Plenty of new shoots stretching up to the net helping build a nice even canopy or buds.
Day 41: just leaving them to do their thing, busy day ahead I’m personal life so won’t get much of a chance to do anything. Noticing that the buds are now starting to form and there is a lovely smell starting to come through every time I open the door.
Day 42: Noticed that the plants where drooping a little today so I adjusted the feeding times to 4 mins morning 4 mins evening. Checked the reservoir and there is still a bit of feed in it so will run this until it needs refilled as ppms are at 420. This week the plants has stretched majorly and I have almost managed to fill the space the whole way across the netting. Removed the dripped stakes (they sit bout 6inch deep in the soil) and. Poured a solution of Dyno Myco down the holes that were left from the stakes. Replaced the dripped head for a more efficient open top one so I can monitor the flow. When turned on the feed pump to adjust the flow of the new drippers nothing came out, I check the medium and there wasn’t much moisture at the top. Removed the feed pump and found the line was blocked. Cleared the blockage and adjusted the dripper. Left the pumps on for 10 mins and did a flush with nutrient solution to ensure that it was well fed.