
6) Green House / Super Lemon Haze Auto


Coco Coir
Custom

Perlite
Custom
Indoor
Room Type
LST
weeks 2-7, 9-10, 15, 17
ScrOG
weeks 4-18
Defoliation
weeks 3, 8-11
8 l
Pot Size
1.82 l
Watering
Start at Harvest
G
Germination3y ago


TinyTenter Outta the fridge and into the pot. Have a nice successful germination streak going! Which is good because I've switched to buying individual seeds as opposed to buying seed packs. Being confident of a germination supports this purchase strategy. When you grow one plant at a time, having 5 seeds of one strain isn't so great. It's a burden of riches.
It was a fairly uneventful germination. Came out with a mild helmet problem. Used a paper clip to help her out.
And off we went!
Another journey full of hope began!
8 likes
2 comments
Share
Used method
Directly In Substrate
Germination Method
1
Week 1. Vegetation3y ago


3.81 cm
Height
24 hrs
Light Schedule
25 °C
Day Air Temp
5.8
pH
No Smell
Smell
500 PPM
TDS
72 %
Air Humidity
25 °C
Night Air Temp
7.57 l
Pot Size
0.61 l
Watering Volume
43.18 cm
Lamp Distance
Nutrients 5

Armor Si
0.159 mll

CALiMAGic
1.294 mll

TriPart Micro
0.317 mll
TinyTenter Week 1 was uneventful. In the first few feedings of every grow, I get this very brown runoff.
This goes on for the first few weeks, actually. Always wondered what caused this. There's this alleged "cation exchange" in the first few weeks of the grow due to the heavy calcium in the fertigation solution necessary when growing in coco. If you don't go calcium-heavy early, your plants will go calcium deficient early, which is a nightmare. This is why starting fertigation early is essential in coco - you should be fertigating with calcium heavy solution about 24 hours after what I call "Day 1" - the 1st moment when you see the cotyledons are open and squarely looking up at the lamp.
So on "Day 2" you should start fertigating. Why? Because coco has no inherent nutrients, and in addition, will just eat the calcium right out of your solution. So a little seedling planted in coco coir in a puddle of only water is just sitting there being eaten alive by the coco, basically. The coco only TAKES at this stage. It GIVES nothing to the plant. So you gotta start fighting this problem right away by supplying all the nutrients to the coco coir plus EXTRA calcium. (BTW, I start on Day 2 with about 0.4 EC and end the week close to 1.0 EC).
You are trying to create an artificial soil for the plant. Get going with it. This is how coco growing ends up being like quasi-hydro or manual-hydro growing.
So I always wondered if the cation exchange caused that brown water or if it's just micro-dust getting dissolved away - or both.
Week 2 is when the fun begins - LST begins.
9 likes
1 comment
Share
2
Week 2. Vegetation3y ago


3.81 cm
Height
24 hrs
Light Schedule
25 °C
Day Air Temp
5.8
pH
No Smell
Smell
525 PPM
TDS
70 %
Air Humidity
25 °C
Night Air Temp
7.57 l
Pot Size
1.82 l
Watering Volume
43.18 cm
Lamp Distance
Nutrients 5
Armor Si
0.317 mll
CALiMAGic
1.294 mll
TriPart Micro
0.66 mll
TinyTenter This is where the fun begins. 1st LST was applied on Day 11 - two days later than the previous grow, giving me my 1st indication that this grow was going to be slower/normal in its growth speed. As usual, I bent the girl over as you can see in the pictures above along the line of its 1st node leaves, so that when bent over, the first node single leaf on one side should be pointing straight up and the one on the other side should be under the plant. I remove the one under the plant, the poor thing. This sets up the plant to grow the branches that I call the North South East West branches or NSEW branches, for short, to grow in the most appropriate way to keep this plant short. This time I actually made a diagram of these branches in a picture. Check out Day 12 up there. Your welcome.. lol. And as you can see in the picture, the job this week is to get hooks around these branches to drag them out to the sides of the pot as low to the coco as you can.
This is also the week when the first pruning happens. (Day 13) I remove the big leaf that comes out of the North branch and blocks the light from the sites where the ESW branches are coming out from. Once this happens, the ultimate design of the plant is complete when you think about it. Now it's just letting the light feed growth that you keep hooking and pulling out away from the center of the pot. It's really that simple. Tedious, yes. But simple.
8 likes
1 comment
Share
Used techniques
LST
Technique
3
Week 3. Vegetation3y ago


5.08 cm
Height
24 hrs
Light Schedule
25 °C
Day Air Temp
5.8
pH
No Smell
Smell
575 PPM
TDS
70 %
Air Humidity
25 °C
Night Air Temp
7.57 l
Pot Size
1.21 l
Watering Volume
33.02 cm
Lamp Distance
Nutrients 5
Armor Si
0.476 mll
CALiMAGic
1.294 mll
TriPart Micro
0.66 mll
TinyTenter LST started going into high gear this week.
All NSEW branches were hooked, heading out directly to the closest edge of the pot with little interest in allowing the branches to reach any height at all except for that which must be forgiven for the sake of a broken branch. More on this later.. 🙈
There was another overhanging light-blocking leaf that was removed on Day 20.
And the plant was moved to the loft tent on Day 21 because all operations with regards to the prior grow were now complete.
Since the scrog net was not close at all to being installed on Day 21, like the prior grow, I was starting to get the notion that the growth speed was something like "normal-to-slow", so I was already starting to think that a Day 42 veg lamp to flowering lamp switch date was a reasonable date for it - back to normal.
3 likes
comments
Share
Used techniques
LST
Technique
Defoliation
Technique
4
Week 4. Vegetation3y ago


5.08 cm
Height
23 hrs
Light Schedule
26 °C
Day Air Temp
5.8
pH
No Smell
Smell
600 PPM
TDS
68 %
Air Humidity
26 °C
Night Air Temp
7.57 l
Pot Size
1.21 l
Watering Volume
30.48 cm
Lamp Distance
Nutrients 5
Armor Si
0.476 mll
CALiMAGic
0.66 mll
TriPart Micro
0.66 mll
TinyTenter LST continued this week. This is the most difficult LST week usually, just due to the virtue of the plant's greater size, foliage, and number of branches. We all know by now that I take what I call the NSEW branches and stretch them out to the edge of the pot. But something I don't normally talk about is how these branches give birth to their own set of budding branches.
These branches are also hooked and taken to the nearest edge of pot location, and as low to the coco as possible without breaking them.
Yeah. That. 🙄
Okay well, I broke another branch. Around Day 26 or 27.
But it wasn't the North branch this time like it usually is. This time I broke the West branch. Pulled too hard I guess. But as usually happens, it wasn't a complete break, it kept growing anyway, and it would eventually heal.
You'll note that the East branch and sub-branches seem larger than the West branch side as you flip around this diary. This breakage could be why. Oh well.
At least it wasn't a total loss of a main branch with many buds to come. This branch breakage thing seems to be more likely to happen than not with each grow.
Need to think about what I can do better to prevent it.
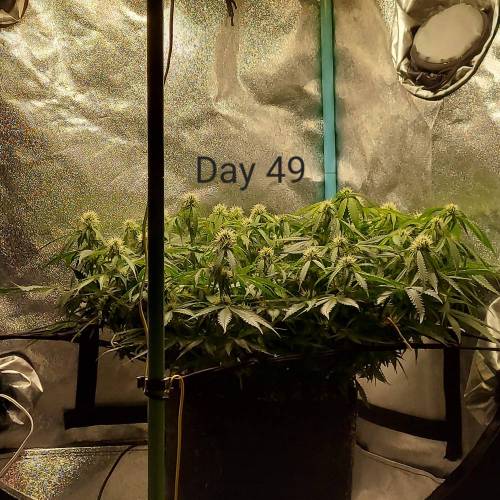
There was some mild defoliating this week under the plant in order to make fertigating easier and safer. (I try not to pour solution directly on the plant to prevent moisture and mold.) The 65 W veg lamp was lowered to 12 inches on Day 24. The scrog net was installed on Day 28.
6 likes
comments
Share
Used techniques
LST
Technique
ScrOG
Technique
5
Week 5. Vegetation3y ago


7.62 cm
Height
24 hrs
Light Schedule
25 °C
Day Air Temp
5.9
pH
No Smell
Smell
625 PPM
TDS
68 %
Air Humidity
25 °C
Night Air Temp
7.57 l
Pot Size
1.82 l
Watering Volume
30.48 cm
Lamp Distance
Nutrients 5
Armor Si
0.476 mll
CALiMAGic
0.66 mll
TriPart Micro
0.66 mll
TinyTenter So I wasn't very good about taking pictures this week. Only took pictures on Day 35. But what happened this week is what usually happens in Week 5 - Scrogging.
This week I'm usually just trying to keep every part of the plant possible under the net. The most important parts of the scrog net are the four center squares, what I call the "inner square". The goal is to get the plant to grow under the net until it reaches the boundary of that inner square.
Once the plant has grown horizontally out past the boundary of that inner square, you can start letting her grow above the scrog net. And btw, I set the net to 11 inches all around above the floor I'm sitting on (you know I'm seated "yoga style" with legs crossed for all of this. Right? No other way to do it and get to plant "eye-level".)
So this week, I use the palm of my extended hand to literally push down on one corner of the plant of that inner square to get her to flatten out under the net. Like making the branches play the Limbo game. Then put the leaves under.
And that's how scrogging starts - usually with all the LST still tied to the plant.
Anyway, you can see in the Day 35 picture above, that scrogging went well.
5 likes
comments
Share
Used techniques
LST
Technique
ScrOG
Technique
6
Week 6. Flowering3y ago


10.8 cm
Height
24 hrs
Light Schedule
26 °C
Day Air Temp
5.9
pH
No Smell
Smell
625 PPM
TDS
61 %
Air Humidity
26 °C
Night Air Temp
7.57 l
Pot Size
2.38 l
Watering Volume
30.48 cm
Lamp Distance
Nutrients 6
Armor Si
0.476 mll
CALiMAGic
0.66 mll
TriPart Micro
0.66 mll
TinyTenter Scrogging continued going well this week. LST ties still connected to the plant. Stretch began early in the week. By Day 39, white pistils were seen. Flowering began right on time.
5 likes
1 comment
Share
Used techniques
LST
Technique
ScrOG
Technique
7
Week 7. Flowering3y ago


20.32 cm
Height
16 hrs
Light Schedule
26 °C
Day Air Temp
6.1
pH
Weak
Smell
600 PPM
TDS
59 %
Air Humidity
22 °C
Night Air Temp
7.57 l
Pot Size
2.38 l
Watering Volume
35.56 cm
Lamp Distance
Nutrients 6
Armor Si
0.476 mll
CALiMAGic
0.66 mll
TriPart Micro
0.317 mll
TinyTenter The sacred red-spectrum-leaning flowering lamp was installed on Day 43 - pretty much typical timetable for this to happen. I originally set the schedule to 16 hours, as prescribed by my DLI model for a plant that will take 105 days to finish - though this was a very preliminary estimate.
Around Day 44, the original LST hooks tied to the velcro and the pot were removed. But the wire ties to the scrog net had just begun - opening the second phase of the LST strategy. Though the plant is allowed to start rising above the scrog once it grows beyond the inner square (refer to prior weeks), once it passes the inner square, you still want to tie the outer branches to the outer edge of the scrog net in order to stretch the plant out horizontally, and not vertically, just a little more. And you do this all the way around the plant as much as you can. This way you truly maximize your grow space for maximum light consumption for your plant - especially now that the red spectrum lamp (branch and bud growth) was just installed and the plant is still in stretch! Exciting! 😛
7 likes
comments
Share
Used techniques
LST
Technique
ScrOG
Technique
8
Week 8. Flowering3y ago


25.4 cm
Height
17 hrs
Light Schedule
26 °C
Day Air Temp
6.1
pH
Weak
Smell
600 PPM
TDS
58 %
Air Humidity
22 °C
Night Air Temp
7.57 l
Pot Size
2.38 l
Watering Volume
33.02 cm
Lamp Distance
Nutrients 6
Armor Si
0.476 mll
CALiMAGic
0.66 mll
TriPart Micro
0.317 mll
TinyTenter Tying to the outer edge of the scrog net continued this week, and so did the flowering stretch. Light schedule was changed to 17 hours per the DLI curve set to 105 days. Had a tough personal week, so the plant wasn't fed a couple days this week. But I don't think it led to any problems. Sometimes, the plant has to be a low priority.
It happens a few days every grow. These plants are pretty darned resilient though. I'm grateful.
3 likes
comments
Share
Used techniques
ScrOG
Technique
Defoliation
Technique
9
Week 9. Flowering3y ago


29.21 cm
Height
17 hrs
Light Schedule
26 °C
Day Air Temp
6.1
pH
Weak
Smell
625 PPM
TDS
54 %
Air Humidity
22 °C
Night Air Temp
7.57 l
Pot Size
2.38 l
Watering Volume
30.48 cm
Lamp Distance
Nutrients 6
Armor Si
0.476 mll
CALiMAGic
0.317 mll
TriPart Micro
0.317 mll
TinyTenter Defoliation week had arrived!
If you read my diaries for some reason, you'll know that the last few harvests left me a true-believer of what I call top-down defoliation.
I'm not sure if this is what my strategy is officially called out there on the streets. But I do know that my strategy intends to be the opposite of lollipopping. I don't like throwing away buds.
Buds are the point of all this, in my mind.
So I'm not a fan of lollipopping. With a plant as "small" as the ones I grow, it should be easy enough over time to make sure that there is enough good airspace around the bud for breathing, light and humidity management. The real benefit of my defoliation strategy, in my belief, is that it permits light to reach down deep into the plant and eventually create fully formed buds up the entire branch!!! Woo! Exciting!! 😝 Its sort of a larf-busting strategy.
My last three grows have had remarkably very little larf - without lollipopping. I've been quite happy with the yield and bud development lately.
So major defoliations occurred on Days 57 and 58. After that, I would just keep removing leaves as necessary from time to time. And as the name implies, I first try to remove all the big leaves with big stems from the canopy. Then around the plant. Then leaves with smaller leaves with smaller stems, all around the plant. And this continues until I leave leaves with what seems like no stems at all. And the real reason to leave these leaves behind is simply that removing them would hurt the pistils on the buds - and you don't want to do that. Do you? Didn't think so... 😄
Buds had started to develop this week and the stretch ended. She was the perfect height, almost. 11.5 inches. She stretched WAY more than I thought she would. I thought this was gonna be a kinda smallish plant like my first Wedding Cake and my Lemon Pie. She ended up being sort of the size of my 2nd Wedding Cake, which portended well for yield. We would see....
Maybe?
4 likes
comments
Share
Used techniques
LST
Technique
ScrOG
Technique
Defoliation
Technique
10
Week 10. Flowering3y ago


29.21 cm
Height
17 hrs
Light Schedule
26 °C
Day Air Temp
6.1
pH
Normal
Smell
600 PPM
TDS
55 %
Air Humidity
22 °C
Night Air Temp
7.57 l
Pot Size
2.38 l
Watering Volume
30.48 cm
Lamp Distance
Nutrients 6
Armor Si
0.317 mll
CALiMAGic
0.317 mll
TriPart Micro
0.317 mll
TinyTenter I'd been testing the limits. I mean, you can only think about plants all day for so long. Growing these plants is not my top concern anymore. And sometimes, I can get pulled away from my plant responsibilities with this grow - much more than my other grows. I just hadn't fertigated when I was supposed to lately. Just being honest.
And as often happens when you deviate from the beaten path, even one beaten by oneself, you sometimes start learning new things.
Started wondering if my typical 1.2 L twice a day was really necessary. My confession above spells it out. When I miss a feeding, I come back the next day with 1.8 L instead of 1.2 L, and I always get some runoff. Had me wondering if I could just get away with 1.8 L once per day. That would be nice for several reasons - time and dollar costs mostly.
Otherwise, things were going well. Lots of white pistils everywhere, and the buds were already chunking up well. My DLI (Daily Light Integral) model was set to 105 days, but I could see this one going longer.
She was getting 17 hours of light atm.
It had been difficult to keep humidity down in the tent, but I hadn't concerned myself with dehumidifying the room to assist as yet.
12 likes
8 comments
Share
Used techniques
LST
Technique
ScrOG
Technique
Defoliation
Technique
11
Week 11. Flowering3y ago


29.21 cm
Height
17 hrs
Light Schedule
26 °C
Day Air Temp
6.2
pH
Strong
Smell
640 PPM
TDS
55 %
Air Humidity
22 °C
Night Air Temp
7.57 l
Pot Size
1.82 l
Watering Volume
30.48 cm
Lamp Distance
Nutrients 6
Armor Si
0.159 mll
CALiMAGic
0.317 mll
TriPart Micro
0.159 mll
TinyTenter So I downgraded the fertigation schedule to once per day at 1.8 L, which would be a nice pace for the rest of the grow if it didn't lead to adverse results.
Was getting runoff with each pour, so no major concerns.
I also changed my DLI curve expectations (Day of Harvest) to 119 days. So many white pistils so late in the game with this one. I was getting concerned about molds because, though she wasn't the bushiest of plants, the buds on this one looked like they were going to be pretty thick and close to each other. I was doing a good amount of inspection for sticky spots and unnecessary leaves around this time. Up to this point, no issues.
The smell was like WOWOWOWOW! Skunkety skunk skunk!
Promising stuff.
13 likes
2 comments
Share
Used techniques
ScrOG
Technique
Defoliation
Technique
12
Week 12. Flowering3y ago


29.21 cm
Height
18 hrs
Light Schedule
26 °C
Day Air Temp
6.2
pH
Strong
Smell
665 PPM
TDS
50 %
Air Humidity
22 °C
Night Air Temp
7.57 l
Pot Size
1.82 l
Watering Volume
30.48 cm
Lamp Distance
Nutrients 5
CALiMAGic
0.159 mll
TriPart Micro
0.159 mll

TriPart Grow
0.159 mll
TinyTenter The plant was flipped 180 degrees around on Day 78.
This is something I do so that I can take a look at the other side of the plant for any surprises that might be there - like a smooshed bud that needs air or more leaves that need to be defoliated.
I also like fertigating from the other side in order to sort of balance things out with the coco - in terms of any salt concentrations or water tunnels that may have developed as a result of fertigating from the same angles for several weeks.
Started noticing some leaf yellowing around the plant.
Felt more like a nitrogen issue than a PK issue like the previous grow. Wasn't sure what to do about it at the time. Part of the difficulty were the conflicting signals I felt the plant was giving me about how developed she was.
There were still a good deal of white pistil around, but I was also seeing some sugary frostiness on the buds developing. I hadn't pulled out the loupe yet, but it looked like cloudiness might had already started. So as Week 12 closed, I knew I'd have to do some research/investigating about this girl. Obviously left wondering if changing the feed amount/frequency led to this.
She was otherwise doing remarkably with some beautifully chunky and super-smelly buds.
😁👍
Light schedule was changed to 18 hours on Day 83.
15 likes
comments
Share
Used techniques
ScrOG
Technique
13
Week 13. Flowering3y ago


29.21 cm
Height
18 hrs
Light Schedule
26 °C
Day Air Temp
6.2
pH
Strong
Smell
665 PPM
TDS
50 %
Air Humidity
22 °C
Night Air Temp
7.57 l
Pot Size
1.82 l
Watering Volume
30.48 cm
Lamp Distance
Nutrients 5
CALiMAGic
0.159 mll
TriPart Micro
0.159 mll
TriPart Grow
0.159 mll
TinyTenter Flipped the plant around back another 180 degrees on Day 85.
She was looking pretty good from a defoliation and ventilation perspective. Felt all the necessary parts had room to breathe.
The yellowing I had noticed at the end of the prior week might have slowed, but it was too early to tell. I lowered the ph to 5.9/6.0 for a few days in order to aid nitrogen absorption, as the mix being fed at the time was fairly low on the element. I wanted her to be as green as possible so she could feed on light as much as possible through the home stretch.
She was looking pretty good and chunky. White pistils disappearing more and more but still there. Took a look at her trichs and there was some cloudy but mostly glassy looking domes. And there was no trichome stem degradation.
Absolutley no amber anywhere. There was still time. I was holding on to my Day 119 harvest date, but I could see it moving down to Day 112.
10 likes
4 comments
Share
Used techniques
ScrOG
Technique
14
Week 14. Flowering3y ago


29.21 cm
Height
17 hrs
Light Schedule
26 °C
Day Air Temp
6.2
pH
Strong
Smell
650 PPM
TDS
50 %
Air Humidity
22 °C
Night Air Temp
7.57 l
Pot Size
1.82 l
Watering Volume
30.48 cm
Lamp Distance
Nutrients 5
CALiMAGic
0.159 mll
TriPart Micro
0.159 mll
TriPart Grow
0.159 mll
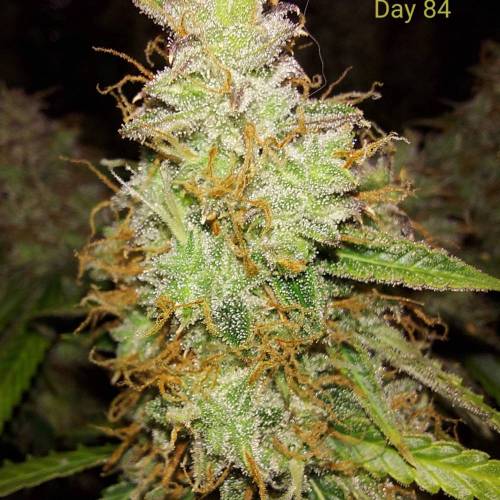
TinyTenter Cloudy days were never so beautiful!. There was some fairly severe cloudiness happening by around Day 95. That helped me narrow down the harvest range to about 112 Days, give or take a few days.
I would, of course, keep checking trichs looking for trich stem degradation. The DLI schedule was changed to 112 days, so I reduced my light schedule to 17 hours on Day 95.
Temperatures were starting to get warm outside. Tent was getting warmer too. The downward lighting schedule curve was welcome. Leaves were changing colors. Autumn had entered the tent.
7 likes
7 comments
Share
Used techniques
ScrOG
Technique
15
Week 15. Flowering3y ago


29.21 cm
Height
17 hrs
Light Schedule
26 °C
Day Air Temp
6.1
pH
Strong
Smell
650 PPM
TDS
50 %
Air Humidity
22 °C
Night Air Temp
7.57 l
Pot Size
1.82 l
Watering Volume
30.48 cm
Lamp Distance
Nutrients 5
CALiMAGic
0.159 mll
TriPart Micro
0.159 mll
TriPart Grow
0.159 mll
TinyTenter She was taking her time. Sometimes, I almost forgot I was still growing a plant this week - even missed one feed. Did a trich check on Day 101 and I still saw plenty of clear and cloudy with very little threatening of amber. So at this point, I changed my harvest estimate back to 119 days. Yellowing was continuing around the plant, but at a slow pace.
There was definitely some foxtailing happening, and there was one bud branch that was completely weird. Weird buds AND leaves on that one. I was using the "healthier" buds to check trichs. Definitely ignoring the strange one. What can I say? Genetics.
Otherwise, everything looking great!
7 likes
2 comments
Share
Used techniques
LST
Technique
ScrOG
Technique
16
Week 16. Flowering3y ago


29.21 cm
Height
17 hrs
Light Schedule
27 °C
Day Air Temp
6.1
pH
Strong
Smell
650 PPM
TDS
50 %
Air Humidity
23 °C
Night Air Temp
7.57 l
Pot Size
1.82 l
Watering Volume
30.48 cm
Lamp Distance
Nutrients 5
CALiMAGic
0.159 mll
TriPart Micro
0.159 mll
TriPart Grow
0.159 mll
TinyTenter Seasons were starting to change. Spring was around and temps in my tent were starting to climb.. So I was happy to see this week that her trichomes were getting milky and juicy now. Because I wanted to avoid running an air conditioner for the benefit of a plant.
Yes, she was peaking now with about 1 to 2% ambering and plastic looking trich stems. No stem degradation, but for some reason, this wasn't as important to me now.
Maybe I just wanted to finish already? I more think it was that the Lemon Pie I was vaping at the time, though greatly anxiety-reducing (something I really needed), I wanted a more head affect this time than a couch lock affect. So it was looking like harvest would happen sometime between Day 116 to Day 123. Wasn't exactly sure when.
Another big sign was that the yellowing leaves were now drying leaves, which is another sign of imminent harvest I've seen before (my prior grow). Exciting times!
8 likes
3 comments
Share
Used techniques
ScrOG
Technique
17
Week 17. Flowering3y ago


29.21 cm
Height
17 hrs
Light Schedule
27 °C
Day Air Temp
6.1
pH
Strong
Smell
650 PPM
TDS
50 %
Air Humidity
23 °C
Night Air Temp
7.57 l
Pot Size
1.82 l
Watering Volume
30.48 cm
Lamp Distance
Nutrients 5
CALiMAGic
0.159 mll
TriPart Micro
0.159 mll
TriPart Grow
0.159 mll
TinyTenter I had been planning to ignore the foxtailing buds. The fact that the pistils on those were white was something I was willing to overlook - focusing only on the trichomes.
But on Day 113, I noticed for the first time that those foxtail white pistils were turning beautifully red now. Well, the "artist" in me wanted to see this process play out to its conclusion. This gave pause to the notion that harvest was as imminent as I thought.
I was thinking more and more around this time that the decision to harvest should almost be a last minute decision if you do it right.
If you're planning with a hard date to harvest weeks before you do, you are prolly harvesting early. Nothing wrong with having a preliminary target date so that you can plan your grow parameters properly, but you should also be ready to change that preliminary date. That's all I mean. And you should keep postponing harvest until that moment you look into your loupe and it already looks somewhat a tiny tad late.
By doing it this way, you almost guarantee harvesting at the perfect time.
And I subscribe to the theory put out by Perfect Gardens that grassy smelling buds after cure is the result of harvesting buds too early, thus leading to less dense buds that have a bud to chlorophyll ratio that is too low. So maximizing grow time (and bud size) is more important, if this is true, than many might think.. So take ya time. ⏲️⌚⌛
Day 116 came around and I took a look under the hood (the trichomes). They were plastic and milky in many places. Glassy in fewer places. And amber in even fewer places.
Left with the feeling that the end was very near for this plant. So I decided then and there that it was time to stop feeding her soon most likely. Day 119 to 121 most likely date.
I ran out of "feed" on Day 117 and decided I wouldn't make another batch. Plain water around 6.0 ph from there on.
On Day 118, I got the feeling described above. The trichs looked like they were a week away from handing me a simultaneously huge wave of amber - and it scared me. But I could not harvest on that day.
Cuz it would potentially set up trim jail on a very bad day for my schedule the following week, so at least one more day it had to wait.
6 likes
1 comment
Share
Used techniques
LST
Technique
ScrOG
Technique
18
Week 18. Flowering3y ago


29.21 cm
Height
16 hrs
Light Schedule
27 °C
Day Air Temp
6.1
pH
Strong
Smell
50 %
Air Humidity
23 °C
Night Air Temp
7.57 l
Pot Size
1.82 l
Watering Volume
30.48 cm
Lamp Distance
Nutrients 1
water
999.891 mll
TinyTenter So my schedule finally agreed with a harvest day of Day 121. So that's when I cut her down. Enjoy her last pictures above! I really enjoy her shades of pink. Hope you do too.
6 likes
comments
Share
Used techniques
ScrOG
Technique
18
Week 18. Harvest3y ago
Happy Harvest Day!


9/10
Rated
She took a little long to finish, but I do stress my plants a ton, so.... No mold anywhere, so I'm happy. Smells great. Looks great.
Show more
Translate
Spent 128 days
Ger Veg Flo Har
159.89 g
Bud dry weight per plant
1
Plants
0.37 m²
Grow Room size
Easy
Difficulty

Happy
Positive effects

Citrus
Taste
Height
Day air temperature
Air humidity
PPM
PH
Light schedule
Night air temperature
Pot size
Lamp distance


TinyTenter DRY TIME 0 DAYS and 1 HOUR: She went into the dry tent very wet. 75% humidity is high with 75 degrees F. Will wait to see if maybe the sensor in there is too low and close to the plant.
Otherwise, I'll kick in the dehumidifier and try to wrangle her down under 70% RH. Fan setting is '1' and will stay there throughout the dry, At that setting, the fan is pulling 20 cubic feet per minute of air, which means all the air in my 12 cubic foot tent is replaced more than once per minute. Good enough.
DRY TIME 5 Days 11 HRS: Okay, yes that's a big jump in time. I've been very busy, and my favorite NBA team is in the playoffs. Priorities can certainly get in the way of a grow. But I have been keeping vigilant of the dry process.
Since the last update, I was able to wrangle down the humidity in the tent by turning on the dehumidifier. But interestingly, the tent stayed with high humidity close to 70% until late Day 4 when RH moderated to about 65%, despite local RH being quite dry the last week (35%). Remarkably, I never had to use the big humidifier for several days - the plant was humidifying the tent by herself. This morning, the tent had gotten down to 58% so I turned on the big humidifier for the first time. Got it up to 73F with 64% RH. So it has been a fairly "wet" dry so far.
I expected this to be a fairly long dry as a result of these findings.
So I was a little surprised how far we had gotten when I opened the tent for the first time about an hour ago. A branch check led to me to conclude, 'Almost there - but not yet.' The branch was both flexible and snappy at the same time. I'd like more of a snap feel to the branch before I start trim jail. There was a strong grassy smell in the tent but I think that is fairly normal at this stage. Maybe I'm wrong.
But I expect jail to begin either tomorrow or the day after (Day 6 or 7),
DRY TIME 6 DAYS 14 HOURS: Just checked the tent and I found what I was looking for. I bent one of the thinner branches and it was woody to the touch (woodier than the day prior), but when I bent the branch it didn't snap. It held together. This, to me, indicates that most of the outer layers of the branch are dry already but that there is still a moist center to the branch.
I'm guessing this is the right feel.
We'll see.
See ya when I get out on parole!! 🙄
TWENTY MINUTES LATER: She's not ready. She's still too wet, I tried cutting off leaves and realized that they normally just fall off to some extent when I'm trimming.
All the leaves were still clinging to the bud. That means those buds and leaves are still wet.
I put all the branches back in the tent. One more day.
(at least).
DRY TIME 8 DAYS 11 HOURS: I checked the buds yesterday and they were still too wet, but when I checked now they felt ready. Here we go!
15 likes
2 comments
Share
Equipment Reviews


34 comments
Sort by
popularity
popularity
newest
oldest

Inganjawetrust commentedweek 103y ago
Good looking plant 🌿
likes 5

TinyTenter commented3y ago
@Inganjawetrust,
Yes, Can't wait to see this one's flowers.
I hope she gets real frosty. Let's see!
Thanks buddy! 😀👍👊
likes 5

mcflow commentedweek 133y ago
Great photos! they look awsome!
likes 4
TinyTenter commented3y ago
@mcflow, Thank you!! 😊👍
likes 2

RagnarLothbrook commentedweek 163y ago
Plant very well handled! You did everything right from start to finish to enjoy those huge buds... Good luck with that expensive harvest and good vibes with that plant!
likes 3
TinyTenter commented3y ago
@@RagnarLothbrook, Thank you!
My trim jails are notoriously long. So yes, expensive.
Costs me a couple Red Bulls or Monsters too! 😉😊
But yeah, the size of this one means there won't be a next one for a while, so that's cool. I like growing, but there are other things I want to focus on so it's nice to be stocked up for the long break I'm gonna take until the fall. Thanks again, buddy!
likes 2

TonkaSun commentedweek 143y ago
Aren't you beautiful! Oohlala😀Lovely plant. Nice growing mate.😎
likes 3
TinyTenter commented3y ago
@TonkaSun, thank u buddy!
😻🤘
like 1
mcflow commentedweek 133y ago
Looks great! Good luck growing🍀
likes 3
TinyTenter commented3y ago
@mcflow, Thank u! 😊👍🤘
likes 2

KOPKUSH commentedweek 113y ago
Nice brother
likes 3
TinyTenter commented3y ago
@KOPKUSH, Thank you! Good luck with your grows as well. 😌🙏
likes 2

Civicgrows commentedweek 103y ago
Looking great as always buddy can I ask out of the strains so far what’s been ur fave to grow and taste wise
likes 3
TinyTenter commented3y ago
@Civicgrows, Hmmm...
I don't think I have a favorite to "grow", really. The challenges that come from growing are all accepted by me, I'm never lokoing to make things easy, because that sets you up for failure. Growing is growing. Just do the work. That's my thought process. I have come to expect Green Crack to be a honeybadger of a grow. Happened twice, so. Wedding Cake gave me two completely different phenos, so.. 🤷♀️
But this Lemon Pie I'm vaping now is amazing. It tastes lemony/sour. I like that. And it's really good for the soul. A good self-therapeutic. It's been very helpful. Lemon Pie has been my fave because the buds were really really beautiful, and the effect is exactly what I needed. I believe a good limonene strain is great for mental therapy you can do by yourself. And in the short term I've been smoking Lemon Pie, I feel much better.
Which is why I vape these days. Honestly, I'd love a day I don't need to vape weed anymore, and just do it for kicks every once in a while. Maybe Lemon Pie finally helps me get there.
Things going well though.
I subbed your youtube channel, btw.
Nice stuff!
And great question! Thanks!
😀👍👊
likes 4

Qutro commentedweek 103y ago
Awesome work on that single plant. Keep it up!👌🌱
likes 3
TinyTenter commented3y ago
@Qutro, Thank you, buddy!
😊👍
likes 3

psyatique commentedweek 143y ago
Good luck buddy💪happy growing🌱
likes 2
TinyTenter commented3y ago
@psyatique, thanks! 😁👍
likes 2
TinyTenter commented3y ago
@psyatique, thanks!
like 1

dylanlikeavillan commentedweek 163y ago
Wow! Finishing beautifully, Some monster colas for only 1 ft tall in 2 gal pot. Enjoy that great lemon flavor and skunky-ness, SLH is a long time favorite of mine. Can't wait to see your harvest results.
likes 2
TinyTenter commented3y ago
@dylanlikeavillan,
Thank you very much. About another week .. 🤞🍀🤞🍀
likes 2

valiotoro commentedweek 153y ago
Bang 💥🍋
likes 2
TinyTenter commented3y ago
@valiotoro, Lemony goodness, yessirree! Thanks buddy!
like 1

love_2_grow commentedweek 103y ago
Happy Growing, Buddy! 🌱🌱🌱
likes 2
TinyTenter commented3y ago
@love_2_grow, Thank you!
😊👍
likes 2

WhiteEdge commentedweek 143y ago
Perfect!
like 1
TinyTenter commented3y ago
@WhiteEdge, thank u! Not exactly tho.
She seems to be foxtailing a little which will cost her some points at the beauty pageant.
But she's otherwise doing great.
Smells really skunky and she's getting frosty.
Yes! 😍😍👌
likes 2

Saymyname commentedweek 23y ago
бро привет, у тебя очень круто получается ! скажи пожалуйста сколько ppfd? сколько % димер ?
likes

FraFra__frankenstoner_Two_days_in_a_day commented3y ago
@Saymyname,It was a board with 95 watts LEDs. Not dimmed. I dont know how much ppfd at this heagt. The 5 weeks before, were only 65 watts LED.
likes

Suez420 commentedweek 12y ago
Could u please help me with all the specifics n details of the led lights as mentioned on it box or label?
likes

Ananacio commentedweek 183y ago
Amigo, te extrañamos. Volve.
likes
FraFra__frankenstoner_Two_days_in_a_day commentedweek 03y ago
The most important thing after sprouting, is the stem of the sprout. If it is thick, like yours, it is healthy and good. When it is thin like a hair, it has no hope, because it had not enogh nutrients. The first days, are very important for the grow.
likes
FraFra__frankenstoner_Two_days_in_a_day commentedweek 183y ago
A modern Lamp with LEDs emits about half of the input power into heat and the rest into light, which is phantastic. An old Lamp just emitted 3 to 5 % light.
Not all heat of the lamp, is direct radiation. Even heat, can be useful to the plant, if it is not too much.
likes
FraFra__frankenstoner_Two_days_in_a_day commentedweek 03y ago
Just wow! How much, you are able to harvest with such a small tent and only 100 watts of light! Amazing.
I would like to see your next grow experience here, but because you have plenty of buds left, you wont start now. It seems, we have to install new restrictive rules for you, like only using the small lamp to the end, or a hand tied behind your back. just kidding. 😂
likes

the end.
Enjoying this diary? Follow for more updates!


Prefer the old Diary view?
Go back to the old Diary view