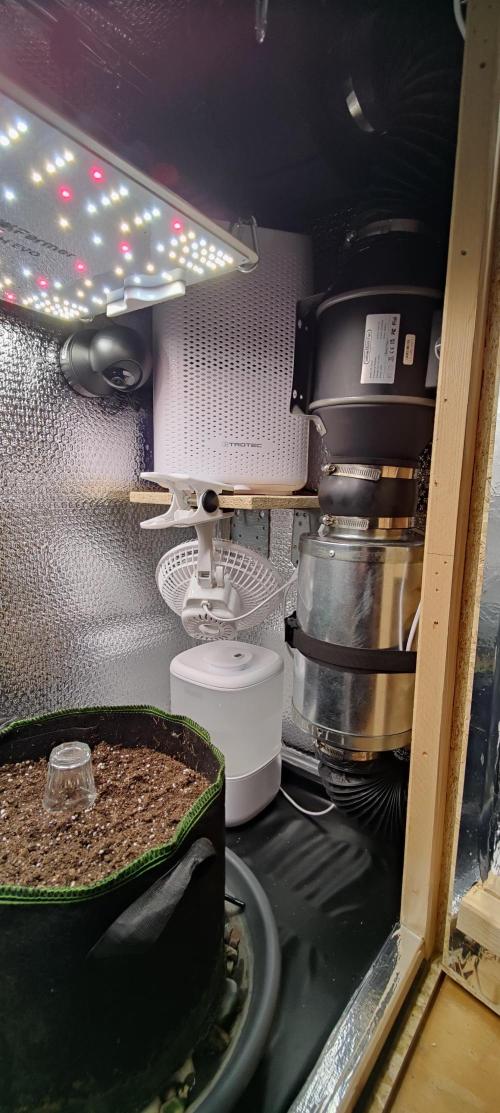
Custom OSB panel box 90x120x75cm lined with heating foil from the inside
Custom
Fan
Aygrochy 100mm Pipe Fan
Custom
Fan
Pro Breeze Mini Ventilator with Clip (20 cm diameter)
Custom
Filt
Aygrochy 100mm Actiated Carbon Filter for 350m³ per h air flow
Custom
Filt
LABT 100mm Pipe Silencer
Custom
Cond
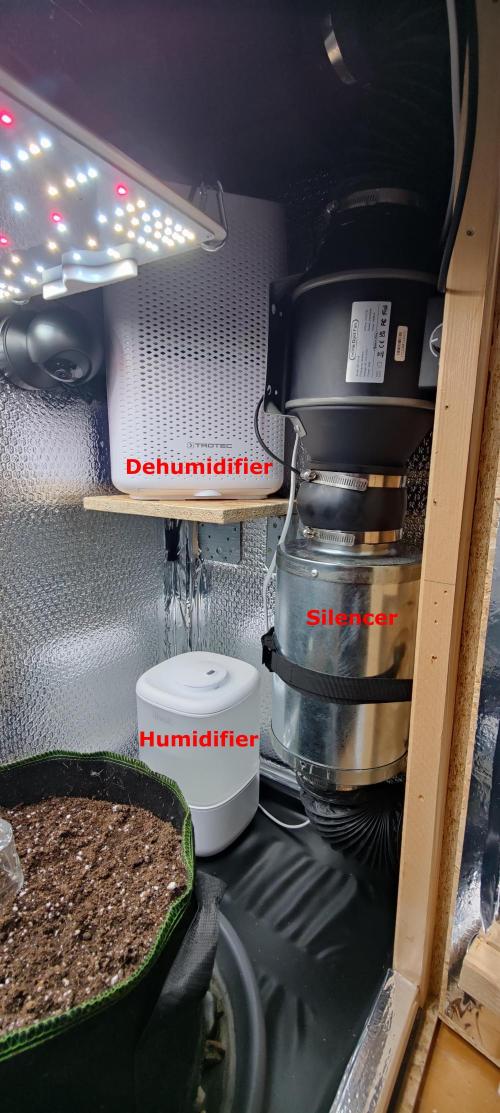
LEVOIT 2,5L Mini Humidifier
Custom
Cond
TROTEC TTP 10 E Dehumidifier (0,75L per day)
Custom
Contr
HomeAssistant
Custom
Drip
Onherm WiFi USB with 10m drip pipe
Custom
Soil
Custom
Worm Soil Other
Custom
Perlite
Custom
Indoor
Room Type
LST
weeks 3
10 liters
Pot Size
Start at 3 Week
G
Germination
1y ago
TimothyGrow Hey folks,
day one of my second grow this year. My first plants were also both from RQS. I grew a Wedding Cake Auto (115g after curing) in the exact setup I'm using now and a Quick One Auto (25g after curing) on the balcony. I like the flavour of the Quick One better, as it has a nice lemony smell/taste. The Wedding Cake Auto smelled strongly of diesel at the beginning and has a very strong woody/earthy flavour even after curing. From my point of view, it doesn't have much to do with wedding cakes, but the effect is very creative and energising for both strains.
Now I'm going to try a photoperiodic one, as my setup can show off all its advantages there. I have an instance of HomeAssistant running on my NAS and have integrated all sensors and actuators via the network. A surveillance camera in the box helps me to make decisions regarding possible cuts and LST steps in advance. I also take a single photo of the plant every 30 minutes so that I can watch the growth in fast motion. In my first grow, I had a very simple camera from TP-Link, which was sufficient for monitoring but did not produce presentable images.
I made a few more changes in the box before I started (not that you know the previous version ;-)). I now have a completely vertical structure for the ventilation system with rubber couplings and also a turntable under the pot tray. I have approx. 3 cm pebbles in the potting tray for drainage, two approx. 20 cm long wicks are threaded through the bottom of the planting bag so that the plant can get the drainage back. The overflow from the dehumidifier now runs through a hose directly into the drip tray unter the plant bag to use the good condensation water.
I'm looking forward to this diary and will try to show you a few pictures of my setup in the next entry. Until then, however, I'll wait for the seeds to germinate.
Greetings
TimothyGrow
3 likes
2 comments
Share
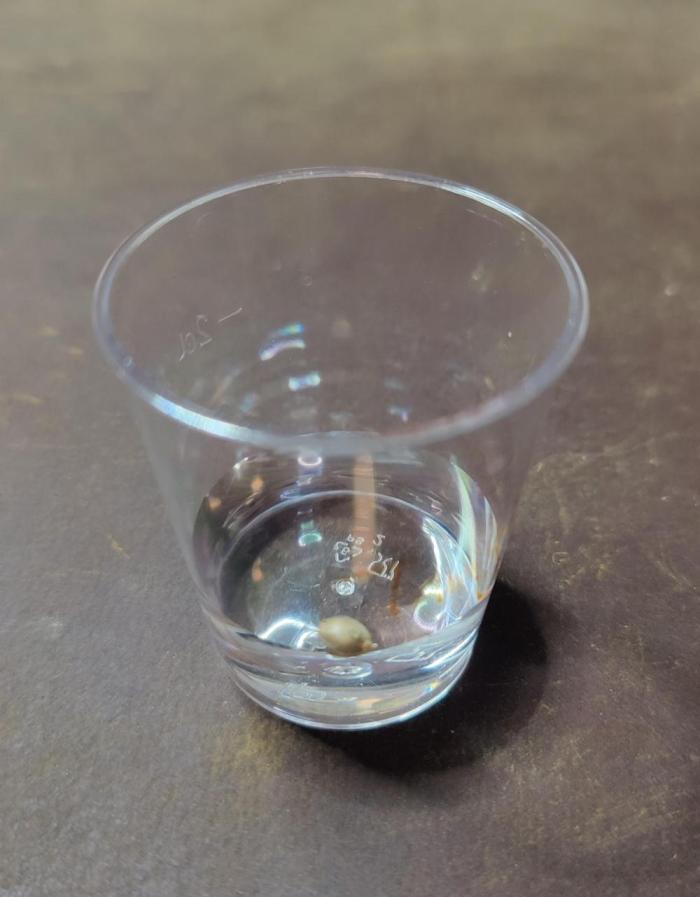
Used method
Glass Of Water
Germination Method
1
Week 1. Vegetation
1y ago
1/8
2 cm
Height
24 hrs
Light Schedule
25 °C
Day Air Temp
62 %
Air Humidity
21 °C
Night Air Temp
10 liters
Pot Size
60 cm
Lamp Distance
TimothyGrow Good morning from little miss,
What has happened so far:
After about 3 days, I put the seedling in a jiffy and waited for the seed coat to push up. Then it went straight into the final pot with the soil mixture already described. I could now increase the humidity with the humidifier, but I think that would be a waste of money and energy. In my opinion, a glass jar placed over the top would also do the trick.
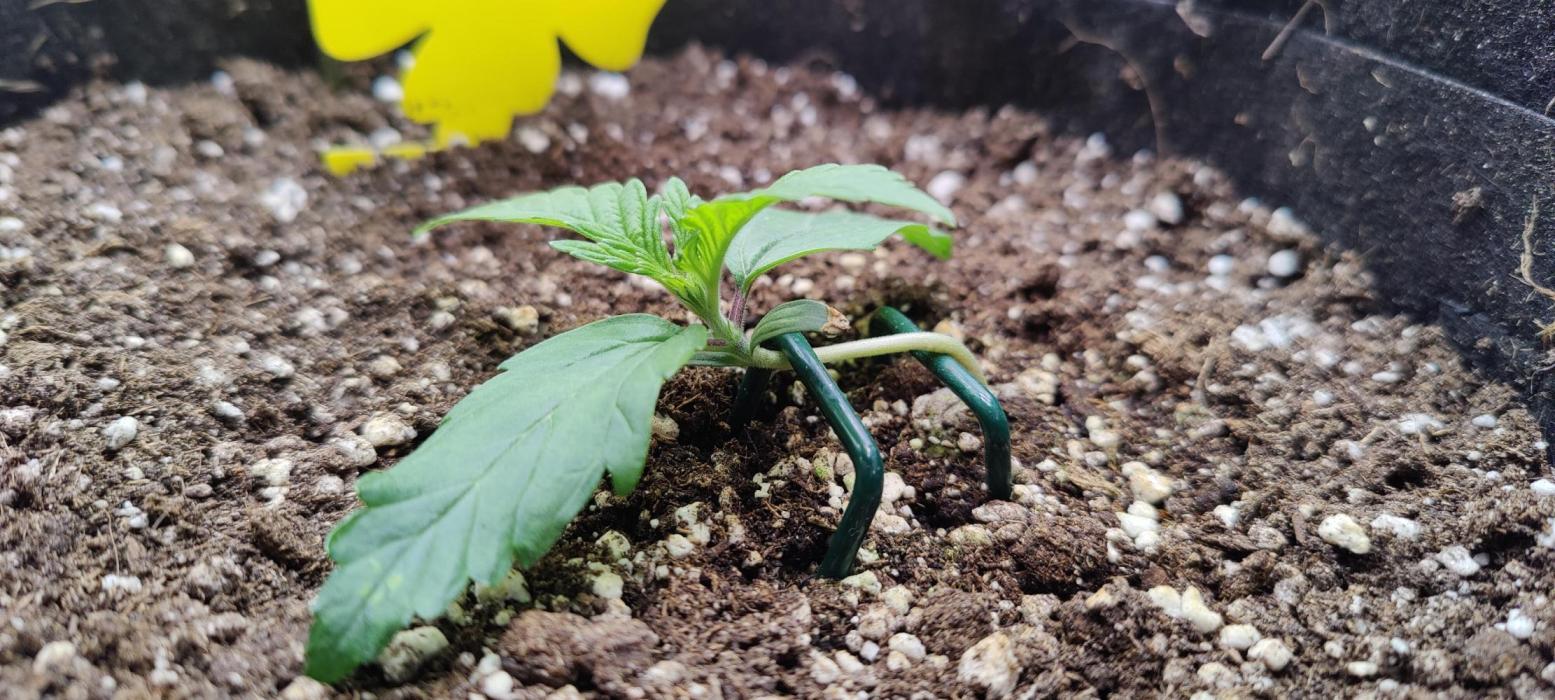
As you can see in the first picture, Tangie is developing very well. As far as the plant is concerned, I would like to say a few words about my further plan: I have planted the seed off-center as I want to use two guiding techniques. First, I will start very quickly with an LST towards the center of the pot. After the second real pair of leaves, I will also do a topping. I hope to achieve two things at once with this approach; on the one hand I will get a very symmetrical plant, and on the other hand I can guide the plant much lower due to the arch achieved at the beginning. From my point of view, this is necessary as I have a very limited box height and don't want to restrict myself in this respect. I am always open to tips and will show you what I mean in the coming weeks.
And now a few comments on my setup:
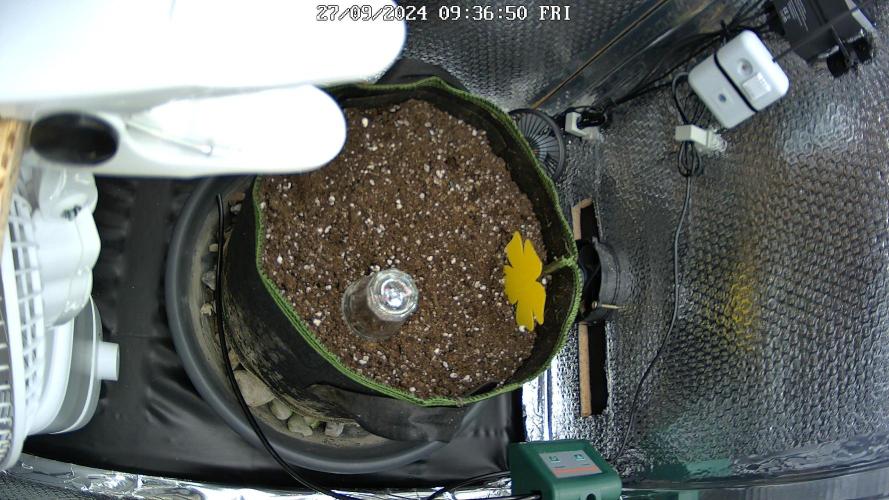
As you can see in the picture, the small PC fan to the left of the pot serves as a supply fan. This would not actually be necessary, as the main fan already draws plenty of air. However, a big advantage of this is that I have a little more influence on the shape of the airflow. Otherwise, the main fan would simply pull diagonally through the room; now I have more of an S-shaped airflow.
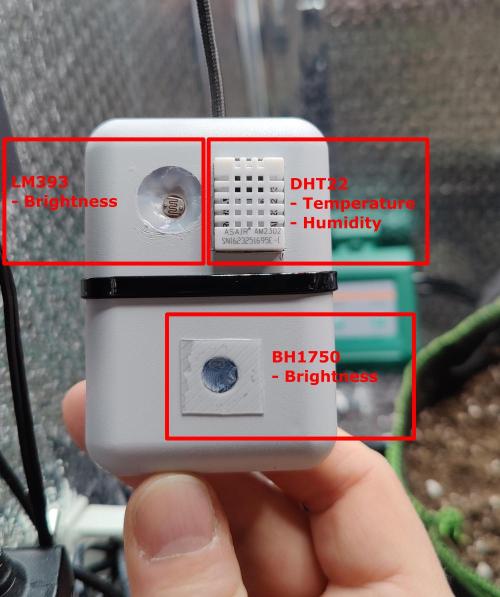
The small gray sensor box contains an ESP32, which is connected to my home network via the WLAN access point in the basement. The most important sensor installed is the DHT22, as it records the temperature and humidity very accurately. The reason for having two different brightness sensors is easy to explain: I thought the LM393 was enough for me, but this sensor is mainly used to determine whether there is light or not (threshold sensor). The BH1750, on the other hand, has a much higher resolution and outputs a value between 1 and 65535 lx, which is much more suitable for my application. One problem, however, is that the sensor box is hanging; I should actually have positioned the BH1750 so that it is facing the LED panel in order to obtain meaningful measurement results. I think I will change that in the course of this grow. I have already purchased a GP8403 PWM module which, also connected to the ESP32, is to take over the light dimming of the LED panel from Spiderfarmer. But more on that later.
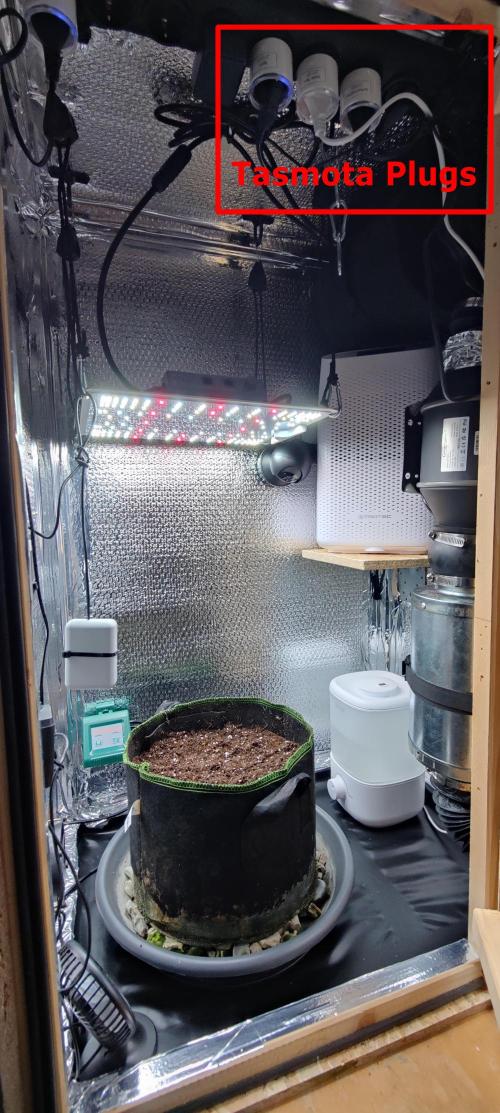
The white sockets are the Gosund EP2, which I flashed with Tasmota OS. Here you have to make sure that they have the ESP8285, otherwise the flashing will no longer work. The sockets then speak MQTT and can be configured and read out in Home Assistant using the Mosquitto MQTT broker. In addition to remote control, the sockets have the great advantage that they record the energy consumption. You then get a very good feeling about the power consumption of the system. I will go into more detail about the HomeAssistant setup in a later post if anyone is interested ;-).
I think the rest is self-explanatory, but feel free to ask questions if anything is unclear. One thing I definitely need to change is either the position of the camera, or the position of the turbulence fan (The last picture was taken with the Reolink E1 and probably says it all ;-)).
That's it from me now.
sincerely
TimothyGrow
3 likes
5 comments
Share
3
Week 3. Vegetation
1y ago
6 cm
Height
18 hrs
Light Schedule
18 °C
Day Air Temp
50 %
Air Humidity
14 °C
Night Air Temp
10 liters
Pot Size
60 cm
Lamp Distance
TimothyGrow It's getting cold outside,
as the grow box stands in the cellar, I am unfortunately closer to the outside temperatures than I would like. I once read somewhere that a temperature between 20°C and 30°C is recommended for Tangie, but I can't find it again. Perhaps someone here can comment on this.
But so far the plant is growing excellently and I think she looks very healthy. I haven't fertilized her yet and am taking a different approach than before. With my previous plants, I always fertilized with the Hesi set and would have given the root complex by now. This time I'm listening to a lot of the forums and only fertilizing after about 6 weeks, as the soil supposedly already contains a lot of nutrients.
As you can see, I started very early with the LST. I had planted the seed slightly outside the center of the pot in order to guide the plant as flat as possible towards the center. Once in the middle, she is then allowed to grow upwards, where the topping is waiting for her. Let's see how she handles it.
I also added a PWM module to the ESP32, which has a output level of 0/10V. Now I can vary the duty cycle very flexibly and thus dim my LED panel gradually. The only thing missing is the connection to Home Assistant, but more on that later.
Greetings
I like your scientific approach. Please explain your HomeAssistant set-up further. Is there a good source, where I can see a typical setup, what is required and how to get it operational?
Hi @Sejanus21,
thank you for your interest.
I have HomeAssistant running on my NAS. This is a TrueNAS instance that I have running on a standard PC. I know many people who run HA on a RaspberryPi (it should be at least version 4) and are very happy with it.
https://www.home-assistant.io/installation/raspberrypi/
... should be a good starting point for setting up HA. And this is a project by someone who approached it in a similar way (need to be translated from german):
https://forum.cannabisanbauen.net/t/smart-ueberwachung-automatisierung-home-assistant-raspberry-pi-4/47820
Since I'm not done optimizing the setup yet (and probably never will be ;-)) I'll always write a bit about the technical aspects and where I see room for improvement. I hope that we can also discuss controversial topics here.
have a nice weekend
TimothyGrow